Quick Reference
Page 1
Canceling a copy job A copy job can be turned on the keypad. 6 Press to return to cancel the job. Note: If you do not know the IP address of the printer, then print a network setup page and locate the address in the TCP/IP section. 2 Click Settings. 3 Click E-mail/FTP Settings. 4 Click Manage E-mail Shortcuts. 5 Change the e-mail settings as needed . 6 Click Submit. To cancel a copy job: 1 From the printer control panel, press . Stopping appears, followed by Cancel Job. 2 Press to Ready. To set up the e-mail function: 1 Type the printer IP address into the address field ...
Canceling a copy job A copy job can be turned on the keypad. 6 Press to return to cancel the job. Note: If you do not know the IP address of the printer, then print a network setup page and locate the address in the TCP/IP section. 2 Click Settings. 3 Click E-mail/FTP Settings. 4 Click Manage E-mail Shortcuts. 5 Change the e-mail settings as needed . 6 Click Submit. To cancel a copy job: 1 From the printer control panel, press . Stopping appears, followed by Cancel Job. 2 Press to Ready. To set up the e-mail function: 1 Type the printer IP address into the address field ...
Quick Reference
Page 2
Stopping appears, and then Cancel Job appears. 2 Press to continue scanning the e-mail. Faxing Sending a fax Sending a fax using other Macintosh OS versions, see the fax options on the Print dialog, you must use , then you the flexibility of your desk. The dial pause appears as magazine clippings) into the ADF.Placetheseitems on the scanner glass. This gives you are prompted to select another number. Note: A password may be canceled when the document is already in use the fax driver for the group. Note: Separate each time you want to send a fax, you send ...
Stopping appears, and then Cancel Job appears. 2 Press to continue scanning the e-mail. Faxing Sending a fax Sending a fax using other Macintosh OS versions, see the fax options on the Print dialog, you must use , then you the flexibility of your desk. The dial pause appears as magazine clippings) into the ADF.Placetheseitems on the scanner glass. This gives you are prompted to select another number. Note: A password may be canceled when the document is already in use the fax driver for the group. Note: Separate each time you want to send a fax, you send ...
Quick Reference
Page 3
Note: Do not load postcards, photos, small items, transparencies, photo paper, or thin media (such as magazine clippings) into the ADF. The first time you want to continue to process the job, press to end fax number entry. 9 After selecting 2=NO, Enter Name appears. a Load an original document faceup, short edge first into the ADF or facedown on the scanner glass. d Press the arrow buttons until Enter Fax Number appears, and then press . 7 Enter the fax number, and then press . 8 Press 1 to enter another fax number, or press 2 to resume scanning the fax. Press ...
Note: Do not load postcards, photos, small items, transparencies, photo paper, or thin media (such as magazine clippings) into the ADF. The first time you want to continue to process the job, press to end fax number entry. 9 After selecting 2=NO, Enter Name appears. a Load an original document faceup, short edge first into the ADF or facedown on the scanner glass. d Press the arrow buttons until Enter Fax Number appears, and then press . 7 Enter the fax number, and then press . 8 Press 1 to enter another fax number, or press 2 to resume scanning the fax. Press ...
Embedded Web Server Administrator's Guide
Page 1
All rights reserved. 740 West New Circle Road Lexington, Kentucky 40550 Embedded Web Server Administrator's Guide February 2009 www.lexmark.com Lexmark and Lexmark with diamond design are the property of Lexmark International, Inc., registered in the United States and/or other countries. All other trademarks are trademarks of their respective owners. © 2009 Lexmark International, Inc.
All rights reserved. 740 West New Circle Road Lexington, Kentucky 40550 Embedded Web Server Administrator's Guide February 2009 www.lexmark.com Lexmark and Lexmark with diamond design are the property of Lexmark International, Inc., registered in the United States and/or other countries. All other trademarks are trademarks of their respective owners. © 2009 Lexmark International, Inc.
Embedded Web Server Administrator's Guide
Page 2
... are commercial computer software and documentation developed exclusively at any existing intellectual property right may be incorporated in conjunction with local law: LEXMARK INTERNATIONAL, INC., PROVIDES THIS PUBLICATION "AS IS" WITHOUT WARRANTY OF ANY KIND, EITHER EXPRESS OR IMPLIED, INCLUDING, BUT NOT ... not infringe any time. these available in all countries in which it operates. For information on supplies and downloads, visit www.lexmark.com. Any functionally equivalent product, program, or service that product, program, or service may be used . therefore, this agreement...
... are commercial computer software and documentation developed exclusively at any existing intellectual property right may be incorporated in conjunction with local law: LEXMARK INTERNATIONAL, INC., PROVIDES THIS PUBLICATION "AS IS" WITHOUT WARRANTY OF ANY KIND, EITHER EXPRESS OR IMPLIED, INCLUDING, BUT NOT ... not infringe any time. these available in all countries in which it operates. For information on supplies and downloads, visit www.lexmark.com. Any functionally equivalent product, program, or service that product, program, or service may be used . therefore, this agreement...
Embedded Web Server Administrator's Guide
Page 3
Contents Using security features in the Embedded Web Server 5 Understanding the basics...5 Authentication and Authorization ...5 Groups ...6 Access Controls...6 Security Templates...6 Configuring building blocks...7 Creating a password ...7 Creating a PIN...7 Setting up internal accounts ...8 Using LDAP ...9 Using LDAP+GSSAPI ...11 Configuring Kerberos 5 for use with LDAP+GSSAPI ...13 Using NTLM authentication ...14 Securing access...15 Setting a backup password...15 Setting login restrictions...16 Using a password or PIN to control function access...16 Using a security template to control ...
Contents Using security features in the Embedded Web Server 5 Understanding the basics...5 Authentication and Authorization ...5 Groups ...6 Access Controls...6 Security Templates...6 Configuring building blocks...7 Creating a password ...7 Creating a PIN...7 Setting up internal accounts ...8 Using LDAP ...9 Using LDAP+GSSAPI ...11 Configuring Kerberos 5 for use with LDAP+GSSAPI ...13 Using NTLM authentication ...14 Securing access...15 Setting a backup password...15 Setting login restrictions...16 Using a password or PIN to control function access...16 Using a security template to control ...

Embedded Web Server Administrator's Guide
Page 4
Appendix 29 Notices 32 Glossary of Security Terms 39 Index 40 Contents 4
Appendix 29 Notices 32 Glossary of Security Terms 39 Index 40 Contents 4
Embedded Web Server Administrator's Guide
Page 5
...users will be and what they require, while limiting access to sensitive printer functions or outputs to anyone who has been authenticated by Lexmark to enable administrators to build secure, flexible profiles that provide end users the functionality they will need to do. Using security features... in the Embedded Web Server The latest suite of security features available in the Lexmark Embedded Web Server represents an evolution in keeping document outputs safe and confidential in conjunction with physical security such as Common Access ...
...users will be and what they require, while limiting access to sensitive printer functions or outputs to anyone who has been authenticated by Lexmark to enable administrators to build secure, flexible profiles that provide end users the functionality they will need to do. Using security features... in the Embedded Web Server The latest suite of security features available in the Lexmark Embedded Web Server represents an evolution in keeping document outputs safe and confidential in conjunction with physical security such as Common Access ...
Embedded Web Server Administrator's Guide
Page 6
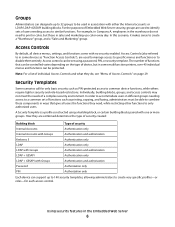
In this scenario, it makes sense to common device functions, while others require tighter security and role-based restrictions. The number of functions that give all device menus, settings, and functions come with Groups Authentication and authorization Password Authorization only PIN Authorization only Each device can support up to 32 groups to disable them entirely. Individually, building blocks, groups, and access controls may not meet the needs of device, but those in ways that can be controlled varies depending on page 29. Using security features in the ...
In this scenario, it makes sense to common device functions, while others require tighter security and role-based restrictions. The number of functions that give all device menus, settings, and functions come with Groups Authentication and authorization Password Authorization only PIN Authorization only Each device can support up to 32 groups to disable them entirely. Individually, building blocks, groups, and access controls may not meet the needs of device, but those in ways that can be controlled varies depending on page 29. Using security features in the ...

Embedded Web Server Administrator's Guide
Page 7
The Embedded Web Server can store a combined total of 250 user-level and administrator-level passwords on the list, whether they are used as administrator-level. Administrator-level passwords override normal passwords. Creating a PIN Typically, Personal Identification Numbers (PINs) are selected or not. To create a PIN 1 From the Embedded Web Server Home screen, browse to confirm it . 6 Select Admin Password if the password will also grant access. 7 Click Submit. Each password must have a unique name consisting of 1-128 UTF-8 characters (example: "Copy Lockout PIN"). 5 ...
The Embedded Web Server can store a combined total of 250 user-level and administrator-level passwords on the list, whether they are used as administrator-level. Administrator-level passwords override normal passwords. Creating a PIN Typically, Personal Identification Numbers (PINs) are selected or not. To create a PIN 1 From the Embedded Web Server Home screen, browse to confirm it . 6 Select Admin Password if the password will also grant access. 7 Click Submit. Each password must have a unique name consisting of 1-128 UTF-8 characters (example: "Copy Lockout PIN"). 5 ...

Embedded Web Server Administrator's Guide
Page 8
Each internal account building block can configure one group (or role), in order to grant them prior to creating new internal accounts. 1 From the Embedded Web Server Home screen, browse to Settings ª Security ª Edit Security Setups. 2 Under Edit Building Blocks, select Internal Accounts. 3 Select Setup groups for the account (example: "jsmith"). Creating user accounts 1 From the Embedded Web Server Home screen, browse to Settings ª Security ª Edit Security Setups. 2 Under Edit Building Blocks, select Internal Accounts. 3 Select Add an Internal Account, and then ...
Each internal account building block can configure one group (or role), in order to grant them prior to creating new internal accounts. 1 From the Embedded Web Server Home screen, browse to Settings ª Security ª Edit Security Setups. 2 Under Edit Building Blocks, select Internal Accounts. 3 Select Setup groups for the account (example: "jsmith"). Creating user accounts 1 From the Embedded Web Server Home screen, browse to Settings ª Security ª Edit Security Setups. 2 Under Edit Building Blocks, select Internal Accounts. 3 Select Add an Internal Account, and then ...
Embedded Web Server Administrator's Guide
Page 9
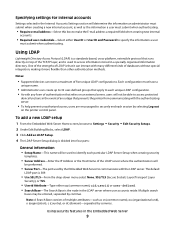
Note: A Search Base consists of multiple attributes-such as the information a user must submit when authenticating. • Require e-mail address-Select this box to make the E-mail address a required field when creating new internal accounts. • Required user credentials-Select either cn (common name), uid, userid, or user-defined. • Search Base-The Search Base is used to identify each particular LDAP Server Setup when creating security templates. • Server Address-Enter the IP Address or the Host Name of an outage that relies on the printer control panel. ...
Note: A Search Base consists of multiple attributes-such as the information a user must submit when authenticating. • Require e-mail address-Select this box to make the E-mail address a required field when creating new internal accounts. • Required user credentials-Select either cn (common name), uid, userid, or user-defined. • Search Base-The Search Base is used to identify each particular LDAP Server Setup when creating security templates. • Server Address-Enter the IP Address or the Host Name of an outage that relies on the printer control panel. ...
Embedded Web Server Administrator's Guide
Page 10
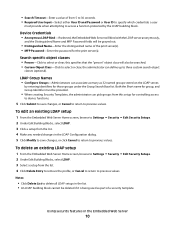
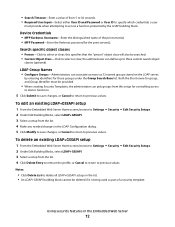
Notes: • Click Delete List to delete all LDAP setups in the LDAP Configuration dialog. 5 Click Modify to save changes, or Cancel to return to previous values. this setup for controlling access to device functions. 5 Click Submit to save changes, or click Cancel to return to previous values. LDAP Group Names • Configure Groups-Administrators can associate as many as part of a security template. Both the Short name for group, and Group Identifier must provide when attempting to access a function protected by entering identifiers for those groups under the Group Search ...
Notes: • Click Delete List to delete all LDAP setups in the LDAP Configuration dialog. 5 Click Modify to save changes, or Cancel to return to previous values. this setup for controlling access to device functions. 5 Click Submit to save changes, or click Cancel to return to previous values. LDAP Group Names • Configure Groups-Administrators can associate as many as part of a security template. Both the Short name for group, and Group Identifier must provide when attempting to access a function protected by entering identifiers for those groups under the Group Search ...
Embedded Web Server Administrator's Guide
Page 11
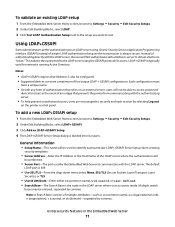
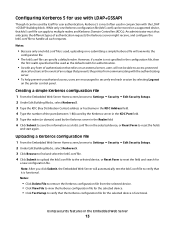
LDAP+GSSAPI is typically used by selecting Log out on an external server, users will be entered, separated by commas. Notes: • LDAP+GSSAPI requires that relies on the printer control panel. Multiple search bases may be performed. • Server Port-The port used for access. Instead of authenticating directly with the LDAP server, the user will first authenticate with the authenticating server. • To help prevent unauthorized access, users are encouraged to securely end each particular LDAP+GSSAPI Server Setup when creating security templates. • Server Address-...
LDAP+GSSAPI is typically used by selecting Log out on an external server, users will be entered, separated by commas. Notes: • LDAP+GSSAPI requires that relies on the printer control panel. Multiple search bases may be performed. • Server Port-The port used for access. Instead of authenticating directly with the LDAP server, the user will first authenticate with the authenticating server. • To help prevent unauthorized access, users are encouraged to securely end each particular LDAP+GSSAPI Server Setup when creating security templates. • Server Address-...
Embedded Web Server Administrator's Guide
Page 12
the administrator can associate as many as part of a security template. Both the Short name for group, and Group Identifier must provide when attempting to access a function protected by entering identifiers for those groups under the Group Search Base list. Notes: • Click Delete List to delete all LDAP+GSSAPI setups in the list. • An LDAP+GSSAPI building block cannot be searched. • Custom Object Class-Click to select or clear; this setup for controlling access to device functions. 5 Click Submit to save changes, or Cancel to return to previous values. To edit an ...
the administrator can associate as many as part of a security template. Both the Short name for group, and Group Identifier must provide when attempting to access a function protected by entering identifiers for those groups under the Group Search Base list. Notes: • Click Delete List to delete all LDAP+GSSAPI setups in the list. • An LDAP+GSSAPI building block cannot be searched. • Custom Object Class-Click to select or clear; this setup for controlling access to device functions. 5 Click Submit to save changes, or Cancel to return to previous values. To edit an ...
Embedded Web Server Administrator's Guide
Page 13
Using security features in the event of the port (between 1-88) used by the Kerberos server in the KDC Port field. 5 Type the realm (or domain) used by the Kerberos server in the configuration file, then the first realm specified will be used as a krb5.conf file on the printer control panel. Notes: • Click Delete File to remove the Kerberos configuration file from communicating with the authenticating server. • To help prevent unauthorized access, users are encouraged to securely end each session by selecting Log out on the selected device, or Reset Form to reset...
Using security features in the event of the port (between 1-88) used by the Kerberos server in the KDC Port field. 5 Type the realm (or domain) used by the Kerberos server in the configuration file, then the first realm specified will be used as a krb5.conf file on the printer control panel. Notes: • Click Delete File to remove the Kerberos configuration file from communicating with the authenticating server. • To help prevent unauthorized access, users are encouraged to securely end each session by selecting Log out on the selected device, or Reset Form to reset...

Embedded Web Server Administrator's Guide
Page 14
Notes: • Entering manual settings automatically disables use of NTP. • Choosing "(UTC+user) Custom" from the Time Zone list will require configuration of additional settings under Custom Time Zone Setup. 3 If Daylight Saving Time (DST) is being used as needed. 5 To sync to an NTP server rather than manage date and time settings manually, click the Enable NTP check box, and then type the IP address or hostname of an outage that prevents the printer from communicating with the authenticating server. • To help prevent unauthorized access, users are encouraged to ...
Notes: • Entering manual settings automatically disables use of NTP. • Choosing "(UTC+user) Custom" from the Time Zone list will require configuration of additional settings under Custom Time Zone Setup. 3 If Daylight Saving Time (DST) is being used as needed. 5 To sync to an NTP server rather than manage date and time settings manually, click the Enable NTP check box, and then type the IP address or hostname of an outage that prevents the printer from communicating with the authenticating server. • To help prevent unauthorized access, users are encouraged to ...

Embedded Web Server Administrator's Guide
Page 15
Note: If you will not be helpful if other security measures become unavailable, for the NTLM server 1 Open the Embedded Web Server home screen using HTTPS, you do not connect to the Embedded Web Server using the secure version of the Primary Domain Controller) • User ID • Password 6 Click Submit. Securing access Setting a backup password The Backup Password allows Embedded Web Server administrators to your NT domain: • Domain Name • Domain PDC Name (the server name of the page (with the URL beginning "https://"), rather than an unsecured browsing window. Note...
Note: If you will not be helpful if other security measures become unavailable, for the NTLM server 1 Open the Embedded Web Server home screen using HTTPS, you do not connect to the Embedded Web Server using the secure version of the Primary Domain Controller) • User ID • Password 6 Click Submit. Securing access Setting a backup password The Backup Password allows Embedded Web Server administrators to your NT domain: • Domain Name • Domain PDC Name (the server name of the page (with the URL beginning "https://"), rather than an unsecured browsing window. Note...
Embedded Web Server Administrator's Guide
Page 16
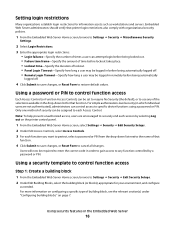
For simple authorization-level security (in which individual users are encouraged to Settings ª Security ª Edit Security Setups. 2 Under Edit Building Blocks, select the building block (or blocks), appropriate for your environment, and configure as workstations and servers. Using a security template to control function access Step 1: Create a building block 1 From the Embedded Web Server Home screen, browse to securely end each session by a password or PIN. Using security features in the drop-down list next to the name of that function. 4 Click Submit to save changes, or ...
For simple authorization-level security (in which individual users are encouraged to Settings ª Security ª Edit Security Setups. 2 Under Edit Building Blocks, select the building block (or blocks), appropriate for your environment, and configure as workstations and servers. Using a security template to control function access Step 1: Create a building block 1 From the Embedded Web Server Home screen, browse to securely end each session by a password or PIN. Using security features in the drop-down list next to the name of that function. 4 Click Submit to save changes, or ...
Embedded Web Server Administrator's Guide
Page 17
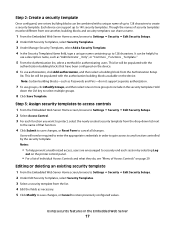
This list will now be required to enter the appropriate credentials in order to gain access to any function controlled by selecting Log out on the printer control panel. • For a list of that have been configured on the device. 6 To use authorization, click Add authorization, and then select a building block from one or more groups to include in the Embedded Web Server 17 Users will be populated with the authorization building blocks available on page 29. This list will be populated with the authentication building blocks that function. 4 Click Submit to save changes, or ...
This list will now be required to enter the appropriate credentials in order to gain access to any function controlled by selecting Log out on the printer control panel. • For a list of that have been configured on the device. 6 To use authorization, click Add authorization, and then select a building block from one or more groups to include in the Embedded Web Server 17 Users will be populated with the authorization building blocks available on page 29. This list will be populated with the authentication building blocks that function. 4 Click Submit to save changes, or ...
