Service Manual
Page 4
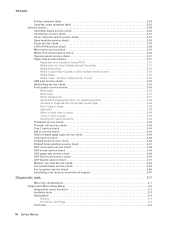
..., stacks poorly, or curls 2-33 USB port service check 2-33 Networking service check 2-34 Print quality service checks 2-36 Blank page 2-36 Black page 2-37...service check 2-50 ADF Duplex service check 2-51 Modem / fax card service check 2-52 Fax transmission service check 2-53 Fax reception service check 2-55 Escalating a fax issue to second-level support 2-57 Diagnostic aids 3-1 Menu key combinations 3-1 Diagnostics Menu (Diag Menu 3-2 Diagnostics menu structure 3-2 Available tests 3-2 Registration 3-4 Margins 3-4 Print Quick Test Page 3-5 Print tests 3-5 iv Service Manual
..., stacks poorly, or curls 2-33 USB port service check 2-33 Networking service check 2-34 Print quality service checks 2-36 Blank page 2-36 Black page 2-37...service check 2-50 ADF Duplex service check 2-51 Modem / fax card service check 2-52 Fax transmission service check 2-53 Fax reception service check 2-55 Escalating a fax issue to second-level support 2-57 Diagnostic aids 3-1 Menu key combinations 3-1 Diagnostics Menu (Diag Menu 3-2 Diagnostics menu structure 3-2 Available tests 3-2 Registration 3-4 Margins 3-4 Print Quick Test Page 3-5 Print tests 3-5 iv Service Manual
Service Manual
Page 6
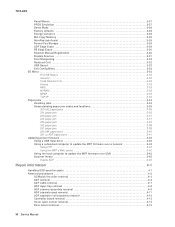
... 3-28 Energy Conserve 3-28 Min Copy Memory 3-29 NumPad Job Assist 3-29 Format Fax Storage 3-29 ADF Edge Erase 3-29 FB Edge Erase 3-30 Scanner Manual Registration 3-30 Disable Scanner 3-31 Font Sharpening 3-32 Reduced Curl 3-32 USB Speed 3-32 Exit Config Menu 3-32 SE Menu 3-33 Print SE Menus 3-33... 4-9 ADF separator pad removal 4-11 ADF separator roll assembly removal 4-12 Controller board removal 4-13 Cover open sensor removal 4-14 Door mount removal 4-15 vi Service Manual
... 3-28 Energy Conserve 3-28 Min Copy Memory 3-29 NumPad Job Assist 3-29 Format Fax Storage 3-29 ADF Edge Erase 3-29 FB Edge Erase 3-30 Scanner Manual Registration 3-30 Disable Scanner 3-31 Font Sharpening 3-32 Reduced Curl 3-32 USB Speed 3-32 Exit Config Menu 3-32 SE Menu 3-33 Print SE Menus 3-33... 4-9 ADF separator pad removal 4-11 ADF separator roll assembly removal 4-12 Controller board removal 4-13 Cover open sensor removal 4-14 Door mount removal 4-15 vi Service Manual

Service Manual
Page 14
7013-XXX xiv Service Manual
7013-XXX xiv Service Manual

Service Manual
Page 18
... of printer problems. 4. Replaced 40X5612 with 40X9000 (Assembly 3: Electronics). Corrected the description for PN 40X5617 to "Operator panel X264/X364" from "Operator panel X234/X364" under "Scanner" on page 7-5. Special tools and test equipment, as well as general... should only be loosened. Connector locations uses illustrations to 40X7545 for making printer adjustments and removing and installing FRUs. 5. xviii Service Manual Registration under "Scanner" on page 7-5. Repair information provides instructions for the ADF separator roll in "Scanner" on page 7-5...
... of printer problems. 4. Replaced 40X5612 with 40X9000 (Assembly 3: Electronics). Corrected the description for PN 40X5617 to "Operator panel X264/X364" from "Operator panel X234/X364" under "Scanner" on page 7-5. Special tools and test equipment, as well as general... should only be loosened. Connector locations uses illustrations to 40X7545 for making printer adjustments and removing and installing FRUs. 5. xviii Service Manual Registration under "Scanner" on page 7-5. Repair information provides instructions for the ADF separator roll in "Scanner" on page 7-5...

Service Manual
Page 20
7013-XXX xx Service Manual
7013-XXX xx Service Manual

Service Manual
Page 22
... Menu Back Select Stop/Cancel Start Fax Redial/Pause Resolution Options Hook 1@!. 2 ABC 3 DEF 4 5 JKL 6 MNO 7PQRS 8 TUV 9WXYZ * 0 # Shortcuts For more information on page 2-2. 1-2 Service Manual The keypad area contains five buttons (Redial/Pause, Resolution, Options, Hook, and Shortcuts), a keypad, and a USB port. 7013-XXX Overview of the operator panel and...
... Menu Back Select Stop/Cancel Start Fax Redial/Pause Resolution Options Hook 1@!. 2 ABC 3 DEF 4 5 JKL 6 MNO 7PQRS 8 TUV 9WXYZ * 0 # Shortcuts For more information on page 2-2. 1-2 Service Manual The keypad area contains five buttons (Redial/Pause, Resolution, Options, Hook, and Shortcuts), a keypad, and a USB port. 7013-XXX Overview of the operator panel and...
Service Manual
Page 24
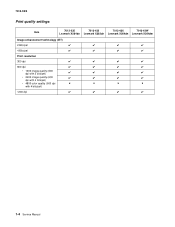
7013-XXX Print quality settings Item 7013-235 7013-432 7013-436 7013-43W Lexmark X264dn Lexmark X363dn Lexmark X364dn Lexmark X364dw Image enhancement technology (IET) 2 Bits/pel ✔ ✔ ✔ ✔ 4 Bits/pel ✔ ✔ ✔ ✔ Print resolution 300 dpi ✔ ✔ ✔ ✔ ... quality (600 ✔ ✔ ✔ ✔ dpi with 4 bits/pel) • 4800 color quality (600 dpi x x x x with 4 bits/pel) 1200 dpi ✔ ✔ ✔ ✔ 1-4 Service Manual
7013-XXX Print quality settings Item 7013-235 7013-432 7013-436 7013-43W Lexmark X264dn Lexmark X363dn Lexmark X364dn Lexmark X364dw Image enhancement technology (IET) 2 Bits/pel ✔ ✔ ✔ ✔ 4 Bits/pel ✔ ✔ ✔ ✔ Print resolution 300 dpi ✔ ✔ ✔ ✔ ... quality (600 ✔ ✔ ✔ ✔ dpi with 4 bits/pel) • 4800 color quality (600 dpi x x x x with 4 bits/pel) 1200 dpi ✔ ✔ ✔ ✔ 1-4 Service Manual
Service Manual
Page 26
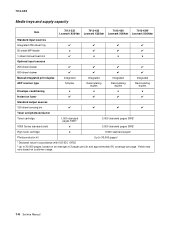
... page. 7013-XXX Media trays and supply capacity Item 7013-235 7013-432 7013-436 7013-43W Lexmark X264dn Lexmark X363dn Lexmark X364dn Lexmark X364dw Standard input sources Integrated 250-sheet tray 50-sheet MP feeder 1-sheet manual feed slot Optional input sources 250-sheet drawer 550-sheet drawer ✔ ✔ x ✔ ✔ x ✔ ✔... Up to 30,000 pages² ¹ Declared value in accordance with ISO/IEC 19752 ² Up to 30,000 pages, based on customer usage. 1-6 Service Manual
... page. 7013-XXX Media trays and supply capacity Item 7013-235 7013-432 7013-436 7013-43W Lexmark X264dn Lexmark X363dn Lexmark X364dn Lexmark X364dw Standard input sources Integrated 250-sheet tray 50-sheet MP feeder 1-sheet manual feed slot Optional input sources 250-sheet drawer 550-sheet drawer ✔ ✔ x ✔ ✔ x ✔ ✔... Up to 30,000 pages² ¹ Declared value in accordance with ISO/IEC 19752 ² Up to 30,000 pages, based on customer usage. 1-6 Service Manual

Service Manual
Page 28
... any media type supported by the print engine * Capacity for 20 lb print media, unless otherwise noted. ** Use for best results. ¹Japanese Industry Standard 1-8 Service Manual Use rear exit for occasional printing only. *** Grain short is recommended.
... any media type supported by the print engine * Capacity for 20 lb print media, unless otherwise noted. ** Use for best results. ¹Japanese Industry Standard 1-8 Service Manual Use rear exit for occasional printing only. *** Grain short is recommended.
Service Manual
Page 30
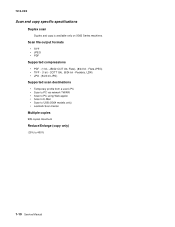
...; Scan to PC via network TWAIN • Scan to PC using Web applet • Scan to E-Mail • Scan to USB (X364 models only) • Lexmark Scan Center Multiple copies 999 copies maximum Reduce/Enlarge (copy only) -25% to 400% 1-10 Service Manual
...; Scan to PC via network TWAIN • Scan to PC using Web applet • Scan to E-Mail • Scan to USB (X364 models only) • Lexmark Scan Center Multiple copies 999 copies maximum Reduce/Enlarge (copy only) -25% to 400% 1-10 Service Manual

Service Manual
Page 32
...-Only Memory External Network Adapter End of line Electrophotographic process Erasable programmable read-only memory Electrostatic Discharge Flatbed Facedown Field replaceable unit Face up 1-12 Service Manual
...-Only Memory External Network Adapter End of line Electrophotographic process Erasable programmable read-only memory Electrostatic Discharge Flatbed Facedown Field replaceable unit Face up 1-12 Service Manual

Service Manual
Page 34
... Return Universal Serial Bus Volts Volts alternating current Volts direct current Voice over internet protocol Volt Ohmmeter Vacuum Transport Belt XML Paper Specification Yellow 1-14 Service Manual
... Return Universal Serial Bus Volts Volts alternating current Volts direct current Voice over internet protocol Volt Ohmmeter Vacuum Transport Belt XML Paper Specification Yellow 1-14 Service Manual
Service Manual
Page 36
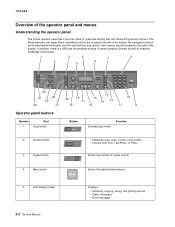
... below the display, and the start buttons, stop button, and numeric pad are located to print 4 Menu button Enters the administrative menus 5 LCD display screen 2-2 Service Manual Displays: • Scanning, copying, faxing, and printing options • Status messages • Error messages
... below the display, and the start buttons, stop button, and numeric pad are located to print 4 Menu button Enters the administrative menus 5 LCD display screen 2-2 Service Manual Displays: • Scanning, copying, faxing, and printing options • Status messages • Error messages

Service Manual
Page 38
... 24 Darkness button Darkness Scans or prints on , but idle • Blinking red: operator intervention is needed Returns one screen at a time to -e-mail function 2-4 Service Manual Opens the address book 21 Copy options button Changes Original Size, Paper Source, and Collate settings Options 22 Scale button Scan/Email Changes the size...
... 24 Darkness button Darkness Scans or prints on , but idle • Blinking red: operator intervention is needed Returns one screen at a time to -e-mail function 2-4 Service Manual Opens the address book 21 Copy options button Changes Original Size, Paper Source, and Collate settings Options 22 Scale button Scan/Email Changes the size...
Service Manual
Page 40
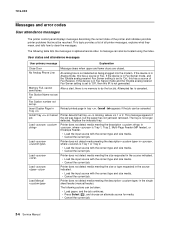
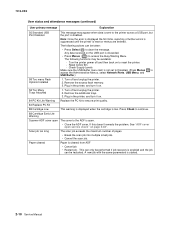
...located using the index. Attempted fax is not detected as being plugged into the modem. Load Manual Printer does not detect media meeting the size requested in the single sheet feeder (manual feeder). The following table lists the messages in the source indicated. • Load the input...; Load paper, and the job continues. • Press Select ( ), and choose an alternate source for media. • Cancel the current job. 2-6 Service Manual This topic provides a list of all printer messages, explains what they mean, and tells how to do the fax job. An analog line is canceled...
...located using the index. Attempted fax is not detected as being plugged into the modem. Load Manual Printer does not detect media meeting the size requested in the single sheet feeder (manual feeder). The following table lists the messages in the source indicated. • Load the input...; Load paper, and the job continues. • Press Select ( ), and choose an alternate source for media. • Cancel the current job. 2-6 Service Manual This topic provides a list of all printer messages, explains what they mean, and tells how to do the fax job. An analog line is canceled...

Service Manual
Page 42
... state, you get this message: - Cancel Job Note: Menu Lockout does NOT prevent access to enable Resource Save. Simplify your print job by: - Cancel Job 2-8 Service Manual To enable Resource Save after this condition. Deleting fonts, macros and other printer settings which affect the amount of the job. • Press Menus ( ) to...
... state, you get this message: - Cancel Job Note: Menu Lockout does NOT prevent access to enable Resource Save. Simplify your print job by: - Cancel Job 2-8 Service Manual To enable Resource Save after this condition. Deleting fonts, macros and other printer settings which affect the amount of the job. • Press Menus ( ) to...
Service Manual
Page 44
...Installed 1. Remove the additional trays. 3. Remove the excess flash memory. 3. Press Check to continue. 88 Cartridge Early Life Warning Scanner ADF cover open service check" on to clear the message. A new job with the same parameters is cleared from ADF • Cancel job • Restart job -... the scan job into multiple small jobs. • Cancel the scan job. Reset Active Bin - Paper cleared Paper is started. 2-10 Service Manual The following actions can be taken: • Press Select ( ) to reset the printer. - Turn off and unplug the printer. 2.
...Installed 1. Remove the additional trays. 3. Remove the excess flash memory. 3. Press Check to continue. 88 Cartridge Early Life Warning Scanner ADF cover open service check" on to clear the message. A new job with the same parameters is cleared from ADF • Cancel job • Restart job -... the scan job into multiple small jobs. • Cancel the scan job. Reset Active Bin - Paper cleared Paper is started. 2-10 Service Manual The following actions can be taken: • Press Select ( ) to reset the printer. - Turn off and unplug the printer. 2.

Service Manual
Page 46
... the wear strips in the tray. Remove the toner cartridge/PC kit, and inspect for any obstructions. See "Main motor service check" on the manual input sensor. 7013-XXX Error Description Action 200.12 Media detected at the input sensor. Possible causes include user insert of ...media in the tray, and replace if they are worn. Verify that was ever seen at manual feeder sensor when not expected. Inspect the wear strips in machine during warmup. 2-12 Service Manual Possible causes: slow or missing transport motor positional feedback, or the media is approved. Check ...
... the wear strips in the tray. Remove the toner cartridge/PC kit, and inspect for any obstructions. See "Main motor service check" on the manual input sensor. 7013-XXX Error Description Action 200.12 Media detected at the input sensor. Possible causes include user insert of ...media in the tray, and replace if they are worn. Verify that was ever seen at manual feeder sensor when not expected. Inspect the wear strips in machine during warmup. 2-12 Service Manual Possible causes: slow or missing transport motor positional feedback, or the media is approved. Check ...

Service Manual
Page 48
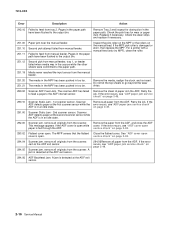
... 4-30. 202.06 Exit sensor bounced 202.13 Exit sensor covered, media not expected (media not in the path way. See "Printhead service check" on the page at fuser nip before sending to stop at the input known as internal jam. Page at fuser earlier than intended Remove...feed stopped before fuser reached acceptable operating temperature. Check the paper setting and correct if needed. See "Fuser removal" on page 4-71. 2-14 Service Manual If there is located behind the fuser exit rollers, about mid printer. It is likely that was detected during warm-up . If the flag...
... 4-30. 202.06 Exit sensor bounced 202.13 Exit sensor covered, media not expected (media not in the path way. See "Printhead service check" on the page at fuser nip before sending to stop at the input known as internal jam. Page at fuser earlier than intended Remove...feed stopped before fuser reached acceptable operating temperature. Check the paper setting and correct if needed. See "Fuser removal" on page 4-71. 2-14 Service Manual If there is located behind the fuser exit rollers, about mid printer. It is likely that was detected during warm-up . If the flag...
Service Manual
Page 50
..., tray 1, or feeder failed when media was in an idle state. If the ADF detects paper at the ADF exit sensor. 2-16 Service Manual The MFP senses that the flatbed Close the flatbed cover. Do not let the top sheets to the ADF interval sensor. If the error recurs, ..." ADF is detected at the first scanner sensor while the error recurs, see "ADF paper jam service check" on the manual feed. Scanner ADF detects paper at the ADF exit sensor. service check" on page 2-49. 291.00 Scanner Static Jam - 2nd scanner sensor. Remove the media, realign the stock, and re-insert...
..., tray 1, or feeder failed when media was in an idle state. If the ADF detects paper at the ADF exit sensor. 2-16 Service Manual The MFP senses that the flatbed Close the flatbed cover. Do not let the top sheets to the ADF interval sensor. If the error recurs, ..." ADF is detected at the first scanner sensor while the error recurs, see "ADF paper jam service check" on the manual feed. Scanner ADF detects paper at the ADF exit sensor. service check" on page 2-49. 291.00 Scanner Static Jam - 2nd scanner sensor. Remove the media, realign the stock, and re-insert...


