Technical Reference
Page 57
... - 40037 87 PerfectFinish X X PerfectFinish Empty Empty Intervention Required - 40038 Replace Oil X X Replace Oil Coating Roll Coating Roll Intervention Required - 40038 Replace PC Kit Replace PC Kit Intervention Required - 40038 Replace PC Kit To X X Replace PC Kit To Continue Continue Intervention Required - 40038 Replace Toner X X Replace Toner Cartridge Cartridge Intervention Required - 40038 Replace Toner To X X Replace Toner Cartridge Continue...
... - 40037 87 PerfectFinish X X PerfectFinish Empty Empty Intervention Required - 40038 Replace Oil X X Replace Oil Coating Roll Coating Roll Intervention Required - 40038 Replace PC Kit Replace PC Kit Intervention Required - 40038 Replace PC Kit To X X Replace PC Kit To Continue Continue Intervention Required - 40038 Replace Toner X X Replace Toner Cartridge Cartridge Intervention Required - 40038 Replace Toner To X X Replace Toner Cartridge Continue...

Technical Reference
Page 62
... Replace X X Replace Cartridge yellow cartridge Black PC Unit Life 40204 84 Black pc unit X X Warning life warning Intervention Required - 40204 84 unsupported X X Unsupported PC Unit [color] pc unit Intervention Required - 40204 84.yy Color PC X X Color PC Units Life Unit Life warning Warning Intervention Required - 40204 PC Kit Life Warning 84 PC kit life warning Intervention Required - 40204 84.yy...
... Replace X X Replace Cartridge yellow cartridge Black PC Unit Life 40204 84 Black pc unit X X Warning life warning Intervention Required - 40204 84 unsupported X X Unsupported PC Unit [color] pc unit Intervention Required - 40204 84.yy Color PC X X Color PC Units Life Unit Life warning Warning Intervention Required - 40204 PC Kit Life Warning 84 PC kit life warning Intervention Required - 40204 84.yy...

Technical Reference
Page 63
... Toner toner Intervention Required - 40303 88 Replace yellow X X Replace Toner toner Intervention Required - 40304 Replace PC Kit 84 Replace PC Kit Intervention Required - 40304 84 Replace X X Replace Photoconductor photoconductor Intervention Required - 40305 84 Replace black X X 84 Replace Black PC Unit PC Unit Intervention Required - 40309 32.yy black X X Cartridge Part Number Unsupported cartridge part number unsupported...
... Toner toner Intervention Required - 40303 88 Replace yellow X X Replace Toner toner Intervention Required - 40304 Replace PC Kit 84 Replace PC Kit Intervention Required - 40304 84 Replace X X Replace Photoconductor photoconductor Intervention Required - 40305 84 Replace black X X 84 Replace Black PC Unit PC Unit Intervention Required - 40309 32.yy black X X Cartridge Part Number Unsupported cartridge part number unsupported...
Technical Reference
Page 65
... Intervention Required - 40404 84 Photoconductor X X abnormal Intervention Required - 40405 84.41 Black PC X X PC Unit Missing Unit missing Intervention Required - 40405 84.41 Black X X Photoconductor Missing photoconductor missing Intervention Required - 40406 84.... X364dw X463de, X464de, X466de, X466dte, X466dwe Intervention Required - 40315 80 Scheduled X X Scheduled Maintenance maintenance [x] Note: [x] indicates 600k kit. Intervention Required - 40315 83.yy Replace X X Replace Transfer Module transfer module Intervention Required - 40316 80.yy Replace X X Replace ...
... Intervention Required - 40404 84 Photoconductor X X abnormal Intervention Required - 40405 84.41 Black PC X X PC Unit Missing Unit missing Intervention Required - 40405 84.41 Black X X Photoconductor Missing photoconductor missing Intervention Required - 40406 84.... X364dw X463de, X464de, X466de, X466dte, X466dwe Intervention Required - 40315 80 Scheduled X X Scheduled Maintenance maintenance [x] Note: [x] indicates 600k kit. Intervention Required - 40315 83.yy Replace X X Replace Transfer Module transfer module Intervention Required - 40316 80.yy Replace X X Replace ...

Maintenance Guide
Page 10
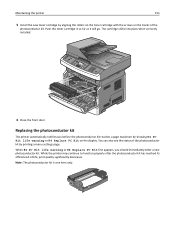
... order a new photoconductor kit. Maintaining the printer 10 5 Install the new toner cartridge by showing 84 PC Kit life warning or 84 Replace PC Kit on the tracks of the photoconductor kit. While the printer may continue to function properly after the photoconductor kit has reached its official ... front door. You can also see the status of -life, print quality significantly decreases. When 84 PC Kit life warning or 84 Replace PC Kit first appears, you before the photoconductor kit reaches a page maximum by aligning the rollers on the toner cartridge with the arrows on the display...
... order a new photoconductor kit. Maintaining the printer 10 5 Install the new toner cartridge by showing 84 PC Kit life warning or 84 Replace PC Kit on the tracks of the photoconductor kit. While the printer may continue to function properly after the photoconductor kit has reached its official ... front door. You can also see the status of -life, print quality significantly decreases. When 84 PC Kit life warning or 84 Replace PC Kit first appears, you before the photoconductor kit reaches a page maximum by aligning the rollers on the toner cartridge with the arrows on the display...
User's Guide
Page 153
...printer may continue to function properly after the photoconductor kit has reached its official end‑of the photoconductor kit. You can also see the status of the photoconductor kit by showing 84 PC Kit life warning or 84 Replace PC Kit on the tracks of ‑life, print ... as it will go. When 84 PC Kit life warning or 84 Replace PC Kit first appears, you before the photoconductor kit reaches a page maximum by printing a menu settings page. Note: The photoconductor kit is one item only. Replacing the photoconductor kit The printer automatically notifies you should immediately...
...printer may continue to function properly after the photoconductor kit has reached its official end‑of the photoconductor kit. You can also see the status of the photoconductor kit by showing 84 PC Kit life warning or 84 Replace PC Kit on the tracks of ‑life, print ... as it will go. When 84 PC Kit life warning or 84 Replace PC Kit first appears, you before the photoconductor kit reaches a page maximum by printing a menu settings page. Note: The photoconductor kit is one item only. Replacing the photoconductor kit The printer automatically notifies you should immediately...
User's Guide
Page 183
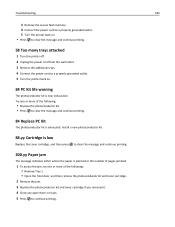
... trays. 4 Connect the power cord to a properly grounded outlet. 5 Turn the printer back on. 84 PC Kit life warning The photoconductor kit is exhausted. Install a new photoconductor kit. 88.yy Cartridge is low Replace the toner cartridge, and then press to clear the message and continue printing...then remove the photoconductor kit and toner cartridge. 2 Remove the jam. 3 Replace the photoconductor kit and toner cartridge if you removed it. 4 Close any open doors or trays. 5 Press to clear the message and continue printing. 84 Replace PC Kit The photoconductor kit is near exhaustion. Try...
... trays. 4 Connect the power cord to a properly grounded outlet. 5 Turn the printer back on. 84 PC Kit life warning The photoconductor kit is exhausted. Install a new photoconductor kit. 88.yy Cartridge is low Replace the toner cartridge, and then press to clear the message and continue printing...then remove the photoconductor kit and toner cartridge. 2 Remove the jam. 3 Replace the photoconductor kit and toner cartridge if you removed it. 4 Close any open doors or trays. 5 Press to clear the message and continue printing. 84 Replace PC Kit The photoconductor kit is near exhaustion. Try...
User's Guide
Page 229
... drawer installing 21 56 Standard USB port disabled 182 58 Too many flash options installed 182 58 Too many trays attached 183 84 PC Kit life warning 183 84 Replace PC Kit 183 840.01 Scanner Disabled 186 840.02 Scanner Auto Disabled 187 88.yy Cartridge is low 183 A Active NIC menu 116...
... drawer installing 21 56 Standard USB port disabled 182 58 Too many flash options installed 182 58 Too many trays attached 183 84 PC Kit life warning 183 84 Replace PC Kit 183 840.01 Scanner Disabled 186 840.02 Scanner Auto Disabled 187 88.yy Cartridge is low 183 A Active NIC menu 116...
User's Guide
Page 233
... 233 56 Standard USB port disabled 182 58 Too many flash options installed 182 58 Too many trays attached 183 84 PC Kit life warning 183 84 Replace PC Kit 183 840.01 Scanner Disabled 186 840.02 Scanner Auto Disabled 187 88.yy Cartridge is low 183 Answering 176 Call ...publications, finding 8 Q Quality menu 138 Queued for sending 179 Quiet Mode 37 R recommended print side 54 recycled paper using 55 recycling 214 Lexmark packaging 37 Lexmark products 37 toner cartridges 37 WEEE statement 213 reducing a copy 72 Remove packaging material, check 179 Remove paper from standard output bin 179 ...
... 233 56 Standard USB port disabled 182 58 Too many flash options installed 182 58 Too many trays attached 183 84 PC Kit life warning 183 84 Replace PC Kit 183 840.01 Scanner Disabled 186 840.02 Scanner Auto Disabled 187 88.yy Cartridge is low 183 Answering 176 Call ...publications, finding 8 Q Quality menu 138 Queued for sending 179 Quiet Mode 37 R recommended print side 54 recycled paper using 55 recycling 214 Lexmark packaging 37 Lexmark products 37 toner cartridges 37 WEEE statement 213 reducing a copy 72 Remove packaging material, check 179 Remove paper from standard output bin 179 ...
Service Manual
Page 44
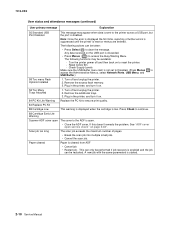
... entered. The following actions can be performed if job recovery is not set to Disabled. (Press Menus to ensure print quality. 84 Replace PC Kit 88 Cartridge Low This warning is displayed when the cartridge is open service check" on . 58 Too Many Trays Attached 1. Remove the additional... is discarded. • Press Menus ( ) to the ADF is low. Plug in the printer, and turn it on. 84 PC Kit Life Warning Replace the PC kit to access the Administrative Menus, select Network/Ports, USB Menu, and USB Buffer.) 58 Too many Flash Options Installed 1. Paper cleared Paper...
... entered. The following actions can be performed if job recovery is not set to Disabled. (Press Menus to ensure print quality. 84 Replace PC Kit 88 Cartridge Low This warning is displayed when the cartridge is open service check" on . 58 Too Many Trays Attached 1. Remove the additional... is discarded. • Press Menus ( ) to the ADF is low. Plug in the printer, and turn it on. 84 PC Kit Life Warning Replace the PC kit to access the Administrative Menus, select Network/Ports, USB Menu, and USB Buffer.) 58 Too many Flash Options Installed 1. Paper cleared Paper...

Service Manual
Page 45
... then replace it does not rotate freely or is too loose. 200.06 Imaged page not expected page (bouncy passthru sensor) Remove the toner cartridge/PC kit. The media is pointed upward and out of the specified length. • Faulty media feed clutch. The main input sensor never became uncovered from the... at the input sensor. 200.01 200.02 Classic input jam. Verify the proper media and inspect the tray wear strips. First, remove the PC kit and paper or debris at the input sensor before the EP was ready Inspect the tray for prestaging. It should rotate freely. See "Media feed...
... then replace it does not rotate freely or is too loose. 200.06 Imaged page not expected page (bouncy passthru sensor) Remove the toner cartridge/PC kit. The media is pointed upward and out of the specified length. • Faulty media feed clutch. The main input sensor never became uncovered from the... at the input sensor. 200.01 200.02 Classic input jam. Verify the proper media and inspect the tray wear strips. First, remove the PC kit and paper or debris at the input sensor before the EP was ready Inspect the tray for prestaging. It should rotate freely. See "Media feed...

Service Manual
Page 46
... reached the input sensor, but no trailing edge was detected during warm-up transport motor Inspect the main motor. Remove the toner cartridge/PC kit and inspect the input sensor flag. Verify that the media is approved. If the flag is loose, then replace it . Inspect the... wear strips in the tray. Remove the toner cartridge/PC kit. Check the bottom of the second page at the input sensor. Possible causes: slow or missing transport motor positional feedback, or the media ...
... reached the input sensor, but no trailing edge was detected during warm-up transport motor Inspect the main motor. Remove the toner cartridge/PC kit and inspect the input sensor flag. Verify that the media is approved. If the flag is loose, then replace it . Inspect the... wear strips in the tray. Remove the toner cartridge/PC kit. Check the bottom of the second page at the input sensor. Possible causes: slow or missing transport motor positional feedback, or the media ...

Service Manual
Page 47
... printhead. Probable causes: ESD or noise on page 2-30. Possible cause is dislodged or broken, then replace the rear exit guide. Remove the toner cartridge/PC kit and check for any page(s) ahead to the media being pre-staged in the fuser, then replace the fuser. Diagnostics information 2-13 See "Printhead service...
... printhead. Probable causes: ESD or noise on page 2-30. Possible cause is dislodged or broken, then replace the rear exit guide. Remove the toner cartridge/PC kit and check for any page(s) ahead to the media being pre-staged in the fuser, then replace the fuser. Diagnostics information 2-13 See "Printhead service...

Service Manual
Page 48
... the fuser. Open the rear door, and inspect the flag on page 4-30. 201.27 Page at fuser earlier than intended Remove the toner cartridge/PC kit and check for obstructions in the exit guide, then replace the exit guide. If the flag does not rotate freely or has no spring action... not in the path. 201.25 201.26 Exit sensor never made by leading edge of the page heading toward desired temperature. Also Remove the PC kit and paper or debris at the fuser, rear door, exit guide, and top cover. Page at the exit sensor. 202.02 Exit sensor never broke...
... the fuser. Open the rear door, and inspect the flag on page 4-30. 201.27 Page at fuser earlier than intended Remove the toner cartridge/PC kit and check for obstructions in the exit guide, then replace the exit guide. If the flag does not rotate freely or has no spring action... not in the path. 201.25 201.26 Exit sensor never made by leading edge of the page heading toward desired temperature. Also Remove the PC kit and paper or debris at the fuser, rear door, exit guide, and top cover. Page at the exit sensor. 202.02 Exit sensor never broke...
Service Manual
Page 70
...cartridge (not a FRU) Printhead LVPS/HVPS Controller board Action Remove the toner cartridge, and gently shake it to Exit Config Menu, and press . Try a different PC kit. • With the cartridge out, check the spring loaded contacts on the lens. None should be caused by the... PC roll not being properly charged. Try a different toner cartridge and PC kit. • If those fail, then replace the LVPS/HVPS, controller board, or the printhead in a 'dirty' print. Using print quality test ...
...cartridge (not a FRU) Printhead LVPS/HVPS Controller board Action Remove the toner cartridge, and gently shake it to Exit Config Menu, and press . Try a different PC kit. • With the cartridge out, check the spring loaded contacts on the lens. None should be caused by the... PC roll not being properly charged. Try a different toner cartridge and PC kit. • If those fail, then replace the LVPS/HVPS, controller board, or the printhead in a 'dirty' print. Using print quality test ...
Service Manual
Page 71
...Action Check the toner darkness setting in the cable. Make sure the toner cartridge and PC Kit are correctly installed and the high voltage contacts are installed correctly, then try a new PC Kit first and then toner cartridge. Check continuity between the print cartridge assembly and spring ... the toner cartridge assembly for pin values.) • Controller board Diagnostics information 2-37 Clean as necessary. If the toner cartridge and PC Kit are clean. Check the contacts for correct installation and contamination where contact is bad, then call the next level of -life. If...
...Action Check the toner darkness setting in the cable. Make sure the toner cartridge and PC Kit are correctly installed and the high voltage contacts are installed correctly, then try a new PC Kit first and then toner cartridge. Check continuity between the print cartridge assembly and spring ... the toner cartridge assembly for pin values.) • Controller board Diagnostics information 2-37 Clean as necessary. If the toner cartridge and PC Kit are clean. Check the contacts for correct installation and contamination where contact is bad, then call the next level of -life. If...

Service Manual
Page 72
... bearings show signs of paper over the roll to the paper. Replace as necessary. A heavier media may have an unbalanced force against the PC (photoconductor) drum. Place a sheet of damage, or fatigue. 7013-XXX Partial blank image/white spots (no repeating pattern) FRU Toner cartridge... is not blocked. Check the media settings in image density horizontally across page FRU PC Kit (not a FRU) Transfer roll Action The charge roll may require higher heat to the PC drum. Try a new PC Kit. Poor fusing of wear, damage or contamination. Make sure recommended media is being...
... bearings show signs of paper over the roll to the paper. Replace as necessary. A heavier media may have an unbalanced force against the PC (photoconductor) drum. Place a sheet of damage, or fatigue. 7013-XXX Partial blank image/white spots (no repeating pattern) FRU Toner cartridge... is not blocked. Check the media settings in image density horizontally across page FRU PC Kit (not a FRU) Transfer roll Action The charge roll may require higher heat to the PC drum. Try a new PC Kit. Poor fusing of wear, damage or contamination. Make sure recommended media is being...

Service Manual
Page 73
... problem continues, then install a new toner cartridge. Recheck condition before replacing PC Kit, if necessary. Toner on toner. Inspect the fuser for signs of toner... FRU Toner cartridge (not a FRU) Transfer roll LVPS/HVPS card Action Make sure the toner cartridge and PC Kit are installed correctly and that the laser beam is plugged into the LVPS/HVPS. To check the lower voltage...toner to transfer to make sure that the toner cartridge is not low on back of page FRU Photoconductor kit (not a FRU) Fuser Transfer roll HVPS or controller board Action Print a menu page found under ...
... problem continues, then install a new toner cartridge. Recheck condition before replacing PC Kit, if necessary. Toner on toner. Inspect the fuser for signs of toner... FRU Toner cartridge (not a FRU) Transfer roll LVPS/HVPS card Action Make sure the toner cartridge and PC Kit are installed correctly and that the laser beam is plugged into the LVPS/HVPS. To check the lower voltage...toner to transfer to make sure that the toner cartridge is not low on back of page FRU Photoconductor kit (not a FRU) Fuser Transfer roll HVPS or controller board Action Print a menu page found under ...

Service Manual
Page 74
... defect. Toner smudges appear on page 2-39 for debris. • Make sure the media is straight and unwrinkled. • Replace the PC Kit, and recheck before replacing the toner cartridge. Try a different toner cartridge. Inspect the fuser at its entry for more information. Check those ...settings. Try a different toner cartridge. Horizontal streaks The toner cartridge or the fuser may be defective. Replace the PC kit. 2-40 Service Manual Vertical white lines See "Vertical streaks" on page 2-39. If the lines are usually caused by the laser ...
... defect. Toner smudges appear on page 2-39 for debris. • Make sure the media is straight and unwrinkled. • Replace the PC Kit, and recheck before replacing the toner cartridge. Try a different toner cartridge. Inspect the fuser at its entry for more information. Check those ...settings. Try a different toner cartridge. Horizontal streaks The toner cartridge or the fuser may be defective. Replace the PC kit. 2-40 Service Manual Vertical white lines See "Vertical streaks" on page 2-39. If the lines are usually caused by the laser ...


