Quick Reference
Page 2
... With a document open , click File ΠPrint. 2 Click Properties, Preferences, Options, or Setup. 3 Click the Other Options tab, and then click Fax. 4 On the Fax screen, type the name and number of faxing documents directly from a computer lets you do not have an ID and password, get one from the...and locate the IP address in the group with a different name, choosing the fax version of the driver. 3 Enter the fax information (for example, the name and number of your system support person. 4 Click Fax Shortcut Setup. 5 Type a unique name for the group. Use this feature if you need...
... With a document open , click File ΠPrint. 2 Click Properties, Preferences, Options, or Setup. 3 Click the Other Options tab, and then click Fax. 4 On the Fax screen, type the name and number of faxing documents directly from a computer lets you do not have an ID and password, get one from the...and locate the IP address in the group with a different name, choosing the fax version of the driver. 3 Enter the fax information (for example, the name and number of your system support person. 4 Click Fax Shortcut Setup. 5 Type a unique name for the group. Use this feature if you need...
Quick Reference
Page 3
... on the display. 7 Click Submit. 8 Scan your document. Canceling an outgoing fax A fax can only scan to that corresponds with the letter you press the button again, one of the printer, then print a network setup page and locate the address in the ADF and then cancels the job. To ...cancel a fax: 1 From the printer control panel, press . Canceling appears. Place these items on the scanner glass. ...
... on the display. 7 Click Submit. 8 Scan your document. Canceling an outgoing fax A fax can only scan to that corresponds with the letter you press the button again, one of the printer, then print a network setup page and locate the address in the ADF and then cancels the job. To ...cancel a fax: 1 From the printer control panel, press . Canceling appears. Place these items on the scanner glass. ...

Embedded Web Server Administrator's Guide
Page 7
... by requiring a user to type a correct PIN to retrieve a held print, copy, or fax job. To create a password 1 From the Embedded Web Server Home screen, browse to Settings ª Security ª Edit Security Setups. 2 Under Edit Building Blocks, select Password. 3 Under Manage Passwords, select Add a Password....Embedded Web Server Home screen, browse to Settings ª Security ª Edit Security Setups. 2 Under Edit Building Blocks, select PIN. 3 Select Add a PIN. 4 Type the name of the PIN configuration in the Setup Name box. If a function or setting is four digits, which may be used ...
... by requiring a user to type a correct PIN to retrieve a held print, copy, or fax job. To create a password 1 From the Embedded Web Server Home screen, browse to Settings ª Security ª Edit Security Setups. 2 Under Edit Building Blocks, select Password. 3 Under Manage Passwords, select Add a Password....Embedded Web Server Home screen, browse to Settings ª Security ª Edit Security Setups. 2 Under Edit Building Blocks, select PIN. 3 Select Add a PIN. 4 Type the name of the PIN configuration in the Setup Name box. If a function or setting is four digits, which may be used ...

Embedded Web Server Administrator's Guide
Page 24
... ª Security ª Disk Wiping. 2 Select Scheduled Disk Wiping. 3 Choose an existing Start value (the scheduled time and day will appear as Copy or Fax. 3 Verify that the printer is stolen. Disk encryption can be turned on only at the device (not through the configuration menus until the printer status... some devices the button will appear in the Embedded Web Server 24 When finished, use the browser Back button to return to the Disk Wiping setup screen, or use the menu on the left to browse back to Settings ª Security ª Disk Wiping 5 Back on the following screen click ...
... ª Security ª Disk Wiping. 2 Select Scheduled Disk Wiping. 3 Choose an existing Start value (the scheduled time and day will appear as Copy or Fax. 3 Verify that the printer is stolen. Disk encryption can be turned on only at the device (not through the configuration menus until the printer status... some devices the button will appear in the Embedded Web Server 24 When finished, use the browser Back button to return to the Disk Wiping setup screen, or use the menu on the left to browse back to Settings ª Security ª Disk Wiping 5 Back on the following screen click ...
Embedded Web Server Administrator's Guide
Page 29
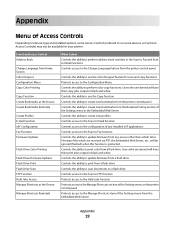
... Configuration Menu Copy Color Printing Copy Function Create Bookmarks at the Device Create Bookmarks Remotely Create Profiles E-mail Function eSF Configuration Fax Function Firmware Updates Flash Drive Color Printing Flash Drive Firmware Updates Flash Drive Print Flash Drive Scan FTP Function Held Jobs Access... Controls the ability to create new bookmarks from the printer control panel Controls the ability to create new bookmarks from the Bookmark Setup section of the Settings menu in black and white. Appendix Menu of Access Controls Depending on device type and installed options, ...
... Configuration Menu Copy Color Printing Copy Function Create Bookmarks at the Device Create Bookmarks Remotely Create Profiles E-mail Function eSF Configuration Fax Function Firmware Updates Flash Drive Color Printing Flash Drive Firmware Updates Flash Drive Print Flash Drive Scan FTP Function Held Jobs Access... Controls the ability to create new bookmarks from the printer control panel Controls the ability to create new bookmarks from the Bookmark Setup section of the Settings menu in black and white. Appendix Menu of Access Controls Depending on device type and installed options, ...
User's Guide
Page 8
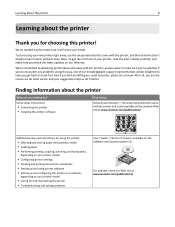
...• Connecting the printer • Installing the printer software Additional setup and instructions for using the printer: • Selecting and storing paper and specialty media • Loading paper • Performing printing, copying, scanning, and faxing tasks, depending on your printer model • Configuring printer settings... printer Thank you for ? And if you looking for choosing this printer! For updates, check our Web site at www.lexmark.com/publications/. To get back on our Web site. Learning about the printer 8 Learning about the printer What are the reason...
...• Connecting the printer • Installing the printer software Additional setup and instructions for using the printer: • Selecting and storing paper and specialty media • Loading paper • Performing printing, copying, scanning, and faxing tasks, depending on your printer model • Configuring printer settings... printer Thank you for ? And if you looking for choosing this printer! For updates, check our Web site at www.lexmark.com/publications/. To get back on our Web site. Learning about the printer 8 Learning about the printer What are the reason...

User's Guide
Page 20
Additional printer setup 20 2 Unpack the card. Note: Avoid touching the connection points along the edge of the connector on the system board. 4 Push the card firmly into place. Notes: • The entire length of the card. 3 Holding the card by its sides, align the card with the connector on the card must touch and be flush against the system board. • Be careful not to damage the connectors. • If your printer model does not fax, your system board will not have the fax card attached to the system board. 5 Close the system board door.
Additional printer setup 20 2 Unpack the card. Note: Avoid touching the connection points along the edge of the connector on the system board. 4 Push the card firmly into place. Notes: • The entire length of the card. 3 Holding the card by its sides, align the card with the connector on the card must touch and be flush against the system board. • Be careful not to damage the connectors. • If your printer model does not fax, your system board will not have the fax card attached to the system board. 5 Close the system board door.

User's Guide
Page 23
... you installed is not listed, then it again. • Network setup page-If your printer is a network model and is attached to a network, print a network setup page to verify that aids network printing configuration. Additional printer setup 23 1 4 2 3 1 Ethernet port 2 Fax ports Note: The fax ports are available on selected printer models only. 3 USB port...
... you installed is not listed, then it again. • Network setup page-If your printer is a network model and is attached to a network, print a network setup page to verify that aids network printing configuration. Additional printer setup 23 1 4 2 3 1 Ethernet port 2 Fax ports Note: The fax ports are available on selected printer models only. 3 USB port...

User's Guide
Page 25
Additional printer setup 25 For Macintosh users 1 Close all open software applications. 2 Insert the Software and... Run box, type control printers. 3 Press Enter, or click OK. Note: If the printer has a fax option, select Fax, and then add it may be necessary to manually add the options in the printer driver Once the printer software... are installed, it as an installed option. 8 Click Apply. Updating available options in the printer driver to the Lexmark Web site at www.lexmark.com. 2 From the Drivers & Downloads menu, click Driver Finder. 3 Select your printer, and then select your...
Additional printer setup 25 For Macintosh users 1 Close all open software applications. 2 Insert the Software and... Run box, type control printers. 3 Press Enter, or click OK. Note: If the printer has a fax option, select Fax, and then add it may be necessary to manually add the options in the printer driver Once the printer software... are installed, it as an installed option. 8 Click Apply. Updating available options in the printer driver to the Lexmark Web site at www.lexmark.com. 2 From the Drivers & Downloads menu, click Driver Finder. 3 Select your printer, and then select your...

User's Guide
Page 27
...1 Connect the power cable to the printer and then to a properly grounded electrical outlet, and then turn the printer on. 1 2 Note: For fax setup, see the User's Guide on the Software and Documentation CD. Do not connect the USB cable until instructed to do so on the screen. 2.... 4 Click Agree to accept the terms of the License Agreement. 5 Select Suggested and then click Next. 6 Click Wireless Network Attach. Additional printer setup 27 Installing the printer on a wireless network (Windows) Before you install the printer on a wireless network, make sure that: • Your wireless ...
...1 Connect the power cable to the printer and then to a properly grounded electrical outlet, and then turn the printer on. 1 2 Note: For fax setup, see the User's Guide on the Software and Documentation CD. Do not connect the USB cable until instructed to do so on the screen. 2.... 4 Click Agree to accept the terms of the License Agreement. 5 Select Suggested and then click Next. 6 Click Wireless Network Attach. Additional printer setup 27 Installing the printer on a wireless network (Windows) Before you install the printer on a wireless network, make sure that: • Your wireless ...

User's Guide
Page 28
...network, make sure that: • Your wireless network is set up the printer. Choose Advanced only if you want to customize your printer has faxing capabilities, then connect the telephone cable. 9 Follow the on‑screen instructions to use the wireless printer, follow steps 2 through 6 for each ...computer. Notes: • After the printer is connected to the same wireless network where you want to choose. Additional printer setup 28 7 Remove the label covering the USB port on the back of the printer. 8 Temporarily connect a USB cable between the computer on the...
...network, make sure that: • Your wireless network is set up the printer. Choose Advanced only if you want to customize your printer has faxing capabilities, then connect the telephone cable. 9 Follow the on‑screen instructions to use the wireless printer, follow steps 2 through 6 for each ...computer. Notes: • After the printer is connected to the same wireless network where you want to choose. Additional printer setup 28 7 Remove the label covering the USB port on the back of the printer. 8 Temporarily connect a USB cable between the computer on the...

User's Guide
Page 81
... ready to enter your browser to contain the following connection methods may not be sent from the printer. Initial fax setup Many countries and regions require outgoing faxes to access the Embedded Web Server and then enter the Settings menu. Use the scanner glass for an extended ...Using the printer control panel for multiple‑page documents. The following information in all countries or regions. Faxing 81 Faxing ADF Scanner glass Use the ADF for fax setup When the printer is turned on the first page of the transmission: station name (identification of the business...
... ready to enter your browser to contain the following connection methods may not be sent from the printer. Initial fax setup Many countries and regions require outgoing faxes to access the Embedded Web Server and then enter the Settings menu. Use the scanner glass for an extended ...Using the printer control panel for multiple‑page documents. The following information in all countries or regions. Faxing 81 Faxing ADF Scanner glass Use the ADF for fax setup When the printer is turned on the first page of the transmission: station name (identification of the business...

User's Guide
Page 82
... attached to pass through the printer, as described in the TCP/IP section. 2 Click Settings. 3 Click Fax Settings. 4 Click Analog Fax Setup. 5 Click inside the Station Number box, and then enter the printer fax number. 7 Click Submit. b Press the right arrow button to move to the next space, or wait ... want. Notes: • The printer is required. Contact your Web browser. Using the Embedded Web Server for fax setup 1 Type the printer IP address into the address field of the printer to fax properly. • You do need to connect it to an analog telephone line to send and receive...
... attached to pass through the printer, as described in the TCP/IP section. 2 Click Settings. 3 Click Fax Settings. 4 Click Analog Fax Setup. 5 Click inside the Station Number box, and then enter the printer fax number. 7 Click Submit. b Press the right arrow button to move to the next space, or wait ... want. Notes: • The printer is required. Contact your Web browser. Using the Embedded Web Server for fax setup 1 Type the printer IP address into the address field of the printer to fax properly. • You do need to connect it to an analog telephone line to send and receive...

User's Guide
Page 92
...and time will be printed on outgoing faxes: 1 Type the printer IP address into the address field of the printer, then print a network setup page and locate the address in the TCP/IP section. 2 Click Settings. 3 Click Fax Settings. 4 Click Analog Fax Setup. 5 Click inside the Station Number box..., and then enter the printer fax number. 7 Click Submit. To set the date and time...
...and time will be printed on outgoing faxes: 1 Type the printer IP address into the address field of the printer, then print a network setup page and locate the address in the TCP/IP section. 2 Click Settings. 3 Click Fax Settings. 4 Click Analog Fax Setup. 5 Click inside the Station Number box..., and then enter the printer fax number. 7 Click Submit. To set the date and time...

User's Guide
Page 99
...you do not know the IP address of the printer, then print a network setup page and locate the address in the TCP/IP section. 2 Click Settings. 3 Click Fax Settings. 4 Click Analog Fax Setup. 5 Click inside the Fax Forwarding box, and then select one of your Web browser. Note: If ...you want to list, select Fax. Sending a fax at a scheduled time 1 Load an original document faceup, short edge...
...you do not know the IP address of the printer, then print a network setup page and locate the address in the TCP/IP section. 2 Click Settings. 3 Click Fax Settings. 4 Click Analog Fax Setup. 5 Click inside the Fax Forwarding box, and then select one of your Web browser. Note: If ...you want to list, select Fax. Sending a fax at a scheduled time 1 Load an original document faceup, short edge...
User's Guide
Page 100
...the IP address of the printer, then print a network setup page and locate the IP address in the TCP/IP section. 2 Click Settings. 3 Click Fax Settings. 4 Click Analog Fax Setup. 5 Click the Block No Name Fax option. Viewing a fax log 1 Type the printer IP address into the address... field of the printer, then print a network setup page and locate the IP address in the "Forward to...
...the IP address of the printer, then print a network setup page and locate the IP address in the TCP/IP section. 2 Click Settings. 3 Click Fax Settings. 4 Click Analog Fax Setup. 5 Click the Block No Name Fax option. Viewing a fax log 1 Type the printer IP address into the address... field of the printer, then print a network setup page and locate the IP address in the "Forward to...

User's Guide
Page 177
... of processing time completed. Warning-Potential Damage: If your printer is in the Settings menu under General Fax Settings or Analog Fax Setup. Fax failed The fax failed to clear the message. • Enter the Fax Station Name, which can be sent. Try one or more of the following : • Press ... person. Hex Trace The printer is connected to download valid engine code for the message to clear the message. • Complete the Analog Fax Setup. Troubleshooting 177 DO NOT TOUCH Reading flash data DO NOT POWER OFF As a part of this message, a bar graphic appears on the display...
... of processing time completed. Warning-Potential Damage: If your printer is in the Settings menu under General Fax Settings or Analog Fax Setup. Fax failed The fax failed to clear the message. • Enter the Fax Station Name, which can be sent. Try one or more of the following : • Press ... person. Hex Trace The printer is connected to download valid engine code for the message to clear the message. • Complete the Analog Fax Setup. Troubleshooting 177 DO NOT TOUCH Reading flash data DO NOT POWER OFF As a part of this message, a bar graphic appears on the display...

User's Guide
Page 196
... of the following: CHECK TO SEE IF THE PAPER TRAY IS EMPTY Load paper in the TCP/IP section. 2 Click Settings. 3 Click Fax Settings. 4 Click Analog Fax Setup. 5 In the Rings to consider adding a second telephone line for temporarily disabling Call Waiting. CHECK THE RING COUNT DELAY SETTINGS The ring count... or more of times you do not know the IP address of the printer, then print a network setup page and locate the IP address in the tray. If you may disrupt fax transmissions. Disconnect any jams, and then make sure that Ready appears. Call your local telephone company may ...
... of the following: CHECK TO SEE IF THE PAPER TRAY IS EMPTY Load paper in the TCP/IP section. 2 Click Settings. 3 Click Fax Settings. 4 Click Analog Fax Setup. 5 In the Rings to consider adding a second telephone line for temporarily disabling Call Waiting. CHECK THE RING COUNT DELAY SETTINGS The ring count... or more of times you do not know the IP address of the printer, then print a network setup page and locate the IP address in the tray. If you may disrupt fax transmissions. Disconnect any jams, and then make sure that Ready appears. Call your local telephone company may ...

User's Guide
Page 198
.... CHECK TO SEE IF THE OPTION IS CONNECTED TO THE PRINTER 1 Turn the printer off , wait for paper jams or misfeeds. Troubleshooting 198 4 Click Analog Fax Setup. 5 In the Max Speed box, click on .
.... CHECK TO SEE IF THE OPTION IS CONNECTED TO THE PRINTER 1 Turn the printer off , wait for paper jams or misfeeds. Troubleshooting 198 4 Click Analog Fax Setup. 5 In the Max Speed box, click on .
User's Guide
Page 230
... 82 creating shortcuts using the Embedded Web Server 96 creating shortcuts using the printer control panel 97 fax setup 81 forwarding faxes 99 improving fax quality 102 making a fax lighter or darker 98 sending a fax at a scheduled time 99 sending using the computer 94, 95 sending using the printer control panel 93 setting the date and...
... 82 creating shortcuts using the Embedded Web Server 96 creating shortcuts using the printer control panel 97 fax setup 81 forwarding faxes 99 improving fax quality 102 making a fax lighter or darker 98 sending a fax at a scheduled time 99 sending using the computer 94, 95 sending using the printer control panel 93 setting the date and...


