
Lexmark X264dn Support Question
Lexmark X264dn Support Question
Find answers below for this question about Lexmark X264dn.Need a Lexmark X264dn manual? We have 8 online manuals for this item!
Question posted by dseitz on February 16th, 2012
Is The Photoconductor Concidered The Toner Cart?
IS THE PHOTOCONDUCTOR CONCIDERED THE TONER CART?
Current Answers
Answer #1: Posted by LexmarkListens on February 20th, 2012 9:03 AM
LexmarkListens

Member since:
July 1st, 2011 Points: 1,410,540

Member since:
July 1st, 2011 Points: 1,410,540
The PC kit is the photoconductor unit, this is where image is being projected before it uses the toner to transfer and print the image.
For further assistance please contact Lexmark Technical Support or you may send us an email, address is provided just below our signature.
Lexmark Listens
Phone:
USA: 1-800-539-6275
Canada: (877) 856-5540
UK: 0800 121 4726
South Africa: 0800 981 435
Answer #2: Posted by BusterDoogen on February 17th, 2012 4:26 PM
BusterDoogen

Member since:
October 30th, 2011 Points: 28,565,407
Member since:
October 30th, 2011 Points: 28,565,407
Yes,
Press the button on the base of the photoconductor kit. Pull the toner cartridge up and out using the ... cartridge side to side and front to back several times to distribute toner. Insert the toner cartridge into the photoconductor kit by aligning the rollers on the toner cartridge with the tracks. Push the toner cartridge until it clicks into place
Related Lexmark X264dn Manual Pages
Wireless Setup Guide - Page 6
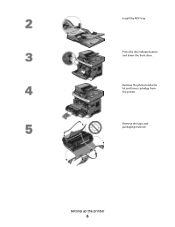
Press the door release button and lower the front door. Remove the photoconductor kit and toner cartridge from the printer. Remove the tape and packaging material.
Setting up the printer
6
Install the ADF tray.
Wireless Setup Guide - Page 7
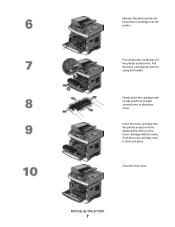
... rollers on the base of the photoconductor kit.
Reinsert the photoconductor kit and toner cartridge into place. Pull the toner cartridge up the printer
7
Setting up and out using the handle. Firmly shake the cartridge side to side and front to back several times to distribute toner. Push the toner cartridge until it clicks into the...
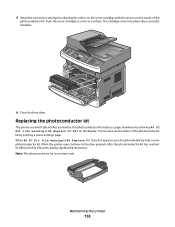
User's Guide - Page 150
... may result from using supplies or replacement items not produced by the manufacturer of the photoconductor kit by the manufacturer of life.
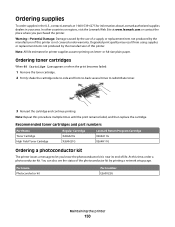
Ordering toner cartridges
When 88 Cartridge Low appears or when the print becomes faded:
1 Remove the toner cartridge. 2 Firmly shake the cartridge side-to-side and front-to-back several times...
User's Guide - Page 152
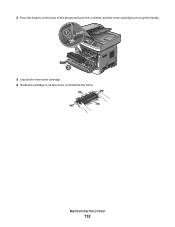
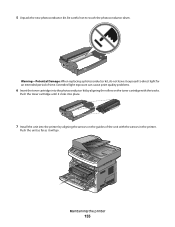
2 Press the button on the base of the photoconductor kit, and then pull the toner cartridge out using the handle.
1 2
3 Unpack the new toner cartridge. 4 Shake the cartridge in all directions to distribute the toner. Maintaining the printer
152
User's Guide - Page 153
... the front door. While the printer may continue to function properly after the photoconductor kit has reached its official end-of the photoconductor kit by printing a menu settings page. Maintaining the printer
153 5 Install the new toner cartridge by aligning the rollers on the toner cartridge with the arrows on the display. Note: The...
User's Guide - Page 154
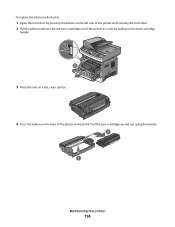
... front door by pressing the button on the left side of the printer and lowering the front door. 2 Pull the photoconductor kit and toner cartridge out of the printer as a unit by pulling on the toner cartridge
handle.
1
2 3
3 Place the unit on a flat, clean surface.
4 Press the button on the base of the...
User's Guide - Page 155
... into the printer by aligning the rollers on the guides of time.
Push the toner cartridge until it will go.
5 Unpack the new photoconductor kit. Be careful not to direct light for an extended period of the unit with the tracks. Maintaining the printer
155
Push the unit as ...
User's Guide - Page 158
... menu is possible to see tray settings, the level of toner in the toner cartridge, the percentage of life remaining in the photoconductor kit, and capacity measurements of the printer, then print a... can safeguard entry to menus by creating passwords and choosing specific menus to protect.
To access the device status:
1 Type the printer IP address in the TCP/IP section.
2 Click Settings. 3...
User's Guide - Page 161
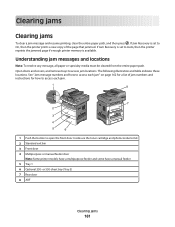
... front door. Clearing jams
Clearing jams
To clear a jam message and resume printing, clear the entire paper path, and then press .
Inside are the toner cartridge and photoconductor kit. 2 Standard exit bin 3 Front door 4 Multipurpose or manual feeder door
Note: Some printer models have a multipurpose feeder and some have a manual feeder 5 Tray...
User's Guide - Page 163
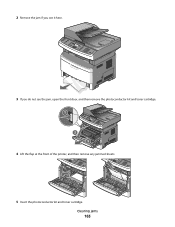
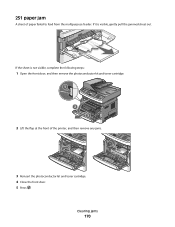
Clearing jams
163 2 Remove the jam if you see it here.
3 If you do not see the jam, open the front door, and then remove the photoconductor kit and toner cartridge.
1
2 3
4 Lift the flap at the front of the printer, and then remove any jammed sheets.
5 Insert the photoconductor kit and toner cartridge.
User's Guide - Page 164
... of injury from a hot component, allow the surface to cool before removing paper from this area.
1 Open the front door, and then remove the photoconductor kit and toner cartridge.
1
2 3
2 Lift the flap in front of the printer near the fuser may be hot. Clearing jams
164
6 Close the front door. 7 Press .
202...
User's Guide - Page 165
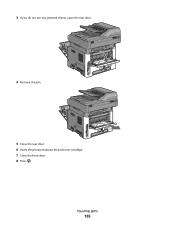
3 If you do not see any jammed sheets, open the rear door.
4 Remove the jam.
5 Close the rear door. 6 Insert the photoconductor kit and toner cartridge. 7 Close the front door. 8 Press . Clearing jams
165
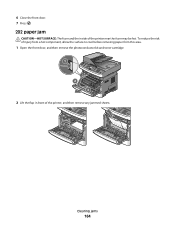
User's Guide - Page 170
Clearing jams
170 If it is not visible, complete the following steps:
1 Open the front door, and then remove the photoconductor kit and toner cartridge.
1
2 3
2 Lift the flap at the front of paper failed to feed from the multipurpose feeder. 251 paper jam
A sheet of the printer, and then ...
User's Guide - Page 207
... THE PAPER PATH
Contact Customer Support.
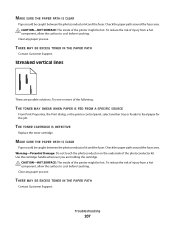
MAKE SURE THE PAPER PATH IS CLEAR
Paper could be caught between the photoconductor kit and the fuser.
To reduce the risk of the following:
THE TONER MAY SMEAR WHEN PAPER IS FED FROM A SPECIFIC SOURCE
From Print Properties, the Print dialog, or the printer control...
User's Guide - Page 231
... current print job to make copies 76, 192 PCL Emul menu 141 PDF menu 141 photoconductor kit ordering 150 replacing 153 photos copying 70 PostScript menu 141 Power Saver 178 adjusting 37...solid white streaks 208 streaked horizontal lines 206 streaked vertical lines 207 toner fog or background
shading 205 toner rubs off 205 toner specks 206 print quality, poor avoiding by selecting paper and
specialty...
User's Guide - Page 232
...179
Scanner ADF Cover Open 179 Scanner Jam Access Cover
Open 179 Toner is low 179 Unsupported USB device, please
remove 179 Unsupported USB hub, please
remove 180 USB/USB...Index
232
Remove packaging material, check 179 Remove paper from standard output bin 179 replacing
photoconductor kit 153 toner cartridge 151 reports viewing 158 Reports menu 116 resolution, fax changing 99
S
safeguarding menus...
User's Guide - Page 233
...recycled paper 35 supplies, ordering ADF pick assembly 151 ADF separator roll 151 photoconductor kit 150 toner cartridges 150 supply notifications configuring 159
T
TCP/IP menu 119 telecommunication notices ... 208 streaked horizontal lines 206 streaked vertical lines 207 toner fog or background
shading 205 toner rubs off 205 toner specks 206 troubleshooting, printer options drawers 198 flash memory...
Service Manual - Page 25
...-XXX
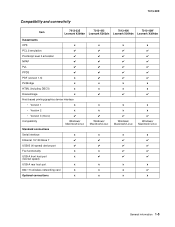
Compatibility and connectivity
Item
7013-235
7013-432
7013-436
7013-43W
Lexmark X264dn Lexmark X363dn Lexmark X364dn Lexmark X364dw
Datastreams
XPS
x
x
x
x
PCL 6 ...
x
x
x
x
Ethernet 10/100 Base T
✔
✔
✔
✔
USB-B (hi-speed) device port
✔
✔
✔
✔
Fax functionality
USB-A front host port (low/full speed)
x
x
...
Service Manual - Page 26
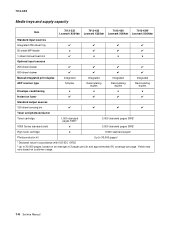
...
Item
7013-235
7013-432
7013-436
7013-43W
Lexmark X264dn Lexmark X363dn Lexmark X364dn Lexmark X364dw
Standard input sources Integrated 250...;
✔
✔
Standard output sources
150-sheet sensing bin
✔
✔
✔
✔
Toner and photoconductor
Toner cartridge X360 Series standard yield
1,500 standard pages SWE¹
x
3,000 standard pages SWE¹ 3,500 ...
Service Manual - Page 33
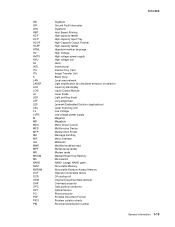
... Device Multifunction Printer Message handling Motor interface Millimeter Modified modified read Multipurpose feeder Modem ready Masked Read Only Memory Microswitch NAND (usage: NAND gate) Nonvolatile Memory Nonvolatile Random Access Memory Operator correctable failure Oil coating roll Original Equipment Manufacturer Overhead projector Optical photo conductor Optical Sensor Photoconductor...
Similar Questions

How To Replace Toner Cartridge In Lexmark X264dn Printer
(Posted by krenrosa 10 years ago)
How To Reset Photoconductor Counter For Lexmark X264dn
(Posted by Brandartis 10 years ago)


I Have An Scanner Feilure 844.02. How To Solve This?
My lexmark X264dn show me that messege, and have no idea what to do
My lexmark X264dn show me that messege, and have no idea what to do
(Posted by haizpuruab 11 years ago)