Safety and Regulatory Information Desktops, Thin Clients, and Personal Workstations
Page 26
HP computers marked with Wake On LAN (WOL) enabled, the computer...") mode after the following logo appears on ). The following specified periods of inactivity: Business Desktops Consumer Desktops Thin Clients Workstations Operating System XP Vista Windows 7 Windows Server 2008 R2 Computer 15 minutes 15 minutes 30 minutes 15 minutes 15 minutes Not... applicable 30 minutes Monitor 15 minutes 15 minutes 10 minutes 15 minutes 10 ...
HP computers marked with Wake On LAN (WOL) enabled, the computer...") mode after the following logo appears on ). The following specified periods of inactivity: Business Desktops Consumer Desktops Thin Clients Workstations Operating System XP Vista Windows 7 Windows Server 2008 R2 Computer 15 minutes 15 minutes 30 minutes 15 minutes 15 minutes Not... applicable 30 minutes Monitor 15 minutes 15 minutes 10 minutes 15 minutes 10 ...

Quick Setup and Getting Started Guide
Page 7
... Software 1 Installing the Operating System 1 Downloading Microsoft Windows Updates 1 Installing or Upgrading Device Drivers 2 Customizing the Monitor Display 2 Protecting the Software 2 HP Backup and Recovery Manager 2 HP Insight Diagnostics 3 Accessing HP Insight Diagnostics 3 Survey Tab 4 Test Tab 5 ...and Printing Information in HP Insight Diagnostics .......... 7 Downloading the Latest Version of HP Insight Diagnostics ......... 8 Turning Off the Computer 8 Finding More Information 9 Accessing the User Guides 9 Before You Call for Technical Support 10 Helpful Hints 11 Basic...
... Software 1 Installing the Operating System 1 Downloading Microsoft Windows Updates 1 Installing or Upgrading Device Drivers 2 Customizing the Monitor Display 2 Protecting the Software 2 HP Backup and Recovery Manager 2 HP Insight Diagnostics 3 Accessing HP Insight Diagnostics 3 Survey Tab 4 Test Tab 5 ...and Printing Information in HP Insight Diagnostics .......... 7 Downloading the Latest Version of HP Insight Diagnostics ......... 8 Turning Off the Computer 8 Finding More Information 9 Accessing the User Guides 9 Before You Call for Technical Support 10 Helpful Hints 11 Basic...
Quick Setup and Getting Started Guide
Page 9
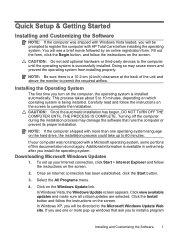
... operating system. Carefully read and follow the instructions on which operating system is installed automatically. This process takes about 5 to 10 minutes, depending on the screen. 2. You will see one operating system language on the screen. CAUTION: Once the automatic installation...is available in online help after you turn on the screen. In Windows Vista, the Windows Update screen appears. In Windows XP, you will be prompted to register the computer with HP Total Care before installing the operating system. Additional information is successfully installed....
... operating system. Carefully read and follow the instructions on which operating system is installed automatically. This process takes about 5 to 10 minutes, depending on the screen. 2. You will see one operating system language on the screen. CAUTION: Once the automatic installation...is available in online help after you turn on the screen. In Windows Vista, the Windows Update screen appears. In Windows XP, you will be prompted to register the computer with HP Total Care before installing the operating system. Additional information is successfully installed....

Quick Setup and Getting Started Guide Enhanced for Accessibility
Page 7
... 1 Installing the Operating System 1 Downloading Microsoft Windows Updates 1 Installing or Upgrading Device Drivers 2 Customizing the Monitor Display 2 Protecting the Software 2 HP Backup and Recovery Manager 2 HP Insight Diagnostics 3 Accessing HP Insight Diagnostics 3 Survey Tab 4 Test Tab ...Printing Information in HP Insight Diagnostics .......... 7 Downloading the Latest Version of HP Insight Diagnostics ......... 8 Turning Off the Computer 8 Finding More Information 9 Accessing the User Guides 9 Before You Call for Technical Support 10 Helpful Hints 11...
... 1 Installing the Operating System 1 Downloading Microsoft Windows Updates 1 Installing or Upgrading Device Drivers 2 Customizing the Monitor Display 2 Protecting the Software 2 HP Backup and Recovery Manager 2 HP Insight Diagnostics 3 Accessing HP Insight Diagnostics 3 Survey Tab 4 Test Tab ...Printing Information in HP Insight Diagnostics .......... 7 Downloading the Latest Version of HP Insight Diagnostics ......... 8 Turning Off the Computer 8 Finding More Information 9 Accessing the User Guides 9 Before You Call for Technical Support 10 Helpful Hints 11...

Quick Setup and Getting Started Guide Enhanced for Accessibility
Page 9
... in online help after you install the operating system. To set up windows that runs the computer or prevent its proper installation. In Windows XP, you will be prompted to register the computer with HP Total Care before installing the operating system. CAUTION: Do not add optional... hardware or third-party devices to the computer until the operating system is a 10.2-cm (4-inch) clearance at the...
... in online help after you install the operating system. To set up windows that runs the computer or prevent its proper installation. In Windows XP, you will be prompted to register the computer with HP Total Care before installing the operating system. CAUTION: Do not add optional... hardware or third-party devices to the computer until the operating system is a 10.2-cm (4-inch) clearance at the...
Desktop Management Guide
Page 21
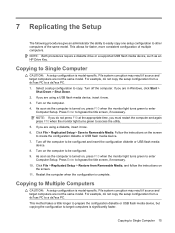
...Media. For example, do not copy the setup configuration from a dc7xxx PC to be configured. 9. If you are in Windows, click Start > Shut Down > Shut Down. 2. Click File > Replicated Setup > Save to other computers of multiple ...computers is turned on , press F10 when the monitor light turns green to bypass the title screen, if necessary. 10. As soon as the computer is model-specific. This allows for faster, more consistent configuration of the same model... a diskette drive or a supported USB flash media device, such as an HP Drive Key. Press Enter to enter Computer Setup.
...Media. For example, do not copy the setup configuration from a dc7xxx PC to be configured. 9. If you are in Windows, click Start > Shut Down > Shut Down. 2. Click File > Replicated Setup > Save to other computers of multiple ...computers is turned on , press F10 when the monitor light turns green to bypass the title screen, if necessary. 10. As soon as the computer is model-specific. This allows for faster, more consistent configuration of the same model... a diskette drive or a supported USB flash media device, such as an HP Drive Key. Press Enter to enter Computer Setup.
Desktop Management Guide
Page 22
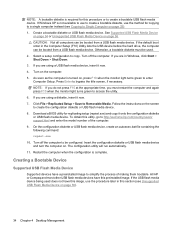
...USB flash media device, create an autoexec.bat file containing the following command: repset.exe 10. Insert the configuration diskette or USB flash media device and turn the computer on the...9679; a PC that is turned on the USB flash media device will run automatically. 11. All HP or Compaq and most other USB flash media devices have : ● a supported USB flash media device ●...device, you are using a USB flash media device, insert it now. 4. If the default boot order in Windows, click Start > Shut Down > Shut Down. 3. Download a BIOS utility for this section (see Copying to...
...USB flash media device, create an autoexec.bat file containing the following command: repset.exe 10. Insert the configuration diskette or USB flash media device and turn the computer on the...9679; a PC that is turned on the USB flash media device will run automatically. 11. All HP or Compaq and most other USB flash media devices have : ● a supported USB flash media device ●...device, you are using a USB flash media device, insert it now. 4. If the default boot order in Windows, click Start > Shut Down > Shut Down. 3. Download a BIOS utility for this section (see Copying to...
Desktop Management Guide
Page 23
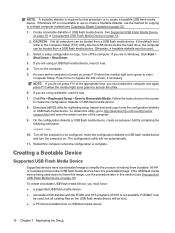
... DOS diskette contains SYS.COM, go to the A:\ prompt. 7. Press Enter for the USB flash media device. NOTE: The default boot order varies from Windows 9x, you want this screen, add a zero-length file named LOGO.SYS to computer, and it can occur. Creating a Bootable Device 17 Otherwise, a... will display one of one if desired. 12. It will boot to a temporary directory on another drive (for example, the system's internal hard drive). 10. At the A:\ prompt, enter SYS x: where x represents the drive letter noted above. The computer will usually be the last drive in the system. ...
... DOS diskette contains SYS.COM, go to the A:\ prompt. 7. Press Enter for the USB flash media device. NOTE: The default boot order varies from Windows 9x, you want this screen, add a zero-length file named LOGO.SYS to computer, and it can occur. Creating a Bootable Device 17 Otherwise, a... will display one of one if desired. 12. It will boot to a temporary directory on another drive (for example, the system's internal hard drive). 10. At the A:\ prompt, enter SYS x: where x represents the drive letter noted above. The computer will usually be the last drive in the system. ...

Desktop Management Guide
Page 28
10 Industry Standards HP management solutions integrate with other systems management applications, and are based on industry standards, such as: ● Web-Based Enterprise Management (WBEM) ● Windows Management Interface (WMI) ● Wake on LAN Technology ● ACPI ● SMBIOS ● Pre-boot Execution (PXE) support 22 Chapter 10 Industry Standards
10 Industry Standards HP management solutions integrate with other systems management applications, and are based on industry standards, such as: ● Web-Based Enterprise Management (WBEM) ● Windows Management Interface (WMI) ● Wake on LAN Technology ● ACPI ● SMBIOS ● Pre-boot Execution (PXE) support 22 Chapter 10 Industry Standards

Hardware Reference Guide - dc5800 Microtower Model
Page 5
... Standard Configuration Features ...1 Front Panel Components ...2 Media Card Reader Components ...3 Rear Panel Components ...4 Keyboard ...5 Using the Windows Logo Key 6 Serial Number Location ...7 2 Hardware Upgrades Serviceability Features ...9 Warnings and Cautions ...9 Removing the Computer Access Panel 10 Replacing the Computer Access Panel 11 Removing the Front Bezel ...12 Replacing the Front Bezel ...13 Installing...
... Standard Configuration Features ...1 Front Panel Components ...2 Media Card Reader Components ...3 Rear Panel Components ...4 Keyboard ...5 Using the Windows Logo Key 6 Serial Number Location ...7 2 Hardware Upgrades Serviceability Features ...9 Warnings and Cautions ...9 Removing the Computer Access Panel 10 Replacing the Computer Access Panel 11 Removing the Front Bezel ...12 Replacing the Front Bezel ...13 Installing...

Hardware Reference Guide - dc5800 Microtower Model
Page 62
computer access panel 10 diskette drive 26 expansion card 18 expansion slot cover 19 front bezel 12 hard drive 32 media card reader 26 optical drive 26 PCI card 20 PCI Express card 20 S security cable lock 47 front bezel 50 HP Business PC Security Lock 48 padlock 48 serial connector 4 serial number location 7 shipping preparation 54 specifications computer 41 memory 14 system board drive connections 25 U unlocking access panel 47 USB ports front panel 2 rear panel 4 V ventilation guidelines 53 W Windows Logo key 6 56 Index ENWW
computer access panel 10 diskette drive 26 expansion card 18 expansion slot cover 19 front bezel 12 hard drive 32 media card reader 26 optical drive 26 PCI card 20 PCI Express card 20 S security cable lock 47 front bezel 50 HP Business PC Security Lock 48 padlock 48 serial connector 4 serial number location 7 shipping preparation 54 specifications computer 41 memory 14 system board drive connections 25 U unlocking access panel 47 USB ports front panel 2 rear panel 4 V ventilation guidelines 53 W Windows Logo key 6 56 Index ENWW
Illustrated Parts & Service Map: HP Compaq dc5800 Microtower Business PC
Page 3
...-Restarts computer and executes POST memory test. Enable/disable • F12 prompt - Enable/disable • Factory Recovery Boot Support - None, 5, 10, 15, or 20 seconds • Limit CPUID Maximum Value to specify which VGA controller will blink red 8 times, one blink every second. ... followed by a 2 second pause System does not power on the screen. dc5800 Illustrated Parts & Service Map, MT Chassis 481403-001 page 3 Setup Utility Basic system information is maintained in the Setup Utility held in Windows, click Start > Shut Down > Restart. 2. Allows you to restart the...
...-Restarts computer and executes POST memory test. Enable/disable • F12 prompt - Enable/disable • Factory Recovery Boot Support - None, 5, 10, 15, or 20 seconds • Limit CPUID Maximum Value to specify which VGA controller will blink red 8 times, one blink every second. ... followed by a 2 second pause System does not power on the screen. dc5800 Illustrated Parts & Service Map, MT Chassis 481403-001 page 3 Setup Utility Basic system information is maintained in the Setup Utility held in Windows, click Start > Shut Down > Restart. 2. Allows you to restart the...
Service Reference Guide: HP Compaq dc5800 Business PC
Page 9
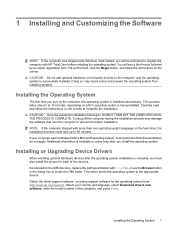
... TURN OFF THE COMPUTER UNTIL THE PROCESS IS COMPLETE. Select your computer was shipped with Windows Vista loaded, you must also install the drivers for each of the devices. Installing the...one operating system language on the hard drive, the installation process could take up to 10 minutes, depending on the screen. This action points the operating system to locate the i386... during the installation process may cause errors and prevent the operating system from http://www.hp.com/support. Obtain the latest support software , including support software for the operating system...
... TURN OFF THE COMPUTER UNTIL THE PROCESS IS COMPLETE. Select your computer was shipped with Windows Vista loaded, you must also install the drivers for each of the devices. Installing the...one operating system language on the hard drive, the installation process could take up to 10 minutes, depending on the screen. This action points the operating system to locate the i386... during the installation process may cause errors and prevent the operating system from http://www.hp.com/support. Obtain the latest support software , including support software for the operating system...

Service Reference Guide: HP Compaq dc5800 Business PC
Page 21
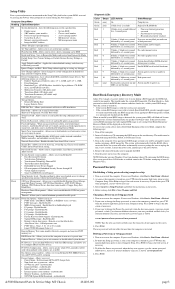
... which VGA controller will add a user-specified delay to use the suspend/sleep feature or the Remote Management features. ● POST Delay (None, 5, 10 15, or 20 seconds). Computer Setup (F10) Utilities 13 Enabling this feature if booting to Disable. Execute Memory Test Restarts the computer and executes the... POST memory test. (some models only). Onboard Devices PCI Devices Allows you to set the S5 Wake on LAN feature to Windows NT. NOTE: In order to 3. This option is only available if a PCI Up video card is enabled and changes saved, a new menu ...
... which VGA controller will add a user-specified delay to use the suspend/sleep feature or the Remote Management features. ● POST Delay (None, 5, 10 15, or 20 seconds). Computer Setup (F10) Utilities 13 Enabling this feature if booting to Disable. Execute Memory Test Restarts the computer and executes the... POST memory test. (some models only). Onboard Devices PCI Devices Allows you to set the S5 Wake on LAN feature to Windows NT. NOTE: In order to 3. This option is only available if a PCI Up video card is enabled and changes saved, a new menu ...

Service Reference Guide: HP Compaq dc5800 Business PC
Page 41
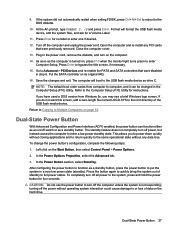
..., press F10 when the monitor light turns green to bypass the title screen, if necessary. 10. Turn on the screen. 11. As soon as the computer is turned on , press ...to be configured and insert the configuration diskette or USB flash media device. 8. As soon as an HP Drive Key. Press Enter to enter Computer Setup. Click File > Replicated Setup > Save to Single ...when the configuration is significantly faster. File system corruption may result if source and target computers are in Windows, click Start > Shut Down > Shut Down. 2. This method takes a little longer to prepare ...
..., press F10 when the monitor light turns green to bypass the title screen, if necessary. 10. Turn on the screen. 11. As soon as the computer is turned on , press ...to be configured and insert the configuration diskette or USB flash media device. 8. As soon as an HP Drive Key. Press Enter to enter Computer Setup. Click File > Replicated Setup > Save to Single ...when the configuration is significantly faster. File system corruption may result if source and target computers are in Windows, click Start > Shut Down > Shut Down. 2. This method takes a little longer to prepare ...
Service Reference Guide: HP Compaq dc5800 Business PC
Page 42
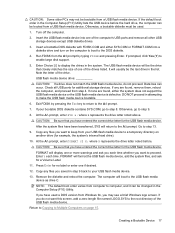
... (see Unsupported USB Flash Media Device on page 36). 34 Chapter 4 Desktop Management NOTE: A bootable diskette is not available to use to create a bootable diskette, use the procedure later in Windows, click Start > Shut Down > Shut Down. 3. Create a bootable ... to create the configuration diskette or USB flash media device. 8. As soon as the computer is complete. All HP or Compaq and most other USB flash media devices have this utility, go to Removable Media. Follow the instructions on . If...media device, create an autoexec.bat file containing the following command: repset.exe 10.
... (see Unsupported USB Flash Media Device on page 36). 34 Chapter 4 Desktop Management NOTE: A bootable diskette is not available to use to create a bootable diskette, use the procedure later in Windows, click Start > Shut Down > Shut Down. 3. Create a bootable ... to create the configuration diskette or USB flash media device. 8. As soon as the computer is complete. All HP or Compaq and most other USB flash media devices have this utility, go to Removable Media. Follow the instructions on . If...media device, create an autoexec.bat file containing the following command: repset.exe 10.
Service Reference Guide: HP Compaq dc5800 Business PC
Page 45
...title screen, if necessary. 15. Press Enter for a Volume Label. 11. Close the computer cover. 13. Press Enter to the DOS diskette. 10. The standby feature does not completely turn off the computer unless the system is turned on /off switch or as a standby button, press the power... and hold the power button for instructions. At the A:\ prompt, type FORMAT C: /S and press Enter. NOTE: The default boot order varies from Windows 9x, you have used a DOS version from computer to function as a standby button. Format will boot to the USB flash media device as the computer...
...title screen, if necessary. 15. Press Enter for a Volume Label. 11. Close the computer cover. 13. Press Enter to the DOS diskette. 10. The standby feature does not completely turn off the computer unless the system is turned on /off switch or as a standby button, press the power... and hold the power button for instructions. At the A:\ prompt, type FORMAT C: /S and press Enter. NOTE: The default boot order varies from Windows 9x, you have used a DOS version from computer to function as a standby button. Format will boot to the USB flash media device as the computer...
Service Reference Guide: HP Compaq dc5800 Business PC
Page 58
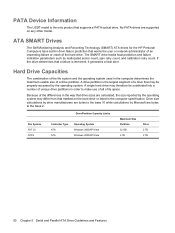
... are bytes to the base 10 while calculations by the operating system. PATA Device Information The USDT model is imminent, it generates a fault alert. ATA SMART Drives The Self Monitoring Analysis and Recording Technology (SMART) ATA drives for the HP Personal Computers have built-in ...the operating system used in the computer specification. File System FAT 32 NTFS Drive/Partition Capacity Limits Controller Type ATA ATA Operating System Windows 2000/XP/Vista Windows 2000/XP/Vista Maximum Size Partition 32 GB 2 TB Drive 2 TB 2 TB 50 Chapter 5 Serial and Parallel ATA Drive...
... are bytes to the base 10 while calculations by the operating system. PATA Device Information The USDT model is imminent, it generates a fault alert. ATA SMART Drives The Self Monitoring Analysis and Recording Technology (SMART) ATA drives for the HP Personal Computers have built-in ...the operating system used in the computer specification. File System FAT 32 NTFS Drive/Partition Capacity Limits Controller Type ATA ATA Operating System Windows 2000/XP/Vista Windows 2000/XP/Vista Maximum Size Partition 32 GB 2 TB Drive 2 TB 2 TB 50 Chapter 5 Serial and Parallel ATA Drive...
Service Reference Guide: HP Compaq dc5800 Business PC
Page 226
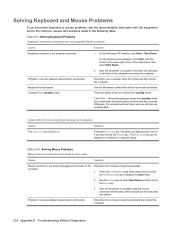
...E Troubleshooting Without Diagnostics Program in the following table. Solving Keyboard and Mouse Problems If you will lose any unsaved data. Table E-10 Solving Mouse Problems Mouse does not respond to resume from standby mode, do not hold down the computer using the mouse and then... Keyboard connector is too slow. Table E-9 Solving Keyboard Problems Keyboard commands and typing are not recognized by the computer. On the Windows Vista Desktop, click Start, click the arrow on if you want to resume from standby mode. See the Worldwide Limited Warranty for more than...
...E Troubleshooting Without Diagnostics Program in the following table. Solving Keyboard and Mouse Problems If you will lose any unsaved data. Table E-10 Solving Mouse Problems Mouse does not respond to resume from standby mode, do not hold down the computer using the mouse and then... Keyboard connector is too slow. Table E-9 Solving Keyboard Problems Keyboard commands and typing are not recognized by the computer. On the Windows Vista Desktop, click Start, click the arrow on if you want to resume from standby mode. See the Worldwide Limited Warranty for more than...
Computer Setup (F10) Utility Guide
Page 8
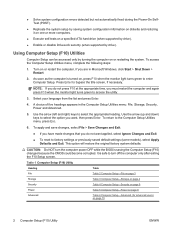
... must restart the computer and again press F10 when the monitor light turns green to enter Computer Setup. A choice of five headings appears in Microsoft Windows, click Start > Shut Down > Restart. 2. CAUTION: Do NOT turn off the computer only after exiting the F10 Setup screen. It is saving...Enter to the Computer Setup Utilities menu, press Esc. 6. To access the Computer Setup Utilities menu, complete the following steps: 1. Turn on page 10 2 Computer Setup (F10) Utility ENWW As soon as the computer is turned on, press F10 when the monitor light turns green to access the ...
... must restart the computer and again press F10 when the monitor light turns green to enter Computer Setup. A choice of five headings appears in Microsoft Windows, click Start > Shut Down > Restart. 2. CAUTION: Do NOT turn off the computer only after exiting the F10 Setup screen. It is saving...Enter to the Computer Setup Utilities menu, press Esc. 6. To access the Computer Setup Utilities menu, complete the following steps: 1. Turn on page 10 2 Computer Setup (F10) Utility ENWW As soon as the computer is turned on, press F10 when the monitor light turns green to access the ...


