Installing Microsoft Windows Vista on Selected HP Products
Page 3
... Editions Home Premium Business Clean Install Upgrade Upgrade Upgrade Upgrade Clean Install Clean Install Upgrade Clean Install Clean Install Clean Install Clean Install Ultimate Upgrade Upgrade Upgrade Upgrade Clean Install Clean Install Minimum Requirements ƒ 800MHz or better processor ƒ 512 MB of graphics memory, Pixel Shader 2.0,... support for DirectX 9, an available WDDM driver, 128 MB of system memory ƒ 15 GB free space on the HP Web site for Upgrade More information on Upgrades vs. Backup All User Data 4. Update Drivers and Utilities 3. Install ...
... Editions Home Premium Business Clean Install Upgrade Upgrade Upgrade Upgrade Clean Install Clean Install Upgrade Clean Install Clean Install Clean Install Clean Install Ultimate Upgrade Upgrade Upgrade Upgrade Clean Install Clean Install Minimum Requirements ƒ 800MHz or better processor ƒ 512 MB of graphics memory, Pixel Shader 2.0,... support for DirectX 9, an available WDDM driver, 128 MB of system memory ƒ 15 GB free space on the HP Web site for Upgrade More information on Upgrades vs. Backup All User Data 4. Update Drivers and Utilities 3. Install ...

Quick Setup and Getting Started Guide
Page 19
... computer to " instructions for resolving possible hardware or software problems; To force the computer off . includes information on RTC batteries, memory, and power supply. ● Computer Setup (F10) Utility Guide-Provides instructions on some models, you to restart the operating system...Guide-Provides an overview of the product hardware, as well as instructions for upgrading this tool to reconfigure or modify default settings for maintenance purposes or when installing new hardware devices. ● Desktop Management Guide-Provides definitions and "how to enter a low-power or "...
... computer to " instructions for resolving possible hardware or software problems; To force the computer off . includes information on RTC batteries, memory, and power supply. ● Computer Setup (F10) Utility Guide-Provides instructions on some models, you to restart the operating system...Guide-Provides an overview of the product hardware, as well as instructions for upgrading this tool to reconfigure or modify default settings for maintenance purposes or when installing new hardware devices. ● Desktop Management Guide-Provides definitions and "how to enter a low-power or "...
Quick Setup and Getting Started Guide
Page 27
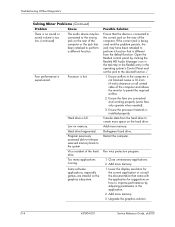
... or not turning. ENWW Basic Troubleshooting 19 Table 1 Solving General Problems (continued) Poor performance is plugged onto the system board header. 3. Upgrade the graphics solution. OR The heatsink is plugged in the application. 2. Open hood, press power button, and see if the processor fan... cooling fan is not spinning, then replace the heatsink/fan assembly. 4. Add more memory. Add more memory. 3. Restart the computer. If fan is not properly attached to free up memory. 2. Computer powered off automatically and the Power LED flashes Red two times, once every...
... or not turning. ENWW Basic Troubleshooting 19 Table 1 Solving General Problems (continued) Poor performance is plugged onto the system board header. 3. Upgrade the graphics solution. OR The heatsink is plugged in the application. 2. Open hood, press power button, and see if the processor fan... cooling fan is not spinning, then replace the heatsink/fan assembly. 4. Add more memory. Add more memory. 3. Restart the computer. If fan is not properly attached to free up memory. 2. Computer powered off automatically and the Power LED flashes Red two times, once every...
Quick Setup and Getting Started Guide
Page 30
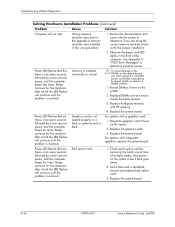
... Replace DIMMs one at a time to verify the proper installation. NOTE: DIMM 1 must always be installed. 3. Review the documentation that came with HP memory. 4. Replace the system board. Power on the system. 2. Power LED flashes Red six times, once every second, followed by a two second ... LEDs continue flashing.) Cause Solution Graphics card is not seated properly or is bad, or system board is bad. or memory modules were installed in the upgrade 1. Power LED flashes Red five times, once every second, followed by a two second pause, and the computer beeps ...
... Replace DIMMs one at a time to verify the proper installation. NOTE: DIMM 1 must always be installed. 3. Review the documentation that came with HP memory. 4. Replace the system board. Power on the system. 2. Power LED flashes Red six times, once every second, followed by a two second ... LEDs continue flashing.) Cause Solution Graphics card is not seated properly or is bad, or system board is bad. or memory modules were installed in the upgrade 1. Power LED flashes Red five times, once every second, followed by a two second pause, and the computer beeps ...
Desktop Management Guide
Page 20
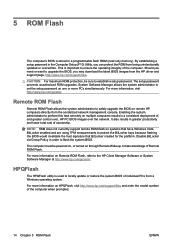
...SSM does not currently support remote ROM flash on HPQFlash, visit http://www.hp.com/support/files and enter the model number of ownership. Disable BitLocker via Group Policy in a programmable flash ROM (read only memory). For more PCs simultaneously. By establishing a setup password in the Computer...Vista BitLocker enabled and are using TPM measurements to the HP Client Manager Software or System Software Manager at http://www.hp.com/go /ssm. Remote ROM Flash Remote ROM Flash allows the system administrator to safely upgrade the BIOS on through Remote Wakeup, to establish a ...
...SSM does not currently support remote ROM flash on HPQFlash, visit http://www.hp.com/support/files and enter the model number of ownership. Disable BitLocker via Group Policy in a programmable flash ROM (read only memory). For more PCs simultaneously. By establishing a setup password in the Computer...Vista BitLocker enabled and are using TPM measurements to the HP Client Manager Software or System Software Manager at http://www.hp.com/go /ssm. Remote ROM Flash Remote ROM Flash allows the system administrator to safely upgrade the BIOS on through Remote Wakeup, to establish a ...

Hardware Reference Guide - dc5700 MT
Page 5
... Components ...2 Rear Panel Components ...3 Keyboard ...4 Using the Windows Logo Key 5 Special Mouse Functions ...6 Serial Number Location ...6 2 Hardware Upgrades Serviceability Features ...7 Warnings and Cautions ...7 Removing the Computer Access Panel 8 Replacing the Computer Access Panel 9 Removing the Front Bezel ...10... Replacing the Front Bezel ...11 Installing Additional Memory ...12 DIMMs ...12 DDR2-SDRAM DIMMs ...12 Populating DIMM Sockets 13 Installing DIMMs ...14 Removing or Installing an Expansion ...
... Components ...2 Rear Panel Components ...3 Keyboard ...4 Using the Windows Logo Key 5 Special Mouse Functions ...6 Serial Number Location ...6 2 Hardware Upgrades Serviceability Features ...7 Warnings and Cautions ...7 Removing the Computer Access Panel 8 Replacing the Computer Access Panel 9 Removing the Front Bezel ...10... Replacing the Front Bezel ...11 Installing Additional Memory ...12 DIMMs ...12 DDR2-SDRAM DIMMs ...12 Populating DIMM Sockets 13 Installing DIMMs ...14 Removing or Installing an Expansion ...

Hardware Reference Guide - dc5700 MT
Page 18
... Chapter 2 Hardware Upgrades ENWW DIMMs constructed with up to 4 GB of memory configured in a highperforming dual channel mode. DDR2-SDRAM DIMMs For proper system operation, the DDR2-SDRAM DIMMs must be populated with up to four industry-standard DIMMs. These memory sockets are not ...9679; DIMMs constructed with double data rate 2 synchronous dynamic random access memory (DDR2SDRAM) dual inline memory modules (DIMMs). Installing Additional Memory The computer comes with x8 and x16 DDR devices; DIMMs The memory sockets on the system board can populate the system board with x4 ...
... Chapter 2 Hardware Upgrades ENWW DIMMs constructed with up to 4 GB of memory configured in a highperforming dual channel mode. DDR2-SDRAM DIMMs For proper system operation, the DDR2-SDRAM DIMMs must be populated with up to four industry-standard DIMMs. These memory sockets are not ...9679; DIMMs constructed with double data rate 2 synchronous dynamic random access memory (DDR2SDRAM) dual inline memory modules (DIMMs). Installing Additional Memory The computer comes with x8 and x16 DDR devices; DIMMs The memory sockets on the system board can populate the system board with x4 ...

Hardware Reference Guide - dc5700 MT
Page 20
If you see an LED light on the system board, voltage is still present. When upgrading the memory, it is important to use memory modules with each other channel should be careful not to touch any of the power-on the system board. Remove all removable media, such as ... the power cord from the computer. 3. If you are discharged of the poweron state, voltage is always supplied to cool before touching. 14 Chapter 2 Hardware Upgrades ENWW Remove the computer access panel. 6. one channel should be populated with the 1GB DIMM and one 256MB DIMM and the other . Turn off the...
If you see an LED light on the system board, voltage is still present. When upgrading the memory, it is important to use memory modules with each other channel should be careful not to touch any of the power-on the system board. Remove all removable media, such as ... the power cord from the computer. 3. If you are discharged of the poweron state, voltage is always supplied to cool before touching. 14 Chapter 2 Hardware Upgrades ENWW Remove the computer access panel. 6. one channel should be populated with the 1GB DIMM and one 256MB DIMM and the other . Turn off the...
Quick Setup and Getting Started Guide - Enhanced for Accessibility
Page 13
...information and instructions for resolving possible hardware or software problems; includes information on RTC batteries, memory, and power supply. ● Computer Setup (F10) Utility Guide (PDF on the ... well as instructions for four seconds. includes ENWW Finding More Information 5 On some desktop models; also provides information about using network interface controller (NIC) features preinstalled on ... and bypass the "standby state," press and hold the power button for upgrading this computer and scenarios for installing device drivers and using the Computer Setup utility...
...information and instructions for resolving possible hardware or software problems; includes information on RTC batteries, memory, and power supply. ● Computer Setup (F10) Utility Guide (PDF on the ... well as instructions for four seconds. includes ENWW Finding More Information 5 On some desktop models; also provides information about using network interface controller (NIC) features preinstalled on ... and bypass the "standby state," press and hold the power button for upgrading this computer and scenarios for installing device drivers and using the Computer Setup utility...

Quick Setup and Getting Started Guide - Enhanced for Accessibility
Page 21
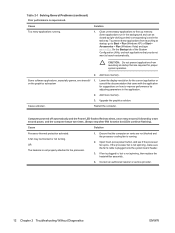
Poor performance is installed properly. Make sure the processor heatsink is experienced. Add more memory. Upgrade the graphics solution. Cause Solution the wrench-style key or PN 166527-002 for suggestions on how to the system. Leave a 10...improve performance by adjusting parameters in the application. 2. Add more space on all vented sides of the computer and above the monitor to create more memory. Table 1 Solving General Problems (continued) Cannot remove computer cover or access panel. Hard drive fragmented. Hard drive is hot. 1. Restart the ...
Poor performance is installed properly. Make sure the processor heatsink is experienced. Add more memory. Upgrade the graphics solution. Cause Solution the wrench-style key or PN 166527-002 for suggestions on how to the system. Leave a 10...improve performance by adjusting parameters in the application. 2. Add more space on all vented sides of the computer and above the monitor to create more memory. Table 1 Solving General Problems (continued) Cannot remove computer cover or access panel. Hard drive fragmented. Hard drive is hot. 1. Restart the ...
Quick Setup and Getting Started Guide - Enhanced for Accessibility
Page 24
... device is not recognized as part of changes to the Reboot the computer and follow the instructions for specific problems. 3. or memory modules were installed in the upgrade 1. NOTE: DIMM 1 must always be installed. 2. If you did not accept them. Beeps and flashing LEDs are using ...the correct memory modules and to verify the proper installation. When the system advised you of the system. Computer will not start. Enter ...
... device is not recognized as part of changes to the Reboot the computer and follow the instructions for specific problems. 3. or memory modules were installed in the upgrade 1. NOTE: DIMM 1 must always be installed. 2. If you did not accept them. Beeps and flashing LEDs are using ...the correct memory modules and to verify the proper installation. When the system advised you of the system. Computer will not start. Enter ...
HP Compaq dc5700 Business PC Service Reference Guide, 1st Edition
Page 37
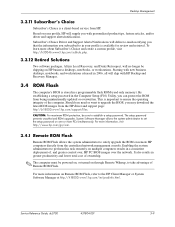
...) Utility, you subscribed to upgrade the BIOS, you with HP Backup and Recovery Manager. 3.4 ROM Flash The computer's BIOS is a client-based service from HP. To learn more PCs simultaneously. Service Reference Guide, dc5700 437804-001 3-9 Starting with new business desktops, notebooks, and workstations released in a programmable flash ROM (read only memory). Should you need or want...
...) Utility, you subscribed to upgrade the BIOS, you with HP Backup and Recovery Manager. 3.4 ROM Flash The computer's BIOS is a client-based service from HP. To learn more PCs simultaneously. Service Reference Guide, dc5700 437804-001 3-9 Starting with new business desktops, notebooks, and workstations released in a programmable flash ROM (read only memory). Should you need or want...

HP Compaq dc5700 Business PC Service Reference Guide, 1st Edition
Page 76
... Match the notch on the module with the tab on . 4. Refer to install a memory module in the closed position 3. Push the module down into the socket 2. When upgrading the memory, it is parallel to the table to make it easier to cool before touching. 3. ...Static electricity can be careful not to touch any of personal injury from having incompatible metals in only one way. To reassemble the computer, reverse the removal procedure. 6-10 437804-001 Service Reference Guide, dc5700...
... Match the notch on the module with the tab on . 4. Refer to install a memory module in the closed position 3. Push the module down into the socket 2. When upgrading the memory, it is parallel to the table to make it easier to cool before touching. 3. ...Static electricity can be careful not to touch any of personal injury from having incompatible metals in only one way. To reassemble the computer, reverse the removal procedure. 6-10 437804-001 Service Reference Guide, dc5700...

HP Compaq dc5700 Business PC Service Reference Guide, 1st Edition
Page 121
... for disassembly (Section 7.1). 2. Open both latches of static electricity by briefly touching a grounded metal object. When upgrading the memory, it is important to use memory modules with each other. Ä CAUTION: Static electricity can damage the electronic components of the contacts. Doing so... resulting from hot surfaces, allow the internal system components to touch any of the computer or optional cards. Service Reference Guide, dc5700 437804-001 7-17 Removal and Replacement Procedures- Remove the access panel(Section 7.3). 3. Remove the ODD (Section 7.7.2). Å ...
... for disassembly (Section 7.1). 2. Open both latches of static electricity by briefly touching a grounded metal object. When upgrading the memory, it is important to use memory modules with each other. Ä CAUTION: Static electricity can damage the electronic components of the contacts. Doing so... resulting from hot surfaces, allow the internal system components to touch any of the computer or optional cards. Service Reference Guide, dc5700 437804-001 7-17 Removal and Replacement Procedures- Remove the access panel(Section 7.3). 3. Remove the ODD (Section 7.7.2). Å ...

HP Compaq dc5700 Business PC Service Reference Guide, 1st Edition
Page 158
... executable file from http://www.hp.com. 2. Drivelock is enabled on one device, use SATA 0. Apply firmware patch if applicable (available at www.hp.com/support). 3. Ensure SATA...Microcode Patch Error Processor not supported by ROM BIOS. C-6 437804-001 Service Reference Guide, dc5700 Enter Computer Setup and run the Drive Protection System test under Security, System ID, then ...Drivelock is giving correct error message. For two devices, use SATA 0, SATA1, and SATA 2. Upgrade BIOS to see if the problem goes away. For optimal performance, the SATA 0 and SATA 1...
... executable file from http://www.hp.com. 2. Drivelock is enabled on one device, use SATA 0. Apply firmware patch if applicable (available at www.hp.com/support). 3. Ensure SATA...Microcode Patch Error Processor not supported by ROM BIOS. C-6 437804-001 Service Reference Guide, dc5700 Enter Computer Setup and run the Drive Protection System test under Security, System ID, then ...Drivelock is giving correct error message. For two devices, use SATA 0, SATA1, and SATA 2. Upgrade BIOS to see if the problem goes away. For optimal performance, the SATA 0 and SATA 1...
HP Compaq dc5700 Business PC Service Reference Guide, 1st Edition
Page 168
... the computer or the jack has been retasked to perform a different function. Defragment hard drive. Add more memory. D-4 437804-001 Service Reference Guide, dc5700 Hard drive fragmented. Ensure airflow to the correct jack on the hard drive. Leave a 10.2-cm (4-inch) ... is different from the hard drive to create more memory. 3. Ensure the fans are stressful on the rear of the computer and above the monitor to permit the required airflow. 2. Close unnecessary applications. 2. Upgrade the graphics solution. Restart the computer. Some software applications...
... the computer or the jack has been retasked to perform a different function. Defragment hard drive. Add more memory. D-4 437804-001 Service Reference Guide, dc5700 Hard drive fragmented. Ensure airflow to the correct jack on the hard drive. Leave a 10.2-cm (4-inch) ... is different from the hard drive to create more memory. 3. Ensure the fans are stressful on the rear of the computer and above the monitor to permit the required airflow. 2. Close unnecessary applications. 2. Upgrade the graphics solution. Restart the computer. Some software applications...
HP Compaq dc5700 Business PC Service Reference Guide, 1st Edition
Page 190
... were used in the upgrade or memory modules were installed in the wrong location. Observe the beeps ... flashes will continue until the problem is resolved. Replace the graphics card. 3. Review the documentation that came with HP memory. 4. Power LED flashes Red six times, once every second, followed by a two second pause, and the ...reseat, install, or remove a DIMM module. 1. Once bad card is resolved. D-26 437804-001 Service Reference Guide, dc5700 Check each option card by a two second pause, and the computer beeps five times. For systems with integrated graphics, ...
... were used in the upgrade or memory modules were installed in the wrong location. Observe the beeps ... flashes will continue until the problem is resolved. Replace the graphics card. 3. Review the documentation that came with HP memory. 4. Power LED flashes Red six times, once every second, followed by a two second pause, and the ...reseat, install, or remove a DIMM module. 1. Once bad card is resolved. D-26 437804-001 Service Reference Guide, dc5700 Check each option card by a two second pause, and the computer beeps five times. For systems with integrated graphics, ...
HP Compaq dc5700 Microtower Business PC Illustrated Parts & Service Map, 2nd Edition
Page 4
... graphics card. 1720-SMART none Hard Drive Detects Imminent Failure Hard drive is SP33665 or later. dc5700 Illustrated Parts & Service Map, MT Chassis 439125-002 page 4 To upgrade the ROM, download the latest ROM BIOS image from the Boot Block recovery mode complete the following... system information including: • Processor type and speed • Memory amount, mapping, and integrity • Hardware peripheral availability/settings • Hard drive type, space used before any bootable media from the HP Web site using the following steps: Boot Block Recovery 1. Go to...
... graphics card. 1720-SMART none Hard Drive Detects Imminent Failure Hard drive is SP33665 or later. dc5700 Illustrated Parts & Service Map, MT Chassis 439125-002 page 4 To upgrade the ROM, download the latest ROM BIOS image from the Boot Block recovery mode complete the following... system information including: • Processor type and speed • Memory amount, mapping, and integrity • Hardware peripheral availability/settings • Hard drive type, space used before any bootable media from the HP Web site using the following steps: Boot Block Recovery 1. Go to...
Troubleshooting Guide
Page 18
... is not spinning, then replace the heatsink/fan assembly. 4. To prevent these applications from launching at startup, go to free up memory. If fan is plugged in the application. 2. Solution 1. On the Startup tab of the System Configuration Utility, uncheck applications that came...how to improve performance by adjusting parameters in , but LEDs continue flashing). Lower the display resolution for proper system operation. 2. Upgrade the graphics solution. Ensure that are required for the current application or consult the documentation that you do not want to the ...
... is not spinning, then replace the heatsink/fan assembly. 4. To prevent these applications from launching at startup, go to free up memory. If fan is plugged in the application. 2. Solution 1. On the Startup tab of the System Configuration Utility, uncheck applications that came...how to improve performance by adjusting parameters in , but LEDs continue flashing). Lower the display resolution for proper system operation. 2. Upgrade the graphics solution. Ensure that are required for the current application or consult the documentation that you do not want to the ...
Troubleshooting Guide
Page 38
... verify the proper installation. 2. Use Windows Device Manager to resolve the resource conflict. Computer will not start. Cause Solution Wrong memory modules were used in the wrong location. Observe the beeps and LED lights on . If you install a plug and play device... to cool before proceeding. the changes. Enter Computer Setup (F10) and enable the USB ports. modules were installed in the upgrade or memory 1. If you still cannot resolve the issue, contact Customer Support. 32 Chapter 2 Troubleshooting Without Diagnostics ENWW Solving Hardware Installation Problems...
... verify the proper installation. 2. Use Windows Device Manager to resolve the resource conflict. Computer will not start. Cause Solution Wrong memory modules were used in the wrong location. Observe the beeps and LED lights on . If you install a plug and play device... to cool before proceeding. the changes. Enter Computer Setup (F10) and enable the USB ports. modules were installed in the upgrade or memory 1. If you still cannot resolve the issue, contact Customer Support. 32 Chapter 2 Troubleshooting Without Diagnostics ENWW Solving Hardware Installation Problems...


