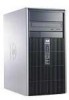
Hardware Reference Guide - dc5700 MT
Page 2
... and services are trademarks of Microsoft Corporation in the express warranty statements accompanying such products and services. Hardware Reference Guide HP Compaq Business PC dc5700 Microtower Model First Edition (October 2006) Document Part Number: 433185-001 No part of Hewlett-Packard Company. This document contains proprietary information that is subject to ...
Hardware Reference Guide - dc5700 MT
Page 7
For a complete listing of the hardware and software installed in the Troubleshooting Guide on the Documentation and Diagnostics CD. 1 Product Features Standard Configuration Features The HP Compaq Microtower features may vary depending on some computer models only). Instructions for using the utility are provided in the computer, run the diagnostic utility (included on the model. Figure 1-1 Microtower Configuration ENWW Standard Configuration Features 1
HP Compaq dc5700 Business PC Service Reference Guide, 1st Edition
Page 6
... Emergency Recovery Mode 3-10 3.4.4 Replicating the Setup 3-11 3.4.5 Dual-State Power Button 3-15 3.4.6 HP Web Site Support 3-16 3.4.7 Industry Standards 3-16 3.5 Asset Tracking and Security 3-16 3.5.1 Password ... ATA SMART Drives 4-3 4.5 Hard Drive Capacities 4-3 5 Identifying the Chassis, Routine Care, and Disassembly Preparation 5.1 Chassis Designations 5-1 5.1.1 Microtower (MT 5-1 5.1.2 Small Form Factor (SFF 5-2 5.2 Electrostatic Discharge Information 5-3 5.2.1 Generating Static 5-3 5.2.2 Preventing Electrostatic Damage to Equipment... 437804-001 Service Reference Guide, dc5700
HP Compaq dc5700 Business PC Service Reference Guide, 1st Edition
Page 7
... 6-32 6.17System Board 6-33 6.18Battery 6-34 6.18.1Type 1 Battery Holder 6-35 6.18.2Type 2 Battery Holder 6-36 6.18.3Type 3 Battery Holder 6-37 7 Removal and Replacement Procedures- Microtower (MT) Chassis 6.1 Preparation for Disassembly 7-1 7.2 External Security Devices 7-2 7.2.1 Cable Lock 7-2 7.2.2 Padlock 7-2 7.3 Access Panel 7-3 7.4 Front Bezel 7-4 7.5 Front Drive Bezels 7-5 7.6 Cable Management 7-6 7.6.1 Cable Connections 7-7 7.7 Drives 7-8 7.7.1 Drive Positions...
HP Compaq dc5700 Business PC Service Reference Guide, 1st Edition
Page 57
5 Identifying the Chassis, Routine Care, and Disassembly Preparation This chapter provides general service information for proper service. Ä CAUTION: When the computer is plugged into an AC power source, voltage is essential for the computer. You must disconnect the power cord from the power source before opening the computer to the system board. Adherence to the procedures and precautions described in this chapter is always applied to prevent system board or component damage. 5.1 Chassis Designations 5.1.1 Microtower (MT) Service Reference Guide, dc5700 437804-001 5-1
HP Compaq dc5700 Business PC Service Reference Guide, 1st Edition
Page 67
... CAUTION: Turn off the computer and any cables. Ä CAUTION: Regardless of different thread sizes and lengths; Service Reference Guide, dc5700 437804-001 6-1 The power cord should always be disconnected before disconnecting any peripheral devices that prohibit opening the computer (See Section 6.2, ...available on even when the computer is in an application may damage the unit. Remove/disengage any open software applications. 3. Microtower (MT) Chassis Adherence to it , noting its position and routing. 6 Removal and Replacement Procedures- Close any security devices...
HP Compaq dc5700 Business PC Service Reference Guide, 1st Edition
Page 68
Microtower (MT) Chassis 6.2 External Security Devices 6.2.1 Installing a Cable Lock The cable lock may be used to secure the computer access panel to the chassis and, at the same time, secure the computer to a fixed object. Removal and Replacement Procedures- Insert the cable lock in the location shown below. 6-2 437804-001 Service Reference Guide, dc5700
HP Compaq dc5700 Business PC Service Reference Guide, 1st Edition
Page 69
Removal and Replacement Procedures- A padlock may be used by itself to secure the access panel to a fixed object. I Service Reference Guide, dc5700 437804-001 6-3 Microtower (MT) Chassis 6.2.2 Installing a Padlock A padlock may also be used with a security cable to secure the computer to the computer chassis.
HP Compaq dc5700 Business PC Service Reference Guide, 1st Edition
Page 70
... that secures the access panel to install internal parts. To install the access panel, reverse the removal procedure. 6-4 437804-001 Service Reference Guide, dc5700 Removal and Replacement Procedures- Microtower (MT) Chassis 6.3 Access Panel 1. Loosen the captive thumbscrew 1 that the power cord is facing up. Be sure the side with the access panel...
HP Compaq dc5700 Business PC Service Reference Guide, 1st Edition
Page 71
Microtower (MT) Chassis 6.4 Front Bezel 1. To remove the front bezel, press the green latch on the bottom right of the chassis 1 to release the bottom of the bezel, then swing the bottom of the bezel away from the chassis 2 to release the top of the bezel. Service Reference Guide, dc5700 437804-001 6-5 Prepare the computer for disassembly (Section 6.1). 2. Remove the access panel (Section 6.3). 3. Removal and Replacement Procedures-
HP Compaq dc5700 Business PC Service Reference Guide, 1st Edition
Page 72
Position the chassis in the upright position. 2. Microtower (MT) Chassis To reinstall the front bezel: 1. Removal and Replacement Procedures- Insert the two hooks on the top of the bezel into the rectangular holes on the chassis 1 then rotate the bottom of the bezel onto the chassis 2 so that the bottom two hooks on the bezel snap into place. 6-6 437804-001 Service Reference Guide, dc5700
HP Compaq dc5700 Business PC Service Reference Guide, 1st Edition
Page 73
Removal and Replacement Procedures- Remove the access panel (Section 6.3). 3. To install a bezel blank, reverse the removal procedure. Remove the front bezel (Section 6.4). 4. Press the two retaining tabs on the inside of the bezel towards the outer edge of the bezel 1 and pull the bezel blank inwards to remove it 2. Prepare the computer for disassembly (Section 6.1). 2. Service Reference Guide, dc5700 437804-001 6-7 Microtower (MT) Chassis 6.5 Front Drive Bezels Follow these steps before removing or installing a front drive bezel. 1.
HP Compaq dc5700 Business PC Service Reference Guide, 1st Edition
Page 74
... board, always follow good cable management practices when working inside the computer. ■ Keep cables away from the P1 or P3 connectors on the cable. Microtower (MT) Chassis 6.6 Cable Management Always follow these cables. ■ Do not bend any cable sharply. A sharp bend can break the internal wires. ■ Never bend... a SATA data cable tighter than a 30 mm (1.18 in a failed power supply. 6-8 437804-001 Service Reference Guide, dc5700 Sharp creases may damage the wires. ■ Some flat ribbon cables come prefolded.
HP Compaq dc5700 Business PC Service Reference Guide, 1st Edition
Page 75
... 3rd HDD if no ODD present System board P63, SATA 3 (Orange) Heatsink fan System board P70 Media Card Reader System board P150 Service Reference Guide, dc5700 437804-001 6-9 Microtower (MT) Chassis 6.6.1 Cable Connections System board connectors are color-coded to make it easier to find the proper connection.
HP Compaq dc5700 Business PC Service Reference Guide, 1st Edition
Page 76
...information. It may damage the module. 1. To reassemble the computer, reverse the removal procedure. 6-10 437804-001 Service Reference Guide, dc5700 Prepare the computer for installing memory modules to cool before touching. 3. Remove the access panel and rotate the computer so the system ...when the computer is turned on (Section 6.3). Å WARNING: To reduce risk of static electricity by briefly touching a grounded metal object. Microtower (MT) Chassis 6.7 Memory Ä CAUTION: The memory module sockets have gold metal contacts. Refer to touch any of the memory module...
HP Compaq dc5700 Business PC Service Reference Guide, 1st Edition
Page 77
Microtower (MT) Chassis 6.8 Expansion Cards 1. Removal and Replacement Procedures- Prepare the computer for disassembly (Section 6.1). 2. On the rear of the computer, a sliding slot cover lock secures the expansion card brackets and expansion slot covers in place 1 and slide the slot cover lock up and off the chassis 2. Remove the access panel and rotate the computer so the system board is parallel to the table to make it easier to work on (Section 6.3). 3. Remove the captive thumbscrew that holds the slot cover lock in place. Service Reference Guide, dc5700 437804-001 6-11
HP Compaq dc5700 Business PC Service Reference Guide, 1st Edition
Page 78
...hold the card at each end, and carefully rock it from the socket. Be sure not to the expansion card. Removal and Replacement Procedures- b. Microtower (MT) Chassis 4. Pull the expansion card straight up from the socket then away from the inside of the chassis 2 to release it back and ... card, disconnect any cables that may be attached to scrape the card against the other components. 6-12 437804-001 Service Reference Guide, dc5700 If you are installing an expansion card in a vacant socket, remove the appropriate expansion slot cover on the back of the chassis.
HP Compaq dc5700 Business PC Service Reference Guide, 1st Edition
Page 79
... an expansion slot cover to scrape the card against the other components. 5. Be sure not to close the open slot. Microtower (MT) Chassis c. Removal and Replacement Procedures- Service Reference Guide, dc5700 437804-001 6-13 If removing a PCI Express x16 card, pull the retention arm on the back of internal components during operation...
HP Compaq dc5700 Business PC Service Reference Guide, 1st Edition
Page 80
... that the bracket on the card is aligned with the open slot on the rear of the chassis 1 so that contained the new card. 9. Microtower (MT) Chassis 7. Press the card straight down toward the rear of the chassis. Connect internal cables to the installed card, if needed . 6-...14 437804-001 Service Reference Guide, dc5700 Removal and Replacement Procedures- If replacing or adding a new expansion card, hold the card just above the expansion slot on the card so that...
HP Compaq dc5700 Business PC Service Reference Guide, 1st Edition
Page 81
...for optional hard drive Primary 3.5-inch internal hard drive bay Service Reference Guide, dc5700 437804-001 6-15 Failure to do so will need to load the HP factory-installed files. 6.9.1 Drive Positions Item 1 2 3 4 Drive Positions ...Description Two 5.25-inch, half-height bays for optional drives (optical drives shown) One 3.5-inch external drive bay for optional drive (1.44-MB diskette drive shown) Secondary 3.5-inch internal hard drive bay for replacing or upgrading the storage drives. Microtower...