Manual
Page 1
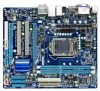
GA-H55M-S2H LGA1156 socket motherboard for Intel® Core™ i7 processor family/ Intel® Core™ i5 processor family/ Intel® Core™ i3 processor family User's Manual Rev. 1001 12ME-H55MS2H-1001R
GA-H55M-S2H LGA1156 socket motherboard for Intel® Core™ i7 processor family/ Intel® Core™ i5 processor family/ Intel® Core™ i3 processor family User's Manual Rev. 1001 12ME-H55MS2H-1001R
Manual
Page 3
... be reproduced, copied, translated, transmitted, or published in the use GIGABYTE's unique features, read the User's Manual. For example, "REV: 1.0" means the revision of the motherboard is the property of this manual may be made by GIGABYTE without GIGABYTE's prior written permission. Example: No part of GIGABYTE. Documentation Classifications In order to assist in any form or...
... be reproduced, copied, translated, transmitted, or published in the use GIGABYTE's unique features, read the User's Manual. For example, "REV: 1.0" means the revision of the motherboard is the property of this manual may be made by GIGABYTE without GIGABYTE's prior written permission. Example: No part of GIGABYTE. Documentation Classifications In order to assist in any form or...
Manual
Page 6
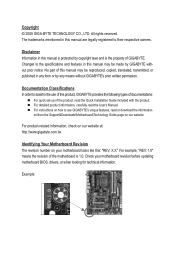
...-0*R) S/PDIF In cable (Part No. 12CR1-1SPDIN-0*R) COM port cable (Part No. 12CF1-1CM001-3*R) - 6 - The box contents are for reference only. Box Contents GA-H55M-S2H motherboard Motherboard driver disk User's Manual Quick Installation Guide One IDE cable Two SATA 3Gb/s cables I/O Shield • The box contents above are subject to change without notice. • The...
...-0*R) S/PDIF In cable (Part No. 12CR1-1SPDIN-0*R) COM port cable (Part No. 12CF1-1CM001-3*R) - 6 - The box contents are for reference only. Box Contents GA-H55M-S2H motherboard Motherboard driver disk User's Manual Quick Installation Guide One IDE cable Two SATA 3Gb/s cables I/O Shield • The box contents above are subject to change without notice. • The...
Manual
Page 9
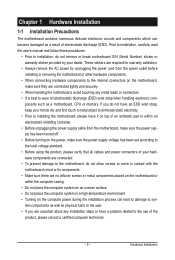
...connecting hardware components to the internal connectors on the motherboard, make sure the power supply voltage has been set according to the use of your dealer. Hardware Installation Prior to installation, carefully read the user's manual and follow these procedures: • Prior to ...installation, do not remove or break motherboard S/N (Serial Number) sticker or warranty sticker provided by unplugging the power cord from...
...connecting hardware components to the internal connectors on the motherboard, make sure the power supply voltage has been set according to the use of your dealer. Hardware Installation Prior to installation, carefully read the user's manual and follow these procedures: • Prior to ...installation, do not remove or break motherboard S/N (Serial Number) sticker or warranty sticker provided by unplugging the power cord from...
Manual
Page 15
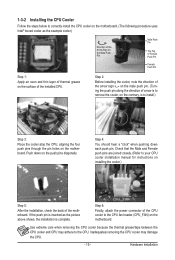
...complete. Step 4: You should hear a "click" when pushing down on the male push pin. (Turning the push pin along the direction of the motherboard. Use extreme care when removing the CPU cooler because the thermal grease/tape between the CPU cooler and CPU may damage the CPU. - 15 - ...push pins through the pin holes on the contrary, is to remove the cooler, on the motherboard. Check that the Male and Female push pins are joined closely. (Refer to your CPU cooler installation manual for instructions on installing the cooler.) Step 5: After the installation, check the back of arrow...
...complete. Step 4: You should hear a "click" when pushing down on the male push pin. (Turning the push pin along the direction of the motherboard. Use extreme care when removing the CPU cooler because the thermal grease/tape between the CPU cooler and CPU may damage the CPU. - 15 - ...push pins through the pin holes on the contrary, is to remove the cooler, on the motherboard. Check that the Male and Female push pins are joined closely. (Refer to your CPU cooler installation manual for instructions on installing the cooler.) Step 5: After the installation, check the back of arrow...
Manual
Page 18
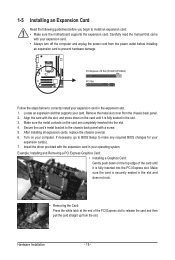
... inserted into the PCI Express slot. If necessary, go to BIOS Setup to make any required BIOS changes for your computer. Carefully read the manual that supports your expansion card. • Always turn off the computer and unplug the power cord from the chassis back panel. 2. Align the...the slot. Remove the metal slot cover from the power outlet before you begin to install an expansion card: • Make sure the motherboard supports the expansion card. 1-5 Installing an Expansion Card Read the following guidelines before installing an expansion card to prevent hardware damage.
... inserted into the PCI Express slot. If necessary, go to BIOS Setup to make any required BIOS changes for your computer. Carefully read the manual that supports your expansion card. • Always turn off the computer and unplug the power cord from the chassis back panel. 2. Align the...the slot. Remove the metal slot cover from the power outlet before you begin to install an expansion card: • Make sure the motherboard supports the expansion card. 1-5 Installing an Expansion Card Read the following guidelines before installing an expansion card to prevent hardware damage.
Manual
Page 28
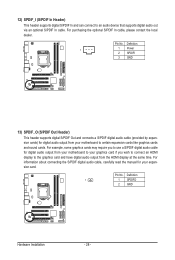
...sound cards. For example, some graphics cards may require you to use a S/PDIF digital audio cable for digital audio output from your motherboard to your graphics card if you wish to connect an HDMI display to the graphics card and have digital audio output from your expansion ...card. For purchasing the optional S/PDIF In cable, please contact the local dealer. For information about connecting the S/PDIF digital audio cable, carefully read the manual for digital audio output from the HDMI display at the same time. Definition 1 1 Power 2 SPDIFI 3 GND 13) SPDIF_O (S/PDIF Out Header) ...
...sound cards. For example, some graphics cards may require you to use a S/PDIF digital audio cable for digital audio output from your motherboard to your graphics card if you wish to connect an HDMI display to the graphics card and have digital audio output from your expansion ...card. For purchasing the optional S/PDIF In cable, please contact the local dealer. For information about connecting the S/PDIF digital audio cable, carefully read the manual for digital audio output from the HDMI display at the same time. Definition 1 1 Power 2 SPDIFI 3 GND 13) SPDIF_O (S/PDIF Out Header) ...
Manual
Page 30
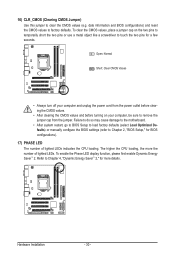
...) PHASE LED The number of lighted LEDs. Failure to do so may cause damage to the motherboard. • After system restart, go to BIOS Setup to load factory defaults (select Load Optimized Defaults) or manually configure the BIOS settings (refer to remove the jumper cap from the jumper. The higher the CPU...
...) PHASE LED The number of lighted LEDs. Failure to do so may cause damage to the motherboard. • After system restart, go to BIOS Setup to load factory defaults (select Load Optimized Defaults) or manually configure the BIOS settings (refer to remove the jumper cap from the jumper. The higher the CPU...
Manual
Page 57
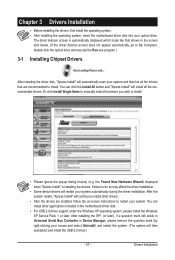
...can install other drivers. • After the drivers are recommended to restart your system. Or click Install Single Items to manually select the drivers you wish to do so may affect the driver installation. • Some device drivers will automatically scan...57 - Chapter 3 Drivers Installation • Before installing the drivers, first install the operating system. • After installing the operating system, insert the motherboard driver disk into your mouse and select Uninstall) and restart the system. (The system will install all the drivers that are installed, follow the on...
...can install other drivers. • After the drivers are recommended to restart your system. Or click Install Single Items to manually select the drivers you wish to do so may affect the driver installation. • Some device drivers will automatically scan...57 - Chapter 3 Drivers Installation • Before installing the drivers, first install the operating system. • After installing the operating system, insert the motherboard driver disk into your mouse and select Uninstall) and restart the system. (The system will install all the drivers that are installed, follow the on...

Manual
Page 58
3-2 Application Software This page displays all the utilities and applications that GIGABYTE develops and some free software. Drivers Installation - 58 - You can click the Install button on the right of an item to install it. 3-3 Technical Manuals This page provides GIGABYTE's application guides, content descriptions for this driver disk, and the motherboard manuals.
3-2 Application Software This page displays all the utilities and applications that GIGABYTE develops and some free software. Drivers Installation - 58 - You can click the Install button on the right of an item to install it. 3-3 Technical Manuals This page provides GIGABYTE's application guides, content descriptions for this driver disk, and the motherboard manuals.
Manual
Page 64
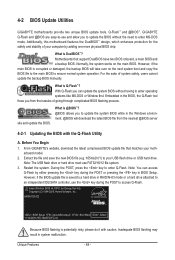
... latest BIOS file from the hassles of system safety, users cannot update the backup BIOS manually. What is Q-Flash™? site and update the BIOS. From GIGABYTE's website, download the latest compressed BIOS update file that support DualBIOS have two BIOS onboard...hard drive. During the POST, press the key to your motherboard model. 2. 4-2 BIOS Update Utilities GIGABYTE motherboards provide two unique BIOS update tools, Q-Flash™ and @BIOS™. What is potentially risky, please do it with the Q-Flash Utility A. H55M-S2H E2 . . . . : BIOS Setup : XpressRecovery2 ...
... latest BIOS file from the hassles of system safety, users cannot update the backup BIOS manually. What is Q-Flash™? site and update the BIOS. From GIGABYTE's website, download the latest compressed BIOS update file that support DualBIOS have two BIOS onboard...hard drive. During the POST, press the key to your motherboard model. 2. 4-2 BIOS Update Utilities GIGABYTE motherboards provide two unique BIOS update tools, Q-Flash™ and @BIOS™. What is potentially risky, please do it with the Q-Flash Utility A. H55M-S2H E2 . . . . : BIOS Setup : XpressRecovery2 ...
Manual
Page 67
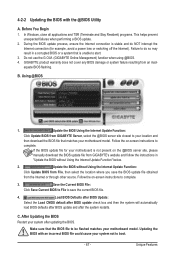
...complete. 3. Using @BIOS 1. Follow the on -screen instructions to be flashed matches your motherboard model. GIGABYTE product warranty does not cover any BIOS damage or system failure resulting from GIGABYTE Server, select the @BIOS server site closest to your location and then download the BIOS file...so may result in a corrupted BIOS or a system that is not present on the @BIOS server site, please manually download the BIOS update file from GIGABYTE's website and follow the instructions in "Update the BIOS without Using the Internet Update Function: Click Update BIOS from...
...complete. 3. Using @BIOS 1. Follow the on -screen instructions to be flashed matches your motherboard model. GIGABYTE product warranty does not cover any BIOS damage or system failure resulting from GIGABYTE Server, select the @BIOS server site closest to your location and then download the BIOS file...so may result in a corrupted BIOS or a system that is not present on the @BIOS server site, please manually download the BIOS update file from GIGABYTE's website and follow the instructions in "Update the BIOS without Using the Internet Update Function: Click Update BIOS from...
Manual
Page 77
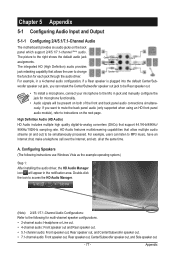
... is plugged into the default Center/Sub- Appendix Chapter 5 Appendix 5-1 Configuring Audio Input and Output 5-1-1 Configuring 2/4/5.1/7.1-Channel Audio The motherboard provides six audio jacks on both of the front and back panel audio connections simultaneously. The integrated HD (High Definition) audio provides... example operating system.) Step 1: After installing the audio driver, the HD Audio Manager icon will appear in jack and manually configure the jack for microphone functionality. • Audio signals will be simultaneously processed. woofer speaker out jack, you want...
... is plugged into the default Center/Sub- Appendix Chapter 5 Appendix 5-1 Configuring Audio Input and Output 5-1-1 Configuring 2/4/5.1/7.1-Channel Audio The motherboard provides six audio jacks on both of the front and back panel audio connections simultaneously. The integrated HD (High Definition) audio provides... example operating system.) Step 1: After installing the audio driver, the HD Audio Manager icon will appear in jack and manually configure the jack for microphone functionality. • Audio signals will be simultaneously processed. woofer speaker out jack, you want...
Manual
Page 87
... of must not be imparted to a third party nor be used equipment must not be disposed of with your product's user's manual and we at the time of disposal will be glad to help to conserve natural resources and ensure that do not use of ... local government office, your local or regional waste collection administration for recycling. Also note that the information contained herein was accurate in all GIGABYTE motherboards fulfill European Union regulations for RoHS (Restriction of Certain Hazardous Substances in your effort. - 87 - To prevent releases of properly. Restriction...
... of must not be imparted to a third party nor be used equipment must not be disposed of with your product's user's manual and we at the time of disposal will be glad to help to conserve natural resources and ensure that do not use of ... local government office, your local or regional waste collection administration for recycling. Also note that the information contained herein was accurate in all GIGABYTE motherboards fulfill European Union regulations for RoHS (Restriction of Certain Hazardous Substances in your effort. - 87 - To prevent releases of properly. Restriction...


