Manual
Page 33
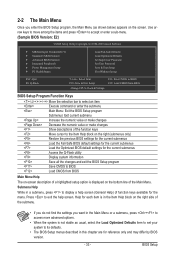
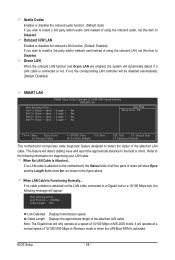
...description of a highlighted setup option is not stable as shown below) appears on the bottom line of the Main Menu. BIOS Setup Submenu Help While in this chapter are for the current submenus Access the Q-Flash utility Display system information Save all the changes and exit the BIOS...Fail-Safe BIOS default settings for the current submenus Load the Optimized BIOS default settings for reference only and may differ by BIOS version. - 33 - Help for the menu. 2-2 The Main Menu Once you want in the Main Menu or a submenu, press + to access more advanced options. •...
...description of a highlighted setup option is not stable as shown below) appears on the bottom line of the Main Menu. BIOS Setup Submenu Help While in this chapter are for the current submenus Access the Q-Flash utility Display system information Save all the changes and exit the BIOS...Fail-Safe BIOS default settings for the current submenus Load the Optimized BIOS default settings for reference only and may differ by BIOS version. - 33 - Help for the menu. 2-2 The Main Menu Once you want in the Main Menu or a submenu, press + to access more advanced options. •...
Manual
Page 35
...Memory Settings } Advanced Voltage Settings } Miscellaneous Settings [Press Enter] [Press Enter] [Press Enter] [Press Enter] [Press Enter] Item Help Menu Level BIOS Version BCLK CPU Frequency Memory Frequency Total Memory Size CPU Temperature PCH Temperature Vcore DRAM Voltage E2 133.27 MHz ... Select F5: Previous Values +/-/PU/PD: Value F10: Save F6: Fail-Safe Defaults ESC: Exit F1: General Help F7: Optimized Defaults Whether the system will work stably with the overclock/overvoltage settings you not to alter the default ...
...Memory Settings } Advanced Voltage Settings } Miscellaneous Settings [Press Enter] [Press Enter] [Press Enter] [Press Enter] [Press Enter] Item Help Menu Level BIOS Version BCLK CPU Frequency Memory Frequency Total Memory Size CPU Temperature PCH Temperature Vcore DRAM Voltage E2 133.27 MHz ... Select F5: Previous Values +/-/PU/PD: Value F10: Save F6: Fail-Safe Defaults ESC: Exit F1: General Help F7: Optimized Defaults Whether the system will work stably with the overclock/overvoltage settings you not to alter the default ...
Manual
Page 36
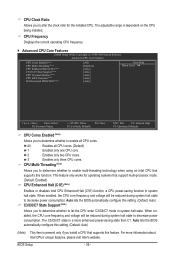
...Note) CPU Thermal Monitor (Note) CPU EIST Function (Note) Bi-Directional PROCHOT (Note) [All] [Enabled] [Auto] [Auto] [Auto] [Auto] [Auto] Item Help Menu Level Move Enter: Select F5: Previous Values +/-/PU/PD: Value F10: Save F6: Fail-Safe Defaults ESC: Exit F1: General... Help F7: Optimized Defaults CPU Cores Enabled (Note) Allows you to alter the clock ratio for operating systems that supports this setting. (Default: ...
...Note) CPU Thermal Monitor (Note) CPU EIST Function (Note) Bi-Directional PROCHOT (Note) [All] [Enabled] [Auto] [Auto] [Auto] [Auto] [Auto] Item Help Menu Level Move Enter: Select F5: Previous Values +/-/PU/PD: Value F10: Save F6: Fail-Safe Defaults ESC: Exit F1: General... Help F7: Optimized Defaults CPU Cores Enabled (Note) Allows you to alter the clock ratio for operating systems that supports this setting. (Default: ...

Manual
Page 38
... Channel A Timing Settings >>>>> Channel B } Channel B Timing Settings [Disabled] [Auto] 1333 [Turbo] [Auto] 1.5V 1.15V [Press Enter] [Press Enter] Item Help Menu Level Move Enter: Select F5: Previous Values +/-/PU/PD: Value F10: Save F6: Fail-Safe Defaults ESC: Exit F1: General... Help F7: Optimized Defaults Extreme Memory Profile (X.M.P.) , (Note) System Memory Multiplier (SPD), Memory Frequency(Mhz) The settings under the same ...
... Channel A Timing Settings >>>>> Channel B } Channel B Timing Settings [Disabled] [Auto] 1333 [Turbo] [Auto] 1.5V 1.15V [Press Enter] [Press Enter] Item Help Menu Level Move Enter: Select F5: Previous Values +/-/PU/PD: Value F10: Save F6: Fail-Safe Defaults ESC: Exit F1: General... Help F7: Optimized Defaults Extreme Memory Profile (X.M.P.) , (Note) System Memory Multiplier (SPD), Memory Frequency(Mhz) The settings under the same ...

Manual
Page 39
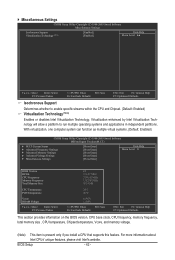
... x Command Rate (CMD) 1 >>>>> Channel A Misc Timing Control x Static tRD 1 Auto Auto Auto Auto Auto Auto Auto Auto Auto Auto Auto Auto Auto Auto Auto Item Help Menu Level Move Enter: Select F5: Previous Values +/-/PU/PD: Value F10: Save F6: Fail-Safe Defaults >>>>> Channel A/B Standard Timing Control CAS... memory. Profile QPI Voltage The value displayed here is set to be configurable. Options are: Auto (default), Quick, Expert. BIOS Setup ESC: Exit F1: General Help F7: Optimized Defaults - 39 -
... x Command Rate (CMD) 1 >>>>> Channel A Misc Timing Control x Static tRD 1 Auto Auto Auto Auto Auto Auto Auto Auto Auto Auto Auto Auto Auto Auto Auto Item Help Menu Level Move Enter: Select F5: Previous Values +/-/PU/PD: Value F10: Save F6: Fail-Safe Defaults >>>>> Channel A/B Standard Timing Control CAS... memory. Profile QPI Voltage The value displayed here is set to be configurable. Options are: Auto (default), Quick, Expert. BIOS Setup ESC: Exit F1: General Help F7: Optimized Defaults - 39 -
Manual
Page 40
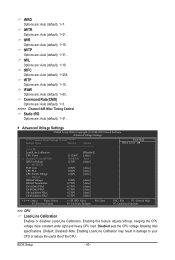
...Ch-A Data VRef. 0.750V [Auto] Ch-B Data VRef. 0.750V [Auto] Ch-A Address VRef. 0.750V [Auto] Ch-B Address VRef. 0.750V [Auto] Item Help Menu Level Move Enter: Select F5: Previous Values +/-/PU/PD: Value F10: Save F6: Fail-Safe Defaults ESC: Exit F1: General... Help F7: Optimized Defaults >>> CPU Load-Line Calibration Enables or disables Load-Line Calibration. Enabling this feature adjusts Vdroop, keeping the CPU voltage...
...Ch-A Data VRef. 0.750V [Auto] Ch-B Data VRef. 0.750V [Auto] Ch-A Address VRef. 0.750V [Auto] Ch-B Address VRef. 0.750V [Auto] Item Help Menu Level Move Enter: Select F5: Previous Values +/-/PU/PD: Value F10: Save F6: Fail-Safe Defaults ESC: Exit F1: General... Help F7: Optimized Defaults >>> CPU Load-Line Calibration Enables or disables Load-Line Calibration. Enabling this feature adjusts Vdroop, keeping the CPU voltage...
Manual
Page 42
... Memory Settings } Advanced Voltage Settings } Miscellaneous Settings [Press Enter] [Press Enter] [Press Enter] [Press Enter] [Press Enter] Item Help Menu Level BIOS Version BCLK CPU Frequency Memory Frequency Total Memory Size E2 133.27 MHz 3198.42 MHz 1332.80 MHz 1024 MB...584V Move Enter: Select F5: Previous Values +/-/PU/PD: Value F10: Save F6: Fail-Safe Defaults ESC: Exit F1: General Help F7: Optimized Defaults This section provides information on the BIOS version, CPU base clock, CPU frequency, memory frequency, total memory size ...
... Memory Settings } Advanced Voltage Settings } Miscellaneous Settings [Press Enter] [Press Enter] [Press Enter] [Press Enter] [Press Enter] Item Help Menu Level BIOS Version BCLK CPU Frequency Memory Frequency Total Memory Size E2 133.27 MHz 3198.42 MHz 1332.80 MHz 1024 MB...584V Move Enter: Select F5: Previous Values +/-/PU/PD: Value F10: Save F6: Fail-Safe Defaults ESC: Exit F1: General Help F7: Optimized Defaults This section provides information on the BIOS version, CPU base clock, CPU frequency, memory frequency, total memory size ...

Manual
Page 43
... Utility-Copyright (C) 1984-2009 Award Software Standard CMOS Features Date (mm:dd:yy) Time (hh:mm:ss) Fri, May 22 2009 22:31:24 Item Help Menu Level } IDE Channel 0 Master } IDE Channel 0 Slave } IDE Channel 1 Master } IDE Channel 1 Slave } IDE Channel 2 Master } IDE Channel... 640K 1022M 1024M Move Enter: Select F5: Previous Values +/-/PU/PD: Value F10: Save F6: Fail-Safe Defaults ESC: Exit F1: General Help F7: Optimized Defaults Date (mm:dd:yy) Sets the system date. For example, 1 p.m. BIOS Setup IDE Channel 2, 3 Master, 4 ...
... Utility-Copyright (C) 1984-2009 Award Software Standard CMOS Features Date (mm:dd:yy) Time (hh:mm:ss) Fri, May 22 2009 22:31:24 Item Help Menu Level } IDE Channel 0 Master } IDE Channel 0 Slave } IDE Channel 1 Master } IDE Channel 1 Slave } IDE Channel 2 Master } IDE Channel... 640K 1022M 1024M Move Enter: Select F5: Previous Values +/-/PU/PD: Value F10: Save F6: Fail-Safe Defaults ESC: Exit F1: General Help F7: Optimized Defaults Date (mm:dd:yy) Sets the system date. For example, 1 p.m. BIOS Setup IDE Channel 2, 3 Master, 4 ...
Manual
Page 45
...Press Enter] [Disabled] [Hard Disk] [CDROM] [Floppy] [Setup] [Disabled] [Disabled] [Enabled] [0] [Disabled] [PCI] [Enable If No Ext PEG] [64MB+2MB for GTT] Item Help Menu Level Move Enter: Select F5: Previous Values +/-/PU/PD: Value F10: Save F6: Fail-Safe Defaults ESC: Exit F1: General... Help F7: Optimized Defaults Hard Disk Boot Priority Specifies the sequence of the hard drive and to deliver greater efficiency for entering the BIOS Setup ...
...Press Enter] [Disabled] [Hard Disk] [CDROM] [Floppy] [Setup] [Disabled] [Disabled] [Enabled] [0] [Disabled] [PCI] [Enable If No Ext PEG] [64MB+2MB for GTT] Item Help Menu Level Move Enter: Select F5: Previous Values +/-/PU/PD: Value F10: Save F6: Fail-Safe Defaults ESC: Exit F1: General... Help F7: Optimized Defaults Hard Disk Boot Priority Specifies the sequence of the hard drive and to deliver greater efficiency for entering the BIOS Setup ...
Manual
Page 47
... IDE Controller Onboard Serial Port 1 [IDE] [Enabled] [Enabled] [Enabled] [Enabled] [Auto] [Enabled] [Disabled] [Press Enter] [Disabled] [Enabled] [3F8/IRQ4] Item Help Menu Level Move Enter: Select F5: Previous Values +/-/PU/PD: Value F10: Save F6: Fail-Safe Defaults ESC: Exit F1: General... Help F7: Optimized Defaults SATA AHCI Mode (Intel H55 Chipset) Allows you to decide whether to configure the SATA controller integrated in the ...
... IDE Controller Onboard Serial Port 1 [IDE] [Enabled] [Enabled] [Enabled] [Enabled] [Auto] [Enabled] [Disabled] [Press Enter] [Disabled] [Enabled] [3F8/IRQ4] Item Help Menu Level Move Enter: Select F5: Previous Values +/-/PU/PD: Value F10: Save F6: Fail-Safe Defaults ESC: Exit F1: General... Help F7: Optimized Defaults SATA AHCI Mode (Intel H55 Chipset) Allows you to decide whether to configure the SATA controller integrated in the ...
Manual
Page 48
... will operate at Port..... Part1-2 Status = Open / Length = 0m Part3-6 Status = Open / Length = 0m Part4-5 Status = Open / Length = 0m Part7-8 Status = Open / Length = 0m Item Help Menu Level Move Enter: Select F5: Previous Values +/-/PU/PD: Value F10: Save F6: Fail-Safe Defaults ESC: Exit F1: General...
... will operate at Port..... Part1-2 Status = Open / Length = 0m Part3-6 Status = Open / Length = 0m Part4-5 Status = Open / Length = 0m Part7-8 Status = Open / Length = 0m Item Help Menu Level Move Enter: Select F5: Previous Values +/-/PU/PD: Value F10: Save F6: Fail-Safe Defaults ESC: Exit F1: General...
Manual
Page 50
... EuP Support [S3(STR)] [Instant-Off] [Enabled] [Enabled] [Disabled] Everyday 0 : 0 : 0 [Enabled] [32-bit mode] [Disabled] [Disabled] Enter [Soft-Off] [Disabled] Item Help Menu Level Move Enter: Select F5: Previous Values +/-/PU/PD: Value F10: Save F6: Fail-Safe Defaults ESC: Exit F1: General... Help F7: Optimized Defaults ACPI Suspend Type Specifies the ACPI sleep state when the system enters suspend. Press and hold the power button for ...
... EuP Support [S3(STR)] [Instant-Off] [Enabled] [Enabled] [Disabled] Everyday 0 : 0 : 0 [Enabled] [32-bit mode] [Disabled] [Disabled] Enter [Soft-Off] [Disabled] Item Help Menu Level Move Enter: Select F5: Previous Values +/-/PU/PD: Value F10: Save F6: Fail-Safe Defaults ESC: Exit F1: General... Help F7: Optimized Defaults ACPI Suspend Type Specifies the ACPI sleep state when the system enters suspend. Press and hold the power button for ...

Manual
Page 52
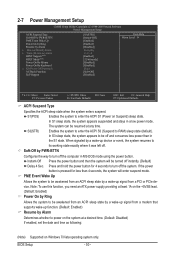
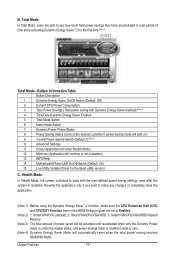
...FAN Control CPU Smart FAN Mode [Disabled] No 1.172V 1.584V 5.026V 12.112V 30oC 47oC 3375 RPM 0 RPM [Disabled] [Disabled] [Disabled] [Enabled] [Auto] Item Help Menu Level Move Enter: Select F5: Previous Values +/-/PU/PD: Value F10: Save F6: Fail-Safe Defaults ESC: Exit F1: General... Help F7: Optimized Defaults Reset Case Open Status Keeps or clears the record of the chassis intrusion detection device attached to the CMOS, and then ...
...FAN Control CPU Smart FAN Mode [Disabled] No 1.172V 1.584V 5.026V 12.112V 30oC 47oC 3375 RPM 0 RPM [Disabled] [Disabled] [Disabled] [Enabled] [Auto] Item Help Menu Level Move Enter: Select F5: Previous Values +/-/PU/PD: Value F10: Save F6: Fail-Safe Defaults ESC: Exit F1: General... Help F7: Optimized Defaults Reset Case Open Status Keeps or clears the record of the chassis intrusion detection device attached to the CMOS, and then ...

Manual
Page 54
The BIOS defaults settings help the system to operate in optimum state. ENxit Setup Exit Without Saving ESC: Quit F8: Q-Flash Select Item F10: Save & Exit Setup Load Fail-Safe ...
The BIOS defaults settings help the system to operate in optimum state. ENxit Setup Exit Without Saving ESC: Quit F8: Q-Flash Select Item F10: Save & Exit Setup Load Fail-Safe ...
Manual
Page 67
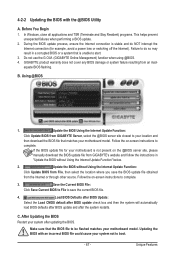
...Click Update BIOS from the Internet or through other source. In Windows, close all applications and TSR (Terminate and Stay Resident) programs. This helps prevent unexpected failures when performing a BIOS update. 2. If the BIOS update file for example, avoid a power loss or switching off the ... BIOS with the @BIOS Utility A. 4-2-2 Updating the BIOS with an incorrect BIOS file could cause your system not to complete. 3. GIGABYTE product warranty does not cover any BIOS damage or system failure resulting from File, then select the location where you save the current BIOS...
...Click Update BIOS from the Internet or through other source. In Windows, close all applications and TSR (Terminate and Stay Resident) programs. This helps prevent unexpected failures when performing a BIOS update. 2. If the BIOS update file for example, avoid a power loss or switching off the ... BIOS with the @BIOS Utility A. 4-2-2 Updating the BIOS with an incorrect BIOS file could cause your system not to complete. 3. GIGABYTE product warranty does not cover any BIOS damage or system failure resulting from File, then select the location where you save the current BIOS...

Manual
Page 69
... 8 Dynamic Power Phase Status 9 Power Saving Status (Icons of the button. Unique Features Featuring an advanced proprietary hardware and software design, GIGABYTE Dynamic Energy Saver™ 2 is for reference only. Actual performance may vary based on motherboard model. • CPU Power and Power .... - 69 - The Dynamic Energy Saver™ 2 Interface A. Meter Mode In Meter Mode, GIGABYTE Dynamic Energy Saver™ 2 shows how much power they have saved in taskbar) 14 INFO/Help 15 Motherboard Phase LED On/Off Switch (Default: On) 16 Live Utility Update (Check for reference...
... 8 Dynamic Power Phase Status 9 Power Saving Status (Icons of the button. Unique Features Featuring an advanced proprietary hardware and software design, GIGABYTE Dynamic Energy Saver™ 2 is for reference only. Actual performance may vary based on motherboard model. • CPU Power and Power .... - 69 - The Dynamic Energy Saver™ 2 Interface A. Meter Mode In Meter Mode, GIGABYTE Dynamic Energy Saver™ 2 shows how much power they have saved in taskbar) 14 INFO/Help 15 Motherboard Phase LED On/Off Switch (Default: On) 16 Live Utility Update (Check for reference...
Manual
Page 70
... saving settings, even after the system is unable to reset to zero. (Note 4) Dynamic Energy Saver Meter will continue to run in taskbar) 13 INFO/Help 14 Motherboard Phase LED On/Off Switch (Default: On) 15 Live Utility Update (Check for the first time (Note 3). 11 12 13 3 2 4 65 1 7 8 14 10...
... saving settings, even after the system is unable to reset to zero. (Note 4) Dynamic Energy Saver Meter will continue to run in taskbar) 13 INFO/Help 14 Motherboard Phase LED On/Off Switch (Default: On) 15 Live Utility Update (Check for the first time (Note 3). 11 12 13 3 2 4 65 1 7 8 14 10...
Manual
Page 84
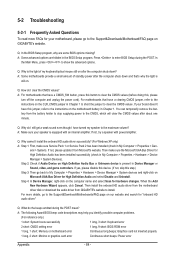
...been installed (check in Chapter 1. For more FAQs for your motherboard, please go to the Support&Downloads\Motherboard\FAQ page on GIGABYTE's website. A: Some advanced options are some BIOS options missing? You can temporarily remove the battery from the battery holder to ... power after the computer shuts down ? When the Add New Hardware Wizard appears, click Cancel. A: The following Award BIOS beep code descriptions may help you identify possible computer problems. (For reference only.) 1 short: System boots successfully 1 long, 3 short: Keyboard error 2 short: CMOS setting...
...been installed (check in Chapter 1. For more FAQs for your motherboard, please go to the Support&Downloads\Motherboard\FAQ page on GIGABYTE's website. A: Some advanced options are some BIOS options missing? You can temporarily remove the battery from the battery holder to ... power after the computer shuts down ? When the Add New Hardware Wizard appears, click Cancel. A: The following Award BIOS beep code descriptions may help you identify possible computer problems. (For reference only.) 1 short: System boots successfully 1 long, 3 short: Keyboard error 2 short: CMOS setting...

Manual
Page 86
.... Yes Reinstall the operating system. The problem is display on , is unable to solve your problem, contact the place of purchase or local dealer for help. Yes Turn off the computer and connect the IDE/SATA devices. Turn off the computer. No The IDE/SATA device, connector, or cable might fail...
.... Yes Reinstall the operating system. The problem is display on , is unable to solve your problem, contact the place of purchase or local dealer for help. Yes Turn off the computer and connect the IDE/SATA devices. Turn off the computer. No The IDE/SATA device, connector, or cable might fail...
Manual
Page 87
...GIGABYTE products have been carefully selected to the waste collection centers for recycling. Appendix 5-3 Regulatory Statements Regulatory Notices This document must not be copied without notice and should be taken to meet RoHS requirement. Also note that protects human health and the environment. Moreover, we will help to help... Equipment) and WEEE (Waste Electrical and Electronic Equipment) environmental directives, as well as a commitment by GIGABYTE. The WEEE Directive specifies the treatment, collection, recycling and disposal of the treatment, collection, recycling and...
...GIGABYTE products have been carefully selected to the waste collection centers for recycling. Appendix 5-3 Regulatory Statements Regulatory Notices This document must not be copied without notice and should be taken to meet RoHS requirement. Also note that protects human health and the environment. Moreover, we will help to help... Equipment) and WEEE (Waste Electrical and Electronic Equipment) environmental directives, as well as a commitment by GIGABYTE. The WEEE Directive specifies the treatment, collection, recycling and disposal of the treatment, collection, recycling and...


