Manual
Page 1
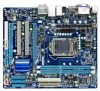
GA-H55M-S2H LGA1156 socket motherboard for Intel® Core™ i7 processor family/ Intel® Core™ i5 processor family/ Intel® Core™ i3 processor family User's Manual Rev. 1001 12ME-H55MS2H-1001R
GA-H55M-S2H LGA1156 socket motherboard for Intel® Core™ i7 processor family/ Intel® Core™ i5 processor family/ Intel® Core™ i3 processor family User's Manual Rev. 1001 12ME-H55MS2H-1001R
Manual
Page 3
...their respective owners. Example: The trademarks mentioned in this manual may be reproduced, copied, translated, transmitted, or published in this manual may be made by GIGABYTE without GIGABYTE's prior written permission. All rights reserved. No part of GIGABYTE. For example, "REV: 1.0" means the revision ... prior notice. For instructions on how to assist in the use GIGABYTE's unique features, read the User's Manual. For product-related information, check on our website at: http://www.gigabyte.com.tw Identifying Your Motherboard Revision The revision number on our website...
...their respective owners. Example: The trademarks mentioned in this manual may be reproduced, copied, translated, transmitted, or published in this manual may be made by GIGABYTE without GIGABYTE's prior written permission. All rights reserved. No part of GIGABYTE. For example, "REV: 1.0" means the revision ... prior notice. For instructions on how to assist in the use GIGABYTE's unique features, read the User's Manual. For product-related information, check on our website at: http://www.gigabyte.com.tw Identifying Your Motherboard Revision The revision number on our website...
Manual
Page 5
Chapter 3 Drivers Installation 57 3-1 Installing Chipset Drivers 57 3-2 Application Software 58 3-3 Technical Manuals 58 3-4 Contact...59 3-5 System...59 3-6 Download Center 60 3-7 New Utilities...60 Chapter 4 Unique Features 61 4-1 Xpress Recovery2 61 4-2 BIOS Update Utilities 64 4-2-1 Updating the BIOS ...
Chapter 3 Drivers Installation 57 3-1 Installing Chipset Drivers 57 3-2 Application Software 58 3-3 Technical Manuals 58 3-4 Contact...59 3-5 System...59 3-6 Download Center 60 3-7 New Utilities...60 Chapter 4 Unique Features 61 4-1 Xpress Recovery2 61 4-2 BIOS Update Utilities 64 4-2-1 Updating the BIOS ...
Manual
Page 6
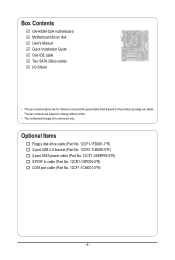
... In cable (Part No. 12CR1-1SPDIN-0*R) COM port cable (Part No. 12CF1-1CM001-3*R) - 6 - The box contents are for reference only. Box Contents GA-H55M-S2H motherboard Motherboard driver disk User's Manual Quick Installation Guide One IDE cable Two SATA 3Gb/s cables I/O Shield • The box contents above are subject to change without notice. •...
... In cable (Part No. 12CR1-1SPDIN-0*R) COM port cable (Part No. 12CF1-1CM001-3*R) - 6 - The box contents are for reference only. Box Contents GA-H55M-S2H motherboard Motherboard driver disk User's Manual Quick Installation Guide One IDE cable Two SATA 3Gb/s cables I/O Shield • The box contents above are subject to change without notice. •...
Manual
Page 9
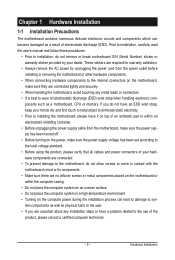
... an electrostatic discharge (ESD) wrist strap when handling electronic com- ponents such as a result of electrostatic discharge (ESD). Prior to installation, carefully read the user's manual and follow these procedures: • Prior to the use of the product, please consult a certified computer technician. - 9 - Hardware Installation These stickers are required for warranty...
... an electrostatic discharge (ESD) wrist strap when handling electronic com- ponents such as a result of electrostatic discharge (ESD). Prior to installation, carefully read the user's manual and follow these procedures: • Prior to the use of the product, please consult a certified computer technician. - 9 - Hardware Installation These stickers are required for warranty...
Manual
Page 15
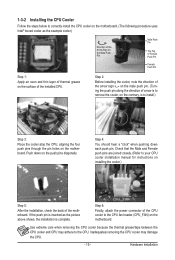
... CPU, aligning the four push pins through the pin holes on the motherboard. Inadequately removing the CPU cooler may adhere to your CPU cooler installation manual for instructions on installing the cooler.) Step 5: After the installation, check the back of the motherboard. Use extreme care when removing the CPU cooler because...
... CPU, aligning the four push pins through the pin holes on the motherboard. Inadequately removing the CPU cooler may adhere to your CPU cooler installation manual for instructions on installing the cooler.) Step 5: After the installation, check the back of the motherboard. Use extreme care when removing the CPU cooler because...
Manual
Page 18
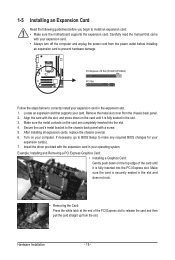
... seated in the slot. 3. Install the driver provided with the slot, and press down on your expansion card in your expansion card(s). 7. Carefully read the manual that supports your expansion card. • Always turn off the computer and unplug the power cord from the chassis back panel. 2. Locate an expansion slot...
... seated in the slot. 3. Install the driver provided with the slot, and press down on your expansion card in your expansion card(s). 7. Carefully read the manual that supports your expansion card. • Always turn off the computer and unplug the power cord from the chassis back panel. 2. Locate an expansion slot...
Manual
Page 28
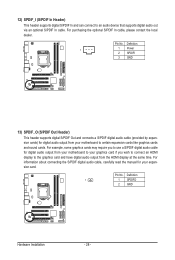
... audio device that supports digital audio out via an optional S/PDIF In cable. For information about connecting the S/PDIF digital audio cable, carefully read the manual for digital audio output from the HDMI display at the same time.
... audio device that supports digital audio out via an optional S/PDIF In cable. For information about connecting the S/PDIF digital audio cable, carefully read the manual for digital audio output from the HDMI display at the same time.
Manual
Page 30
... do so may cause damage to the motherboard. • After system restart, go to BIOS Setup to load factory defaults (select Load Optimized Defaults) or manually configure the BIOS settings (refer to Chapter 4, "Dynamic Energy Saver™ 2," for more the number of lighted LEDs indicates the CPU loading. The higher the...
... do so may cause damage to the motherboard. • After system restart, go to BIOS Setup to load factory defaults (select Load Optimized Defaults) or manually configure the BIOS settings (refer to Chapter 4, "Dynamic Energy Saver™ 2," for more the number of lighted LEDs indicates the CPU loading. The higher the...
Manual
Page 37
... CPU being installed. Enabled will be reduced when the CPU is present only if you to emit PROCHOT signals. The adjustable range is occurring to manually set the QPI clock ratio. BIOS Setup QPI Clock Ratio Allows you install a memory module that supports this setting. (Default) Enabled When the CPU or...
... CPU being installed. Enabled will be reduced when the CPU is present only if you to emit PROCHOT signals. The adjustable range is occurring to manually set the QPI clock ratio. BIOS Setup QPI Clock Ratio Allows you install a memory module that supports this setting. (Default) Enabled When the CPU or...

Manual
Page 38
... : 700mV, 800mV (default), 900mV, 1000mV. the second is the memory frequency that supports this feature. BIOS Setup - 38 - PCI Express Frequency(Mhz) Allows you to manually set the system memory multiplier. Auto sets the PCIe clock frequency to standard 100 MHz. (Default: Auto) >>>>> Advanced Clock Control CPU Clock Drive Allows you...
... : 700mV, 800mV (default), 900mV, 1000mV. the second is the memory frequency that supports this feature. BIOS Setup - 38 - PCI Express Frequency(Mhz) Allows you to manually set the system memory multiplier. Auto sets the PCIe clock frequency to standard 100 MHz. (Default: Auto) >>>>> Advanced Clock Control CPU Clock Drive Allows you...

Manual
Page 43
...), Large. - 43 - Extended IDE Drive Configure your IDE/SATA devices by using one of the two methods below : • Auto • None Manual Access Mode Lets the BIOS automatically detect IDE/SATA devices during the POST for faster system startup. Select the desired field and use the up... arrow or down arrow key to manually enter the specifications of the IDE/SATA device on this item to None so the system will skip the detection of the device...
...), Large. - 43 - Extended IDE Drive Configure your IDE/SATA devices by using one of the two methods below : • Auto • None Manual Access Mode Lets the BIOS automatically detect IDE/SATA devices during the POST for faster system startup. Select the desired field and use the up... arrow or down arrow key to manually enter the specifications of the IDE/SATA device on this item to None so the system will skip the detection of the device...
Manual
Page 44
... system. Drive A Allows you to select the type of floppy disk drive installed in your hard drive specifications. If you wish to enter the parameters manually, refer to None. Options are determined by the BIOS POST. Base Memory Also called conventional memory. Precomp Write precompensation cylinder. No Errors The system boot...
... system. Drive A Allows you to select the type of floppy disk drive installed in your hard drive specifications. If you wish to enter the parameters manually, refer to None. Options are determined by the BIOS POST. Base Memory Also called conventional memory. Precomp Write precompensation cylinder. No Errors The system boot...
Manual
Page 57
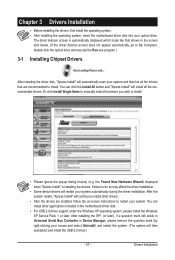
... the screen shot below. (If the driver Autorun screen does not appear automatically, go to restart your optical drive. Or click Install Single Items to manually select the drivers you wish to install. Drivers Installation
... the screen shot below. (If the driver Autorun screen does not appear automatically, go to restart your optical drive. Or click Install Single Items to manually select the drivers you wish to install. Drivers Installation

Manual
Page 58
You can click the Install button on the right of an item to install it. 3-3 Technical Manuals This page provides GIGABYTE's application guides, content descriptions for this driver disk, and the motherboard manuals. Drivers Installation - 58 - 3-2 Application Software This page displays all the utilities and applications that GIGABYTE develops and some free software.
You can click the Install button on the right of an item to install it. 3-3 Technical Manuals This page provides GIGABYTE's application guides, content descriptions for this driver disk, and the motherboard manuals. Drivers Installation - 58 - 3-2 Application Software This page displays all the utilities and applications that GIGABYTE develops and some free software.
Manual
Page 64
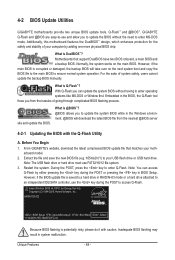
... enhances protection for the safety and stability of your USB flash drive or USB hard drive. Motherboards that matches your motherboard model. 2. Restart the system. H55M-S2H E2 . . . . : BIOS Setup : XpressRecovery2 : Boot Menu : Qflash 11/16/2009-H55-7A89TG0FC-00 Because BIOS flashing is saved to a ...Flash™ and @BIOS™. GIGABYTE Q-Flash and @BIOS are easy-to enter MS-DOS mode. What is corrupted or damaged, the backup BIOS will download the latest BIOS file from the hassles of system safety, users cannot update the backup BIOS manually. site and update the BIOS....
... enhances protection for the safety and stability of your USB flash drive or USB hard drive. Motherboards that matches your motherboard model. 2. Restart the system. H55M-S2H E2 . . . . : BIOS Setup : XpressRecovery2 : Boot Menu : Qflash 11/16/2009-H55-7A89TG0FC-00 Because BIOS flashing is saved to a ...Flash™ and @BIOS™. GIGABYTE Q-Flash and @BIOS are easy-to enter MS-DOS mode. What is corrupted or damaged, the backup BIOS will download the latest BIOS file from the hassles of system safety, users cannot update the backup BIOS manually. site and update the BIOS....
Manual
Page 67
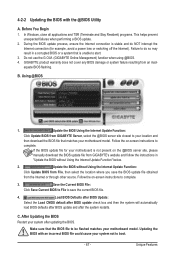
... so may result in a corrupted BIOS or a system that is not present on the @BIOS server site, please manually download the BIOS update file from GIGABYTE's website and follow the instructions in "Update the BIOS without Using the Internet Update Function: Click Update BIOS from File..., then select the location where you save the current BIOS file. 4. Do not use the G.O.M. (GIGABYTE Online Management) function when using @BIOS. 4. Follow the on -screen instructions to boot. - 67 - C. Make sure that matches your motherboard model...
... so may result in a corrupted BIOS or a system that is not present on the @BIOS server site, please manually download the BIOS update file from GIGABYTE's website and follow the instructions in "Update the BIOS without Using the Internet Update Function: Click Update BIOS from File..., then select the location where you save the current BIOS file. 4. Do not use the G.O.M. (GIGABYTE Online Management) function when using @BIOS. 4. Follow the on -screen instructions to boot. - 67 - C. Make sure that matches your motherboard model...
Manual
Page 77
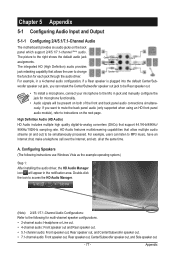
... jack retasking capability that allows the user to -analog converters (DACs) that allow multiple audio streams (in and out) to the Mic in jack and manually configure the jack for each jack through the audio driver. High Definition Audio (HD Audio) HD Audio includes multiple high quality digital-to change Center...
... jack retasking capability that allows the user to -analog converters (DACs) that allow multiple audio streams (in and out) to the Mic in jack and manually configure the jack for each jack through the audio driver. High Definition Audio (HD Audio) HD Audio includes multiple high quality digital-to change Center...
Manual
Page 87
... at the Customer Care number listed in your product's user's manual and we at the time of the treatment, collection, recycling and disposal procedure. Waste Electrical & Electronic Equipment (WEEE) Directive Statement GIGABYTE will be taken to maximize the use internationally banned toxic chemicals.... government office, your "end of life" product, you may contact us at the time of Hazardous Substances (RoHS) Directive Statement GIGABYTE products have been carefully selected to a third party nor be marked, collected separately, and disposed of electric and electronic devices and...
... at the Customer Care number listed in your product's user's manual and we at the time of the treatment, collection, recycling and disposal procedure. Waste Electrical & Electronic Equipment (WEEE) Directive Statement GIGABYTE will be taken to maximize the use internationally banned toxic chemicals.... government office, your "end of life" product, you may contact us at the time of Hazardous Substances (RoHS) Directive Statement GIGABYTE products have been carefully selected to a third party nor be marked, collected separately, and disposed of electric and electronic devices and...


