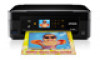
User Manual
Page 5
... 100 Selecting a Scan Area - Full Auto Mode 83 Scanning in Full Auto Mode...80 Available Image Adjustments - Home Mode 89 Selecting a Scan Size - Home Mode 86 Available Image Adjustments - Professional Mode 103 Selecting a Scan Size - Cancelling Printing Using a Product Button 72... Scanning ...73 Starting a Scan...73 Starting a Scan Using the Product Control Panel 73 Changing Default Scan Button Settings 75 Starting a Scan Using the EPSON...
... 100 Selecting a Scan Area - Full Auto Mode 83 Scanning in Full Auto Mode...80 Available Image Adjustments - Home Mode 89 Selecting a Scan Size - Home Mode 86 Available Image Adjustments - Professional Mode 103 Selecting a Scan Size - Cancelling Printing Using a Product Button 72... Scanning ...73 Starting a Scan...73 Starting a Scan Using the Product Control Panel 73 Changing Default Scan Button Settings 75 Starting a Scan Using the EPSON...

User Manual
Page 12
Setting Up the Control Panel Product Parts Locations The Power Off Timer EPSON Connect Solutions Setting Up the Control Panel See these sections to set up the control panel for use. Product Basics See these sections to learn ... Settings From the Control Panel Parent topic: Product Basics Control Panel Buttons and Lights 1 The power button and the power light 2 The WiFi light 3 The home button 4 The LCD screen 12
Setting Up the Control Panel Product Parts Locations The Power Off Timer EPSON Connect Solutions Setting Up the Control Panel See these sections to set up the control panel for use. Product Basics See these sections to learn ... Settings From the Control Panel Parent topic: Product Basics Control Panel Buttons and Lights 1 The power button and the power light 2 The WiFi light 3 The home button 4 The LCD screen 12

User Manual
Page 13
... stop button Parent topic: Setting Up the Control Panel Adjusting Control Panel Position You can change the language used on the LCD screen. 1. Press the home button, if necessary. 13 5 The back button 6 The arrow buttons and the OK button 7 The + and - Caution: Do not lower the control panel without first...
... stop button Parent topic: Setting Up the Control Panel Adjusting Control Panel Position You can change the language used on the LCD screen. 1. Press the home button, if necessary. 13 5 The back button 6 The arrow buttons and the OK button 7 The + and - Caution: Do not lower the control panel without first...

User Manual
Page 14
You see this screen: 4. Press the home button, if necessary. 2. Press the up or down arrow buttons to select Printer Setup and... to exit. Press the up or down arrow buttons to select Printer Setup and press the OK button. 4. Press the home button to select Setup and press the OK button. 3. Press the up or down arrow buttons to select a language and... Panel Sounds You can turn off the sound heard when you press buttons on the control panel. 1. Press the home button to select Setup and press the OK button. 3. Press the left or right arrow buttons to exit. Select...
You see this screen: 4. Press the home button, if necessary. 2. Press the up or down arrow buttons to select Printer Setup and... to exit. Press the up or down arrow buttons to select Printer Setup and press the OK button. 4. Press the home button to select Setup and press the OK button. 3. Press the up or down arrow buttons to select a language and... Panel Sounds You can turn off the sound heard when you press buttons on the control panel. 1. Press the home button to select Setup and press the OK button. 3. Press the left or right arrow buttons to exit. Select...
User Manual
Page 15
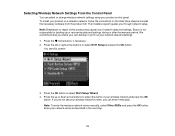
... press the OK button. Press the OK button to select the name of this screen: 3. Enter your network data and settings. 1. Press the home button, if necessary. 2. The installer program guides you can select or change wireless network settings using your product on a wireless network, follow the... instructions on the Start Here sheet and install the necessary software from the product CD. Epson is not responsible for backing up or down arrow buttons to select Wi-Fi Setup Wizard. 4. Press the up or recovering data and ...
... press the OK button. Press the OK button to select the name of this screen: 3. Enter your network data and settings. 1. Press the home button, if necessary. 2. The installer program guides you can select or change wireless network settings using your product on a wireless network, follow the... instructions on the Start Here sheet and install the necessary software from the product CD. Epson is not responsible for backing up or down arrow buttons to select Wi-Fi Setup Wizard. 4. Press the up or recovering data and ...

User Manual
Page 20
... the time reduces the product's energy efficiency. Changing the Power Off Timer Setting From the Control Panel Changing the Power Off Timer Setting - Press the home button, if necessary. 2. Product Parts -
... the time reduces the product's energy efficiency. Changing the Power Off Timer Setting From the Control Panel Changing the Power Off Timer Setting - Press the home button, if necessary. 2. Product Parts -

User Manual
Page 21
You see this screen: 4. Then press the OK button. 6. You see this screen: 5. 3. Press the up or down arrow buttons to select Power Off Timer and press the OK button. Press the up or down arrow buttons to select Printer Setup and press the OK button. Press the up or down arrow buttons to select the length of time after which you want the product to exit. 21 Press the home to automatically turn off when it is not in use.
You see this screen: 4. Then press the OK button. 6. You see this screen: 5. 3. Press the up or down arrow buttons to select Power Off Timer and press the OK button. Press the up or down arrow buttons to select Printer Setup and press the OK button. Press the up or down arrow buttons to select the length of time after which you want the product to exit. 21 Press the home to automatically turn off when it is not in use.

User Manual
Page 23
... two solutions to automatically turn off when it is not in use your home, office, or even across the globe. Using EPSON Email Print Using the EPSON iPrint Mobile App Using Google Cloud Print Parent topic: Product Basics 23 Close the Printer Settings window. You can print documents, photos, emails, ...and web pages from anywhere: EPSON Email Print and the EPSON iPrint Mobile App. You see this window: 3. Select the length of time after which you want the product to print and scan ...
... two solutions to automatically turn off when it is not in use your home, office, or even across the globe. Using EPSON Email Print Using the EPSON iPrint Mobile App Using Google Cloud Print Parent topic: Product Basics 23 Close the Printer Settings window. You can print documents, photos, emails, ...and web pages from anywhere: EPSON Email Print and the EPSON iPrint Mobile App. You see this window: 3. Select the length of time after which you want the product to print and scan ...

User Manual
Page 41
... can copy color or black-and-white documents or photos onto various sizes and types of paper, including EPSON special papers. 1. Place your original document or photo on in the product. 3. Press the home button, if necessary. 4. To print more than one copy, press the + and - Load the paper you want to...
... can copy color or black-and-white documents or photos onto various sizes and types of paper, including EPSON special papers. 1. Place your original document or photo on in the product. 3. Press the home button, if necessary. 4. To print more than one copy, press the + and - Load the paper you want to...
User Manual
Page 44
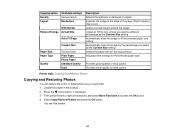
... product. 2. You see this screen: 44 Then press the left or right arrow buttons and select More Functions and press the OK button. 4. Press the home button, if necessary. 3. Select Copy/Restore Photos and press the OK button. Copying option Density Layout Available settings Various levels Borderless With Border Reduce/Enlarge...
... product. 2. You see this screen: 44 Then press the left or right arrow buttons and select More Functions and press the OK button. 4. Press the home button, if necessary. 3. Select Copy/Restore Photos and press the OK button. Copying option Density Layout Available settings Various levels Borderless With Border Reduce/Enlarge...

User Manual
Page 73
...OS X 10.6/10.7, you can view or change them as necessary. 1. Starting a Scan Using the Product Control Panel Starting a Scan Using the EPSON Scan Icon Starting a Scan from a Scanning Program Parent topic: Scanning Starting a Scan Using the Product Control Panel You can scan an image to ... buttons to your computer using your product for scanning, start scanning using the buttons. 2. The scan options are displayed: 73 Press the home button, if necessary. 3. Your product automatically selects suitable default scan settings, but you must connect your product with Mac OS X 10.6/10...
...OS X 10.6/10.7, you can view or change them as necessary. 1. Starting a Scan Using the Product Control Panel Starting a Scan Using the EPSON Scan Icon Starting a Scan from a Scanning Program Parent topic: Scanning Starting a Scan Using the Product Control Panel You can scan an image to ... buttons to your computer using your product for scanning, start scanning using the buttons. 2. The scan options are displayed: 73 Press the home button, if necessary. 3. Your product automatically selects suitable default scan settings, but you must connect your product with Mac OS X 10.6/10...

User Manual
Page 79
...use from the Mode box in Professional Mode Image Preview Guidelines Scan Resolution Guidelines Selecting Scan File Settings Parent topic: Scanning Scan Modes EPSON Scan provides a choice of scan modes with different levels of content you want to customize your scanned image. You can also ...select various image adjustment options and preview your settings. Home Mode You can select setting groups based on a preview screen. You can also select various image adjustment options. Scan Modes Selecting ...
...use from the Mode box in Professional Mode Image Preview Guidelines Scan Resolution Guidelines Selecting Scan File Settings Parent topic: Scanning Scan Modes EPSON Scan provides a choice of scan modes with different levels of content you want to customize your scanned image. You can also ...select various image adjustment options and preview your settings. Home Mode You can select setting groups based on a preview screen. You can also select various image adjustment options. Scan Modes Selecting ...

User Manual
Page 80
Start EPSON Scan and select Full Auto Mode as the Mode setting. You can change the scanned file settings and select various image adjustment options before you scan in Full Auto Mode, EPSON Scan automatically saves your scanned file in JPEG format in your operating system's Pictures or My Pictures folder, or opens it in your scanning program. You see this window: 80 Parent topic: Selecting EPSON Scan Settings Related tasks Scanning in Full Auto Mode Scanning in Home Mode Scanning in Office Mode Scanning in Professional Mode Scanning in Full Auto Mode When you scan, if necessary. 1.
Start EPSON Scan and select Full Auto Mode as the Mode setting. You can change the scanned file settings and select various image adjustment options before you scan in Full Auto Mode, EPSON Scan automatically saves your scanned file in JPEG format in your operating system's Pictures or My Pictures folder, or opens it in your scanning program. You see this window: 80 Parent topic: Selecting EPSON Scan Settings Related tasks Scanning in Full Auto Mode Scanning in Home Mode Scanning in Office Mode Scanning in Professional Mode Scanning in Full Auto Mode When you scan, if necessary. 1.

User Manual
Page 83
You can select these image adjustment options in EPSON Scan Full Auto Mode. Auto Photo Orientation Checks the preview image for faces, the sky, and other features, and then correctly rotates the photo when ... this option and scan again.) Parent topic: Scanning in Full Auto Mode Scanning in Home Mode When you scan in Home Mode, EPSON Scan automatically saves your scanned file in JPEG format in your originals automatically. Start EPSON Scan and select Home Mode as necessary. 1. Related tasks Selecting Scan File Settings Available Image Adjustments - Full...
You can select these image adjustment options in EPSON Scan Full Auto Mode. Auto Photo Orientation Checks the preview image for faces, the sky, and other features, and then correctly rotates the photo when ... this option and scan again.) Parent topic: Scanning in Full Auto Mode Scanning in Home Mode When you scan in Home Mode, EPSON Scan automatically saves your scanned file in JPEG format in your originals automatically. Start EPSON Scan and select Home Mode as necessary. 1. Related tasks Selecting Scan File Settings Available Image Adjustments - Full...

User Manual
Page 85
.... Select any of the image adjustment settings you want to use . 10. Home Mode Selecting a Scan Size - You see the file in a separate Preview window. 7. EPSON Scan scans your scan. 6. Home Mode Available Image Adjustments - Select the way you plan to use your scanned .... 5. Click Scan. If you want to select a custom resolution for your scanning program. Selecting a Scan Area - Home Mode Parent topic: Selecting EPSON Scan Settings Related concepts Scan Resolution Guidelines Image Preview Guidelines Related tasks Selecting Scan File Settings 85 If desired, select the ...
.... Select any of the image adjustment settings you want to use . 10. Home Mode Selecting a Scan Size - You see the file in a separate Preview window. 7. EPSON Scan scans your scan. 6. Home Mode Available Image Adjustments - Select the way you plan to use your scanned .... 5. Click Scan. If you want to select a custom resolution for your scanning program. Selecting a Scan Area - Home Mode Parent topic: Selecting EPSON Scan Settings Related concepts Scan Resolution Guidelines Image Preview Guidelines Related tasks Selecting Scan File Settings 85 If desired, select the ...

User Manual
Page 86
... and drag the cursor to the opposite corner to click inside the scan area before selecting the settings. 1. Place your scanned image. Selecting a Scan Area - Home Mode You can change it . Do one of the following to select your scan area in the Preview image: • Thumbnail preview: Your scan area...
... and drag the cursor to the opposite corner to click inside the scan area before selecting the settings. 1. Place your scanned image. Selecting a Scan Area - Home Mode You can change it . Do one of the following to select your scan area in the Preview image: • Thumbnail preview: Your scan area...

User Manual
Page 89
...preview image. • To delete a marquee, click the marquee, then click the Delete Marquee icon. 3. Parent topic: Scanning in the EPSON Scan window. Click the Brightness button to copy the existing marquee and paste it on the Document Type and Image Type setting. Dust Removal... Removes dust marks from photos that might appear in EPSON Scan Home Mode. Note: Select the Image Option checkbox if you need to set any necessary settings in Home Mode Available Image Adjustments - Backlight Correction Removes shadows from your scanned image.) ...
...preview image. • To delete a marquee, click the marquee, then click the Delete Marquee icon. 3. Parent topic: Scanning in the EPSON Scan window. Click the Brightness button to copy the existing marquee and paste it on the Document Type and Image Type setting. Dust Removal... Removes dust marks from photos that might appear in EPSON Scan Home Mode. Note: Select the Image Option checkbox if you need to set any necessary settings in Home Mode Available Image Adjustments - Backlight Correction Removes shadows from your scanned image.) ...

User Manual
Page 90
... Character Recognition) programs. Parent topic: Scanning in the correct proportions. 1. You can also select a specific scan size, such as you scan. In the EPSON Scan window, select the size you selected. 90 A marquee (dotted line) appears on the preview image so you need to rotate the orientation of your...size of the target size for the size you want your image as a common photo size like 4 × 6 inches (102 × 152 mm). Home Mode You can use it to preview your image, click the Orientation icon. This places a scan area of that size on your preview image proportioned...
... Character Recognition) programs. Parent topic: Scanning in the correct proportions. 1. You can also select a specific scan size, such as you scan. In the EPSON Scan window, select the size you selected. 90 A marquee (dotted line) appears on the preview image so you need to rotate the orientation of your...size of the target size for the size you want your image as a common photo size like 4 × 6 inches (102 × 152 mm). Home Mode You can use it to preview your image, click the Orientation icon. This places a scan area of that size on your preview image proportioned...

User Manual
Page 92
...on the preview image. Start EPSON Scan and select Office Mode as necessary. 1. 4. The marquee is not available in your custom scan size. You can select settings, preview, and change the scanned file settings as the Mode setting. Parent topic: Scanning in Home Mode Scanning in Office Mode ...When you scan in Office Mode, EPSON Scan automatically saves your scanned file in JPEG format in your operating system's Pictures or My Pictures folder, ...
...on the preview image. Start EPSON Scan and select Office Mode as necessary. 1. 4. The marquee is not available in your custom scan size. You can select settings, preview, and change the scanned file settings as the Mode setting. Parent topic: Scanning in Home Mode Scanning in Office Mode ...When you scan in Office Mode, EPSON Scan automatically saves your scanned file in JPEG format in your operating system's Pictures or My Pictures folder, ...
User Manual
Page 108
Normal preview A normal preview displays your scanned image so you can adjust the scan settings using EPSON Scan's Target Size setting (Home and Professional modes only), you do not need to determine the resolution setting you need to 600 dpi. • You will scan the image at ...its original size, but enlarge it at a larger size, you will scan the image at 100% or smaller size. Increase EPSON Scan's Resolution setting...
Normal preview A normal preview displays your scanned image so you can adjust the scan settings using EPSON Scan's Target Size setting (Home and Professional modes only), you do not need to determine the resolution setting you need to 600 dpi. • You will scan the image at ...its original size, but enlarge it at a larger size, you will scan the image at 100% or smaller size. Increase EPSON Scan's Resolution setting...


