User Manual
Page 3
... the Control Panel 20 Changing the Power Off Timer Setting - Mac OS X 22 EPSON Connect Solutions...23 Using EPSON Email Print ...24 Using the EPSON iPrint Mobile App 24 Using Google Cloud Print ...24 Loading Paper ...26 Loading Paper for Documents ...26 Loading Paper for Photos ...29... ...35 Available EPSON Papers...35 Borderless Paper Type Compatibility 37 Paper or Media Type Settings ...38 Placing Originals on the Product ...39 Placing Originals on the Scanner Glass 39 3 Inside ...19 Product Parts - Windows 22 Changing the Power Off Timer Setting - Contents XP-400 User's Guide...
... the Control Panel 20 Changing the Power Off Timer Setting - Mac OS X 22 EPSON Connect Solutions...23 Using EPSON Email Print ...24 Using the EPSON iPrint Mobile App 24 Using Google Cloud Print ...24 Loading Paper ...26 Loading Paper for Documents ...26 Loading Paper for Photos ...29... ...35 Available EPSON Papers...35 Borderless Paper Type Compatibility 37 Paper or Media Type Settings ...38 Placing Originals on the Product ...39 Placing Originals on the Scanner Glass 39 3 Inside ...19 Product Parts - Windows 22 Changing the Power Off Timer Setting - Contents XP-400 User's Guide...
User Manual
Page 4
... OS X 10.5/10.6/10.7 72 4 Windows 52 Advanced Print Options - Mac OS X 10.5/10.6/10.7 70 Printing Preferences - Windows 47 Basic Print Options - Windows 53 Color Management Options - Windows 57 Selecting Default Print Settings - Mac OS X 10.5/10.6/10.7 62 Print Quality Settings - Windows 54 Selecting a Printing Preset - Mac OS X 10.5/10.6/10.7 67 Managing Color...
... OS X 10.5/10.6/10.7 72 4 Windows 52 Advanced Print Options - Mac OS X 10.5/10.6/10.7 70 Printing Preferences - Windows 47 Basic Print Options - Windows 53 Color Management Options - Windows 57 Selecting Default Print Settings - Mac OS X 10.5/10.6/10.7 62 Print Quality Settings - Windows 54 Selecting a Printing Preset - Mac OS X 10.5/10.6/10.7 67 Managing Color...
User Manual
Page 5
...Scan 116 5 Professional Mode 100 Available Image Adjustments - Full Auto Mode 83 Scanning in Office Mode...92 Selecting a Scan Area - Cancelling Printing Using a Product Button 72 Scanning ...73 Starting a Scan...73 Starting a Scan Using the Product Control Panel 73 Changing Default Scan Button... Settings 75 Starting a Scan Using the EPSON Scan Icon 75 Starting a Scan from a Scanning Program 76 Selecting EPSON Scan Settings...79 Scan Modes ...79 Selecting the Scan Mode...79 Scanning in Professional Mode ...97 ...
...Scan 116 5 Professional Mode 100 Available Image Adjustments - Full Auto Mode 83 Scanning in Office Mode...92 Selecting a Scan Area - Cancelling Printing Using a Product Button 72 Scanning ...73 Starting a Scan...73 Starting a Scan Using the Product Control Panel 73 Changing Default Scan Button... Settings 75 Starting a Scan Using the EPSON Scan Icon 75 Starting a Scan from a Scanning Program 76 Selecting EPSON Scan Settings...79 Scan Modes ...79 Selecting the Scan Mode...79 Scanning in Professional Mode ...97 ...
User Manual
Page 6
... 134 Purchase EPSON Ink Cartridges ...136 Ink Cartridge Part Numbers ...136 Removing and Installing Ink Cartridges 136 Replacing Ink Cartridges Using a Computer Utility 142 Printing With Black Ink and Expended Color Cartridges 144 Printing With Expended Color Cartridges - Photo Mode 122 Printing Photo Layouts ...Scanning to Your Computer 127 Replacing Ink Cartridges ...129 Check Cartridge Status ...129 Checking Cartridge Status on the LCD Screen 122 Print Setting Options - Using Memory Cards With Your Product 117 Inserting a Memory Card...117 Memory Card Types ...118 Memory Card ...
... 134 Purchase EPSON Ink Cartridges ...136 Ink Cartridge Part Numbers ...136 Removing and Installing Ink Cartridges 136 Replacing Ink Cartridges Using a Computer Utility 142 Printing With Black Ink and Expended Color Cartridges 144 Printing With Expended Color Cartridges - Photo Mode 122 Printing Photo Layouts ...Scanning to Your Computer 127 Replacing Ink Cartridges ...129 Check Cartridge Status ...129 Checking Cartridge Status on the LCD Screen 122 Print Setting Options - Using Memory Cards With Your Product 117 Inserting a Memory Card...117 Memory Card Types ...118 Memory Card ...
User Manual
Page 7
... Using a Computer Utility 151 Print Head Cleaning ...153 Cleaning the Print Head Using the Product Control Panel 153 Cleaning the Print Head Using a Computer Utility 155 Print Head Alignment ...158 Aligning the Print Head Using the Product Control Panel 159 Aligning the Print Head Using a Computer Utility ...Cannot Find Product on a Network 175 Product Does Not Appear in Mac OS X Printer Window 176 Cannot Print Over a Network...176 Cannot Scan Over a Network ...177 Printing a Network Status Sheet 177 Solving Copying Problems ...179 Product Makes Noise, But Nothing Copies 179 Product ...
... Using a Computer Utility 151 Print Head Cleaning ...153 Cleaning the Print Head Using the Product Control Panel 153 Cleaning the Print Head Using a Computer Utility 155 Print Head Alignment ...158 Aligning the Print Head Using the Product Control Panel 159 Aligning the Print Head Using a Computer Utility ...Cannot Find Product on a Network 175 Product Does Not Appear in Mac OS X Printer Window 176 Cannot Print Over a Network...176 Cannot Scan Over a Network ...177 Printing a Network Status Sheet 177 Solving Copying Problems ...179 Product Makes Noise, But Nothing Copies 179 Product ...
User Manual
Page 8
...185 Inverted Image ...185 Too Many Copies Print ...186 Blank Pages Print ...186 Incorrect Margins on Printout...186 Border Appears on Borderless Prints 187 Incorrect Characters Print...187 Incorrect Image Size or Position 188 Slanted Printout ...188 Solving Print Quality Problems...189 White or Dark Lines ...in Printout ...189 Blurry or Smeared Printout ...190 Faint Printout or Printout Has Gaps 191 Grainy Printout...192 Incorrect Colors ...193 Solving Scanning Problems ...193 Scanning Software Does Not Operate Correctly 193 Cannot Start EPSON ...
...185 Inverted Image ...185 Too Many Copies Print ...186 Blank Pages Print ...186 Incorrect Margins on Printout...186 Border Appears on Borderless Prints 187 Incorrect Characters Print...187 Incorrect Image Size or Position 188 Slanted Printout ...188 Solving Print Quality Problems...189 White or Dark Lines ...in Printout ...189 Blurry or Smeared Printout ...190 Faint Printout or Printout Has Gaps 191 Grainy Printout...192 Incorrect Colors ...193 Solving Scanning Problems ...193 Scanning Software Does Not Operate Correctly 193 Cannot Start EPSON ...

User Manual
Page 9
... Image Edges are Cropped 199 Solving Memory Card Problems...199 Memory Card Does Not Fit Into a Slot 200 Cannot View or Print Photos from a Memory Card 200 Cannot Transfer Photos To or From a Memory Card 200 When to Get Help...203 Technical ...Specifications ...204 Windows System Requirements ...204 Mac System Requirements ...205 Printing Specifications...205 Scanning Specifications ...205 Paper Specifications ...206 Printable Area Specifications ...207 Ink Cartridge Specifications...208 Memory Card Specifications ...209 Dimension ...
... Image Edges are Cropped 199 Solving Memory Card Problems...199 Memory Card Does Not Fit Into a Slot 200 Cannot View or Print Photos from a Memory Card 200 Cannot Transfer Photos To or From a Memory Card 200 When to Get Help...203 Technical ...Specifications ...204 Windows System Requirements ...204 Mac System Requirements ...205 Printing Specifications...205 Scanning Specifications ...205 Paper Specifications ...206 Printable Area Specifications ...207 Ink Cartridge Specifications...208 Memory Card Specifications ...209 Dimension ...
User Manual
Page 15
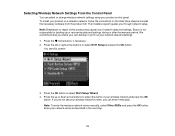
Selecting Wireless Network Settings From the Control Panel You can enter it manually. Epson is not responsible for backing up or down arrow buttons to select the name of network data and settings. Enter your product on a wireless network, ... network settings using your network data and settings. 1. Note: Breakdown or repair of this screen: 3. The installer program guides you make your own backup or print out your product control panel. Press the home button, if necessary. 2. Press the up or recovering data and settings during or after the warranty period...
Selecting Wireless Network Settings From the Control Panel You can enter it manually. Epson is not responsible for backing up or down arrow buttons to select the name of network data and settings. Enter your product on a wireless network, ... network settings using your network data and settings. 1. Note: Breakdown or repair of this screen: 3. The installer program guides you make your own backup or print out your product control panel. Press the home button, if necessary. 2. Press the up or recovering data and settings during or after the warranty period...

User Manual
Page 16
... back arrow and press the OK button. • When you finish entering characters, select Done and press the OK button. 6. Press the OK button to print a network status report, or No if not, and press the OK button. The WiFi light should now be on your wireless password (or network name...
... back arrow and press the OK button. • When you finish entering characters, select Done and press the OK button. 6. Press the OK button to print a network status report, or No if not, and press the OK button. The WiFi light should now be on your wireless password (or network name...

User Manual
Page 22
... automatically turn off automatically. 1. Select Printer Settings. 22 Click the Maintenance tab and select Printer and Option Information. Select Print & Fax or Print & Scan, select your product, and select Open Print Queue. Click Send. 5. Select Print & Fax, select your product, and select Options & Supplies. In the drop-down menu, select the length of the...
... automatically turn off automatically. 1. Select Printer Settings. 22 Click the Maintenance tab and select Printer and Option Information. Select Print & Fax or Print & Scan, select your product, and select Open Print Queue. Click Send. 5. Select Print & Fax, select your product, and select Options & Supplies. In the drop-down menu, select the length of the...

User Manual
Page 23
... your smartphone, tablet, or computer. You can print documents, photos, emails, and web pages from anywhere: EPSON Email Print and the EPSON iPrint Mobile App. Close the Printer Settings window. Parent topic: The Power Off Timer EPSON Connect Solutions You can use as the Power Off Timer setting. 4. Epson offers two solutions to automatically turn off...
... your smartphone, tablet, or computer. You can print documents, photos, emails, and web pages from anywhere: EPSON Email Print and the EPSON iPrint Mobile App. Close the Printer Settings window. Parent topic: The Power Off Timer EPSON Connect Solutions You can use as the Power Off Timer setting. 4. Epson offers two solutions to automatically turn off...
User Manual
Page 24
... an online service such as described on the Start Here sheet. 2. Using EPSON Email Print With EPSON Email Print, you can print from any attachments print by logging into your mobile device. 3. Parent topic: EPSON Connect Solutions Using Google Cloud Print With a Google Account, you want to print, attach a PDF, Microsoft Office document, or photo and send an email...
... an online service such as described on the Start Here sheet. 2. Using EPSON Email Print With EPSON Email Print, you can print from any attachments print by logging into your mobile device. 3. Parent topic: EPSON Connect Solutions Using Google Cloud Print With a Google Account, you want to print, attach a PDF, Microsoft Office document, or photo and send an email...
User Manual
Page 25
If your product is already on your wireless network, follow the on-screen instructions. 8. To install EPSON Printer Finder on using . 2. Select the Google Cloud Print Setupoption. 5. Enter your Google Account username and password and click Sign in, or if you don't have Download ...agree to the same wireless network that came with internet access. Click Finish printer registration to your EPSON product is now linked to complete setup and print a test page. Parent topic: EPSON Connect Solutions 25 Click Register. 6. Click Open Setup Page. 4. Your product is using Google Cloud...
If your product is already on your wireless network, follow the on-screen instructions. 8. To install EPSON Printer Finder on using . 2. Select the Google Cloud Print Setupoption. 5. Enter your Google Account username and password and click Sign in, or if you don't have Download ...agree to the same wireless network that came with internet access. Click Finish printer registration to your EPSON product is now linked to complete setup and print a test page. Parent topic: EPSON Connect Solutions 25 Click Register. 6. Click Open Setup Page. 4. Your product is using Google Cloud...

User Manual
Page 26
Loading Paper Before you will do. Pull up the paper support and its extension. 26 Loading Paper for Documents Loading Paper for Photos Loading Envelopes Paper Loading Capacity Available EPSON Papers Borderless Paper Type Compatibility Paper or Media Type Settings Loading Paper for Documents You can print documents on a variety of printing you print, load paper for the type of paper types and sizes. 1. Flip the feeder guard forward. 2.
Loading Paper Before you will do. Pull up the paper support and its extension. 26 Loading Paper for Documents Loading Paper for Photos Loading Envelopes Paper Loading Capacity Available EPSON Papers Borderless Paper Type Compatibility Paper or Media Type Settings Loading Paper for Documents You can print documents on a variety of printing you print, load paper for the type of paper types and sizes. 1. Flip the feeder guard forward. 2.
User Manual
Page 27
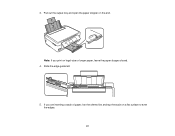
Note: If you are inserting a stack of paper, fan the sheets first and tap the stack on a flat surface to even the edges. 27 Slide the edge guide left. 5. Pull out the output tray and open the paper stopper on legal-size or longer paper, leave the paper stopper closed. 4. If you print on the end. 3.
Note: If you are inserting a stack of paper, fan the sheets first and tap the stack on a flat surface to even the edges. 27 Slide the edge guide left. 5. Pull out the output tray and open the paper stopper on legal-size or longer paper, leave the paper stopper closed. 4. If you print on the end. 3.

User Manual
Page 29
Flip the feeder guard forward. 2. Pull up the paper support and its extension. 29 • Load paper short edge first, no matter which way your document faces. • Load letterhead or pre-printed paper top edge first. • Do not load paper past the line on a variety of paper types and sizes. 1. Parent topic: Loading Paper Related references Paper Loading Capacity Loading Paper for Photos You can print photos on the left edge guide. • Check the paper package for any additional loading instructions.
Flip the feeder guard forward. 2. Pull up the paper support and its extension. 29 • Load paper short edge first, no matter which way your document faces. • Load letterhead or pre-printed paper top edge first. • Do not load paper past the line on a variety of paper types and sizes. 1. Parent topic: Loading Paper Related references Paper Loading Capacity Loading Paper for Photos You can print photos on the left edge guide. • Check the paper package for any additional loading instructions.

User Manual
Page 32
Flip the feeder guard forward. 2. Parent topic: Loading Paper Related references Paper Loading Capacity Loading Envelopes You can print on the left edge guide. • Check the paper package for any additional loading instructions. Pull up the paper support and its extension. 32 • Load paper short edge first, no matter which way your photo faces. • Do not load paper past the line on plain paper envelopes in this size: No. 10 (4.1 × 9.5 inches [105 × 241 mm]). 1.
Flip the feeder guard forward. 2. Parent topic: Loading Paper Related references Paper Loading Capacity Loading Envelopes You can print on the left edge guide. • Check the paper package for any additional loading instructions. Pull up the paper support and its extension. 32 • Load paper short edge first, no matter which way your photo faces. • Do not load paper past the line on plain paper envelopes in this size: No. 10 (4.1 × 9.5 inches [105 × 241 mm]). 1.
User Manual
Page 35
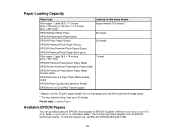
... left edge guide. ** For two-sided printing, load up to 30 sheets. sales) or www.epson.ca (Canadian sales). Parent topic: Loading Paper Available EPSON Papers You can also purchase supplies from an EPSON authorized reseller. You can purchase genuine EPSON ink and paper at EPSON Supplies Central at www.epson.com/ink3 (U.S. To find the nearest...
... left edge guide. ** For two-sided printing, load up to 30 sheets. sales) or www.epson.ca (Canadian sales). Parent topic: Loading Paper Available EPSON Papers You can also purchase supplies from an EPSON authorized reseller. You can purchase genuine EPSON ink and paper at EPSON Supplies Central at www.epson.com/ink3 (U.S. To find the nearest...

User Manual
Page 41
... black-and-white documents or photos onto various sizes and types of paper, including EPSON special papers. 1. Place your original document or photo on in the product. 3. Load the paper you want to print on the product. 2. To print more than one copy, press the + and - Then press the left or right arrow...
... black-and-white documents or photos onto various sizes and types of paper, including EPSON special papers. 1. Place your original document or photo on in the product. 3. Load the paper you want to print on the product. 2. To print more than one copy, press the + and - Then press the left or right arrow...
User Manual
Page 42
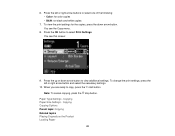
.... Press the left or right arrow button and select the necessary settings. 10. You see this screen: 9. To change the print settings, press the left or right arrow buttons to view additional settings. Note: To cancel copying, press the stop button. Paper Type Settings - ... Copying Related topics Placing Originals on the Product Loading Paper 42 Press the up or down arrow button. 6. Copying Paper Size Settings - To view the print settings for the copies, press the down arrow button to select one of the following: • Color: for color copies • B&W: for black-and...
.... Press the left or right arrow button and select the necessary settings. 10. You see this screen: 9. To change the print settings, press the left or right arrow buttons to view additional settings. Note: To cancel copying, press the stop button. Paper Type Settings - ... Copying Related topics Placing Originals on the Product Loading Paper 42 Press the up or down arrow button. 6. Copying Paper Size Settings - To view the print settings for the copies, press the down arrow button to select one of the following: • Color: for color copies • B&W: for black-and...


