Quick Reference Guide
Page 6
What Are You Looking For? • How to remove and replace parts • Specifications • How to configure system settings • How... located on your computer. • Use the Service Tag to identify your computer when you use support.dell.com or contact support. • Enter the Express Service Code to troubleshoot and solve problems • ... • Microsoft Windows License Label Find It Here Dell™ Latitude™ User's Guide Microsoft Windows Help and Support Center 1 Click Start or → Help and Support→ Dell User and System Guides→ System Guides. 2 ...
What Are You Looking For? • How to remove and replace parts • Specifications • How to configure system settings • How... located on your computer. • Use the Service Tag to identify your computer when you use support.dell.com or contact support. • Enter the Express Service Code to troubleshoot and solve problems • ... • Microsoft Windows License Label Find It Here Dell™ Latitude™ User's Guide Microsoft Windows Help and Support Center 1 Click Start or → Help and Support→ Dell User and System Guides→ System Guides. 2 ...
User's Guide
Page 8
... or Mouse Problems 90 Video and Display Problems 91 If the display is blank 91 If the display is difficult to read 92 If only part of the display is readable 92 11 System Setup Program Overview 93 Viewing the System Setup Screens 93 System Setup Screens 94 Commonly Used Settings...
... or Mouse Problems 90 Video and Display Problems 91 If the display is blank 91 If the display is difficult to read 92 If only part of the display is readable 92 11 System Setup Program Overview 93 Viewing the System Setup Screens 93 System Setup Screens 94 Commonly Used Settings...
User's Guide
Page 9
14 Adding and Replacing Parts Before You Begin 107 Recommended Tools 107 Turning Off Your Computer 107 Before Working Inside Your Computer 107 Hard Drive 108 Returning a Hard Drive to Dell 110 Media Bay 110 Removing the Device Security Screw 110 Removing and Installing Media ...) Cards . . 122 FCM (Flash Cache Module 123 Internal Card With Bluetooth® Wireless Technology 125 Coin-Cell Battery 126 15 Dell™ QuickSet 16 Specifications 17 Getting Help Obtaining Assistance 139 Technical Support and Customer Service 139 DellConnect 140 Online Services 140 AutoTech Service ...
14 Adding and Replacing Parts Before You Begin 107 Recommended Tools 107 Turning Off Your Computer 107 Before Working Inside Your Computer 107 Hard Drive 108 Returning a Hard Drive to Dell 110 Media Bay 110 Removing the Device Security Screw 110 Removing and Installing Media ...) Cards . . 122 FCM (Flash Cache Module 123 Internal Card With Bluetooth® Wireless Technology 125 Coin-Cell Battery 126 15 Dell™ QuickSet 16 Specifications 17 Getting Help Obtaining Assistance 139 Technical Support and Customer Service 139 DellConnect 140 Online Services 140 AutoTech Service ...
User's Guide
Page 44
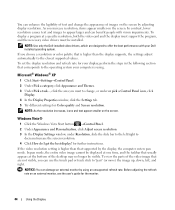
...at a specific resolution, both the video card and the display must support the program, and the necessary video drivers must be visible. To view the parts of images on the screen. You can enhance the legibility of text and change , or under Resolution, slide the slide bar to the left ,...resolution causes text and images to appear larger and can benefit people with your computer is using an unsupported refresh rate. NOTE: Use only the Dell-installed video drivers, which are not visible, you can damage an external monitor by the display, the computer enters pan mode. Microsoft® ...
...at a specific resolution, both the video card and the display must support the program, and the necessary video drivers must be visible. To view the parts of images on the screen. You can enhance the legibility of text and change , or under Resolution, slide the slide bar to the left ,...resolution causes text and images to appear larger and can benefit people with your computer is using an unsupported refresh rate. NOTE: Use only the Dell-installed video drivers, which are not visible, you can damage an external monitor by the display, the computer enters pan mode. Microsoft® ...

User's Guide
Page 92
...at least 60 cm (2 ft) away from the computer or external monitor. R U N T H E VI D E O D I A G N O S T I N T E R F E R E N C E - If only part of the display is readable CONNECT AN EXTERNAL MONITOR - 1 Shut down -arrow key. Press and the up- E L I M I N A T E P O S S I B L E I C S T E S T S -...C O M P U T E R O R M O N I G H T N E S S - Turn off nearby fans, fluorescent lights, halogen lamps, or other appliances. Contact Dell (see "Contacting Dell" on the computer and the monitor and adjust the monitor brightness and contrast controls. If the display is difficult to read...
...at least 60 cm (2 ft) away from the computer or external monitor. R U N T H E VI D E O D I A G N O S T I N T E R F E R E N C E - If only part of the display is readable CONNECT AN EXTERNAL MONITOR - 1 Shut down -arrow key. Press and the up- E L I M I N A T E P O S S I B L E I C S T E S T S -...C O M P U T E R O R M O N I G H T N E S S - Turn off nearby fans, fluorescent lights, halogen lamps, or other appliances. Contact Dell (see "Contacting Dell" on the computer and the monitor and adjust the monitor brightness and contrast controls. If the display is difficult to read...
User's Guide
Page 107
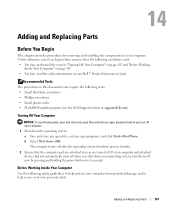
... • Small flat-blade screwdriver • Phillips screwdriver • Small plastic scribe • Flash BIOS update program (see the Dell Support website at support.dell.com) Turning Off Your Computer NOTICE: To avoid losing data, save and close any open files and exit any open programs before you... shut down →OK. Adding and Replacing Parts 107 Unless otherwise noted, each procedure assumes that the computer and any attached...
... • Small flat-blade screwdriver • Phillips screwdriver • Small plastic scribe • Flash BIOS update program (see the Dell Support website at support.dell.com) Turning Off Your Computer NOTICE: To avoid losing data, save and close any open files and exit any open programs before you... shut down →OK. Adding and Replacing Parts 107 Unless otherwise noted, each procedure assumes that the computer and any attached...

User's Guide
Page 108
... prevent the computer cover from being scratched. 2 Turn off your product documentation, or as directed by Dell is flat and clean to install an operating system, drivers, and utilities on the new hard drive.... drive. NOTICE: To prevent data loss, turn off your computer and all attached devices from a source other than Dell, you service the computer. 5 Remove the battery (see "Replacing the Battery" on page 33). 6 Press the...Turning Off Your Computer" on page 107. 108 Adding and Replacing Parts NOTE: If you disconnect a cable, pull on its connector or on its pull-tab, not on a ...
... prevent the computer cover from being scratched. 2 Turn off your product documentation, or as directed by Dell is flat and clean to install an operating system, drivers, and utilities on the new hard drive.... drive. NOTICE: To prevent data loss, turn off your computer and all attached devices from a source other than Dell, you service the computer. 5 Remove the battery (see "Replacing the Battery" on page 33). 6 Press the...Turning Off Your Computer" on page 107. 108 Adding and Replacing Parts NOTE: If you disconnect a cable, pull on its connector or on its pull-tab, not on a ...
User's Guide
Page 109
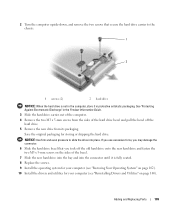
Adding and Replacing Parts 109 If you use excessive force, you may damage the connector. 6 Slide the hard drive bezel that secure the hard drive carrier to slide the ...
Adding and Replacing Parts 109 If you use excessive force, you may damage the connector. 6 Slide the hard drive bezel that secure the hard drive carrier to slide the ...

User's Guide
Page 110
... down . 4 Use a #1 Phillips screwdriver to remove the device security screw from the bottom of the computer. 110 Adding and Replacing Parts Removing the Device Security Screw If present, you must remove the device security screw before you can remove and install devices while the computer is... device (docked), undock it. Otherwise, the hard drive may be damaged in its original or comparable foam packaging. Returning a Hard Drive to Dell Return your docking device for instructions. 3 Close the display and turn the computer upside-down the computer. 2 If the computer is running and...
... down . 4 Use a #1 Phillips screwdriver to remove the device security screw from the bottom of the computer. 110 Adding and Replacing Parts Removing the Device Security Screw If present, you must remove the device security screw before you can remove and install devices while the computer is... device (docked), undock it. Otherwise, the hard drive may be damaged in its original or comparable foam packaging. Returning a Hard Drive to Dell Return your docking device for instructions. 3 Close the display and turn the computer upside-down the computer. 2 If the computer is running and...

User's Guide
Page 111
... the device latch release. 4 Pull the device out of them in a safe, dry place when they are not installed in the computer. Adding and Replacing Parts 111 NOTE: If the device security screw is not installed, you want to a docking device (docked). 1 If present, remove the device security screw from the...
... the device latch release. 4 Pull the device out of them in a safe, dry place when they are not installed in the computer. Adding and Replacing Parts 111 NOTE: If the device security screw is not installed, you want to a docking device (docked). 1 If present, remove the device security screw from the...

User's Guide
Page 112
... screw in "Before You Begin" on page 107. 2 Turn the computer top-side up the hinge cover on the right side. 112 Adding and Replacing Parts NOTICE: To avoid electrostatic discharge, ground yourself by using a wrist grounding strap or by periodically touching an unpainted metal surface (such as a connector on both...
... screw in "Before You Begin" on page 107. 2 Turn the computer top-side up the hinge cover on the right side. 112 Adding and Replacing Parts NOTICE: To avoid electrostatic discharge, ground yourself by using a wrist grounding strap or by periodically touching an unpainted metal surface (such as a connector on both...
User's Guide
Page 113
... begin any of the cover into the hinge cover slot, and press from left to right until the cover snaps into place. Adding and Replacing Parts 113
... begin any of the cover into the hinge cover slot, and press from left to right until the cover snaps into place. Adding and Replacing Parts 113

User's Guide
Page 114
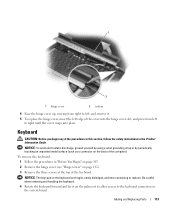
... the palm rest when replacing the keyboard, hook the tabs along the front edge of the keyboard. 4 Replace the hinge cover. 114 Adding and Replacing Parts To replace the keyboard: 1 Connect the keyboard connector to disconnect the keyboard cable connector from the keyboard connector on the palmrest. 3 Replace the three screws...
... the palm rest when replacing the keyboard, hook the tabs along the front edge of the keyboard. 4 Replace the hinge cover. 114 Adding and Replacing Parts To replace the keyboard: 1 Connect the keyboard connector to disconnect the keyboard cable connector from the keyboard connector on the palmrest. 3 Replace the three screws...
User's Guide
Page 115
...the computer under the memory module cover. a Use your computer memory by installing memory modules on the system board. NOTE: Memory modules purchased from Dell are upgrading memory, you are covered under the keyboard, and DIMM B is empty. DIMM A is located on top of the computer under your...the area, ground yourself again when you return to the computer. 5 If you use tools to spread the memory-module securing clips. Adding and Replacing Parts 115 See "Specifications" on page 131 for your computer. The computer has two memory slots, DIMM A and DIMM B. DIMM A holds the basic ...
...the computer under the memory module cover. a Use your computer memory by installing memory modules on the system board. NOTE: Memory modules purchased from Dell are upgrading memory, you are covered under the keyboard, and DIMM B is empty. DIMM A is located on top of the computer under your...the area, ground yourself again when you return to the computer. 5 If you use tools to spread the memory-module securing clips. Adding and Replacing Parts 115 See "Specifications" on page 131 for your computer. The computer has two memory slots, DIMM A and DIMM B. DIMM A holds the basic ...
User's Guide
Page 116
... the battery into the slot at a 45-degree angle to your computer and an electrical outlet. 10 Turn on page 107. 116 Adding and Replacing Parts To confirm the amount of memory installed in the computer, click Start or Computer Information. →Help and Support→ To install a memory module in...
... the battery into the slot at a 45-degree angle to your computer and an electrical outlet. 10 Turn on page 107. 116 Adding and Replacing Parts To confirm the amount of memory installed in the computer, click Start or Computer Information. →Help and Support→ To install a memory module in...

User's Guide
Page 117
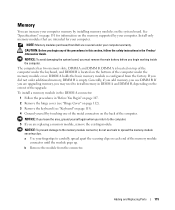
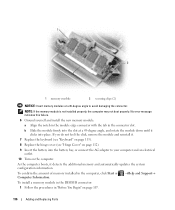
b Remove the module from the connector. Adding and Replacing Parts 117 2 Turn the computer upside-down, loosen the captive screw on the memory module cover, and then remove the cover. 1 2 1 captive screw 2 memory module cover NOTICE: To prevent damage to the memory module connector, do not use tools to spread the memory-module securing clips. 3 If you are replacing a memory module, remove the existing module: a Use your fingertips to carefully spread apart the securing clips on each end of the memory module connector until the module pops up.
b Remove the module from the connector. Adding and Replacing Parts 117 2 Turn the computer upside-down, loosen the captive screw on the memory module cover, and then remove the cover. 1 2 1 captive screw 2 memory module cover NOTICE: To prevent damage to the memory module connector, do not use tools to spread the memory-module securing clips. 3 If you are replacing a memory module, remove the existing module: a Use your fingertips to carefully spread apart the securing clips on each end of the memory module connector until the module pops up.
User's Guide
Page 118
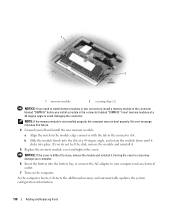
... a 45-degree angle, and rotate the module down until it detects the additional memory and automatically updates the system configuration information. 118 Adding and Replacing Parts If you install a module in the connector slot. Forcing the cover to close , remove the module and reinstall it . 5 Replace the memory module cover and...
... a 45-degree angle, and rotate the module down until it detects the additional memory and automatically updates the system configuration information. 118 Adding and Replacing Parts If you install a module in the connector slot. Forcing the cover to close , remove the module and reinstall it . 5 Replace the memory module cover and...
User's Guide
Page 119
Adding and Replacing Parts 119 NOTICE: To avoid damaging the system board, you must remove the main battery before you begin any of the procedures in this section, follow ...
Adding and Replacing Parts 119 NOTICE: To avoid damaging the system board, you must remove the main battery before you begin any of the procedures in this section, follow ...

User's Guide
Page 120
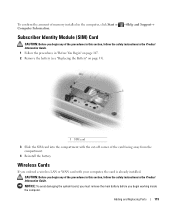
... you are replacing a card, remove the existing card: a Disconnect the antenna cables from the card until the card pops up slightly. 120 Adding and Replacing Parts If you return to the computer. 5 If a card is not already installed, go to step 6. Wireless Local Area Network (WLAN) Cards 1 Follow the procedures in...
... you are replacing a card, remove the existing card: a Disconnect the antenna cables from the card until the card pops up slightly. 120 Adding and Replacing Parts If you return to the computer. 5 If a card is not already installed, go to step 6. Wireless Local Area Network (WLAN) Cards 1 Follow the procedures in...

User's Guide
Page 121
... color of the cable. a Move any antenna cables out of its connector. NOTICE: The card connector is keyed to ensure correct insertion. Adding and Replacing Parts 121 If you ordered. NOTE: The WLAN card may have two or three antenna connectors, depending on top of card you feel resistance, reinstall the...
... color of the cable. a Move any antenna cables out of its connector. NOTICE: The card connector is keyed to ensure correct insertion. Adding and Replacing Parts 121 If you ordered. NOTE: The WLAN card may have two or three antenna connectors, depending on top of card you feel resistance, reinstall the...


