Quick Reference Guide
Page 10
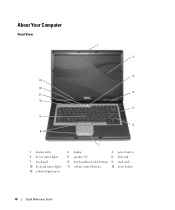
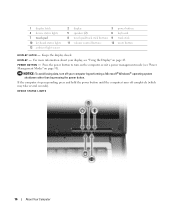
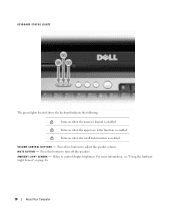
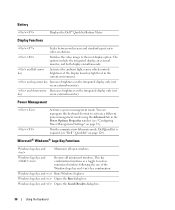
About Your Computer Front View 1 2 3 13 12 4 11 10 5 9 6 8 1 display latch 4 device status lights 7 touch pad 10 keyboard status lights 13 ambient light sensor 7 2 display 3 power button 5 speakers (2) 6 keyboard 8 touch pad/track stick buttons 9 track stick 11 volume control buttons 12 mute button 10 Quick Reference Guide
About Your Computer Front View 1 2 3 13 12 4 11 10 5 9 6 8 1 display latch 4 device status lights 7 touch pad 10 keyboard status lights 13 ambient light sensor 7 2 display 3 power button 5 speakers (2) 6 keyboard 8 touch pad/track stick buttons 9 track stick 11 volume control buttons 12 mute button 10 Quick Reference Guide

Quick Reference Guide
Page 19
... turns off . If necessary, uninstall and then reinstall the program. The Program Compatibility Wizard configures a program so it runs in its documentation or on your keyboard or moving your mouse, press and hold the power button for an earlier Microsoft® Windows® operating system R U N T H E P R O G R A M C O M P A T I B I L... Click Start→ All Programs→ Accessories→ Program Compatibility Wizard→ Next. 2 Follow the instructions on your keyboard or moving your mouse, press and hold the power button for at least 8 to 10 seconds until the computer turns ...
... turns off . If necessary, uninstall and then reinstall the program. The Program Compatibility Wizard configures a program so it runs in its documentation or on your keyboard or moving your mouse, press and hold the power button for an earlier Microsoft® Windows® operating system R U N T H E P R O G R A M C O M P A T I B I L... Click Start→ All Programs→ Accessories→ Program Compatibility Wizard→ Next. 2 Follow the instructions on your keyboard or moving your mouse, press and hold the power button for at least 8 to 10 seconds until the computer turns ...
Quick Reference Guide
Page 21
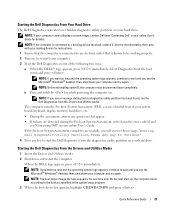
...Utilities media. NOTE: If the computer is located on a hidden diagnostic utility partition on (or restart) your computer. 3 Start the Dell Diagnostics in your system board, keyboard, display, memory, hard drive, etc. • During the assessment, answer any key to start -up, the computer boots according...appears, continue to wait until you see the Microsoft® Windows® desktop; NOTE: If you will receive the message, "Booting Dell Diagnostic Utility Partition.Press any key to continue". 4 Press any questions that is known to the devices specified in your online User's ...
...Utilities media. NOTE: If the computer is located on a hidden diagnostic utility partition on (or restart) your computer. 3 Start the Dell Diagnostics in your system board, keyboard, display, memory, hard drive, etc. • During the assessment, answer any key to start -up, the computer boots according...appears, continue to wait until you see the Microsoft® Windows® desktop; NOTE: If you will receive the message, "Booting Dell Diagnostic Utility Partition.Press any key to continue". 4 Press any questions that is known to the devices specified in your online User's ...
User's Guide
Page 4
Replacing the Battery 33 Storing a Battery 34 4 Using the Keyboard Numeric Keypad 35 Key Combinations 35 System Functions 35 Battery 36 Display Functions 36 Power Management 36 Microsoft® Windows® Logo Key Functions 36 ...
Replacing the Battery 33 Storing a Battery 34 4 Using the Keyboard Numeric Keypad 35 Key Combinations 35 System Functions 35 Battery 36 Display Functions 36 Power Management 36 Microsoft® Windows® Logo Key Functions 36 ...
User's Guide
Page 7
... 76 Accessing the Dell Support Utility 76 Clicking the Dell Support Icon 76 Double-Clicking the Dell Support Icon 77 Drive Problems 77 CD and DVD drive problems 78 Hard drive problems 78 E-Mail, Modem, and Internet Problems 79 Error Messages 80 IEEE 1394 Device Problems 83 Keyboard Problems 83 External keyboard problems 84 Unexpected...
... 76 Accessing the Dell Support Utility 76 Clicking the Dell Support Icon 76 Double-Clicking the Dell Support Icon 77 Drive Problems 77 CD and DVD drive problems 78 Hard drive problems 78 E-Mail, Modem, and Internet Problems 79 Error Messages 80 IEEE 1394 Device Problems 83 Keyboard Problems 83 External keyboard problems 84 Unexpected...
User's Guide
Page 9
... Computer 107 Before Working Inside Your Computer 107 Hard Drive 108 Returning a Hard Drive to Dell 110 Media Bay 110 Removing the Device Security Screw 110 Removing and Installing Media Bay Devices 111 Hinge Cover 112 Keyboard 113 Memory 115 Subscriber Identity Module (SIM) Card 119 Wireless Cards 119 Wireless Local Area...
... Computer 107 Before Working Inside Your Computer 107 Hard Drive 108 Returning a Hard Drive to Dell 110 Media Bay 110 Removing the Device Security Screw 110 Removing and Installing Media Bay Devices 111 Hinge Cover 112 Keyboard 113 Memory 115 Subscriber Identity Module (SIM) Card 119 Wireless Cards 119 Wireless Local Area...

User's Guide
Page 10
Automated Order-Status Service 141 Problems With Your Order 141 Product Information 141 Returning Items for Warranty Repair or Credit 141 Before You Call 142 Contacting Dell 143 18 Appendix Cleaning Your Computer 145 Computer, Keyboard, and Display 145 Touch Pad 145 Mouse 146 Floppy Drive 146 CDs and DVDs 146 Macrovision Product Notice 147 FCC Notice (U.S. Only 147 FCC Class B 147 Glossary 149 10 Contents
Automated Order-Status Service 141 Problems With Your Order 141 Product Information 141 Returning Items for Warranty Repair or Credit 141 Before You Call 142 Contacting Dell 143 18 Appendix Cleaning Your Computer 145 Computer, Keyboard, and Display 145 Touch Pad 145 Mouse 146 Floppy Drive 146 CDs and DVDs 146 Macrovision Product Notice 147 FCC Notice (U.S. Only 147 FCC Class B 147 Glossary 149 10 Contents
User's Guide
Page 16
... computer turns off your display, see "Power Management Modes" on page 43. 1 display latch 4 device status lights 7 touch pad 10 keyboard status lights 13 ambient light sensor 2 display 3 power button 5 speakers (2) 6 keyboard 8 touch pad/track stick buttons 9 track stick 11 volume control buttons 12 mute button D I S P L A Y - D I S P L A Y L A T C H - For more information about your computer...
... computer turns off your display, see "Power Management Modes" on page 43. 1 display latch 4 device status lights 7 touch pad 10 keyboard status lights 13 ambient light sensor 2 display 3 power button 5 speakers (2) 6 keyboard 8 touch pad/track stick buttons 9 track stick 11 volume control buttons 12 mute button D I S P L A Y - D I S P L A Y L A T C H - For more information about your computer...
User's Guide
Page 17
... to indicate battery charge status. To enable or disable Bluetooth wireless technology, use the security management software that came with your Bluetooth wireless technology. The keyboard includes a numeric keypad as well as follows: - For information on a battery, the light operates as the Windows logo key. Turns on when ... information. Flashing green: The battery is low. - See "Touch Pad" on page 35. Provide the functionality of a mouse. Helps to authenticate your Dell™ computer secure. When you ordered Bluetooth wireless technology with your computer.
... to indicate battery charge status. To enable or disable Bluetooth wireless technology, use the security management software that came with your Bluetooth wireless technology. The keyboard includes a numeric keypad as well as follows: - For information on a battery, the light operates as the Windows logo key. Turns on when ... information. Flashing green: The battery is low. - See "Touch Pad" on page 35. Provide the functionality of a mouse. Helps to authenticate your Dell™ computer secure. When you ordered Bluetooth wireless technology with your computer.
User's Guide
Page 18
Turns on when the numeric keypad is enabled. V O L U M E C O N T R O L B U T T O N S - Helps to adjust the speaker volume. KEYBOARD STATUS LIGHTS The green lights located above the keyboard indicate the following: 9 Turns on when the scroll lock function is enabled. Press these buttons to control display brightness. A M B I E N T L I G H T S E N S O R - For more information, see "Using the ...
Turns on when the numeric keypad is enabled. V O L U M E C O N T R O L B U T T O N S - Helps to adjust the speaker volume. KEYBOARD STATUS LIGHTS The green lights located above the keyboard indicate the following: 9 Turns on when the scroll lock function is enabled. Press these buttons to control display brightness. A M B I E N T L I G H T S E N S O R - For more information, see "Using the ...
User's Guide
Page 22
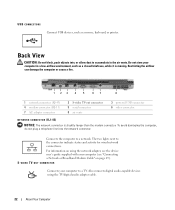
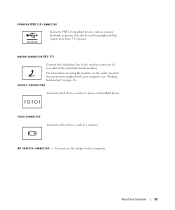
..., such as a closed briefcase, while it is slightly larger than the modem connector. Connects the computer to accumulate in a low-airflow environment, such as a mouse, keyboard, or printer. To avoid damaging the computer, do not plug a telephone line into , or allow dust to a network. Also connects digital audio-capable devices using...
..., such as a closed briefcase, while it is slightly larger than the modem connector. Connects the computer to accumulate in a low-airflow environment, such as a mouse, keyboard, or printer. To avoid damaging the computer, do not plug a telephone line into , or allow dust to a network. Also connects digital audio-capable devices using...
User's Guide
Page 23
...). About Your Computer 23 VIDEO CONNECTOR Connects video devices, such as a mouse or handheld device. POWERED USB 2.0 CONNECTOR Connects USB 2.0 compliant devices, such as a mouse, keyboard, or printer. A C A D A P T E R C O N N E C T O R - MODEM CONNECTOR (RJ-11) Connects the telephone line to the computer. Can also be used for peripherals that require more than 5 V of power...
...). About Your Computer 23 VIDEO CONNECTOR Connects video devices, such as a mouse or handheld device. POWERED USB 2.0 CONNECTOR Connects USB 2.0 compliant devices, such as a mouse, keyboard, or printer. A C A D A P T E R C O N N E C T O R - MODEM CONNECTOR (RJ-11) Connects the telephone line to the computer. Can also be used for peripherals that require more than 5 V of power...
User's Guide
Page 35
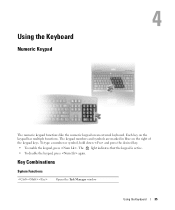
The keypad numbers and symbols are marked in blue on the keypad has multiple functions. To type a number or symbol, hold down and press the desired key. • To enable the keypad, press . Each key on the right of the keypad keys. Using the Keyboard Numeric Keypad The numeric keypad functions like the numeric keypad on an external keyboard. Key Combinations System Functions Opens the Task Manager window Using the Keyboard 35 The 9 light indicates that the keypad is active. • To disable the keypad, press again.
The keypad numbers and symbols are marked in blue on the keypad has multiple functions. To type a number or symbol, hold down and press the desired key. • To enable the keypad, press . Each key on the right of the keypad keys. Using the Keyboard Numeric Keypad The numeric keypad functions like the numeric keypad on an external keyboard. Key Combinations System Functions Opens the Task Manager window Using the Keyboard 35 The 9 light indicates that the keypad is active. • To disable the keypad, press again.
User's Guide
Page 36
... sensor, which controls brightness of the Windows logo key and key combination. Power Management Activates a power management mode. You can reprogram this keyboard shortcut to the next display option. Dell QuickSet is required (see "Configuring Power Management Settings" on page 129). Windows logo key and Restores all open windows. The options include...
... sensor, which controls brightness of the Windows logo key and key combination. Power Management Activates a power management mode. You can reprogram this keyboard shortcut to the next display option. Dell QuickSet is required (see "Configuring Power Management Settings" on page 129). Windows logo key and Restores all open windows. The options include...
User's Guide
Page 37
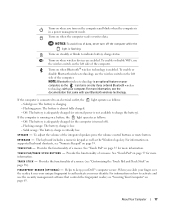
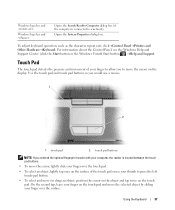
... box. Use the touch pad and touch pad buttons as the character repeat rate, click→Control Panel→Printers and Other Hardware→Keyboard. Using the Keyboard 37 Touch Pad The touch pad detects the pressure and movement of the touch pad or use a mouse. 1 2 1 touch pad 2 touch pad ... • To select and move (or drag) an object, position the cursor on the object and tap twice on the touch pad. To adjust keyboard operation, such as you would use your thumb to a network). For information about the Control Panel, see the Windows Help and Support Center (click the...
... box. Use the touch pad and touch pad buttons as the character repeat rate, click→Control Panel→Printers and Other Hardware→Keyboard. Using the Keyboard 37 Touch Pad The touch pad detects the pressure and movement of the touch pad or use a mouse. 1 2 1 touch pad 2 touch pad ... • To select and move (or drag) an object, position the cursor on the object and tap twice on the touch pad. To adjust keyboard operation, such as you would use your thumb to a network). For information about the Control Panel, see the Windows Help and Support Center (click the...
User's Guide
Page 38
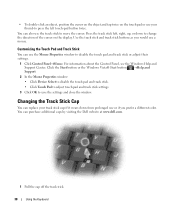
... down from prolonged use or if you would use a mouse. Customizing the Touch Pad and Track Stick You can purchase additional caps by visiting the Dell website at www.dell.com. 1 Pull the cap off the track stick. 38 Using the...
... down from prolonged use or if you would use a mouse. Customizing the Touch Pad and Track Stick You can purchase additional caps by visiting the Dell website at www.dell.com. 1 Pull the cap off the track stick. 38 Using the...

User's Guide
Page 39
Using the Keyboard 39 NOTICE: The track stick can damage the display if it is not properly seated on the post. 3 Test the track stick to ensure that the cap is seated properly. 2 Align the new cap over the square track-stick post and gently press the cap down onto the post.
Using the Keyboard 39 NOTICE: The track stick can damage the display if it is not properly seated on the post. 3 Test the track stick to ensure that the cap is seated properly. 2 Align the new cap over the square track-stick post and gently press the cap down onto the post.

User's Guide
Page 40
40 Using the Keyboard
40 Using the Keyboard
User's Guide
Page 43
... brightness on the integrated display only (not on an external monitor). • Press and the down -arrow key on the keyboard. Using the Display 43 Using the Display Adjusting Brightness When a Dell™ computer is connected to an external monitor and you try to change the brightness level, the Brightness Meter may...
... brightness on the integrated display only (not on an external monitor). • Press and the down -arrow key on the keyboard. Using the Display 43 Using the Display Adjusting Brightness When a Dell™ computer is connected to an external monitor and you try to change the brightness level, the Brightness Meter may...
User's Guide
Page 71
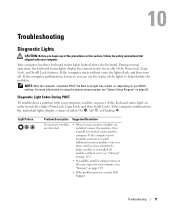
...). • If the problem persists, contact Dell Support. If the computer starts without error (see "Memory" on or off . Diagnostic Light Codes During POST To troubleshoot a problem with your computer, read the sequence of the keyboard status lights in this section, follow the safety...computer malfunctions the individual lights display a status of the same type into your BIOS settings. Your computer has three keyboard status lights located above the keyboard. Light Pattern Problem Description Suggested Resolution No memory modules are detected. • If two or more information on...
...). • If the problem persists, contact Dell Support. If the computer starts without error (see "Memory" on or off . Diagnostic Light Codes During POST To troubleshoot a problem with your computer, read the sequence of the keyboard status lights in this section, follow the safety...computer malfunctions the individual lights display a status of the same type into your BIOS settings. Your computer has three keyboard status lights located above the keyboard. Light Pattern Problem Description Suggested Resolution No memory modules are detected. • If two or more information on...


