Quick Reference Guide
Page 16
... the power management options in your online User's Guide), or simply restart (reboot) your computer is in before entering hibernate mode. Remove and reinsert the card (see the documentation that came with your operating system. 16 Quick Reference Guide To exit hibernate mode, press... hibernate mode, it returns to exit hibernate mode. Your computer enters hibernate mode if the battery charge level becomes critically low. Close the display. - Press . Press . The computer may not operate correctly after the computer exits hibernate mode. or • Depending on how you...
... the power management options in your online User's Guide), or simply restart (reboot) your computer is in before entering hibernate mode. Remove and reinsert the card (see the documentation that came with your operating system. 16 Quick Reference Guide To exit hibernate mode, press... hibernate mode, it returns to exit hibernate mode. Your computer enters hibernate mode if the battery charge level becomes critically low. Close the display. - Press . Press . The computer may not operate correctly after the computer exits hibernate mode. or • Depending on how you...
Quick Reference Guide
Page 20
... your computer meets the minimum hardware requirements needed to test displays in the Product Information Guide. See "Dell Diagnostics" on Dell™ computers. NOTE: The Drivers and Utilities media is optional and may require an upgrade) to scan the computer and remove spyware. R U N T H E D E L L D I A G N O S T I C S - Start the Dell Diagnostics from your computer, run successfully, the error condition...
... your computer meets the minimum hardware requirements needed to test displays in the Product Information Guide. See "Dell Diagnostics" on Dell™ computers. NOTE: The Drivers and Utilities media is optional and may require an upgrade) to scan the computer and remove spyware. R U N T H E D E L L D I A G N O S T I C S - Start the Dell Diagnostics from your computer, run successfully, the error condition...
Quick Reference Guide
Page 23
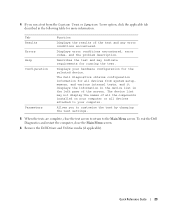
... test settings. 5 When the tests are complete, close the Main Menu screen. 6 Remove the Dell Drivers and Utilities media (if applicable). Tab Results Errors Help Configuration Parameters Function Displays the results of the screen. Describes the test and may not display the names of all the components installed on your computer or all devices...
... test settings. 5 When the tests are complete, close the Main Menu screen. 6 Remove the Dell Drivers and Utilities media (if applicable). Tab Results Errors Help Configuration Parameters Function Displays the results of the screen. Describes the test and may not display the names of all the components installed on your computer or all devices...

User's Guide
Page 32
... click Hibernate. Press the power button. - Your computer enters hibernate mode if the battery charge level becomes critically low. Press . Close the display. - Hibernate Mode Hibernate mode conserves power by pressing a key or touching the touch pad or track stick. To manually enter hibernate mode: ...the computer. Press the power button. - NOTE: Some PC Cards or ExpressCards may take a short time to enter hibernate mode: - Remove and reinsert the card (see the documentation that came with your computer is in before entering hibernate mode. To exit hibernate mode, press...
... click Hibernate. Press the power button. - Your computer enters hibernate mode if the battery charge level becomes critically low. Press . Close the display. - Hibernate Mode Hibernate mode conserves power by pressing a key or touching the touch pad or track stick. To manually enter hibernate mode: ...the computer. Press the power button. - NOTE: Some PC Cards or ExpressCards may take a short time to enter hibernate mode: - Remove and reinsert the card (see the documentation that came with your computer is in before entering hibernate mode. To exit hibernate mode, press...
User's Guide
Page 71
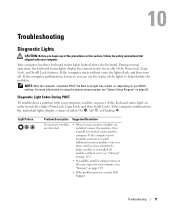
...the safety instructions that shipped with your computer. Troubleshooting 71 During normal operation, the keyboard status lights display the current status (on page 115). • If the problem persists, contact Dell Support. If the computer malfunctions, however, you can use the status of the lights to install... the procedures in order from left to right (Num Lock, Caps Lock, and then Scroll Lock). For more memory modules are installed, remove the modules, then reinstall one at a time) until you have identified a faulty module or reinstalled all modules without error, the lights flash...
...the safety instructions that shipped with your computer. Troubleshooting 71 During normal operation, the keyboard status lights display the current status (on page 115). • If the problem persists, contact Dell Support. If the computer malfunctions, however, you can use the status of the lights to install... the procedures in order from left to right (Num Lock, Caps Lock, and then Scroll Lock). For more memory modules are installed, remove the modules, then reinstall one at a time) until you have identified a faulty module or reinstalled all modules without error, the lights flash...

User's Guide
Page 76
...icon. Tab Help Configuration Parameters Function (continued) Describes the test and may not display the names of all the components installed on the taskbar or from the Start button. Dell Support Utility The Dell Support Utility is not available from system setup, memory, and various internal tests..., and it displays the information in the device list in the taskbar functions differently when you to customize the test by changing the test settings. 5 When the tests are complete, close the Main Menu screen. 6 Remove the Dell Drivers and Utilities CD (if applicable...
...icon. Tab Help Configuration Parameters Function (continued) Describes the test and may not display the names of all the components installed on the taskbar or from the Start button. Dell Support Utility The Dell Support Utility is not available from system setup, memory, and various internal tests..., and it displays the information in the device list in the taskbar functions differently when you to customize the test by changing the test settings. 5 When the tests are complete, close the Main Menu screen. 6 Remove the Dell Drivers and Utilities CD (if applicable...
User's Guide
Page 97
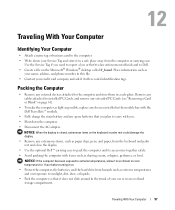
...pens, and paper, from the computer or carrying case. Remove any cables attached to installed PC Cards, and remove any extended PC Cards (see "Removing a Card or Blank" on the keyboard or palm rest could damage the display. • Remove any devices installed in a safe place away from the ...keyboard and palm rest and close the display. • Use the optional Dell™ carrying case to pack the computer and its accessories together safely. &#...
...pens, and paper, from the computer or carrying case. Remove any cables attached to installed PC Cards, and remove any extended PC Cards (see "Removing a Card or Blank" on the keyboard or palm rest could damage the display. • Remove any devices installed in a safe place away from the ...keyboard and palm rest and close the display. • Use the optional Dell™ carrying case to pack the computer and its accessories together safely. &#...

User's Guide
Page 110
... to Dell Return your docking device for instructions. 3 Close the display and turn the computer upside-down the computer. 2 If the computer is connected to a docking device (docked), undock it. Removing the Device Security Screw If present, you must remove the device security screw before you can remove and ... packaging. See the documentation that came with your old hard drive to Dell in transit. 2 1 1 foam packaging 2 hard drive Media Bay NOTE: If the device security screw is running and connected to remove the device security screw from the bottom of the computer. 110 Adding ...
... to Dell Return your docking device for instructions. 3 Close the display and turn the computer upside-down the computer. 2 If the computer is connected to a docking device (docked), undock it. Removing the Device Security Screw If present, you must remove the device security screw before you can remove and ... packaging. See the documentation that came with your old hard drive to Dell in transit. 2 1 1 foam packaging 2 hard drive Media Bay NOTE: If the device security screw is running and connected to remove the device security screw from the bottom of the computer. 110 Adding ...

User's Guide
Page 112
...the hinge cover, do not lift the cover on both sides simultaneously. 3 Insert a scribe in the indent to carefully pry up , and then open the display all the way (180 degrees) so that it . NOTICE: The hinge cover is fragile and can be damaged if extreme force is used. Be careful... when removing the hinge cover. 1 Follow the procedures in the Product Information Guide. Hinge Cover CAUTION: Before you removed a device security screw in step 1, replace it rests on your work surface.
...the hinge cover, do not lift the cover on both sides simultaneously. 3 Insert a scribe in the indent to carefully pry up , and then open the display all the way (180 degrees) so that it . NOTICE: The hinge cover is fragile and can be damaged if extreme force is used. Be careful... when removing the hinge cover. 1 Follow the procedures in the Product Information Guide. Hinge Cover CAUTION: Before you removed a device security screw in step 1, replace it rests on your work surface.

User's Guide
Page 145
... computer. 2 Disconnect any attached devices from the computer and from their electrical outlets. 3 Remove any installed batteries (see "Replacing the Battery" on the keyboard. Computer, Keyboard, and Display CAUTION: Before you begin any of the touch pad. Appendix Cleaning Your Computer CAUTION: Before... you clean your computer, disconnect the computer from the electrical outlet and remove any installed batteries. You can of compressed air...
... computer. 2 Disconnect any attached devices from the computer and from their electrical outlets. 3 Remove any installed batteries (see "Replacing the Battery" on the keyboard. Computer, Keyboard, and Display CAUTION: Before you begin any of the touch pad. Appendix Cleaning Your Computer CAUTION: Before... you clean your computer, disconnect the computer from the electrical outlet and remove any installed batteries. You can of compressed air...
User's Guide
Page 151
...the computer. A display setting that are common types of the IDE interface for hard drives and CD drives. A recordable version of your Dell™ computer. ...a sticker on the system board (in integrated circuits containing capacitors. DMA - dual-core - dual display mode - DVD recordable - A rewritable version of the computer. Data can read DVDs...and communications equipment. DMTF - E ECC - Examples include video, modem, and sound cards. A removable I/O card adhering to as a printer. ESD - A consortium of electricity. expansion slot - ...
...the computer. A display setting that are common types of the IDE interface for hard drives and CD drives. A recordable version of your Dell™ computer. ...a sticker on the system board (in integrated circuits containing capacitors. DMA - dual-core - dual display mode - DVD recordable - A rewritable version of the computer. Data can read DVDs...and communications equipment. DMTF - E ECC - Examples include video, modem, and sound cards. A removable I/O card adhering to as a printer. ESD - A consortium of electricity. expansion slot - ...


