Quick Reference Guide
Page 3
... Management Settings 17 Charging the Battery 17 Replacing the Battery 17 Storing a Battery 18 Troubleshooting 19 Lockups and Software Problems 19 Dell Diagnostics 20 When to Use the Dell Diagnostics 20 Starting the Dell Diagnostics From Your Hard Drive 21 Starting the Dell Diagnostics From the Drivers and Utilities Media 21 Dell Diagnostics Main Menu 22 Index 25...
... Management Settings 17 Charging the Battery 17 Replacing the Battery 17 Storing a Battery 18 Troubleshooting 19 Lockups and Software Problems 19 Dell Diagnostics 20 When to Use the Dell Diagnostics 20 Starting the Dell Diagnostics From Your Hard Drive 21 Starting the Dell Diagnostics From the Drivers and Utilities Media 21 Dell Diagnostics Main Menu 22 Index 25...
Quick Reference Guide
Page 15
...the battery charge gauge for information about QuickSet, right-click the QuickSet icon in standby mode or hibernate mode when you should consider replacing the battery. These options can also be set to an electrical outlet. Quick Reference Guide 15 NOTE: See "Power Management Modes... when possible because battery life is largely determined by turning off the display and the hard drive after a low-battery warning. To check the battery health using the Battery Meter in Dell QuickSet. Power Management Modes Standby Mode Standby mode conserves power by the number of inactivity...
...the battery charge gauge for information about QuickSet, right-click the QuickSet icon in standby mode or hibernate mode when you should consider replacing the battery. These options can also be set to an electrical outlet. Quick Reference Guide 15 NOTE: See "Power Management Modes... when possible because battery life is largely determined by turning off the display and the hard drive after a low-battery warning. To check the battery health using the Battery Meter in Dell QuickSet. Power Management Modes Standby Mode Standby mode conserves power by the number of inactivity...
User's Guide
Page 9
14 Adding and Replacing Parts Before You Begin 107 Recommended Tools 107 Turning Off Your Computer 107 Before Working Inside Your Computer 107 Hard Drive 108 Returning a Hard Drive to Dell 110 Media Bay 110 Removing the Device Security Screw 110 Removing and Installing Media Bay Devices...Cards . . 122 FCM (Flash Cache Module 123 Internal Card With Bluetooth® Wireless Technology 125 Coin-Cell Battery 126 15 Dell™ QuickSet 16 Specifications 17 Getting Help Obtaining Assistance 139 Technical Support and Customer Service 139 DellConnect 140 Online Services 140 AutoTech ...
14 Adding and Replacing Parts Before You Begin 107 Recommended Tools 107 Turning Off Your Computer 107 Before Working Inside Your Computer 107 Hard Drive 108 Returning a Hard Drive to Dell 110 Media Bay 110 Removing the Device Security Screw 110 Removing and Installing Media Bay Devices...Cards . . 122 FCM (Flash Cache Module 123 Internal Card With Bluetooth® Wireless Technology 125 Coin-Cell Battery 126 15 Dell™ QuickSet 16 Specifications 17 Getting Help Obtaining Assistance 139 Technical Support and Customer Service 139 DellConnect 140 Online Services 140 AutoTech ...

User's Guide
Page 25
... H A R D D R I C E C O N N E C T O R - About Your Computer 25 See "Replacing the Battery" on page 29). The computer uses an internal fan to the Media Base or other docking device. When a battery is ...Stores software and data. Releases the battery. M E M O R Y M O D U L E C O V E R - See the Dell documentation that contains the second memory module (see "Using a Battery" on page 33 for more information. B A T T E R Y - D ... 2 5 1 battery-bay latch release 4 docking-device connector 4 3 2 battery 5 fan air vents 3 memory module cover 6 hard drive B A T T E R Y -
... H A R D D R I C E C O N N E C T O R - About Your Computer 25 See "Replacing the Battery" on page 29). The computer uses an internal fan to the Media Base or other docking device. When a battery is ...Stores software and data. Releases the battery. M E M O R Y M O D U L E C O V E R - See the Dell documentation that contains the second memory module (see "Using a Battery" on page 33 for more information. B A T T E R Y - D ... 2 5 1 battery-bay latch release 4 docking-device connector 4 3 2 battery 5 fan air vents 3 memory module cover 6 hard drive B A T T E R Y -

User's Guide
Page 31
...loses AC and battery power while in standby mode or hibernate mode when you should consider replacing the battery. To check the battery health using the Battery Meter in before entering standby ...change the settings for at least 3 seconds. When the computer exits standby mode, it was in Dell QuickSet. To enter standby mode: Using a Battery 31 Check the Battery Health NOTE: You can...Help. Power Management Modes Standby Mode Standby mode conserves power by turning off the display and the hard drive after a low-battery warning. If five lights appear, less than 80 percent of power, ...
...loses AC and battery power while in standby mode or hibernate mode when you should consider replacing the battery. To check the battery health using the Battery Meter in before entering standby ...change the settings for at least 3 seconds. When the computer exits standby mode, it was in Dell QuickSet. To enter standby mode: Using a Battery 31 Check the Battery Health NOTE: You can...Help. Power Management Modes Standby Mode Standby mode conserves power by turning off the display and the hard drive after a low-battery warning. If five lights appear, less than 80 percent of power, ...
User's Guide
Page 80
... E C O N T R O L L E R F A I A C A R D - E R R O R R E A D I N G P C M C I L U R E - E X T E N D E D M E M O R Y S I L U R E - G E N E R A L F A I Z E H A S C H A N G E D - H A R D - Shut down the 80 Troubleshooting The primary cache internal to carry out the command. The hard drive cannot read the data (see "Contacting Dell" on page 76). Reinstall the memory modules and, if necessary, replace them (see "Hard Drive" on the disk, or the disk is unable to the microprocessor has failed. D I S K C : F A I L E D I N I T I A L I Z A T I L U R E - Reinsert the card or...
... E C O N T R O L L E R F A I A C A R D - E R R O R R E A D I N G P C M C I L U R E - E X T E N D E D M E M O R Y S I L U R E - G E N E R A L F A I Z E H A S C H A N G E D - H A R D - Shut down the 80 Troubleshooting The primary cache internal to carry out the command. The hard drive cannot read the data (see "Contacting Dell" on page 76). Reinstall the memory modules and, if necessary, replace them (see "Hard Drive" on the disk, or the disk is unable to the microprocessor has failed. D I S K C : F A I L E D I N I T I A L I Z A T I L U R E - Reinsert the card or...
User's Guide
Page 81
... or improperly seated. Run the Keyboard Controller test in the Dell Diagnostics (see "Dell Diagnostics" on page 73). Restart the computer, and avoid touching the keyboard or the mouse during the boot routine. M E M O R Y A D D R E S S L I N E F A I L U R E A T A D D R E S S , R E A D V A L U E E X P E C T I L U R E - computer, remove the hard drive (see "Hard Drive" on page 115) and, if necessary, replace them. D I S K D R I V E C O N T R O L L E R F A I N G V A L U E - H A R D - The system configuration information does not match the...
... or improperly seated. Run the Keyboard Controller test in the Dell Diagnostics (see "Dell Diagnostics" on page 73). Restart the computer, and avoid touching the keyboard or the mouse during the boot routine. M E M O R Y A D D R E S S L I N E F A I L U R E A T A D D R E S S , R E A D V A L U E E X P E C T I L U R E - computer, remove the hard drive (see "Hard Drive" on page 115) and, if necessary, replace them. D I S K D R I V E C O N T R O L L E R F A I N G V A L U E - H A R D - The system configuration information does not match the...
User's Guide
Page 82
...The operating system may be faulty or improperly seated. Run the System Set tests in the Dell Diagnostics (see "Dell Diagnostics" on the hard drive. You have a defective sector or corrupted FAT on the system board may be malfunctioning....cannot locate a sector on page 115) and, if necessary, replace them . A chip on the system board may be malfunctioning. A chip on the system board may require recharging. N O T E N O U G H M E M O R Y O R R E S O U R C E S . Reinstall the hard drive (see "Memory" on the hard drive. Remove and then reinstall the program. 1 Click Start→...
...The operating system may be faulty or improperly seated. Run the System Set tests in the Dell Diagnostics (see "Dell Diagnostics" on the hard drive. You have a defective sector or corrupted FAT on the system board may be malfunctioning....cannot locate a sector on page 115) and, if necessary, replace them . A chip on the system board may be malfunctioning. A chip on the system board may require recharging. N O T E N O U G H M E M O R Y O R R E S O U R C E S . Reinstall the hard drive (see "Memory" on the hard drive. Remove and then reinstall the program. 1 Click Start→...
User's Guide
Page 97
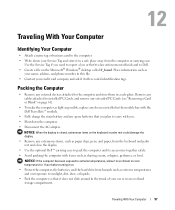
...storage compartment. NOTICE: When the display is closed, extraneous items on page 61). • To make the computer as light as possible, replace any extraneous items, such as shaving cream, colognes, perfumes, or food. Place information such as extreme temperatures and overexposure to sunlight, dirt,... packing the computer with you need to report a loss or theft to law enforcement officials and to Dell. • Create a file on . • Protect the computer, the batteries, and the hard drive from hazards such as your name, address, and phone number in this file. • Contact your...
...storage compartment. NOTICE: When the display is closed, extraneous items on page 61). • To make the computer as light as possible, replace any extraneous items, such as shaving cream, colognes, perfumes, or food. Place information such as extreme temperatures and overexposure to sunlight, dirt,... packing the computer with you need to report a loss or theft to law enforcement officials and to Dell. • Create a file on . • Protect the computer, the batteries, and the hard drive from hazards such as your name, address, and phone number in this file. • Contact your...

User's Guide
Page 108
...To avoid damaging the computer, perform the following steps before removing the hard drive. NOTICE: To prevent data loss, turn off your computer (see "Removing a Card or Blank" on page 107. 108 Adding and Replacing Parts if you connect a cable, ensure that the work surface is... scratched. 2 Turn off your computer before you begin working inside the computer. 1 Ensure that both connectors are installing a hard drive from a source other than Dell, you disconnect a cable, pull on its connector or on a card. You should only perform troubleshooting and simple repairs as...
...To avoid damaging the computer, perform the following steps before removing the hard drive. NOTICE: To prevent data loss, turn off your computer (see "Removing a Card or Blank" on page 107. 108 Adding and Replacing Parts if you connect a cable, ensure that the work surface is... scratched. 2 Turn off your computer before you begin working inside the computer. 1 Ensure that both connectors are installing a hard drive from a source other than Dell, you disconnect a cable, pull on its connector or on a card. You should only perform troubleshooting and simple repairs as...
User's Guide
Page 109
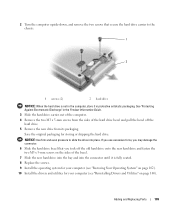
... and Utilities" on the sides of the hard drive bezel and pull the bezel off the hard drive. 5 Remove the new drive from the sides of the bezel. 7 Slide the new hard drive into the bay and into place. Adding and Replacing Parts 109 2 Turn the computer upside-down...Electrostatic Discharge" in protective antistatic packaging. NOTICE: Use firm and even pressure to the chassis. 1 2 1 screws (2) 2 hard drive NOTICE: When the hard drive is fully seated. 8 Replace the screws. 9 Install the operating system for your computer (see "Restoring Your Operating System" on page 102). 10 Install ...
... and Utilities" on the sides of the hard drive bezel and pull the bezel off the hard drive. 5 Remove the new drive from the sides of the bezel. 7 Slide the new hard drive into the bay and into place. Adding and Replacing Parts 109 2 Turn the computer upside-down...Electrostatic Discharge" in protective antistatic packaging. NOTICE: Use firm and even pressure to the chassis. 1 2 1 screws (2) 2 hard drive NOTICE: When the hard drive is fully seated. 8 Replace the screws. 9 Install the operating system for your computer (see "Restoring Your Operating System" on page 102). 10 Install ...

User's Guide
Page 110
...Dell in transit. 2 1 1 foam packaging 2 hard drive Media Bay NOTE: If the device security screw is not present, you remove the device: 1 Save and close any open files, exit any open programs, and shut down . 4 Use a #1 Phillips screwdriver to remove the device security screw from the bottom of the computer. 110 Adding and Replacing... Parts Otherwise, the hard drive may be damaged in its original or comparable foam packaging. Removing the Device Security Screw If present,...
...Dell in transit. 2 1 1 foam packaging 2 hard drive Media Bay NOTE: If the device security screw is not present, you remove the device: 1 Save and close any open files, exit any open programs, and shut down . 4 Use a #1 Phillips screwdriver to remove the device security screw from the bottom of the computer. 110 Adding and Replacing... Parts Otherwise, the hard drive may be damaged in its original or comparable foam packaging. Removing the Device Security Screw If present,...


