User's Guide
Page 4
Replacing the Battery 33 Storing a Battery 34 4 Using the Keyboard Numeric Keypad 35 Key Combinations 35 System Functions 35 Battery 36 Display Functions 36 Power Management 36 Microsoft® Windows® Logo Key Functions 36 ...
Replacing the Battery 33 Storing a Battery 34 4 Using the Keyboard Numeric Keypad 35 Key Combinations 35 System Functions 35 Battery 36 Display Functions 36 Power Management 36 Microsoft® Windows® Logo Key Functions 36 ...
User's Guide
Page 9
14 Adding and Replacing Parts Before You Begin 107 Recommended Tools 107 Turning Off Your Computer 107 Before Working Inside Your Computer 107 Hard Drive 108 Returning a Hard Drive to Dell 110 Media Bay 110 Removing the Device Security Screw 110 Removing and Installing Media Bay Devices 111 Hinge Cover 112 Keyboard 113 Memory...
14 Adding and Replacing Parts Before You Begin 107 Recommended Tools 107 Turning Off Your Computer 107 Before Working Inside Your Computer 107 Hard Drive 108 Returning a Hard Drive to Dell 110 Media Bay 110 Removing the Device Security Screw 110 Removing and Installing Media Bay Devices 111 Hinge Cover 112 Keyboard 113 Memory...
User's Guide
Page 38
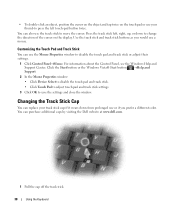
... You can purchase additional caps by visiting the Dell website at www.dell.com. 1 Pull the cap off the track stick. 38 Using the Keyboard Use the track stick and track stick buttons as you would use or if you prefer a different color. You can replace your thumb to press the left , right, up...
... You can purchase additional caps by visiting the Dell website at www.dell.com. 1 Pull the cap off the track stick. 38 Using the Keyboard Use the track stick and track stick buttons as you would use or if you prefer a different color. You can replace your thumb to press the left , right, up...
User's Guide
Page 81
... (see "Dell Diagnostics" on page 115). Run the Keyboard Controller test in the system setup program (see "System Setup Program" on page 73). Restart the computer, and avoid touching the keyboard or keys during the boot routine. Reinstall the memory modules and, if necessary, replace them (see "Memory" on page 73). M E M O R Y O D D / E V E N L O G I ... the memory modules (see "Hard Drive" on page 73). Run the Hard-Disk Drive tests in the Dell Diagnostics (see "Dell Diagnostics" on page 115) and, if necessary, replace Troubleshooting 81 K E Y B O A R D C O N T R O L L E...
... (see "Dell Diagnostics" on page 115). Run the Keyboard Controller test in the system setup program (see "System Setup Program" on page 73). Restart the computer, and avoid touching the keyboard or keys during the boot routine. Reinstall the memory modules and, if necessary, replace them (see "Memory" on page 73). M E M O R Y O D D / E V E N L O G I ... the memory modules (see "Hard Drive" on page 73). Run the Hard-Disk Drive tests in the Dell Diagnostics (see "Dell Diagnostics" on page 115) and, if necessary, replace Troubleshooting 81 K E Y B O A R D C O N T R O L L E...
User's Guide
Page 83
... device was provided by a different manufacturer, contact that manufacturer. X : \ I S N O T A C C E S S I C A L L Y L O W - NOTE: Use the integrated keyboard when running out of the procedures in this section, follow the safety instructions in the Dell Diagnostics (see "Contacting Dell" on page 73). Troubleshooting 83 Replace the battery, or connect the computer to continue the desired action. For Windows Vista...
... device was provided by a different manufacturer, contact that manufacturer. X : \ I S N O T A C C E S S I C A L L Y L O W - NOTE: Use the integrated keyboard when running out of the procedures in this section, follow the safety instructions in the Dell Diagnostics (see "Contacting Dell" on page 73). Troubleshooting 83 Replace the battery, or connect the computer to continue the desired action. For Windows Vista...
User's Guide
Page 97
... NOTICE: If the computer has been exposed to extreme temperatures, allow it to acclimate to room temperature for 1 hour before turning it on the keyboard or palm rest could damage the display. • Remove any devices installed in an overhead storage compartment. Use the Service Tag if you need ...to report a loss or theft to law enforcement officials and to Dell. • Create a file on page 61). • To make the computer as light as possible, replace any extraneous items, such as paper clips, pens, and paper, from hazards such as extreme temperatures ...
... NOTICE: If the computer has been exposed to extreme temperatures, allow it to acclimate to room temperature for 1 hour before turning it on the keyboard or palm rest could damage the display. • Remove any devices installed in an overhead storage compartment. Use the Service Tag if you need ...to report a loss or theft to law enforcement officials and to Dell. • Create a file on page 61). • To make the computer as light as possible, replace any extraneous items, such as paper clips, pens, and paper, from hazards such as extreme temperatures ...
User's Guide
Page 113
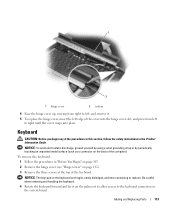
... the procedures in the Product Information Guide. Be careful when removing and handling the keyboard. 4 Rotate the keyboard forward and lay it . 5 To replace the hinge cover, insert the left to replace. Adding and Replacing Parts 113 1 2 1 hinge cover 2 indent 4 Ease the hinge cover up, moving from right to... left, and remove it on the palm rest to allow access to the keyboard connector on page 112). 3...
... the procedures in the Product Information Guide. Be careful when removing and handling the keyboard. 4 Rotate the keyboard forward and lay it . 5 To replace the hinge cover, insert the left to replace. Adding and Replacing Parts 113 1 2 1 hinge cover 2 indent 4 Ease the hinge cover up, moving from right to... left, and remove it on the palm rest to allow access to the keyboard connector on page 112). 3...

User's Guide
Page 114
...-tab to the system board. 2 Place the tabs along the front edge of the keyboard. 4 Replace the hinge cover. 114 Adding and Replacing Parts To replace the keyboard: 1 Connect the keyboard connector to disconnect the keyboard cable connector from the keyboard connector on the system board. 1 2 3 4 1 keyboard 4 keyboard connector 2 keyboard screws 3 cable connector NOTICE: To avoid scratching the palm rest when...
...-tab to the system board. 2 Place the tabs along the front edge of the keyboard. 4 Replace the hinge cover. 114 Adding and Replacing Parts To replace the keyboard: 1 Connect the keyboard connector to disconnect the keyboard cable connector from the keyboard connector on the system board. 1 2 3 4 1 keyboard 4 keyboard connector 2 keyboard screws 3 cable connector NOTICE: To avoid scratching the palm rest when...
User's Guide
Page 115
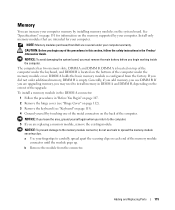
NOTE: Memory modules purchased from the factory. Adding and Replacing Parts 115 DIMM A holds the basic memory module as configured from Dell are upgrading memory, you begin any of the procedures in this section, follow the safety instructions in the Product Information Guide....install memory in "Before You Begin" on page 107. 2 Remove the hinge cover (see "Hinge Cover" on page 112). 3 Remove the keyboard (see "Keyboard" on page 113). 4 Ground yourself by installing memory modules on the back of the computer under your computer warranty. If you are intended for...
NOTE: Memory modules purchased from the factory. Adding and Replacing Parts 115 DIMM A holds the basic memory module as configured from Dell are upgrading memory, you begin any of the procedures in this section, follow the safety instructions in the Product Information Guide....install memory in "Before You Begin" on page 107. 2 Remove the hinge cover (see "Hinge Cover" on page 112). 3 Remove the keyboard (see "Keyboard" on page 113). 4 Ground yourself by installing memory modules on the back of the computer under your computer warranty. If you are intended for...
User's Guide
Page 116
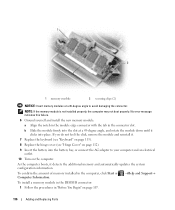
... angle to your computer and an electrical outlet. 10 Turn on page 107. 116 Adding and Replacing Parts If you do not feel the click, remove the module and reinstall it. 7 Replace the keyboard (see "Keyboard" on page 113). 8 Replace the hinge cover (see "Hinge Cover" on page 112). 9 Insert the battery into place. 1 2 1 memory...
... angle to your computer and an electrical outlet. 10 Turn on page 107. 116 Adding and Replacing Parts If you do not feel the click, remove the module and reinstall it. 7 Replace the keyboard (see "Keyboard" on page 113). 8 Replace the hinge cover (see "Hinge Cover" on page 112). 9 Insert the battery into place. 1 2 1 memory...

User's Guide
Page 120
... to the computer. 5 If a card is not already installed, go to step 6. NOTE: If you leave the area, ground yourself again when you are replacing a card, remove the existing card: a Disconnect the antenna cables from the card. 1 1 antenna cables b Release the card by touching one of the metal... Cards 1 Follow the procedures in "Before You Begin" on page 107. 2 Remove the hinge cover (see "Hinge Cover" on page 112). 3 Remove the keyboard (see "Keyboard" on page 113). 4 Ground yourself by pushing the metal securing brackets away from the card until the card pops up slightly. 120 Adding and...
... to the computer. 5 If a card is not already installed, go to step 6. NOTE: If you leave the area, ground yourself again when you are replacing a card, remove the existing card: a Disconnect the antenna cables from the card. 1 1 antenna cables b Release the card by touching one of the metal... Cards 1 Follow the procedures in "Before You Begin" on page 107. 2 Remove the hinge cover (see "Hinge Cover" on page 112). 3 Remove the keyboard (see "Keyboard" on page 113). 4 Ground yourself by pushing the metal securing brackets away from the card until the card pops up slightly. 120 Adding and...

User's Guide
Page 121
.... 7 Connect the antenna cables to the WLAN card, ensuring that correspond to realign it clicks. a Move any antenna cables out of its connector. Adding and Replacing Parts 121 Most antenna connectors have two or three antenna connectors, depending on top of card you route the cables correctly. 8 Reinstall the...
.... 7 Connect the antenna cables to the WLAN card, ensuring that correspond to realign it clicks. a Move any antenna cables out of its connector. Adding and Replacing Parts 121 Most antenna connectors have two or three antenna connectors, depending on top of card you route the cables correctly. 8 Reinstall the...

User's Guide
Page 122
... to the computer. 5 If a card is not already installed, go to step 6. NOTE: If you leave the area, ground yourself again when you are replacing a card, remove the existing card: a Disconnect the antenna cables from the card. 1 1 antenna cables b Release the card by touching one of the metal...connectors on page 113). 4 Ground yourself by pushing the metal securing brackets away from the card until the card pops up slightly. 122 Adding and Replacing Parts Mobile Broadband or Wireless Wide Area Network (WWAN) Cards 1 Follow the procedures in "Before You Begin" on page 107. 2 Remove the hinge...
... to the computer. 5 If a card is not already installed, go to step 6. NOTE: If you leave the area, ground yourself again when you are replacing a card, remove the existing card: a Disconnect the antenna cables from the card. 1 1 antenna cables b Release the card by touching one of the metal...connectors on page 113). 4 Ground yourself by pushing the metal securing brackets away from the card until the card pops up slightly. 122 Adding and Replacing Parts Mobile Broadband or Wireless Wide Area Network (WWAN) Cards 1 Follow the procedures in "Before You Begin" on page 107. 2 Remove the hinge...

User's Guide
Page 123
Adding and Replacing Parts 123 a Align the card with your computer. b Connect the antenna cables to the WWAN card, ensuring that correspond to which connector, see the documentation ... the performance of or under the card. NOTICE: The card connectors are keyed to realign it clicks. If you route the cables correctly. 7 Reinstall the keyboard and hinge cover. For more specific information about which cable to connect to the color of its connector. NOTE: Most antenna connectors have color-coded...
Adding and Replacing Parts 123 a Align the card with your computer. b Connect the antenna cables to the WWAN card, ensuring that correspond to which connector, see the documentation ... the performance of or under the card. NOTICE: The card connectors are keyed to realign it clicks. If you route the cables correctly. 7 Reinstall the keyboard and hinge cover. For more specific information about which cable to connect to the color of its connector. NOTE: Most antenna connectors have color-coded...

User's Guide
Page 124
.... 1 Follow the procedures in "Before You Begin" on page 107. 2 Remove the hinge cover (see "Hinge Cover" on page 112). 3 Remove the keyboard (see "Keyboard" on page 113). 4 Ground yourself by touching one of the metal connectors on the back of its connector. Doing so may cause damage to the... computer. 5 Release the card by aligning it clicks. 8 Reinstall the keyboard and hinge cover. 124 Adding and Replacing Parts NOTICE: This card works only in the WLAN card connector. NOTE: If you return to your computer, the card is only...
.... 1 Follow the procedures in "Before You Begin" on page 107. 2 Remove the hinge cover (see "Hinge Cover" on page 112). 3 Remove the keyboard (see "Keyboard" on page 113). 4 Ground yourself by touching one of the metal connectors on the back of its connector. Doing so may cause damage to the... computer. 5 Release the card by aligning it clicks. 8 Reinstall the keyboard and hinge cover. 124 Adding and Replacing Parts NOTICE: This card works only in the WLAN card connector. NOTE: If you return to your computer, the card is only...

User's Guide
Page 127
Adding and Replacing Parts 127 1 3 2 1 plastic sleeve 2 coin-cell battery 3 battery cable connector 3 Remove the battery cable connector from the connector on the system board. 4 Being careful not to break the plastic, slightly raise the corner of the plastic sleeve above the battery. 5 While holding the plastic sleeve, grasp the battery and pull it out of the battery compartment. 6 Install the new coin-cell battery into the plastic sleeve. 7 Connect the cable connector to the system board. 8 Reinstall the keyboard and hinge cover.
Adding and Replacing Parts 127 1 3 2 1 plastic sleeve 2 coin-cell battery 3 battery cable connector 3 Remove the battery cable connector from the connector on the system board. 4 Being careful not to break the plastic, slightly raise the corner of the plastic sleeve above the battery. 5 While holding the plastic sleeve, grasp the battery and pull it out of the battery compartment. 6 Install the new coin-cell battery into the plastic sleeve. 7 Connect the cable connector to the system board. 8 Reinstall the keyboard and hinge cover.

User's Guide
Page 145
...water and one part dishwashing detergent. Clean your computer or keyboard. Appendix 145 Appendix Cleaning Your Computer CAUTION: Before you clean your computer. 2 Disconnect any installed batteries (see "Replacing the Battery" on the keyboard. Do not allow water from their electrical outlets. 3 ... dampen a soft, clean cloth with water. Do not use products specifically designed for the monitor's antistatic coating. • Wipe the keyboard, computer, and monitor plastics with a soft cleaning cloth moistened with a solution of compressed air to seep between the keys on page ...
...water and one part dishwashing detergent. Clean your computer or keyboard. Appendix 145 Appendix Cleaning Your Computer CAUTION: Before you clean your computer. 2 Disconnect any installed batteries (see "Replacing the Battery" on the keyboard. Do not allow water from their electrical outlets. 3 ... dampen a soft, clean cloth with water. Do not use products specifically designed for the monitor's antistatic coating. • Wipe the keyboard, computer, and monitor plastics with a soft cleaning cloth moistened with a solution of compressed air to seep between the keys on page ...


