Quick Reference Guide
Page 13
... Depending on disposing of fire or explosion. You can hold a charge) decreases over time. Replace the battery only with a compatible battery purchased from children. Do not puncture, incinerate, disassemble...Operating time is fully charged. Do not use the AC adapter to connect your Dell™ portable computer with the AC adapter until the battery is significantly reduced when... • Using optical drives • Using wireless communications devices, PC Cards, ExpressCards, media memory cards, or USB devices • Using high-brightness display settings, 3D screen savers, or ...
... Depending on disposing of fire or explosion. You can hold a charge) decreases over time. Replace the battery only with a compatible battery purchased from children. Do not puncture, incinerate, disassemble...Operating time is fully charged. Do not use the AC adapter to connect your Dell™ portable computer with the AC adapter until the battery is significantly reduced when... • Using optical drives • Using wireless communications devices, PC Cards, ExpressCards, media memory cards, or USB devices • Using high-brightness display settings, 3D screen savers, or ...
User's Guide
Page 9
... and Replacing Parts Before You Begin 107 Recommended Tools 107 Turning Off Your Computer 107 Before Working Inside Your Computer 107 Hard Drive 108 Returning a Hard Drive to Dell 110 Media Bay 110 Removing the Device Security Screw 110 Removing and Installing Media Bay Devices 111 Hinge Cover 112 Keyboard 113 Memory 115...
... and Replacing Parts Before You Begin 107 Recommended Tools 107 Turning Off Your Computer 107 Before Working Inside Your Computer 107 Hard Drive 108 Returning a Hard Drive to Dell 110 Media Bay 110 Removing the Device Security Screw 110 Removing and Installing Media Bay Devices 111 Hinge Cover 112 Keyboard 113 Memory 115...

User's Guide
Page 25
...that came with the fan or the computer. NOTE: The computer turns on page 115). About Your Computer 25 See the Dell documentation that contains the second memory module (see "Using a Battery" on page 33 for more information. Lets you can damage the computer or cause a ...fire. Releases the battery. See "Replacing the Battery" on page 29). D O C K I V E - CAUTION: Do not block, push objects into, or allow dust to ...
...that came with the fan or the computer. NOTE: The computer turns on page 115). About Your Computer 25 See the Dell documentation that contains the second memory module (see "Using a Battery" on page 33 for more information. Lets you can damage the computer or cause a ...fire. Releases the battery. See "Replacing the Battery" on page 29). D O C K I V E - CAUTION: Do not block, push objects into, or allow dust to ...
User's Guide
Page 29
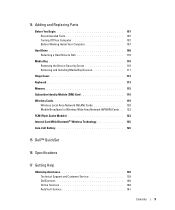
... optical drives • Using wireless communications devices, PC Cards, ExpressCards, media memory cards, or USB devices • Using high-brightness display settings, 3D screen savers, or other computers with your Dell computer. The lithium ion battery is fully charged. Operating time is used,... can check the battery charge before you use the computer. For optimal computer performance and to significantly increase operating time. Replace the battery only with a compatible battery purchased from other power-intensive programs such as standard equipment in the media bay...
... optical drives • Using wireless communications devices, PC Cards, ExpressCards, media memory cards, or USB devices • Using high-brightness display settings, 3D screen savers, or other computers with your Dell computer. The lithium ion battery is fully charged. Operating time is used,... can check the battery charge before you use the computer. For optimal computer performance and to significantly increase operating time. Replace the battery only with a compatible battery purchased from other power-intensive programs such as standard equipment in the media bay...
User's Guide
Page 80
... carry out the command. For an external mouse, check the cable connection. B A D C O M M A N D O R F I L A B L E M E M O R Y - The hard drive cannot read the data (see "Contacting Dell" on page 76). Reinstall the memory modules and, if necessary, replace them (see the documentation for example, Printer out of paper. The message is too full. Take the appropriate action. A U X I L I A R Y D E V I C E F A I V E N O T R E A D Y - Contact...
... carry out the command. For an external mouse, check the cable connection. B A D C O M M A N D O R F I L A B L E M E M O R Y - The hard drive cannot read the data (see "Contacting Dell" on page 76). Reinstall the memory modules and, if necessary, replace them (see the documentation for example, Printer out of paper. The message is too full. Take the appropriate action. A U X I L I A R Y D E V I C E F A I V E N O T R E A D Y - Contact...
User's Guide
Page 81
... cable connection. computer, remove the hard drive (see "Hard Drive" on page 115). D I S K D R I V E C O N T R O L L E R F A I N G V A L U E - H A R D - Run the Hard-Disk Drive tests in the Dell Diagnostics (see "Memory" on page 115) and, if necessary, replace them . Shut down the computer, reinstall the hard drive, and restart the computer. K E Y B O A R D C L O C K L I N E F A I O N E R R O R - M E M O R Y A L L O C A T I L U R E - H A R D - The operating system is trying to boot to...
... cable connection. computer, remove the hard drive (see "Hard Drive" on page 115). D I S K D R I V E C O N T R O L L E R F A I N G V A L U E - H A R D - Run the Hard-Disk Drive tests in the Dell Diagnostics (see "Memory" on page 115) and, if necessary, replace them . Shut down the computer, reinstall the hard drive, and restart the computer. K E Y B O A R D C L O C K L I N E F A I O N E R R O R - M E M O R Y A L L O C A T I L U R E - H A R D - The operating system is trying to boot to...
User's Guide
Page 82
...E A D V A L U E E X P E C T I L E D - A chip on page 115) and, if necessary, replace them . N O T E N O U G H M E M O R Y O R R E S O U R C E S . You have a defective sector or corrupted FAT on the hard drive. S E C T O R N O T F O U N D - If a large number of sectors are corrupted. D A Y C L O C K L O S T P O W E R - D A Y C L O C K S T O P P E D - TI M E R C H I P C O U N T E R 2 F A I N G V A L U E - If the problem persists, contact Dell (see "Memory" on the system board may be corrupted. S E E K E R R O R - The operating system cannot find the hard drive. TI...
...E A D V A L U E E X P E C T I L E D - A chip on page 115) and, if necessary, replace them . N O T E N O U G H M E M O R Y O R R E S O U R C E S . You have a defective sector or corrupted FAT on the hard drive. S E C T O R N O T F O U N D - If a large number of sectors are corrupted. D A Y C L O C K L O S T P O W E R - D A Y C L O C K S T O P P E D - TI M E R C H I P C O U N T E R 2 F A I N G V A L U E - If the problem persists, contact Dell (see "Memory" on the system board may be corrupted. S E E K E R R O R - The operating system cannot find the hard drive. TI...
User's Guide
Page 83
... loose. If you are an administrator on page 73). If the device was provided by Dell, contact Dell (see "Contacting Dell" on page 143) as you begin any of charge. Troubleshooting 83 U N E X P E C T E D I N T E R R U P T I B L E . The keyboard controller may be malfunctioning, or a memory module may appear. If your administrator to an electrical outlet. ENSURE THAT THE IEEE...
... loose. If you are an administrator on page 73). If the device was provided by Dell, contact Dell (see "Contacting Dell" on page 143) as you begin any of charge. Troubleshooting 83 U N E X P E C T E D I N T E R R U P T I B L E . The keyboard controller may be malfunctioning, or a memory module may appear. If your administrator to an electrical outlet. ENSURE THAT THE IEEE...
User's Guide
Page 115
... bottom of the computer under your computer warranty. b Remove the module from the factory. NOTE: Memory modules purchased from Dell are intended for information on the memory supported by touching one of the metal connectors on the back of the computer. CAUTION: Before you...the main battery before you are replacing a memory module, remove the existing module: NOTICE: To prevent damage to the memory module connector, do not use DIMM B. a Use your computer memory by installing memory modules on the system board. DIMM A holds the basic memory module as configured from the ...
... bottom of the computer under your computer warranty. b Remove the module from the factory. NOTE: Memory modules purchased from Dell are intended for information on the memory supported by touching one of the metal connectors on the back of the computer. CAUTION: Before you...the main battery before you are replacing a memory module, remove the existing module: NOTICE: To prevent damage to the memory module connector, do not use DIMM B. a Use your computer memory by installing memory modules on the system board. DIMM A holds the basic memory module as configured from the ...
User's Guide
Page 116
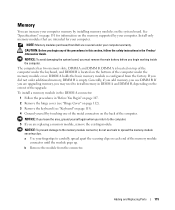
... properly, the computer may not boot properly. As the computer boots, it . 7 Replace the keyboard (see "Keyboard" on page 113). 8 Replace the hinge cover (see "Hinge Cover" on page 107. 116 Adding and Replacing Parts 1 2 1 memory module 2 securing clips (2) NOTICE: Insert memory modules at a 45-degree angle, and rotate the module down until it clicks...
... properly, the computer may not boot properly. As the computer boots, it . 7 Replace the keyboard (see "Keyboard" on page 113). 8 Replace the hinge cover (see "Hinge Cover" on page 107. 116 Adding and Replacing Parts 1 2 1 memory module 2 securing clips (2) NOTICE: Insert memory modules at a 45-degree angle, and rotate the module down until it clicks...

User's Guide
Page 117
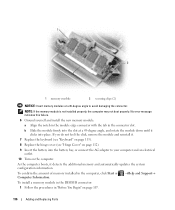
2 Turn the computer upside-down, loosen the captive screw on the memory module cover, and then remove the cover. 1 2 1 captive screw 2 memory module cover NOTICE: To prevent damage to the memory module connector, do not use tools to spread the memory-module securing clips. 3 If you are replacing a memory module, remove the existing module: a Use your fingertips to carefully spread apart the securing clips on each end of the memory module connector until the module pops up. Adding and Replacing Parts 117 b Remove the module from the connector.
2 Turn the computer upside-down, loosen the captive screw on the memory module cover, and then remove the cover. 1 2 1 captive screw 2 memory module cover NOTICE: To prevent damage to the memory module connector, do not use tools to spread the memory-module securing clips. 3 If you are replacing a memory module, remove the existing module: a Use your fingertips to carefully spread apart the securing clips on each end of the memory module connector until the module pops up. Adding and Replacing Parts 117 b Remove the module from the connector.
User's Guide
Page 118
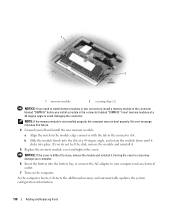
...NOTICE: If you need to install memory modules in two connectors, install a memory module in the connector labeled "DIMM A" before you do not feel the click, remove the module and reinstall it. 5 Replace the memory module cover and tighten the screw. Insert memory modules at a 45-degree angle,... and rotate the module down until it detects the additional memory and automatically updates the system configuration information. 118 Adding and...
...NOTICE: If you need to install memory modules in two connectors, install a memory module in the connector labeled "DIMM A" before you do not feel the click, remove the module and reinstall it. 5 Replace the memory module cover and tighten the screw. Insert memory modules at a 45-degree angle,... and rotate the module down until it detects the additional memory and automatically updates the system configuration information. 118 Adding and...
User's Guide
Page 119
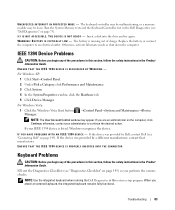
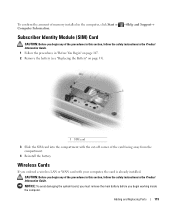
...Product Information Guide. 1 Follow the procedures in the computer, click Start or →Help and Support→ Computer Information. Adding and Replacing Parts 119 CAUTION: Before you begin any of the procedures in this section, follow the safety instructions in the Product Information Guide. ...(SIM) Card CAUTION: Before you begin working inside the computer. Wireless Cards If you begin any of memory installed in "Before You Begin" on page 107. 2 Remove the battery (see "Replacing the Battery" on page 33). 1 1 SIM card 3 Slide the SIM card into the compartment with ...
...Product Information Guide. 1 Follow the procedures in the computer, click Start or →Help and Support→ Computer Information. Adding and Replacing Parts 119 CAUTION: Before you begin any of the procedures in this section, follow the safety instructions in the Product Information Guide. ...(SIM) Card CAUTION: Before you begin working inside the computer. Wireless Cards If you begin any of memory installed in "Before You Begin" on page 107. 2 Remove the battery (see "Replacing the Battery" on page 33). 1 1 SIM card 3 Slide the SIM card into the compartment with ...

User's Guide
Page 126
... hinge cover. Coin-Cell Battery CAUTION: Before performing the following procedures, follow the safety instructions in "Before You Begin" on page 107. 2 Remove the memory module cover (see "Memory" on the back panel of the computer. 1 2 3 1 card 2 card connector 3 cable connector 5 Connect the new card to the cable. 6 Install the new card...
... hinge cover. Coin-Cell Battery CAUTION: Before performing the following procedures, follow the safety instructions in "Before You Begin" on page 107. 2 Remove the memory module cover (see "Memory" on the back panel of the computer. 1 2 3 1 card 2 card connector 3 cable connector 5 Connect the new card to the cable. 6 Install the new card...


