
Quick Reference Guide
Page 28
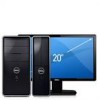
www.dell.com | support.dell.com Desktop Computer 2 1 3 4 5 7 6 1 drives bay (CD/DVD, floppy, and hard drive) 2 power supply 3 chassis intrusion switch 4 system board 5 card slots (3) for one PCI Express x16 card and two PCI cards 6 heat sink assembly 7 front I/O panel 28 Quick Reference Guide
www.dell.com | support.dell.com Desktop Computer 2 1 3 4 5 7 6 1 drives bay (CD/DVD, floppy, and hard drive) 2 power supply 3 chassis intrusion switch 4 system board 5 card slots (3) for one PCI Express x16 card and two PCI cards 6 heat sink assembly 7 front I/O panel 28 Quick Reference Guide
Quick Reference Guide
Page 29
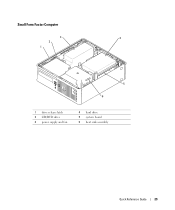
Small Form Factor Computer 3 4 2 1 5 6 1 drive release latch 2 CD/DVD drive 3 power supply and fan 4 hard drive 5 system board 6 heat sink assembly Quick Reference Guide 29
Small Form Factor Computer 3 4 2 1 5 6 1 drive release latch 2 CD/DVD drive 3 power supply and fan 4 hard drive 5 system board 6 heat sink assembly Quick Reference Guide 29
Quick Reference Guide
Page 36
... several A configuration error exists. If the Dell Diagnostics is running , allow the testing to see your online User's Guide. 36 Quick Reference Guide Blinking yellow A power supply or system board failure has occurred. See "Power Problems" in a power-saving mode. See "Beep Codes" on ...page 37 to see if the specific problem is required. If the computer does not boot, contact Dell for instructions on the ...
... several A configuration error exists. If the Dell Diagnostics is running , allow the testing to see your online User's Guide. 36 Quick Reference Guide Blinking yellow A power supply or system board failure has occurred. See "Power Problems" in a power-saving mode. See "Beep Codes" on ...page 37 to see if the specific problem is required. If the computer does not boot, contact Dell for instructions on the ...
Setup Guide
Page 19
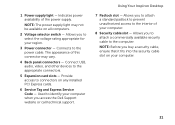
... a pair of this button indicates the power state: • Off - Connects to a powered speaker or sound system, use with the system board or the power supply. 1 Optical drive (2) - Using Your Inspiron Desktop 5 Power button and light - Contact Dell (see "Power Problems" on page 57) for assistance. • NOTE: For information on power problems, see "Contacting Dell" on page 30. 17
... a pair of this button indicates the power state: • Off - Connects to a powered speaker or sound system, use with the system board or the power supply. 1 Optical drive (2) - Using Your Inspiron Desktop 5 Power button and light - Contact Dell (see "Power Problems" on page 57) for assistance. • NOTE: For information on power problems, see "Contacting Dell" on page 30. 17
Setup Guide
Page 23
... the computer. Allows you access the Dell Support website or call technical support. Used to the interior of the power supply. Indicates power availability of your computer when you to attach a standard padlock to prevent unauthorized access to identify your computer. 8 Security cable slot - Using Your Inspiron Desktop 7 Padlock slot - 1 Power supply light - Allows you to attach...
... the computer. Allows you access the Dell Support website or call technical support. Used to the interior of the power supply. Indicates power availability of your computer when you to attach a standard padlock to prevent unauthorized access to identify your computer. 8 Security cable slot - Using Your Inspiron Desktop 7 Padlock slot - 1 Power supply light - Allows you to attach...
Setup Guide
Page 32
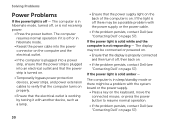
... a problem with the power supply or the power cable. • If the problem persists, contact Dell (see "Contacting Dell" on the back of the computer is not receiving power. • Press the power button. Solving Problems Power Problems If the power light is not responding - If the power light is solid white...then back on. • If the problem persists, contact Dell (see "Contacting Dell" on page 57). If the power light is in sleep/standby mode or there might be connected or powered on. • Ensure that the power supply light on page 57). 30 The computer is solid amber -...
... a problem with the power supply or the power cable. • If the problem persists, contact Dell (see "Contacting Dell" on the back of the computer is not receiving power. • Press the power button. Solving Problems Power Problems If the power light is not responding - If the power light is solid white...then back on. • If the problem persists, contact Dell (see "Contacting Dell" on page 57). If the power light is in sleep/standby mode or there might be connected or powered on. • Ensure that the power supply light on page 57). 30 The computer is solid amber -...

Setup Guide
Page 33
... page 57). 31 There might be a problem with the memory. • If the problem persists, contact Dell (see if that your computer is successfully communicating with the system board or the power supply. Solving Problems If the power light is creating interference by interrupting or blocking other signals. The computer has detected an error...
... page 57). 31 There might be a problem with the memory. • If the problem persists, contact Dell (see if that your computer is successfully communicating with the system board or the power supply. Solving Problems If the power light is creating interference by interrupting or blocking other signals. The computer has detected an error...

Setup Guide
Page 65
Power AC Power Supply Wattage Input voltage 300 W 100-127 VAC/ 200-240 VAC Input frequency 50/60 Hz Input current 9A (8A)/4.5 A Specifications Communication Network adapter 10/100/1000 Ethernet LAN on system board Wireless (optional) Wi-Fi Physical Height Width Depth Weight 368.20 mm (14.50 inches) 182.80 mm (7.20 inches) 448.80 mm (17.67 inches) 8.94 kg (19.71 lb) 63
Power AC Power Supply Wattage Input voltage 300 W 100-127 VAC/ 200-240 VAC Input frequency 50/60 Hz Input current 9A (8A)/4.5 A Specifications Communication Network adapter 10/100/1000 Ethernet LAN on system board Wireless (optional) Wi-Fi Physical Height Width Depth Weight 368.20 mm (14.50 inches) 182.80 mm (7.20 inches) 448.80 mm (17.67 inches) 8.94 kg (19.71 lb) 63
Service Manual
Page 1
...model: D06D series Regulatory type: D06D001 disclaims any manner whatsoever without notice. © 2011 Dell Inc. Trademarks used in this text: Dell™, the DELL logo, and Inspiron-™ are either potential damage to hardware or loss of data and tells you make ... of your computer. Dell™ Inspiron™ 620s Service Manual Technical Overview Before You Begin Computer Cover Memory Module(s) Front Bezel PCI Express Cards Card Retention Bracket Drives Front I/O Panel Power Button Module Fans Processor Coin-Cell Battery Power Supply System Board System Setup...
...model: D06D series Regulatory type: D06D001 disclaims any manner whatsoever without notice. © 2011 Dell Inc. Trademarks used in this text: Dell™, the DELL logo, and Inspiron-™ are either potential damage to hardware or loss of data and tells you make ... of your computer. Dell™ Inspiron™ 620s Service Manual Technical Overview Before You Begin Computer Cover Memory Module(s) Front Bezel PCI Express Cards Card Retention Bracket Drives Front I/O Panel Power Button Module Fans Processor Coin-Cell Battery Power Supply System Board System Setup...
Service Manual
Page 31
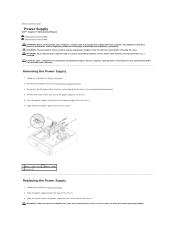
... and tighten all screws may cause electrical shock as these screws are a key part of the chassis. 3. Back to Contents Page Power Supply Dell™ Inspiron™ 620s Service Manual Removing the Power Supply Replacing the Power Supply WARNING: Before working inside your computer, read the safety information that shipped with your computer. CAUTION: Only a certified service technician should...
... and tighten all screws may cause electrical shock as these screws are a key part of the chassis. 3. Back to Contents Page Power Supply Dell™ Inspiron™ 620s Service Manual Removing the Power Supply Replacing the Power Supply WARNING: Before working inside your computer, read the safety information that shipped with your computer. CAUTION: Only a certified service technician should...

Service Manual
Page 32
4. Connect the DC power cables to electrical outlets, and turn them on. Replace the three screws that secure the power supply to Contents Page Replace the computer cover (see System Board Components). 6. Back to the chassis. 5. Connect your computer and devices to the system board and drives (see Replacing the Computer Cover). 7.
4. Connect the DC power cables to electrical outlets, and turn them on. Replace the three screws that secure the power supply to Contents Page Replace the computer cover (see System Board Components). 6. Back to the chassis. 5. Connect your computer and devices to the system board and drives (see Replacing the Computer Cover). 7.
Service Manual
Page 42
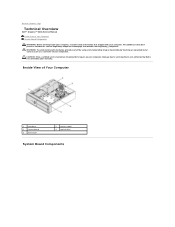
...Dell™ Inspiron™ 620s Service Manual Inside View of Your Computer 1 hard drive 3 system board 5 front bezel 2 power supply 4 optical drive System Board Components Inside View of Your Computer System Board Components WARNING: Before working inside your computer, read the safety information that is not authorized by Dell...connector on your computer). For additional safety best practices information, see the Regulatory Compliance Homepage at www.dell.com/regulatory_compliance. CAUTION: Only a certified service technician should perform repairs on your computer. Back to ...
...Dell™ Inspiron™ 620s Service Manual Inside View of Your Computer 1 hard drive 3 system board 5 front bezel 2 power supply 4 optical drive System Board Components Inside View of Your Computer System Board Components WARNING: Before working inside your computer, read the safety information that is not authorized by Dell...connector on your computer). For additional safety best practices information, see the Regulatory Compliance Homepage at www.dell.com/regulatory_compliance. CAUTION: Only a certified service technician should perform repairs on your computer. Back to ...


