Quick Reference Guide
Page 34
...Utilities CD 1 Insert the Drivers and Utilities CD. 2 Shut down your computer and try again. 3 When the boot device list appears, highlight Boot to Utility Partition and press . 4 When the Dell Diagnostics Main Menu appears, select the test you see a message stating that appears. 6 Type 1 to start the... to wait until you want to test displays in system setup and is active. NOTE: The next steps change the boot sequence for your computer. 2 When the DELL™ logo appears, press immediately. If multiple versions are listed, select the version appropriate for one time only. If...
...Utilities CD 1 Insert the Drivers and Utilities CD. 2 Shut down your computer and try again. 3 When the boot device list appears, highlight Boot to Utility Partition and press . 4 When the Dell Diagnostics Main Menu appears, select the test you see a message stating that appears. 6 Type 1 to start the... to wait until you want to test displays in system setup and is active. NOTE: The next steps change the boot sequence for your computer. 2 When the DELL™ logo appears, press immediately. If multiple versions are listed, select the version appropriate for one time only. If...
Quick Reference Guide
Page 36
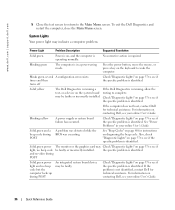
... is running a test, or a device on page 37 to see if the specific problem is identified. If the computer does not boot, contact Dell for instructions on page 37 to see if the specific problem is required. Blinking yellow A power supply or system board failure has occurred. ... page 37 to see your online User's Guide. times and then turns off Check "Diagnostic Lights" on page 40 for technical assistance. www.dell.com | support.dell.com 5 Close the test screen to return to wake the computer. See "Beep Codes" on page 37 to complete. Press the power button...
... is running a test, or a device on page 37 to see if the specific problem is identified. If the computer does not boot, contact Dell for instructions on page 37 to see if the specific problem is required. Blinking yellow A power supply or system board failure has occurred. ... page 37 to see your online User's Guide. times and then turns off Check "Diagnostic Lights" on page 40 for technical assistance. www.dell.com | support.dell.com 5 Close the test screen to return to wake the computer. See "Beep Codes" on page 37 to complete. Press the power button...
Quick Reference Guide
Page 37
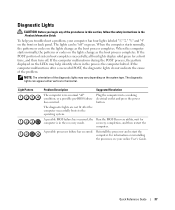
..., the pattern displayed on the LEDs may vary depending on the front or back panel. If the computer malfunctions after the computer successfully boots to the operating system. Plug the computer into a working electrical outlet and press the power button. recovery completion, and then restart the... lights may help you begin any of the problem. When the computer starts normally, the patterns or codes on the lights change as the boot process completes. the Run the BIOS Recovery utility, wait for a short time, and then turn off " or green. Diagnostic Lights CAUTION:...
..., the pattern displayed on the LEDs may vary depending on the front or back panel. If the computer malfunctions after the computer successfully boots to the operating system. Plug the computer into a working electrical outlet and press the power button. recovery completion, and then restart the... lights may help you begin any of the problem. When the computer starts normally, the patterns or codes on the lights change as the boot process completes. the Run the BIOS Recovery utility, wait for a short time, and then turn off " or green. Diagnostic Lights CAUTION:...

Quick Reference Guide
Page 43
...System CD provides options for instructions. NOTICE: To prevent conflicts with a newly installed driver, first try using Windows XP Device Driver Rollback. Booting From the Operating System CD 1 Save and close any open programs. 2 Insert the Operating System CD. NOTICE: Before performing the installation..., back up all the steps in the following items: • Dell™ Operating System CD • Dell Drivers and Utilities CD To reinstall Windows XP, perform all data files on your computer has a RAID controller. To ...
...System CD provides options for instructions. NOTICE: To prevent conflicts with a newly installed driver, first try using Windows XP Device Driver Rollback. Booting From the Operating System CD 1 Save and close any open programs. 2 Insert the Operating System CD. NOTICE: Before performing the installation..., back up all the steps in the following items: • Dell™ Operating System CD • Dell Drivers and Utilities CD To reinstall Windows XP, perform all data files on your computer has a RAID controller. To ...
Quick Reference Guide
Page 44
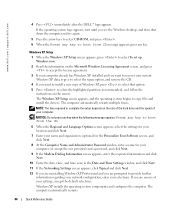
... the DELL™ logo appears. The computer automatically restarts multiple times. If the operating system logo appears, wait until you see the Windows desktop, and then shut down the computer and try again. 5 Press the arrow keys to select CD-ROM, and press . 6 When the Press any key to boot from... CD message appears, press any key to boot from the CD. 6 When the Regional and Language Options screen appears, select the settings for your location and click Next. 7 Enter...
... the DELL™ logo appears. The computer automatically restarts multiple times. If the operating system logo appears, wait until you see the Windows desktop, and then shut down the computer and try again. 5 Press the arrow keys to select CD-ROM, and press . 6 When the Press any key to boot from... CD message appears, press any key to boot from the CD. 6 When the Regional and Language Options screen appears, select the settings for your location and click Next. 7 Enter...
Quick Reference Guide
Page 45
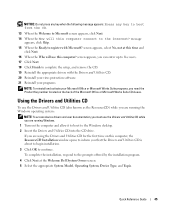
... If you are using the Drivers and Utilities CD for the first time on the computer and allow it to boot to the Windows desktop. 2 Insert the Drivers and Utilities CD into the CD drive. NOTICE: Do not press... any key when the following message appears: Press any key to boot from the CD. 13 When the Welcome to Microsoft screen appears, click Next. 14 When the How will use...3 Click OK to continue. screen appears, select No, not at the Welcome Dell System Owner screen. 5 Select the appropriate System Model, Operating System, Device Type, and Topic.
... If you are using the Drivers and Utilities CD for the first time on the computer and allow it to boot to the Windows desktop. 2 Insert the Drivers and Utilities CD into the CD drive. NOTICE: Do not press... any key when the following message appears: Press any key to boot from the CD. 13 When the Welcome to Microsoft screen appears, click Next. 14 When the How will use...3 Click OK to continue. screen appears, select No, not at the Welcome Dell System Owner screen. 5 Select the appropriate System Model, Operating System, Device Type, and Topic.

Setup Guide
Page 39
... have failed at checkpoint [nnnn]. Contact Dell (see "Contacting Dell" on page 57) for assistance. Contact Dell (see "Contacting Dell" on page 57) for assistance. For help you identify the cause and action needed to complete the boot routine three consecutive times for the same ... BIOS Setup default has been loaded- Previous attempts at booting this checkpoint and contact Dell Technical Support - Keyboard failure - Replace the battery (see the Service Manual at support.dell.com/manuals) or Contact Dell (see "Contacting Dell" on page 57) for loose connection. 37 Using ...
... have failed at checkpoint [nnnn]. Contact Dell (see "Contacting Dell" on page 57) for assistance. Contact Dell (see "Contacting Dell" on page 57) for assistance. For help you identify the cause and action needed to complete the boot routine three consecutive times for the same ... BIOS Setup default has been loaded- Previous attempts at booting this checkpoint and contact Dell Technical Support - Keyboard failure - Replace the battery (see the Service Manual at support.dell.com/manuals) or Contact Dell (see "Contacting Dell" on page 57) for loose connection. 37 Using ...
Setup Guide
Page 40
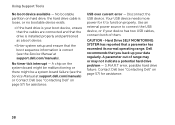
...malfunctioning or there might be a system board failure (see the Service Manual at support.dell.com/manuals). Use an external power source to function properly. Dell recommends that you back up your boot device, ensure that the cables are connected and that the drive is installed properly ...and partitioned as a boot device. • Enter system setup and ensure that a parameter has exceeded its...
...malfunctioning or there might be a system board failure (see the Service Manual at support.dell.com/manuals). Use an external power source to function properly. Dell recommends that you back up your boot device, ensure that the cables are connected and that the drive is installed properly ...and partitioned as a boot device. • Enter system setup and ensure that a parameter has exceeded its...

Setup Guide
Page 42
..., the following message is displayed: "Enhanced Pre-boot System Assessment Complete." 5. If you want to restart your computer. 40 then, shut down the error code(s) that appear on the screen and contact Dell (see the Microsoft Windows desktop; Follow the instructions...message appears "Do you are experiencing memory issues, press , otherwise press . Select Diagnostics from the boot menu and press . 4. Using Support Tools Starting Dell ePSA Diagnostics Enhanced Pre-boot System Assessment (ePSA) tests devices such as the system board, keyboard, display, memory, hard drive...
..., the following message is displayed: "Enhanced Pre-boot System Assessment Complete." 5. If you want to restart your computer. 40 then, shut down the error code(s) that appear on the screen and contact Dell (see the Microsoft Windows desktop; Follow the instructions...message appears "Do you are experiencing memory issues, press , otherwise press . Select Diagnostics from the boot menu and press . 4. Using Support Tools Starting Dell ePSA Diagnostics Enhanced Pre-boot System Assessment (ePSA) tests devices such as the system board, keyboard, display, memory, hard drive...

Setup Guide
Page 47
...data files. Dell DataSafe Local Backup allows you to: • Backup and restore your computer to an earlier operating state • Create system recovery media (see the Microsoft Windows desktop; Disconnect all the devices (USB drive, printer, and so on) connected to access the Advanced Boot Options window.... NOTE: If you wait too long and the operating system logo appears, continue to restore your computer and try again. 5. When the DELL logo appears, press several times to the computer and remove any ...
...data files. Dell DataSafe Local Backup allows you to: • Backup and restore your computer to an earlier operating state • Create system recovery media (see the Microsoft Windows desktop; Disconnect all the devices (USB drive, printer, and so on) connected to access the Advanced Boot Options window.... NOTE: If you wait too long and the operating system logo appears, continue to restore your computer and try again. 5. When the DELL logo appears, press several times to the computer and remove any ...

Setup Guide
Page 49
Insert the system recovery disc or USB key and restart the computer. 2. Select the appropriate boot device from being recovered. When the DELL logo appears, press immediately. Follow the instructions on the screen. 47 You can use of the recovery options installed on your ...8226; Hard drive failure that you purchased the computer while preserving the data files. Restoring Your Operating System To restore the operating system and Dell factory-installed software on your computer and try again. 3. then, shut down your computer using the system recovery media. Use the system...
Insert the system recovery disc or USB key and restart the computer. 2. Select the appropriate boot device from being recovered. When the DELL logo appears, press immediately. Follow the instructions on the screen. 47 You can use of the recovery options installed on your ...8226; Hard drive failure that you purchased the computer while preserving the data files. Restoring Your Operating System To restore the operating system and Dell factory-installed software on your computer and try again. 3. then, shut down your computer using the system recovery media. Use the system...

Setup Guide
Page 50
...your computer. NOTE: If Dell Factory Image Restore is not...so on the computer. 2. Starting Dell Factory Image Restore 1. If possible, ...Dell DataSafe Local Backup" on your computer, use Dell DataSafe Local Backup (see the Microsoft Windows desktop; Turn on . Restoring Your Operating System Dell Factory Image Restore CAUTION: Using Dell... Factory Image Restore to restore your operating system permanently deletes all data before using Dell Factory Image Restore. If possible, back up all data on certain computers. Use Dell...Use Dell Factory Image ...
...your computer. NOTE: If Dell Factory Image Restore is not...so on the computer. 2. Starting Dell Factory Image Restore 1. If possible, ...Dell DataSafe Local Backup" on your computer, use Dell DataSafe Local Backup (see the Microsoft Windows desktop; Turn on . Restoring Your Operating System Dell Factory Image Restore CAUTION: Using Dell... Factory Image Restore to restore your operating system permanently deletes all data before using Dell Factory Image Restore. If possible, back up all data on certain computers. Use Dell...Use Dell Factory Image ...
Setup Guide
Page 68
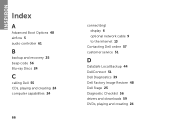
INSPIRON Index A Advanced Boot Options 48 airflow 5 audio controller 61 B backup and recovery 25 beep code 56 Blu-ray Discs 24 C calling Dell 55 CDs, playing and creating 24 computer capabilities 24 66 connect(ing) display 6 optional network cable 9 to the Internet 13 Contacting Dell online 57 customer service 51 D DataSafe Local Backup 44 DellConnect 51 Dell Diagnostics 39 Dell Factory Image Restore 48 Dell Stage 25 Diagnostic Checklist 56 drivers and downloads 59 DVDs, playing and creating 24
INSPIRON Index A Advanced Boot Options 48 airflow 5 audio controller 61 B backup and recovery 25 beep code 56 Blu-ray Discs 24 C calling Dell 55 CDs, playing and creating 24 computer capabilities 24 66 connect(ing) display 6 optional network cable 9 to the Internet 13 Contacting Dell online 57 customer service 51 D DataSafe Local Backup 44 DellConnect 51 Dell Diagnostics 39 Dell Factory Image Restore 48 Dell Stage 25 Diagnostic Checklist 56 drivers and downloads 59 DVDs, playing and creating 24
Service Manual
Page 38
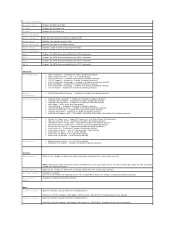
... USB Powershare in S4/S5 State -Enabled or Disabled (Disabled by default) Boot 1st Boot Priority 2nd Boot Priority Specifies the boot sequence from the available devices Hard Disk; Off (On by default) Specifies the boot sequence from S4/S5 - Disabled (Enabled by default) Security Admin Password Allows...speed in Sleep State - Hence, the administrator password must enter Admin Password to access the F12 Boot Menu when this setting is present System Password Boot Menu Security HDD Protection Feature NOTE: Deleting the administrator password will delete the system password. USB ...
... USB Powershare in S4/S5 State -Enabled or Disabled (Disabled by default) Boot 1st Boot Priority 2nd Boot Priority Specifies the boot sequence from the available devices Hard Disk; Off (On by default) Specifies the boot sequence from S4/S5 - Disabled (Enabled by default) Security Admin Password Allows...speed in Sleep State - Hence, the administrator password must enter Admin Password to access the F12 Boot Menu when this setting is present System Password Boot Menu Security HDD Protection Feature NOTE: Deleting the administrator password will delete the system password. USB ...
Service Manual
Page 39
... the available devices Hard Disk; Changing Boot Sequence for example, to boot from the CD/DVD/CD-RW drive to boot from the CD/DVD/CD-RW drive. USB Hard Disk; USB CD/DVD; The computer attempts to run the Dell Diagnostics from the network, ensure that your device is...DVD/CD-RW Drive - l USB Storage Device - To ensure that onboard LAN boot ROM option is in the system setup (see System Setup). Network; 3rd Boot Priority 4th Boot Priority 5th Boot Priority 6th Boot Priority Specifies the boot sequence from the network. USB Floppy; If no operating system is found on (...
... the available devices Hard Disk; Changing Boot Sequence for example, to boot from the CD/DVD/CD-RW drive to boot from the CD/DVD/CD-RW drive. USB Hard Disk; USB CD/DVD; The computer attempts to run the Dell Diagnostics from the network, ensure that your device is...DVD/CD-RW Drive - l USB Storage Device - To ensure that onboard LAN boot ROM option is in the system setup (see System Setup). Network; 3rd Boot Priority 4th Boot Priority 5th Boot Priority 6th Boot Priority Specifies the boot sequence from the network. USB Floppy; If no operating system is found on (...

Service Manual
Page 40
... repairs on the system board. (see Removing the Computer Cover). 3. Follow the instructions in Before You Begin. 2. and down your current boot sequence in case you begin any of the device. Press plus (+) or minus (-) to restore it on your computer). 1. Clearing CMOS ...Passwords WARNING: Before you want to change the boot priority of the procedures in this section, follow the safety instructions that is not authorized by Dell is not covered by periodically touching an unpainted metal surface (such as a connector on pins 1...
... repairs on the system board. (see Removing the Computer Cover). 3. Follow the instructions in Before You Begin. 2. and down your current boot sequence in case you begin any of the device. Press plus (+) or minus (-) to restore it on your computer). 1. Clearing CMOS ...Passwords WARNING: Before you want to change the boot priority of the procedures in this section, follow the safety instructions that is not authorized by Dell is not covered by periodically touching an unpainted metal surface (such as a connector on pins 1...


