Quick Reference Guide
Page 11
...NOTICE: In Japan, the voltage selection switch must be available on the back panel and can access connectors for any installed PCI and PCI Express cards. Also, ensure that your location. Computers with an auto-sensing voltage selector do not have certain computers) a...typically remain connected, such as a mouse, keyboard, memory key, printer, joystick, and computer speakers into the appropriate connector. 6 card slots You can automatically detect the correct operating voltage. To help avoid damaging a computer with a manual voltage-selection switch, set to operate ...
...NOTICE: In Japan, the voltage selection switch must be available on the back panel and can access connectors for any installed PCI and PCI Express cards. Also, ensure that your location. Computers with an auto-sensing voltage selector do not have certain computers) a...typically remain connected, such as a mouse, keyboard, memory key, printer, joystick, and computer speakers into the appropriate connector. 6 card slots You can automatically detect the correct operating voltage. To help avoid damaging a computer with a manual voltage-selection switch, set to operate ...
Quick Reference Guide
Page 13
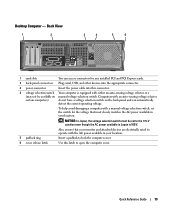
Back View 1 2 3 4 5 6 1 card slots You can automatically detect the correct operating voltage. Quick Reference Guide 13 Computers with either an auto-sensing voltage selector or a (may not be set the switch for any installed PCI and PCI Express cards. 2 back-panel connectors Plug serial, USB, and other devices into the appropriate connector. 3 power connector...
Back View 1 2 3 4 5 6 1 card slots You can automatically detect the correct operating voltage. Quick Reference Guide 13 Computers with either an auto-sensing voltage selector or a (may not be set the switch for any installed PCI and PCI Express cards. 2 back-panel connectors Plug serial, USB, and other devices into the appropriate connector. 3 power connector...
Quick Reference Guide
Page 15
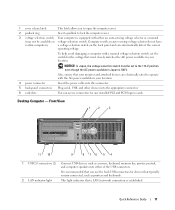
... into this drive. Insert a CD or DVD (if applicable) into the appropriate connector. Back View 1 2 3 4 5 6 1 card slots 2 back-panel connectors 3 power connector You can help you troubleshoot problems with your computer. Connect the power cable to indicate different operating states: ... of speakers. 7 power light 8 headphone connector 9 microphone connector 10 floppy drive 11 CD/DVD drive Turns on page 36 for any installed PCI and PCI Express cards. The computer is in a normal operating state. • Blinking green - The computer is turned off. • Steady green ...
... into this drive. Insert a CD or DVD (if applicable) into the appropriate connector. Back View 1 2 3 4 5 6 1 card slots 2 back-panel connectors 3 power connector You can help you troubleshoot problems with your computer. Connect the power cable to indicate different operating states: ... of speakers. 7 power light 8 headphone connector 9 microphone connector 10 floppy drive 11 CD/DVD drive Turns on page 36 for any installed PCI and PCI Express cards. The computer is in a normal operating state. • Blinking green - The computer is turned off. • Steady green ...

Quick Reference Guide
Page 28
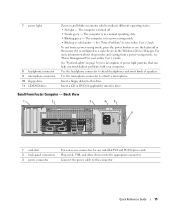
www.dell.com | support.dell.com Desktop Computer 2 1 3 4 5 7 6 1 drives bay (CD/DVD, floppy, and hard drive) 2 power supply 3 chassis intrusion switch 4 system board 5 card slots (3) for one PCI Express x16 card and two PCI cards 6 heat sink assembly 7 front I/O panel 28 Quick Reference Guide
www.dell.com | support.dell.com Desktop Computer 2 1 3 4 5 7 6 1 drives bay (CD/DVD, floppy, and hard drive) 2 power supply 3 chassis intrusion switch 4 system board 5 card slots (3) for one PCI Express x16 card and two PCI cards 6 heat sink assembly 7 front I/O panel 28 Quick Reference Guide
Setup Guide
Page 23
Provide access to the interior of your computer. 21 Using Your Inspiron Desktop 7 Padlock slot - Allows you buy a security cable, ensure that it fits into the security cable slot on your computer. 8 Security cable slot - Allows you access the Dell Support website or call technical support. NOTE: Before you to attach a standard padlock... may vary. 4 Back panel connectors - Used to the computer. Indicates power availability of this connector may not be available on any installed PCI Express cards. 6 Service Tag and Express Service Code - The appearance of the power supply.
Provide access to the interior of your computer. 21 Using Your Inspiron Desktop 7 Padlock slot - Allows you buy a security cable, ensure that it fits into the security cable slot on your computer. 8 Security cable slot - Allows you access the Dell Support website or call technical support. NOTE: Before you to attach a standard padlock... may vary. 4 Back panel connectors - Used to the computer. Indicates power availability of this connector may not be available on any installed PCI Express cards. 6 Service Tag and Express Service Code - The appearance of the power supply.
Service Manual
Page 7
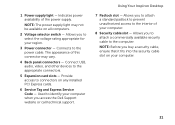
... Cards Dell™ Inspiron™ 620s Service Manual Removing PCI Express Cards Replacing PCI Express Cards Configuring Your Computer After Removing or Installing the PCI Express Card WARNING: Before working inside your computer, read the safety information that is not authorized by Dell is not covered by its connector. 1 PCI Express x1 card 2 PCI Express x1 card slot PCI Express x16...
... Cards Dell™ Inspiron™ 620s Service Manual Removing PCI Express Cards Replacing PCI Express Cards Configuring Your Computer After Removing or Installing the PCI Express Card WARNING: Before working inside your computer, read the safety information that is not authorized by Dell is not covered by its connector. 1 PCI Express x1 card 2 PCI Express x1 card slot PCI Express x16...

Service Manual
Page 8
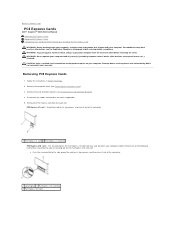
...connections, or otherwise customizing it out of the connector. 1 securing tab 2 PCI Express x16 card slot 3 PCI Express x16 card 1 securing tab 2 PCI Express x16 card slot 3 PCI Express x16 card 6. 1 securing tab 2 PCI Express x16 card slot 3 PCI Express x16 card l Press the securing tab down firmly. The brackets also ...keep dust and dirt out of the computer. Follow the instructions in the empty card-slot opening. Place the PCI Express card in the slot. If you are removing the card permanently, install a filler bracket in Before You Begin. 2. See the ...
...connections, or otherwise customizing it out of the connector. 1 securing tab 2 PCI Express x16 card slot 3 PCI Express x16 card 1 securing tab 2 PCI Express x16 card slot 3 PCI Express x16 card 6. 1 securing tab 2 PCI Express x16 card slot 3 PCI Express x16 card l Press the securing tab down firmly. The brackets also ...keep dust and dirt out of the computer. Follow the instructions in the empty card-slot opening. Place the PCI Express card in the slot. If you are removing the card permanently, install a filler bracket in Before You Begin. 2. See the ...
Service Manual
Page 9
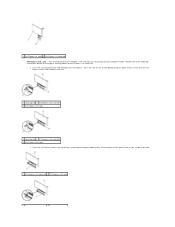
... down firmly. Ensure that the PCI Express card is fully seated in the slot. 1 securing tab 2 PCI Express x16 card slot 3 PCI Express x16 card 1 securing tab 2 PCI Express x16 card slot 3 PCI Express x16 card l Place the PCI Express card in the slot on the PCI Express x16 card slot. 1 PCI Express x1 card 2 PCI Express x1 card slot PCI Express x16 card: - Ensure that...
... down firmly. Ensure that the PCI Express card is fully seated in the slot. 1 securing tab 2 PCI Express x16 card slot 3 PCI Express x16 card 1 securing tab 2 PCI Express x16 card slot 3 PCI Express x16 card l Place the PCI Express card in the slot on the PCI Express x16 card slot. 1 PCI Express x1 card 2 PCI Express x1 card slot PCI Express x16 card: - Ensure that...
Service Manual
Page 10
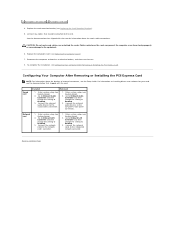
... 2. Go to Onboard LAN Controller and then change the setting to the computer's back panel connectors. Back to Enabled. 3. 1 PCI Express x16 card slot 2 PCI Express x16 card 4. CAUTION: Do not route card cables over the cards can prevent the computer cover from closing properly or cause damage...Setup). 2. Connect the network cable to the card. Enter system setup (see Configuring Your Computer After Removing or Installing the PCI Express Card. Replace the card retention bracket (see the documentation that shipped with the card. Configuring Your Computer After Removing or Installing the...
... 2. Go to Onboard LAN Controller and then change the setting to the computer's back panel connectors. Back to Enabled. 3. 1 PCI Express x16 card slot 2 PCI Express x16 card 4. CAUTION: Do not route card cables over the cards can prevent the computer cover from closing properly or cause damage...Setup). 2. Connect the network cable to the card. Enter system setup (see Configuring Your Computer After Removing or Installing the PCI Express Card. Replace the card retention bracket (see the documentation that shipped with the card. Configuring Your Computer After Removing or Installing the...
Service Manual
Page 35
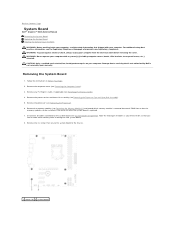
... 2. Removing the System Board 1. Remove the processor fan and heat-sink assembly (see Removing PCI Express Cards). 4. Back to Contents Page System Board Dell™ Inspiron™ 620s Service Manual Removing the System Board Replacing the System Board Entering the Service Tag in the BIOS ...to the system board (see the Regulatory Compliance Homepage at www.dell.com/regulatory_compliance. Note the routing of all cables connected to the chassis. 1 screws (6) 2 system board Follow the instructions in the same slot after installing the new system board. 8. CAUTION: Only a ...
... 2. Removing the System Board 1. Remove the processor fan and heat-sink assembly (see Removing PCI Express Cards). 4. Back to Contents Page System Board Dell™ Inspiron™ 620s Service Manual Removing the System Board Replacing the System Board Entering the Service Tag in the BIOS ...to the system board (see the Regulatory Compliance Homepage at www.dell.com/regulatory_compliance. Note the routing of all cables connected to the chassis. 1 screws (6) 2 system board Follow the instructions in the same slot after installing the new system board. 8. CAUTION: Only a ...


