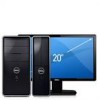
Quick Reference Guide
Page 3
...- Front View 18 Ultra-Small Form Factor Computer - Back-Panel Connectors 16 Ultra-Small Form Factor Computer - Back View 19 Removing the Computer Cover 21 Before You Begin 21 Mini Tower Computer 22 Desktop Computer 24 Small Form Factor Computer 25 Ultra-Small Form...29 Ultra-Small Form Factor Computer 30 Setting Up Your Computer 30 Solving Problems 33 Dell Diagnostics 33 System Lights 36 Diagnostic Lights 37 Beep Codes 40 Running the Dell™ IDE Hard Drive Diagnostics 41 Resolving Software and Hardware Incompatibilities 41 Contents 3 Back View 10 Desktop Computer...
...- Front View 18 Ultra-Small Form Factor Computer - Back-Panel Connectors 16 Ultra-Small Form Factor Computer - Back View 19 Removing the Computer Cover 21 Before You Begin 21 Mini Tower Computer 22 Desktop Computer 24 Small Form Factor Computer 25 Ultra-Small Form...29 Ultra-Small Form Factor Computer 30 Setting Up Your Computer 30 Solving Problems 33 Dell Diagnostics 33 System Lights 36 Diagnostic Lights 37 Beep Codes 40 Running the Dell™ IDE Hard Drive Diagnostics 41 Resolving Software and Hardware Incompatibilities 41 Contents 3 Back View 10 Desktop Computer...

Quick Reference Guide
Page 38
A possible graphics card failure has occurred. • If the computer has a graphics card, remove the card, reinstall it and restart the computer. For information on contacting Dell, see your online User's Guide. A possible floppy or hard drive failure has Reseat all USB devices, check cable connections, and then restart the computer. 38 Quick Reference Guide...
A possible graphics card failure has occurred. • If the computer has a graphics card, remove the card, reinstall it and restart the computer. For information on contacting Dell, see your online User's Guide. A possible floppy or hard drive failure has Reseat all USB devices, check cable connections, and then restart the computer. 38 Quick Reference Guide...

Quick Reference Guide
Page 39
A failure has occurred. For information on contacting Dell, see your online User's Guide. • If you have two or more memory modules installed, remove the modules, reinstall one memory module installed, reinstall it and restart the computer. Memory modules are detected, but a ...computer. • If the problem persists, contact Dell. Continue until you have identified a faulty module or reinstalled all four diagnostic lights turn green briefly before turning off to the system board from the hard drive, CD drive, and DVD drive. • Check the computer message that you ...
A failure has occurred. For information on contacting Dell, see your online User's Guide. • If you have two or more memory modules installed, remove the modules, reinstall one memory module installed, reinstall it and restart the computer. Memory modules are detected, but a ...computer. • If the problem persists, contact Dell. Continue until you have identified a faulty module or reinstalled all four diagnostic lights turn green briefly before turning off to the system board from the hard drive, CD drive, and DVD drive. • Check the computer message that you ...
Quick Reference Guide
Page 44
www.dell.com | support.dell.com 4 Press immediately after the DELL™ logo appears. NOTE: The time required to complete the setup depends on the size of the hard drive and the speed of your computer. NOTICE: Do not press any key when the following message appears: Press any key. The ... you are prompted to provide further information regarding your network configuration, enter your current Windows XP data, type r to select the repair option, and remove the CD. 4 If you want to install a new copy of Windows XP, press to select that option. 5 Press to select the highlighted partition...
www.dell.com | support.dell.com 4 Press immediately after the DELL™ logo appears. NOTE: The time required to complete the setup depends on the size of the hard drive and the speed of your computer. NOTICE: Do not press any key when the following message appears: Press any key. The ... you are prompted to provide further information regarding your network configuration, enter your current Windows XP data, type r to select the repair option, and remove the CD. 4 If you want to install a new copy of Windows XP, press to select that option. 5 Press to select the highlighted partition...

Setup Guide
Page 47
... remove any newly added internal hardware. 3. Turn off your computer and try again. 5. NOTE: If you see the Microsoft Windows desktop; Restoring Your Operating System NOTE: If Dell DataSafe Local Backup is not available on your computer, use Dell DataSafe Local Backup to restore your hard drive ...to access the Advanced Boot Options window. then, shut down your computer. 2. Disconnect all the devices (USB drive, printer, and so on page...
... remove any newly added internal hardware. 3. Turn off your computer and try again. 5. NOTE: If you see the Microsoft Windows desktop; Restoring Your Operating System NOTE: If Dell DataSafe Local Backup is not available on your computer, use Dell DataSafe Local Backup to restore your hard drive ...to access the Advanced Boot Options window. then, shut down your computer. 2. Disconnect all the devices (USB drive, printer, and so on page...

Setup Guide
Page 50
... too long and the operating system logo appears, continue to wait until you see "Dell DataSafe Local Backup" on the hard drive and removes any programs or drivers installed after you received your computer and try again. 48 Use Dell Factory Image Restore only if System Restore did not resolve your operating system. Turn on...
... too long and the operating system logo appears, continue to wait until you see "Dell DataSafe Local Backup" on the hard drive and removes any programs or drivers installed after you received your computer and try again. 48 Use Dell Factory Image Restore only if System Restore did not resolve your operating system. Turn on...

Setup Guide
Page 56
...the return. 3. You are missing any of your confidential, proprietary or personal information; Include a copy of the Diagnostics Checklist (see "Contacting Dell" on the outside of loss during shipment to call for your return. 1. Collect On Delivery (C.O.D.) packages are responsible for credit. 5. NOTE:...removable media, such as follows: NOTE: Before you have run and any accessories that belong with your region, see "Diagnostic Checklist" on page 56), indicating the tests that are also responsible for insuring any product returned, and you back up any data on the hard drive...
...the return. 3. You are missing any of your confidential, proprietary or personal information; Include a copy of the Diagnostics Checklist (see "Contacting Dell" on the outside of loss during shipment to call for your return. 1. Collect On Delivery (C.O.D.) packages are responsible for credit. 5. NOTE:...removable media, such as follows: NOTE: Before you have run and any accessories that belong with your region, see "Diagnostic Checklist" on page 56), indicating the tests that are also responsible for insuring any product returned, and you back up any data on the hard drive...
Service Manual
Page 20
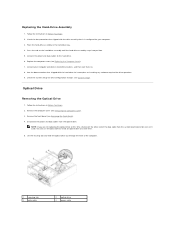
... the instructions in Before You Begin. 2. Remove the computer cover (see the Regulatory Compliance Homepage at a later time. 4. You can use the data cable to install a hard drive at www.dell.com/regulatory_compliance. Push the tab on your computer. Back to Contents Page Drives Dell™ Inspiron™ 620s Service Manual Hard Drive Optical Drive WARNING: Before working inside your computer...
... the instructions in Before You Begin. 2. Remove the computer cover (see the Regulatory Compliance Homepage at a later time. 4. You can use the data cable to install a hard drive at www.dell.com/regulatory_compliance. Push the tab on your computer. Back to Contents Page Drives Dell™ Inspiron™ 620s Service Manual Hard Drive Optical Drive WARNING: Before working inside your computer...

Service Manual
Page 21
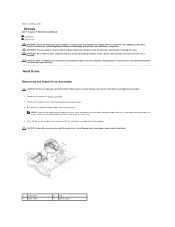
... Setup). 5. If removing the hard drive changes the drive configuration, ensure that you reflect these changes in the hard-drive bezel. 3. Follow the instructions in Before You Begin. 2. Pull the tabs on the hard drive. 4. Pull the tabs on the hard-drive bezel outwards and lift the hard-drive off the hard-drive bezel. 1 hard-drive bezel 3 hard drive 2 tabs (4) Replacing the Hard-Drive Bezel 1. Remove the hard-drive assembly (see Removing the Hard-Drive Assembly). 3.
... Setup). 5. If removing the hard drive changes the drive configuration, ensure that you reflect these changes in the hard-drive bezel. 3. Follow the instructions in Before You Begin. 2. Pull the tabs on the hard drive. 4. Pull the tabs on the hard-drive bezel outwards and lift the hard-drive off the hard-drive bezel. 1 hard-drive bezel 3 hard drive 2 tabs (4) Replacing the Hard-Drive Bezel 1. Remove the hard-drive assembly (see Removing the Hard-Drive Assembly). 3.
Service Manual
Page 22
.... 9. Connect the power and data cables to electrical outlets, and then turn them on the hard-drive assembly until the hard-drive assembly snaps into position. 5. Follow the instructions in the hard-drive bay. 4. Replacing the Hard-Drive Assembly 1. Remove the front bezel (see Replacing the Computer Cover). 7. Follow the instructions in Before You Begin. 2. Check the documentation that...
.... 9. Connect the power and data cables to electrical outlets, and then turn them on the hard-drive assembly until the hard-drive assembly snaps into position. 5. Follow the instructions in the hard-drive bay. 4. Replacing the Hard-Drive Assembly 1. Remove the front bezel (see Replacing the Computer Cover). 7. Follow the instructions in Before You Begin. 2. Check the documentation that...
Service Manual
Page 37
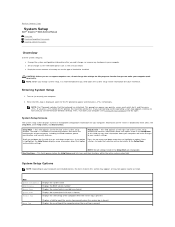
... the Setup Item. Key Functions - Back to Contents Page System Setup Dell™ Inspiron™ 620s Service Manual Overview Clearing Forgotten Passwords Clearing CMOS Passwords Overview Use the system... setup to: l Change the system configuration information after you add, change, or remove any...computer work incorrectly. As an option is absent Displays the asset tag of hard drive installed CAUTION: Unless you are changeable. NOTE: Before you can view ...
... the Setup Item. Key Functions - Back to Contents Page System Setup Dell™ Inspiron™ 620s Service Manual Overview Clearing Forgotten Passwords Clearing CMOS Passwords Overview Use the system... setup to: l Change the system configuration information after you add, change, or remove any...computer work incorrectly. As an option is absent Displays the asset tag of hard drive installed CAUTION: Unless you are changeable. NOTE: Before you can view ...


