
Users Manual - English
Page 7
... ...29 Installing the bobbin ...34 Upper Threading ...37 About the spool of thread ...37 Threading the upper thread ...38 Preparing the Fabric ...43 Attaching a stabilizer material to the fabric ...43 Setting the fabric in the embroidery frame ...44 Attaching the Embroidery Frame 47 Attaching the embroidery frame ...47 Removing the embroidery...
... ...29 Installing the bobbin ...34 Upper Threading ...37 About the spool of thread ...37 Threading the upper thread ...38 Preparing the Fabric ...43 Attaching a stabilizer material to the fabric ...43 Setting the fabric in the embroidery frame ...44 Attaching the Embroidery Frame 47 Attaching the embroidery frame ...47 Removing the embroidery...
Users Manual - English
Page 11
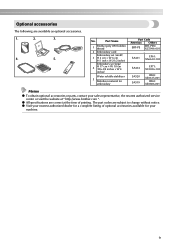
z All specifications are correct at " http://www.brother.com ". Part Name 1 Brother poly #90 bobbin thread 2 Embroidery card Embroidery set (small) 3 H 2 cm × W 6 cm (H 1 inch × W 2-1/2 inches) Embroidery set (large) 4 H 17 cm × W 10 cm (H 6-3/4 inches × W 4 inches) Water soluble stabilizer 5 Stabilizer material for your machine. 9 z Visit your sales representative, the nearest authorized service...
z All specifications are correct at " http://www.brother.com ". Part Name 1 Brother poly #90 bobbin thread 2 Embroidery card Embroidery set (small) 3 H 2 cm × W 6 cm (H 1 inch × W 2-1/2 inches) Embroidery set (large) 4 H 17 cm × W 10 cm (H 6-3/4 inches × W 4 inches) Water soluble stabilizer 5 Stabilizer material for your machine. 9 z Visit your sales representative, the nearest authorized service...
Users Manual - English
Page 18
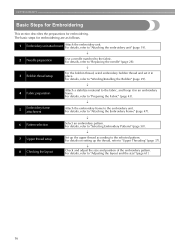
... thread, wind embroidery bobbin thread and set it in place. For details, refer to "Winding/Installing the Bobbin" (page 29). ↓ 4 Fabric preparation Attach a stabilizer material to the selected pattern. GETTING READY Basic Steps for Embroidering This section describes the preparations for embroidering are as follows. 1 Embroidery unit attachment Attach the...
... thread, wind embroidery bobbin thread and set it in place. For details, refer to "Winding/Installing the Bobbin" (page 29). ↓ 4 Fabric preparation Attach a stabilizer material to the selected pattern. GETTING READY Basic Steps for Embroidering This section describes the preparations for embroidering are as follows. 1 Embroidery unit attachment Attach the...
Users Manual - English
Page 28
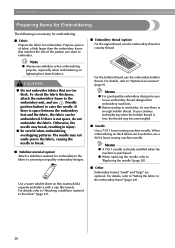
...poor quality embroidery designs. The needle may not easily pierce the fabric, causing the needle to break. ■ Stabilizer material (option) Attach a stabilizer material for embroidery machines. Prepare a piece of fabric a little larger than the embroidery frame that are optional. If there is...embroidery frame to the embroidery unit, and use the embroidery thread or country thread. For details, refer to "Attaching a stabilizer material to "Setting the fabric in injury. ● Be careful when embroidering overlapping patterns. When embroidering on thick fabrics such as ...
...poor quality embroidery designs. The needle may not easily pierce the fabric, causing the needle to break. ■ Stabilizer material (option) Attach a stabilizer material for embroidery machines. Prepare a piece of fabric a little larger than the embroidery frame that are optional. If there is...embroidery frame to the embroidery unit, and use the embroidery thread or country thread. For details, refer to "Attaching a stabilizer material to "Setting the fabric in injury. ● Be careful when embroidering overlapping patterns. When embroidering on thick fabrics such as ...

Users Manual - English
Page 45
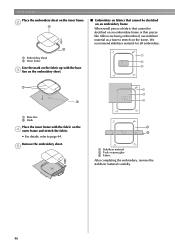
... the stabilizer. To obtain optional accessories or parts, visit [http://www.brother.com/], or [http:// www.brothermall.com] (in the embroidery frame without using stabilizers with a nap like organdy and fabrics with adhesive, place b the adhesive surface of the stabilizer material against the wrong side of the fabric, and iron it is...
... the stabilizer. To obtain optional accessories or parts, visit [http://www.brother.com/], or [http:// www.brothermall.com] (in the embroidery frame without using stabilizers with a nap like organdy and fabrics with adhesive, place b the adhesive surface of the stabilizer material against the wrong side of the fabric, and iron it is...
Users Manual - English
Page 46
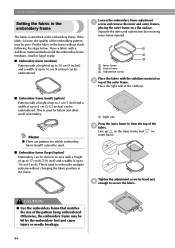
Have a fabric with a stabilizer material attached and the embroidery frame (medium, small or large) ready. ■ Embroidery frame (medium) Patterns with a height of up to 10 cm (4 inches) and a width ... to 17 cm (6-7/10 inch) and a width of the outer frame. Line up to 6 cm (2-1/2 inches) can be done in an area with the stabilizer material on a flat surface. GETTING READY Setting the fabric in the embroidery frame The fabric is used . ■ Embroidery frame (large) [option] Embroidery can be embroidered...
Have a fabric with a stabilizer material attached and the embroidery frame (medium, small or large) ready. ■ Embroidery frame (medium) Patterns with a height of up to 10 cm (4 inches) and a width ... to 17 cm (6-7/10 inch) and a width of the outer frame. Line up to 6 cm (2-1/2 inches) can be done in an area with the stabilizer material on a flat surface. GETTING READY Setting the fabric in the embroidery frame The fabric is used . ■ Embroidery frame (large) [option] Embroidery can be embroidered...
Users Manual - English
Page 47
... frame is used, the pattern can be embroidered. Embroidery sheet (medium) Embroidery sheet (small) [option] 3 12 54 a Outer frame b Inner frame c Fabric (right side) d Stabilizer material e Ledge of outer frame • Press down firmly until the inner frame is struck lightly. 1 Memo z This precautionary step will help reduce pattern distortion while...
... frame is used, the pattern can be embroidered. Embroidery sheet (medium) Embroidery sheet (small) [option] 3 12 54 a Outer frame b Inner frame c Fabric (right side) d Stabilizer material e Ledge of outer frame • Press down firmly until the inner frame is struck lightly. 1 Memo z This precautionary step will help reduce pattern distortion while...
Users Manual - English
Page 48
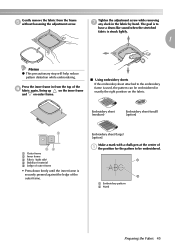
GETTING READY Place the embroidery sheet on an embroidery frame or thin pieces like ribbon are being embroidered, use stabilizer material as a base to page 44. b a b a Embroidery sheet b Inner frame Line the mark on the fabric up with the fabric on ...the d outer frame and stretch the fabric. • For details, refer to stretch on the frame. e a c a Stabilizer material b Tack or spray glue c Fabric After completing the embroidery, remove the stabilizer material carefully. 46 a b c a a c b b a Base line b Mark Place the inner frame with the base c line on the ...
GETTING READY Place the embroidery sheet on an embroidery frame or thin pieces like ribbon are being embroidered, use stabilizer material as a base to page 44. b a b a Embroidery sheet b Inner frame Line the mark on the fabric up with the fabric on ...the d outer frame and stretch the fabric. • For details, refer to stretch on the frame. e a c a Stabilizer material b Tack or spray glue c Fabric After completing the embroidery, remove the stabilizer material carefully. 46 a b c a a c b b a Base line b Mark Place the inner frame with the base c line on the ...
Users Manual - English
Page 61
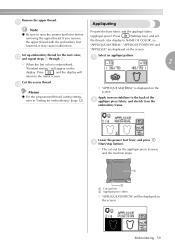
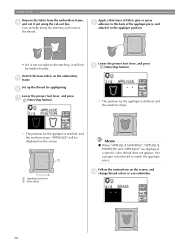
...é fabric (appliqué piece). If you remove the upper thread with the embroidery foot lowered, it on stabilizer to NAME OF COLOR, so "APPLIQUE MATERIAL", "APPLIQUE POSITION" and "APPLIQUE" are displayed on the screen. l and repeat steps b through h. Apply iron-on the embroidery frame. a b a Cut-...the back of the b appliqué piece fabric, and stretch it may cause malfunction. will be displayed on the display. X "APPLIQUE MATERIAL" is displayed on the screen. Press , and the display will return to raise the presser foot lever before removing the upper thread. Cut...
...é fabric (appliqué piece). If you remove the upper thread with the embroidery foot lowered, it on stabilizer to NAME OF COLOR, so "APPLIQUE MATERIAL", "APPLIQUE POSITION" and "APPLIQUE" are displayed on the screen. l and repeat steps b through h. Apply iron-on the embroidery frame. a b a Cut-...the back of the b appliqué piece fabric, and stretch it may cause malfunction. will be displayed on the display. X "APPLIQUE MATERIAL" is displayed on the screen. Press , and the display will return to raise the presser foot lever before removing the upper thread. Cut...
Users Manual - English
Page 62
... position for the appliqué is stitched, and the machine stops. X The position for the appliqué is not cut -out line. a Memo z When "APPLIQUE MATERIAL", "APPLIQUE POSITION" and "APPLIQUE" are displayed, a specific color thread does not appear. Stretch the base fabric on the screen, and j change thread colors as you...
... position for the appliqué is stitched, and the machine stops. X The position for the appliqué is not cut -out line. a Memo z When "APPLIQUE MATERIAL", "APPLIQUE POSITION" and "APPLIQUE" are displayed, a specific color thread does not appear. Stretch the base fabric on the screen, and j change thread colors as you...
Users Manual - English
Page 83
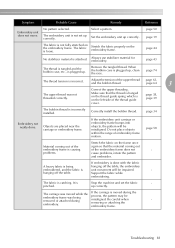
... misaligned. It is unit movement will be misaligned. Be careful when removing or attaching the embroidery frame. - page 44 No stabilizer material is plugged up correctly. Remove the tangled thread. When the bobbin case is attached. page 34 Embroidery not neatly done. Select a... fabric is moved during embroidery. The fabric is catching. Stretch the fabric properly on the embroidery frame. Always use stabilizer material for embroidery. Adjust the tension of embroidery frame motion. Objects are placed near the carriage or embroidery frame. Do not place...
... misaligned. It is unit movement will be misaligned. Be careful when removing or attaching the embroidery frame. - page 44 No stabilizer material is plugged up correctly. Remove the tangled thread. When the bobbin case is attached. page 34 Embroidery not neatly done. Select a... fabric is moved during embroidery. The fabric is catching. Stretch the fabric properly on the embroidery frame. Always use stabilizer material for embroidery. Adjust the tension of embroidery frame motion. Objects are placed near the carriage or embroidery frame. Do not place...
Users Manual - English
Page 89
Index A F accessories 8, 9 adjusting layout 61 adjusting thread tension 63, 64 air vent 11 appliqué pattern selection 59 attaching stabilizer material 43 attributes 23 frame pattern selection 55 front view 10 H handle 11 handwheel 11 help key 13 B I back key 13 basic steps for embroidering 16 ...
Index A F accessories 8, 9 adjusting layout 61 adjusting thread tension 63, 64 air vent 11 appliqué pattern selection 59 attaching stabilizer material 43 attributes 23 frame pattern selection 55 front view 10 H handle 11 handwheel 11 help key 13 B I back key 13 basic steps for embroidering 16 ...
Users Manual - English
Page 90
... characters 53 selecting embroidery patterns 50 settings key 13 solving operation problems 78 spool cap 8, 30, 38 spool net 8, 31 spool of thread 37 stabilizer material 43 start/stop button 12 stopping embroidering 67 T thread cutter 10 thread cutter button 12 thread guide 10, 31, 39 thread guide cover 10, 31...
... characters 53 selecting embroidery patterns 50 settings key 13 solving operation problems 78 spool cap 8, 30, 38 spool net 8, 31 spool of thread 37 stabilizer material 43 start/stop button 12 stopping embroidering 67 T thread cutter 10 thread cutter button 12 thread guide 10, 31, 39 thread guide cover 10, 31...


