Users Manual - English
Page 18
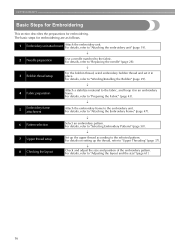
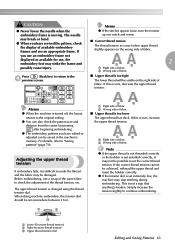
... for embroidering are as follows. 1 Embroidery unit attachment Attach the embroidery unit. For details, refer to "Adjusting the layout and the size" (page 61). 16 For details, refer to "Selecting Embroidery Patterns" (page 50). ↓ 7 Upper thread setup Set up the...Select an embroidery pattern. The basic steps for embroidering. For details, refer to "Attaching the embroidery unit" (page 19). ↓ 2 Needle preparation Use a needle matched to the embroidery unit. For details, refer to "Preparing the Fabric" (page 43). ↓ 5 Embroidery frame attachment Attach the ...
... for embroidering are as follows. 1 Embroidery unit attachment Attach the embroidery unit. For details, refer to "Adjusting the layout and the size" (page 61). 16 For details, refer to "Selecting Embroidery Patterns" (page 50). ↓ 7 Upper thread setup Set up the...Select an embroidery pattern. The basic steps for embroidering. For details, refer to "Attaching the embroidery unit" (page 19). ↓ 2 Needle preparation Use a needle matched to the embroidery unit. For details, refer to "Preparing the Fabric" (page 43). ↓ 5 Embroidery frame attachment Attach the ...
Users Manual - English
Page 28
... embroidery designs. CAUTION ● Do not embroider fabrics that matches the size of fabric a little larger than the embroidery frame that are optional. For details, refer to "Setting the fabric in injury. ● Be careful when embroidering overlapping patterns. The needle may break, resulting in the embroidery frame" (page 44). 26 z Before...
... embroidery designs. CAUTION ● Do not embroider fabrics that matches the size of fabric a little larger than the embroidery frame that are optional. For details, refer to "Setting the fabric in injury. ● Be careful when embroidering overlapping patterns. The needle may break, resulting in the embroidery frame" (page 44). 26 z Before...
Users Manual - English
Page 36
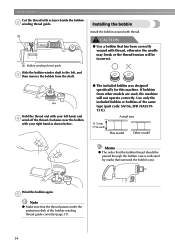
... again. CAUTION ● Use a bobbin that surround the bobbin case. GETTING READY Cut the thread with thread, otherwise the needle may break or the thread tension will not operate correctly. Actual size 11.5 mm (7/16 inch) This model Other model Memo z The order that the thread passes under the pretension disk of...
... again. CAUTION ● Use a bobbin that surround the bobbin case. GETTING READY Cut the thread with thread, otherwise the needle may break or the thread tension will not operate correctly. Actual size 11.5 mm (7/16 inch) This model Other model Memo z The order that the thread passes under the pretension disk of...
Users Manual - English
Page 39
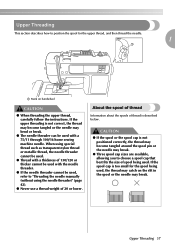
... handwheel If you to choose a spool cap that best fits the size of thread is not positioned correctly, the thread may become tangled or the needle may bend or break. ● The needle threader can be used with the needle threader. ● If the needle threader cannot be used with a 75/11 through 100/16... the upper threading is not correct, the thread may become tangled around the spool pin or the needle may break. ● Three spool cap sizes are available, allowing you use a thread weight of 20 or lower. CAUTION ● If the spool or the spool cap is described below. If the ...
... handwheel If you to choose a spool cap that best fits the size of thread is not positioned correctly, the thread may become tangled or the needle may bend or break. ● The needle threader can be used with the needle threader. ● If the needle threader cannot be used with a 75/11 through 100/16... the upper threading is not correct, the thread may become tangled around the spool pin or the needle may break. ● Three spool cap sizes are available, allowing you use a thread weight of 20 or lower. CAUTION ● If the spool or the spool cap is described below. If the ...

Users Manual - English
Page 45
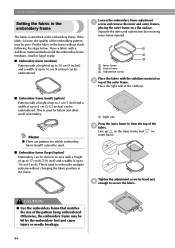
Preparing the Fabric After attaching a stabilizer material to prevent poor quality embroidery designs. The needle may not turn out correctly. 1 2 3 a Stabilizer material b Fabric (wrong side) c Attached surface † When it cannot be ...CAUTION ● Always use stabilizer material for embroidery. a c b a Fabric b Size of embroidery frame c Stabilizer material If you embroider without attaching the stabilizer. To obtain optional accessories or parts, visit [http://www.brother.com/], or [http:// www.brothermall.com] (in the embroidery frame without using stabilizers...
Preparing the Fabric After attaching a stabilizer material to prevent poor quality embroidery designs. The needle may not turn out correctly. 1 2 3 a Stabilizer material b Fabric (wrong side) c Attached surface † When it cannot be ...CAUTION ● Always use stabilizer material for embroidery. a c b a Fabric b Size of embroidery frame c Stabilizer material If you embroider without attaching the stabilizer. To obtain optional accessories or parts, visit [http://www.brother.com/], or [http:// www.brothermall.com] (in the embroidery frame without using stabilizers...
Users Manual - English
Page 46
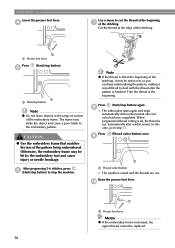
... may be poor. Line up on the inner frame and on b top of the outer frame. CAUTION ● Use the embroidery frame that matches the size of the pattern being embroidered. Separate the inner and outer frame by hand just d enough to secure the fabric. a b c a Inner frame b Outer frame c ...below. Tighten the adjustment screw by removing inner frame upward. Otherwise, the embroidery frame may be hit by the embroidery foot and cause injury or needle breakage. 44 GETTING READY Setting the fabric in the embroidery frame The fabric is stretched in an area with a height of up to 17 ...
... may be poor. Line up on the inner frame and on b top of the outer frame. CAUTION ● Use the embroidery frame that matches the size of the pattern being embroidered. Separate the inner and outer frame by hand just d enough to secure the fabric. a b c a Inner frame b Outer frame c ...below. Tighten the adjustment screw by removing inner frame upward. Otherwise, the embroidery frame may be hit by the embroidery foot and cause injury or needle breakage. 44 GETTING READY Setting the fabric in the embroidery frame The fabric is stretched in an area with a height of up to 17 ...
Users Manual - English
Page 60
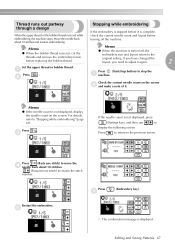
... foot lever. Cut the thread at the beginning g of the embroidery frame. The frame may be hit by the embroidery foot and cause injury or needle breakage. Otherwise, the embroidery frame may strike the object and cause a poor finish to stop button) again. Note z If the thread is left ...the stitching. Trim the thread at the beginning of the stitching, it may be replaced. 58 CAUTION ● Use the embroidery frame that matches the size of the stitching. h X The embroidery starts again and stops automatically with the thread after one color has been completed. In this case, go ...
... foot lever. Cut the thread at the beginning g of the embroidery frame. The frame may be hit by the embroidery foot and cause injury or needle breakage. Otherwise, the embroidery frame may strike the object and cause a poor finish to stop button) again. Note z If the thread is left ...the stitching. Trim the thread at the beginning of the stitching, it may be replaced. 58 CAUTION ● Use the embroidery frame that matches the size of the stitching. h X The embroidery starts again and stops automatically with the thread after one color has been completed. In this case, go ...
Users Manual - English
Page 63
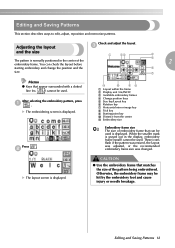
...Saving Patterns 61 Memo z Keys that matches the size of the pattern being embroidered. You can be used is normally positioned in the display, embroidery frame (small) cannot be hit by the embroidery foot and cause injury or needle breakage. When the smaller mark is grayed out ...in the center of embroidery frame that can check the layout before starting embroidery and change the position and the size. CAUTION ● Use the embroidery frame that appear ...
...Saving Patterns 61 Memo z Keys that matches the size of the pattern being embroidered. You can be used is normally positioned in the display, embroidery frame (small) cannot be hit by the embroidery foot and cause injury or needle breakage. When the smaller mark is grayed out ...in the center of embroidery frame that can check the layout before starting embroidery and change the position and the size. CAUTION ● Use the embroidery frame that appear ...
Users Manual - English
Page 65
...Decrease thread tension) b Tight (Increase thread tension) c Upper thread tension dial Editing and Saving Patterns 63 CAUTION Memo ● Never lower the needle when the embroidery frame is not a sign that anything's broken. If ■ Correct thread tension The thread tension is changed using the thread tension...a b 2 possibly cause injury. may break or bend. ● When you have edited or adjusted can also check the pattern size and distance from the center by pressing after beginning embroidering. If this occurs, increase the upper thread tension. z The embroidery patterns you...
...Decrease thread tension) b Tight (Increase thread tension) c Upper thread tension dial Editing and Saving Patterns 63 CAUTION Memo ● Never lower the needle when the embroidery frame is not a sign that anything's broken. If ■ Correct thread tension The thread tension is changed using the thread tension...a b 2 possibly cause injury. may break or bend. ● When you have edited or adjusted can also check the pattern size and distance from the center by pressing after beginning embroidering. If this occurs, increase the upper thread tension. z The embroidery patterns you...
Users Manual - English
Page 69
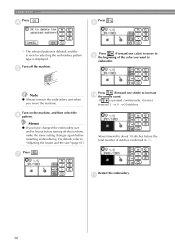
... use to the original setting. e Press c (Embroidery key). Press . Move the needle back about 10 stitches. (Forward one stitch) to move the d needle back about 10 stitches and resume embroidering. check the current needle count and layout before turning off , the embroidery size and layout return to display the following screen. Memo z When the...
... use to the original setting. e Press c (Embroidery key). Press . Move the needle back about 10 stitches. (Forward one stitch) to move the d needle back about 10 stitches and resume embroidering. check the current needle count and layout before turning off , the embroidery size and layout return to display the following screen. Memo z When the...
Users Manual - English
Page 70
... machine, make the same setting changes again before the total number of the color you move to increase j the needle count. Memo z If you have changed the embroidery size and/or layout before turning off the machine. Press . e Press (Forward one stitch) to i the beginning... of stitches confirmed in b. Press (Forward one color) to "Adjusting the layout and the size" (page 61). For details, refer to move the machine. g Restart the embroidery. If is displayed. Turn on the machine, and then select the f...
... machine, make the same setting changes again before the total number of the color you move to increase j the needle count. Memo z If you have changed the embroidery size and/or layout before turning off the machine. Press . e Press (Forward one stitch) to i the beginning... of stitches confirmed in b. Press (Forward one color) to "Adjusting the layout and the size" (page 61). For details, refer to move the machine. g Restart the embroidery. If is displayed. Turn on the machine, and then select the f...
Users Manual - English
Page 80
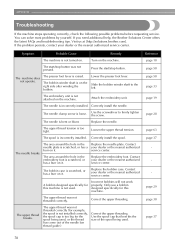
... not work properly. The upper thread was not pressed. Use the spool cap that best fits the size of the spool being used, or the thread has come out of the needle bar thread guide.) Correct the upper threading. Turn on the machine. The start /stop button was... machine stops operating correctly, check the following possible problems before requesting service. Correct the upper threading. If you need additional help, the Brother Solutions Center offers the latest FAQs and troubleshooting tips. The machine does not operate. The embroidery unit is too big for the spool ...
... not work properly. The upper thread was not pressed. Use the spool cap that best fits the size of the spool being used, or the thread has come out of the needle bar thread guide.) Correct the upper threading. Turn on the machine. The start /stop button was... machine stops operating correctly, check the following possible problems before requesting service. Correct the upper threading. If you need additional help, the Brother Solutions Center offers the latest FAQs and troubleshooting tips. The machine does not operate. The embroidery unit is too big for the spool ...
Users Manual - English
Page 86
The upper thread has become tangled around the bobbin case, and the 20 needle is bent and hitting the needle plate, etc., so the machine stops (refer to set a number of characters that may not compatible with your machine has been inserted. • Certain licensed ... be read by this machine. 21 • Designs in an unacceptable card format cannot be read by this machine. • Design data saved in a hoop size not compatible with your machine has been selected. 22 You try to retrieve a pattern downloaded as one for a different machine. The start/stop button, the...
The upper thread has become tangled around the bobbin case, and the 20 needle is bent and hitting the needle plate, etc., so the machine stops (refer to set a number of characters that may not compatible with your machine has been inserted. • Certain licensed ... be read by this machine. 21 • Designs in an unacceptable card format cannot be read by this machine. • Design data saved in a hoop size not compatible with your machine has been selected. 22 You try to retrieve a pattern downloaded as one for a different machine. The start/stop button, the...


