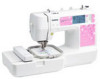
Users Manual - English
Page 7
... Included accessories ...8 Optional accessories ...9 Names of Machine Parts and Their Functions 10 Front view ...10 Needle and embroidery foot section ...11 Right-side/rear view ...11 Operation buttons ...12 Operation panel ...13 GETTING READY 15 Basic ...to the fabric ...43 Setting the fabric in the embroidery frame ...44 Attaching the Embroidery Frame 47 Attaching the embroidery frame ...47 Removing the embroidery frame ...48 EMBROIDERY 49 Selecting Embroidery Patterns 50 Copyright information ...50 Embroidery pattern types ...50 Setting for embroidering ...51 Selecting alphanumeric...
... Included accessories ...8 Optional accessories ...9 Names of Machine Parts and Their Functions 10 Front view ...10 Needle and embroidery foot section ...11 Right-side/rear view ...11 Operation buttons ...12 Operation panel ...13 GETTING READY 15 Basic ...to the fabric ...43 Setting the fabric in the embroidery frame ...44 Attaching the Embroidery Frame 47 Attaching the embroidery frame ...47 Removing the embroidery frame ...48 EMBROIDERY 49 Selecting Embroidery Patterns 50 Copyright information ...50 Embroidery pattern types ...50 Setting for embroidering ...51 Selecting alphanumeric...

Users Manual - English
Page 12
... 12) Use these descriptions to thread the needle. k Thread cutter (page 40) Pass the threads through the thread cutter to raise and lower the embroidery foot . n Thread take-up lever (page 40) o Bobbin-winding thread guide and pretension disc (page 31) Pass the thread under this thread guide...) Raise and lower the presser foot lever to cut them. Before using the machine, carefully read these buttons to the machine, and then attach the embroidery frame. Front view a Thread guide cover (page 31, 39) Pass the thread under this dial. m Thread tension dial (page 63) Adjust the upper...
... 12) Use these descriptions to thread the needle. k Thread cutter (page 40) Pass the threads through the thread cutter to raise and lower the embroidery foot . n Thread take-up lever (page 40) o Bobbin-winding thread guide and pretension disc (page 31) Pass the thread under this thread guide...) Raise and lower the presser foot lever to cut them. Before using the machine, carefully read these buttons to the machine, and then attach the embroidery frame. Front view a Thread guide cover (page 31, 39) Pass the thread under this dial. m Thread tension dial (page 63) Adjust the upper...
Users Manual - English
Page 15
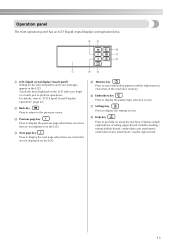
.... c Previous page key Press to "LCD (Liquid Crystal Display) Operation" (page 22). Displays simple explanations of setting upper thread / bobbin winding / setting bobbin thread / embroidery unit attachment / embroidery frame attachment / needle replacement. 13 For details, refer to display the previous page when there are items that are not displayed on the LCD with... get help on the LCD. h Help key Press to display the next page when there are items that are not displayed on using the machine. f Embroidery key Press to display the pattern type selection screen.
.... c Previous page key Press to "LCD (Liquid Crystal Display) Operation" (page 22). Displays simple explanations of setting upper thread / bobbin winding / setting bobbin thread / embroidery unit attachment / embroidery frame attachment / needle replacement. 13 For details, refer to display the previous page when there are items that are not displayed on the LCD with... get help on the LCD. h Help key Press to display the next page when there are items that are not displayed on using the machine. f Embroidery key Press to display the pattern type selection screen.
Users Manual - English
Page 17
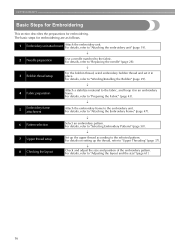
1 GETTING READY The various preparations to start embroidering are described in this chapter. Basic Steps for Embroidering 16 Turning the Machine On/Off 17 Attaching the Embroidery Unit 19 LCD (Liquid Crystal Display) Operation 22 Preparing Items for Embroidering 26 Preparing the Needle 27 Winding/Installing the Bobbin 29 Upper Threading ...37 Preparing the Fabric 43 Attaching the Embroidery Frame 47
1 GETTING READY The various preparations to start embroidering are described in this chapter. Basic Steps for Embroidering 16 Turning the Machine On/Off 17 Attaching the Embroidery Unit 19 LCD (Liquid Crystal Display) Operation 22 Preparing Items for Embroidering 26 Preparing the Needle 27 Winding/Installing the Bobbin 29 Upper Threading ...37 Preparing the Fabric 43 Attaching the Embroidery Frame 47
Users Manual - English
Page 18
... Attach a stabilizer material to "Upper Threading" (page 37). 8 Checking the layout ↓ Check and adjust the size and position of the embroidery pattern. For details, refer to "Preparing the Fabric" (page 43). ↓ 5 Embroidery frame attachment Attach the embroidery frame to "Adjusting the layout and the size" (page 61). 16 For details, refer to the...
... Attach a stabilizer material to "Upper Threading" (page 37). 8 Checking the layout ↓ Check and adjust the size and position of the embroidery pattern. For details, refer to "Preparing the Fabric" (page 43). ↓ 5 Embroidery frame attachment Attach the embroidery frame to "Adjusting the layout and the size" (page 61). 16 For details, refer to the...

Users Manual - English
Page 23
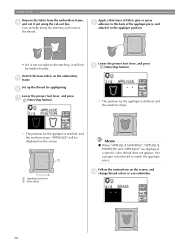
It may cause malfunctions. a • For details on removing the embroidery frame, refer to the left of d the embroidery unit, and slowly pull the embroidery unit to "Removing the embroidery frame" (page 48). b a X The embroidery carriage moves into a position where it can be saved. Attaching the Embroidery Unit 21 Press , and then press . CAUTION ● Do not carry the...
It may cause malfunctions. a • For details on removing the embroidery frame, refer to the left of d the embroidery unit, and slowly pull the embroidery unit to "Removing the embroidery frame" (page 48). b a X The embroidery carriage moves into a position where it can be saved. Attaching the Embroidery Unit 21 Press , and then press . CAUTION ● Do not carry the...
Users Manual - English
Page 27
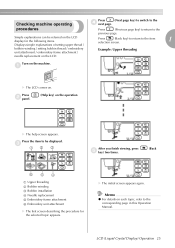
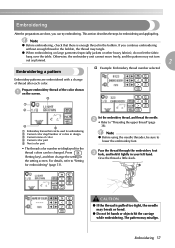
Press (Back key) to return to the d next page. bobbin winding / setting bobbin thread / embroidery unit attachment / embroidery frame attachment / Example: Upper threading needle replacement on the operation X The help screen appears. Press b ... finish viewing, press e key) two times. (Back f ed a Upper threading b Bobbin winding c Bobbin installation d Needle replacement e Embroidery frame attachment f Embroidery unit attachment X The first screen describing the procedure for the following items. Displays simple explanations of setting upper thread / previous page. X ...
Press (Back key) to return to the d next page. bobbin winding / setting bobbin thread / embroidery unit attachment / embroidery frame attachment / Example: Upper threading needle replacement on the operation X The help screen appears. Press b ... finish viewing, press e key) two times. (Back f ed a Upper threading b Bobbin winding c Bobbin installation d Needle replacement e Embroidery frame attachment f Embroidery unit attachment X The first screen describing the procedure for the following items. Displays simple explanations of setting upper thread / previous page. X ...
Users Manual - English
Page 28
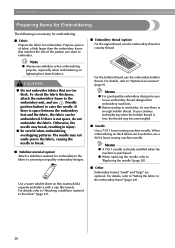
...there is not space, do not embroider the fabric. z When replacing the needle, refer to "Replacing the needle" (page 28). ■ Other Embroidery frames "small" and "large" are too thick. Use a water soluble sheet on lightweight or stretch fabrics. If you want to embroider. For details,... thread. CAUTION ● Do not embroider fabrics that matches the size of fabric a little larger than the embroidery frame that are optional. The needle may break, resulting in the embroidery frame" (page 44). 26 Memo z A 75/11 needle is already installed when the machine is low, the...
...there is not space, do not embroider the fabric. z When replacing the needle, refer to "Replacing the needle" (page 28). ■ Other Embroidery frames "small" and "large" are too thick. Use a water soluble sheet on lightweight or stretch fabrics. If you want to embroider. For details,... thread. CAUTION ● Do not embroider fabrics that matches the size of fabric a little larger than the embroidery frame that are optional. The needle may break, resulting in the embroidery frame" (page 44). 26 Memo z A 75/11 needle is already installed when the machine is low, the...

Users Manual - English
Page 45
... fabric, and iron it is larger than 1 Attaching a stabilizer a the embroidery frame being used. CAUTION ● Always use stabilizer material for embroidery. Preparing the Fabric 43 To obtain optional accessories or parts, visit [http://www.brother.com/], or [http:// www.brothermall.com] (in the embroidery frame without using stabilizers with adhesive, place b the adhesive surface of...
... fabric, and iron it is larger than 1 Attaching a stabilizer a the embroidery frame being used. CAUTION ● Always use stabilizer material for embroidery. Preparing the Fabric 43 To obtain optional accessories or parts, visit [http://www.brother.com/], or [http:// www.brothermall.com] (in the embroidery frame without using stabilizers with adhesive, place b the adhesive surface of...
Users Manual - English
Page 46
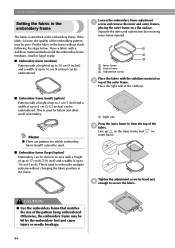
... up to secure the fabric. This is used for which embroidery frame (small) cannot be used. ■ Embroidery frame (large) [option] Embroidery can be hit by removing inner frame upward. Separate the inner and outer frame by the embroidery foot and cause injury or needle breakage. 44 Tighten the...to 2 cm (1 inch) and a width of the pattern being embroidered. Have a fabric with a stabilizer material attached and the embroidery frame (medium, small or large) ready. ■ Embroidery frame (medium) Patterns with a height of up to 10 cm (4 inches) and a width of up to 10 cm (4 inches)...
... up to secure the fabric. This is used for which embroidery frame (small) cannot be used. ■ Embroidery frame (large) [option] Embroidery can be hit by removing inner frame upward. Separate the inner and outer frame by the embroidery foot and cause injury or needle breakage. 44 Tighten the...to 2 cm (1 inch) and a width of the pattern being embroidered. Have a fabric with a stabilizer material attached and the embroidery frame (medium, small or large) ready. ■ Embroidery frame (medium) Patterns with a height of up to 10 cm (4 inches) and a width of up to 10 cm (4 inches)...
Users Manual - English
Page 47
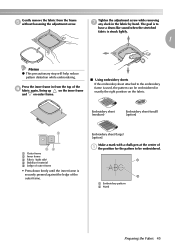
... the top of the f fabric again, lining up on the inner frame and on outer frame. ■ Using embroidery sheets If the embroidery sheet attached to the embroidery frame is used, the pattern can be embroidered. Press the inner frame in the fabric by hand. a b a Embroidery pattern b Mark Preparing the Fabric 45 Tighten the adjustment screw while removing...
... the top of the f fabric again, lining up on the inner frame and on outer frame. ■ Using embroidery sheets If the embroidery sheet attached to the embroidery frame is used, the pattern can be embroidered. Press the inner frame in the fabric by hand. a b a Embroidery pattern b Mark Preparing the Fabric 45 Tighten the adjustment screw while removing...
Users Manual - English
Page 48
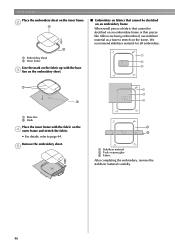
.... 46 We recommend stabilizer material for all embroidery. Remove the embroidery sheet. a b c a a c b b a Base line b Mark Place the inner frame with the base c line on the embroidery sheet. ■ Embroidery on fabrics that cannot be stretched on an embroidery frame When small pieces of fabric that cannot be stretched on an embroidery frame or thin pieces like ribbon are being...
.... 46 We recommend stabilizer material for all embroidery. Remove the embroidery sheet. a b c a a c b b a Base line b Mark Place the inner frame with the base c line on the embroidery sheet. ■ Embroidery on fabrics that cannot be stretched on an embroidery frame When small pieces of fabric that cannot be stretched on an embroidery frame or thin pieces like ribbon are being...
Users Manual - English
Page 49
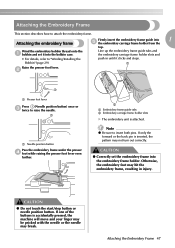
... with the needle or the needle may hit the embroidery frame, resulting in until it into the bobbin case. Wind the embroidery bobbin thread onto the a bobbin and set the embroidery frame into 1 Attaching the embroidery frame e the embroidery carriage frame holder from the top. b a Embroidery frame guide tabs b Embroidery carriage frame holder slots X The embroidery unit is inserted, the pattern may not turn...
... with the needle or the needle may hit the embroidery frame, resulting in until it into the bobbin case. Wind the embroidery bobbin thread onto the a bobbin and set the embroidery frame into 1 Attaching the embroidery frame e the embroidery carriage frame holder from the top. b a Embroidery frame guide tabs b Embroidery carriage frame holder slots X The embroidery unit is inserted, the pattern may not turn...
Users Manual - English
Page 50
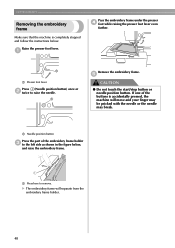
...pricked with the needle or the needle may break. GETTING READY Removing the embroidery frame Pass the embroidery frame under the presser d foot while raising the presser foot lever even further. a Remove the embroidery frame. a Needle position button Press the part of the buttons is completely stopped... and follow the instructions below , and raise the embroidery frame. If one of the embroidery frame holder c to remove. Raise the presser foot lever. a Press here to the left side as shown in the figure below ...
...pricked with the needle or the needle may break. GETTING READY Removing the embroidery frame Pass the embroidery frame under the presser d foot while raising the presser foot lever even further. a Remove the embroidery frame. a Needle position button Press the part of the buttons is completely stopped... and follow the instructions below , and raise the embroidery frame. If one of the embroidery frame holder c to remove. Raise the presser foot lever. a Press here to the left side as shown in the figure below ...
Users Manual - English
Page 55
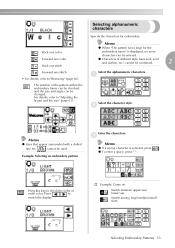
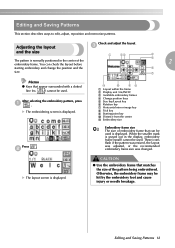
Selecting alphanumeric characters Specify the characters for the embroidery frame" is displayed, no more characters can be combined. 2 Forward one stitch Memo z When "The pattern is selected, press . Back one color Forward one color Back ...one stitch • For details, refer to check the order of multi color. z Characters of the pattern within the embroidery frame can be checked, and the size and angle can be used. Press to "Adjusting the layout and the size" (page 61). For details, refer to...
Selecting alphanumeric characters Specify the characters for the embroidery frame" is displayed, no more characters can be combined. 2 Forward one stitch Memo z When "The pattern is selected, press . Back one color Forward one color Back ...one stitch • For details, refer to check the order of multi color. z Characters of the pattern within the embroidery frame can be checked, and the size and angle can be used. Press to "Adjusting the layout and the size" (page 61). For details, refer to...
Users Manual - English
Page 59
..." (page 38). Embroidering 57 Note z Before embroidering, check that can try embroidering. Set the embroidery thread, and thread the needle. Give the thread a little slack. c a b d e a Embroidery frames that there is pulled too tight, the needle may tangle. Otherwise, the embroidery unit cannot move freely, and the pattern may misalign. b • Refer to "Setting for...
..." (page 38). Embroidering 57 Note z Before embroidering, check that can try embroidering. Set the embroidery thread, and thread the needle. Give the thread a little slack. c a b d e a Embroidery frames that there is pulled too tight, the needle may tangle. Otherwise, the embroidery unit cannot move freely, and the pattern may misalign. b • Refer to "Setting for...
Users Manual - English
Page 60
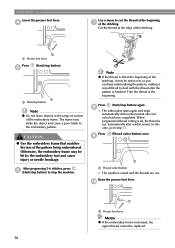
...and the threads are cut the thread at the beginning. a a Start/stop the machine. CAUTION ● Use the embroidery frame that matches the size of the embroidery frame. In this case, go to stop button Note z Do not leave objects in the range of motion of the ...it very difficult to deal with reinforcement after reinforcement. Press (Start/stop button). Press i (Thread cutter button) once. EMBROIDERY Lower the presser foot lever. Trim the thread at the beginning g of the stitching. Otherwise, the embroidery frame may strike the object and cause a poor finish to cut .
...and the threads are cut the thread at the beginning. a a Start/stop the machine. CAUTION ● Use the embroidery frame that matches the size of the embroidery frame. In this case, go to stop button Note z Do not leave objects in the range of motion of the ...it very difficult to deal with reinforcement after reinforcement. Press (Start/stop button). Press i (Thread cutter button) once. EMBROIDERY Lower the presser foot lever. Trim the thread at the beginning g of the stitching. Otherwise, the embroidery frame may strike the object and cause a poor finish to cut .
Users Manual - English
Page 61
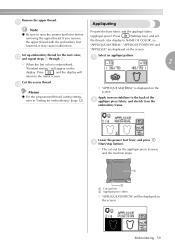
...é pattern. l and repeat steps b through h. Apply iron-on stabilizer to NAME OF COLOR, so "APPLIQUE MATERIAL", "APPLIQUE POSITION" and "APPLIQUE" are displayed on the embroidery frame. Press (Settings key), and set the thread color display to the back of the b appliqué piece fabric, and stretch it may cause malfunction. X "APPLIQUE.... Prepare the base fabric and the appliqué fabric (appliqué piece). will appear on the screen. If you remove the upper thread with the embroidery foot lowered, it on the screen. Cut the excess thread.
...é pattern. l and repeat steps b through h. Apply iron-on stabilizer to NAME OF COLOR, so "APPLIQUE MATERIAL", "APPLIQUE POSITION" and "APPLIQUE" are displayed on the embroidery frame. Press (Settings key), and set the thread color display to the back of the b appliqué piece fabric, and stretch it may cause malfunction. X "APPLIQUE.... Prepare the base fabric and the appliqué fabric (appliqué piece). will appear on the screen. If you remove the upper thread with the embroidery foot lowered, it on the screen. Cut the excess thread.
Users Manual - English
Page 62
...; is stitched, and the machine stops. X The position for appliquéing. b a Appliqué position b Base fabric Follow the instructions on the embroidery e frame. EMBROIDERY Remove the fabric from the embroidery frame, d and cut it out along the stitching and remove the thread. Apply a thin layer of fabric glue or spray h adhesive to match the...
...; is stitched, and the machine stops. X The position for appliquéing. b a Appliqué position b Base fabric Follow the instructions on the embroidery e frame. EMBROIDERY Remove the fabric from the embroidery frame, d and cut it out along the stitching and remove the thread. Apply a thin layer of fabric glue or spray h adhesive to match the...
Users Manual - English
Page 63
... image key h Trial key i Starting point key j Distance from the center k Embroidery size Embroidery frame size The size of embroidery frame that appear surrounded with a dotted line (ex. ) cannot be used is displayed. CAUTION ● Use the embroidery frame that matches the size of the 2 embroidery frame. You can be used . Editing and Saving Patterns 61 X The embroidering screen...
... image key h Trial key i Starting point key j Distance from the center k Embroidery size Embroidery frame size The size of embroidery frame that appear surrounded with a dotted line (ex. ) cannot be used is displayed. CAUTION ● Use the embroidery frame that matches the size of the 2 embroidery frame. You can be used . Editing and Saving Patterns 61 X The embroidering screen...


