Users Manual - English
Page 7
... Needle ...27 Needle precautions ...27 Checking the needle ...27 Replacing the needle ...28 Winding/Installing the Bobbin 29 Bobbin precautions ...29 Winding the bobbin ...29 Installing the bobbin ...34 Upper Threading ...37 About the spool of thread ...37 Threading the upper thread ...38 Preparing the Fabric ...43 Attaching a stabilizer material to the fabric ...43 Setting the fabric in...
... Needle ...27 Needle precautions ...27 Checking the needle ...27 Replacing the needle ...28 Winding/Installing the Bobbin 29 Bobbin precautions ...29 Winding the bobbin ...29 Installing the bobbin ...34 Upper Threading ...37 About the spool of thread ...37 Threading the upper thread ...38 Preparing the Fabric ...43 Attaching a stabilizer material to the fabric ...43 Setting the fabric in...

Users Manual - English
Page 8
... Appliquéing ...59 Editing and Saving Patterns 61 Adjusting the layout and the size ...61 Adjusting the upper thread tension ...63 Adjusting the bobbin thread tension ...64 Connecting character patterns ...65 Resewing ...66 Thread runs out partway through a design ...67 Stopping while embroidering ...67 Using the Memory Function 69 Embroidery data precautions ...69...
... Appliquéing ...59 Editing and Saving Patterns 61 Adjusting the layout and the size ...61 Adjusting the upper thread tension ...63 Adjusting the bobbin thread tension ...64 Connecting character patterns ...65 Resewing ...66 Thread runs out partway through a design ...67 Stopping while embroidering ...67 Using the Memory Function 69 Embroidery data precautions ...69...
Users Manual - English
Page 9
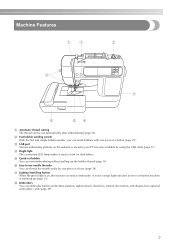
g Lighting Start/Stop button When the green light is on, the machine is warming up the bobbin thread (page 34). d Bright light The convenient LED lamp makes it easy to work on the website or saved in embroidery patterns, alphanumeric characters, framed... using the USB cable (page 71). c USB port Various embroidery patterns on dark fabrics. Machine Features a Automatic thread cutting The thread can start embroidering without pulling up (page 12). e Quick-set bobbin You can be cut automatically after embroidering (page 58). A red or orange light indicates an error or that the...
g Lighting Start/Stop button When the green light is on, the machine is warming up the bobbin thread (page 34). d Bright light The convenient LED lamp makes it easy to work on the website or saved in embroidery patterns, alphanumeric characters, framed... using the USB cable (page 71). c USB port Various embroidery patterns on dark fabrics. Machine Features a Automatic thread cutting The thread can start embroidering without pulling up (page 12). e Quick-set bobbin You can be cut automatically after embroidering (page 58). A red or orange light indicates an error or that the...
Users Manual - English
Page 10
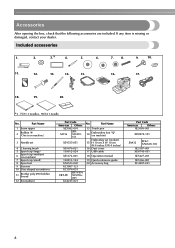
Part Name 13 Touch pen 14 Embroidery foot "Q" (on machine) 7 Spool cap (small) 8 Spool net 9 Scissors 10 Disc-shaped screwdriver 11 Brother poly #90 bobbin thread 12 Screwdriver Part Code Americas Others XZ5082-001 SFB: SA156 XA5539151 X59535-051 X59476-021 130012-024 No. Included accessories 1. 2. 3.*1 4. 5. 6. 7. 8. 9. 10. 11. 12. 13. ...XD0745-051 XE5427-201 XE5366-001 XC4487-021 8 Accessories After opening the box, check that the following accessories are included. Part Name 1 Seam ripper 2 Bobbin (4) (One is missing or damaged, contact your dealer.
Part Name 13 Touch pen 14 Embroidery foot "Q" (on machine) 7 Spool cap (small) 8 Spool net 9 Scissors 10 Disc-shaped screwdriver 11 Brother poly #90 bobbin thread 12 Screwdriver Part Code Americas Others XZ5082-001 SFB: SA156 XA5539151 X59535-051 X59476-021 130012-024 No. Included accessories 1. 2. 3.*1 4. 5. 6. 7. 8. 9. 10. 11. 12. 13. ...XD0745-051 XE5427-201 XE5366-001 XC4487-021 8 Accessories After opening the box, check that the following accessories are included. Part Name 1 Seam ripper 2 Bobbin (4) (One is missing or damaged, contact your dealer.
Users Manual - English
Page 11
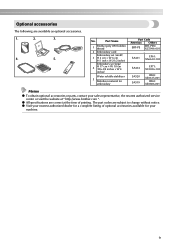
Part Name 1 Brother poly #90 bobbin thread 2 Embroidery card Embroidery set (small) 3 H 2 cm × W 6 cm (H 1 inch × W 2-1/2 inches) Embroidery set (large) 4 H 17 cm × W 10 cm (H 6-3/4 inches × W 4 inches) Water soluble stabilizer 5 ... your sales representative, the nearest authorized service center or visit the website at the time of printing. The part codes are correct at " http://www.brother.com ". No. SA431 EF61: XA6630-102 SA434 SA520 SA519 EF71: XC2026-102 BM5: XE0615-001 BM3: XE0806-001 Memo z To obtain optional accessories or parts...
Part Name 1 Brother poly #90 bobbin thread 2 Embroidery card Embroidery set (small) 3 H 2 cm × W 6 cm (H 1 inch × W 2-1/2 inches) Embroidery set (large) 4 H 17 cm × W 10 cm (H 6-3/4 inches × W 4 inches) Water soluble stabilizer 5 ... your sales representative, the nearest authorized service center or visit the website at the time of printing. The part codes are correct at " http://www.brother.com ". No. SA431 EF61: XA6630-102 SA434 SA520 SA519 EF71: XC2026-102 BM5: XE0615-001 BM3: XE0806-001 Memo z To obtain optional accessories or parts...

Users Manual - English
Page 12
..., or check how to learn the names of the machine parts. n Thread take-up lever (page 40) o Bobbin-winding thread guide and pretension disc (page 31) Pass the thread under this thread guide cover when winding the bobbin thread and threading the machine. c Spool pin (page 30, 38) Place a spool... names of the various parts of thread on this dial. Front view a Thread guide cover (page 31, 39) Pass the thread under this thread guide when winding the bobbin thread and threading the machine. b Thread guide (page 31, 39) Pass the thread under this thread guide and around the pretension disc ...
..., or check how to learn the names of the machine parts. n Thread take-up lever (page 40) o Bobbin-winding thread guide and pretension disc (page 31) Pass the thread under this thread guide cover when winding the bobbin thread and threading the machine. c Spool pin (page 30, 38) Place a spool... names of the various parts of thread on this dial. Front view a Thread guide cover (page 31, 39) Pass the thread under this thread guide when winding the bobbin thread and threading the machine. b Thread guide (page 31, 39) Pass the thread under this thread guide and around the pretension disc ...

Users Manual - English
Page 13
... (page 40) Pass the upper thread through the thread guide disk when using the needle threader to thread the needle. e Bobbin cover/bobbin case (page 35) Remove the bobbin cover, and then insert the bobbin into the power supply jack. c Embroidery card slot (page 55) Insert the embroidery card. Do not cover the ... used for embroidering. d Needle plate cover (page 74) Remove the needle plate cover to turn the machine on the power supply cord into the bobbin case. b Handwheel (page 38) Turn the handwheel toward you are learning to be exchanged. d USB port (page 71) Connect the one end...
... (page 40) Pass the upper thread through the thread guide disk when using the needle threader to thread the needle. e Bobbin cover/bobbin case (page 35) Remove the bobbin cover, and then insert the bobbin into the power supply jack. c Embroidery card slot (page 55) Insert the embroidery card. Do not cover the ... used for embroidering. d Needle plate cover (page 74) Remove the needle plate cover to turn the machine on the power supply cord into the bobbin case. b Handwheel (page 38) Turn the handwheel toward you are learning to be exchanged. d USB port (page 71) Connect the one end...
Users Manual - English
Page 14
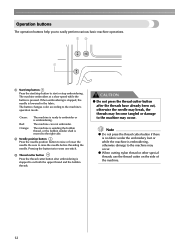
... on the side of the machine. 12 The machine is winding the bobbin thread, or the bobbin winder shaft is lowered in the fabric. c Thread cutter button Press the thread cutter button after the threads have already been cut both the upper thread and the bobbin threads. Operation buttons The operation buttons help you to start or stop embroidering...
... on the side of the machine. 12 The machine is winding the bobbin thread, or the bobbin winder shaft is lowered in the fabric. c Thread cutter button Press the thread cutter button after the threads have already been cut both the upper thread and the bobbin threads. Operation buttons The operation buttons help you to start or stop embroidering...
Users Manual - English
Page 15
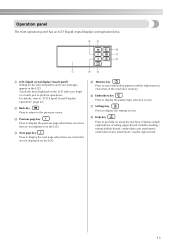
... LCD with your finger or a touch pen to save embroidery patterns and the alphanumeric characters in the LCD. Displays simple explanations of setting upper thread / bobbin winding / setting bobbin thread / embroidery unit attachment / embroidery frame attachment / needle replacement. 13 b Back key Press to return to display the pattern type selection screen. f Embroidery key Press...
... LCD with your finger or a touch pen to save embroidery patterns and the alphanumeric characters in the LCD. Displays simple explanations of setting upper thread / bobbin winding / setting bobbin thread / embroidery unit attachment / embroidery frame attachment / needle replacement. 13 b Back key Press to return to display the pattern type selection screen. f Embroidery key Press...
Users Manual - English
Page 17
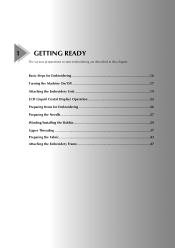
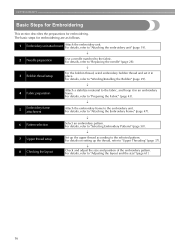
Basic Steps for Embroidering 16 Turning the Machine On/Off 17 Attaching the Embroidery Unit 19 LCD (Liquid Crystal Display) Operation 22 Preparing Items for Embroidering 26 Preparing the Needle 27 Winding/Installing the Bobbin 29 Upper Threading ...37 Preparing the Fabric 43 Attaching the Embroidery Frame 47 1 GETTING READY The various preparations to start embroidering are described in this chapter.
Basic Steps for Embroidering 16 Turning the Machine On/Off 17 Attaching the Embroidery Unit 19 LCD (Liquid Crystal Display) Operation 22 Preparing Items for Embroidering 26 Preparing the Needle 27 Winding/Installing the Bobbin 29 Upper Threading ...37 Preparing the Fabric 43 Attaching the Embroidery Frame 47 1 GETTING READY The various preparations to start embroidering are described in this chapter.
Users Manual - English
Page 18
...details, refer to the selected pattern. For details on setting up the upper thread according to "Replacing the needle" (page 28). ↓ 3 Bobbin thread setup For the bobbin thread, wind embroidery bobbin thread and set it in place. For details, refer to the fabric. For details...Select an embroidery pattern. The basic steps for embroidering. For details, refer to "Winding/Installing the Bobbin" (page 29). ↓ 4 Fabric preparation Attach a stabilizer material to "Upper Threading" (page 37). 8 Checking the layout ↓ Check and adjust the size and position of ...
...details, refer to the selected pattern. For details on setting up the upper thread according to "Replacing the needle" (page 28). ↓ 3 Bobbin thread setup For the bobbin thread, wind embroidery bobbin thread and set it in place. For details, refer to the fabric. For details...Select an embroidery pattern. The basic steps for embroidering. For details, refer to "Winding/Installing the Bobbin" (page 29). ↓ 4 Fabric preparation Attach a stabilizer material to "Upper Threading" (page 37). 8 Checking the layout ↓ Check and adjust the size and position of ...
Users Manual - English
Page 27
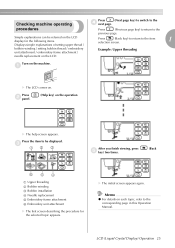
bobbin winding / setting bobbin thread / embroidery unit attachment / embroidery frame attachment / Example: Upper threading needle replacement on . a X The LCD comes on the LCD. Checking machine operating Press (Next page key) to switch .... LCD (Liquid Crystal Display) Operation 25 c ab c After you finish viewing, press e key) two times. (Back f ed a Upper threading b Bobbin winding c Bobbin installation d Needle replacement e Embroidery frame attachment f Embroidery unit attachment X The first screen describing the procedure for the following items. Displays simple explanations...
bobbin winding / setting bobbin thread / embroidery unit attachment / embroidery frame attachment / Example: Upper threading needle replacement on . a X The LCD comes on the LCD. Checking machine operating Press (Next page key) to switch .... LCD (Liquid Crystal Display) Operation 25 c ab c After you finish viewing, press e key) two times. (Back f ed a Upper threading b Bobbin winding c Bobbin installation d Needle replacement e Embroidery frame attachment f Embroidery unit attachment X The first screen describing the procedure for the following items. Displays simple explanations...
Users Manual - English
Page 28
... space between the embroidery foot and the fabric, the fabric can be embroidered. Note z Always use a 90/14 home sewing machine needle. For the bobbin thread, use (Needle position button) to raise the needle. If there is necessary for embroidering. ■ Fabric Prepare the fabric for embroidery. For details, ...refer to prevent poor quality embroidery designs. If there is enough bobbin thread. To check the fabric thickness, attach the embroidery frame to the embroidery unit, and use the embroidery...
... space between the embroidery foot and the fabric, the fabric can be embroidered. Note z Always use a 90/14 home sewing machine needle. For the bobbin thread, use (Needle position button) to raise the needle. If there is necessary for embroidering. ■ Fabric Prepare the fabric for embroidery. For details, ...refer to prevent poor quality embroidery designs. If there is enough bobbin thread. To check the fabric thickness, attach the embroidery frame to the embroidery unit, and use the embroidery...
Users Manual - English
Page 31
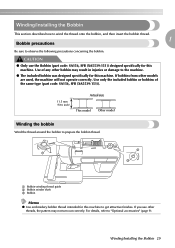
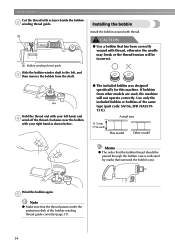
... observe the following precautions concerning the bobbin. If bobbins from other bobbin may not turn out correctly. Winding/Installing the Bobbin This section describes how to wind the thread onto the bobbin, and then insert the bobbin thread. 1 Bobbin precautions Be sure to "Optional accessories" (page 9). b a c a Bobbin-winding thread guide b Bobbin winder shaft c Bobbin Memo z Use embroidery bobbin thread intended for this machine. Use only...
... observe the following precautions concerning the bobbin. If bobbins from other bobbin may not turn out correctly. Winding/Installing the Bobbin This section describes how to wind the thread onto the bobbin, and then insert the bobbin thread. 1 Bobbin precautions Be sure to "Optional accessories" (page 9). b a c a Bobbin-winding thread guide b Bobbin winder shaft c Bobbin Memo z Use embroidery bobbin thread intended for this machine. Use only...

Users Manual - English
Page 32
Note z If the spool is inserted onto the spool pin. Pick up in the direction of thread for the bobbin onto e the spool pin. Press down on the bobbin until it snaps into the notch in the spool or the machine may become tangled around the spool pin. Slide the spool cap onto the... spool pin and remove the spool d cap that is not positioned so that best fits the size of spool being used . Memo z Use the embroidery bobbin thread for the spool being used , the thread may catch on the left. If the spool cap is too small for embroidering. Place the...
Note z If the spool is inserted onto the spool pin. Pick up in the direction of thread for the bobbin onto e the spool pin. Press down on the bobbin until it snaps into the notch in the spool or the machine may become tangled around the spool pin. Slide the spool cap onto the... spool pin and remove the spool d cap that is not positioned so that best fits the size of spool being used . Memo z Use the embroidery bobbin thread for the spool being used , the thread may catch on the left. If the spool cap is too small for embroidering. Place the...
Users Manual - English
Page 33
... the small spool cap, and leave a your right hand, pull the thread with your left small space between the cap and the spool. a b a a Thread guide cover Pull the thread to fit the size of the bobbin-winding thread guide, and then wind the thread counterclockwise under the pretension disc, pulling it in as far as possible...
... the small spool cap, and leave a your right hand, pull the thread with your left small space between the cap and the spool. a b a a Thread guide cover Pull the thread to fit the size of the bobbin-winding thread guide, and then wind the thread counterclockwise under the pretension disc, pulling it in as far as possible...

Users Manual - English
Page 34
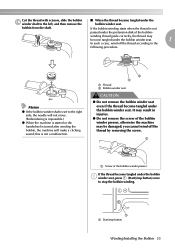
...built into the slit in the bobbin winder seat, the thread may bend or break when the bobbin thread starts to hold the thread that the thread is wound counterclockwise, the thread may be damaged. l CAUTION ● Be sure to stop button) once to pull the thread tightly and wind it . ... machine while winding the bobbin. If the bobbin thread is wound incorrectly, press (Start/stop the bobbin winding. X The bobbin winding will stop the machine. If the thread is correctly set before starting the bobbin winding. Otherwise the thread may become tangled in the bobbin or the needle may ...
...built into the slit in the bobbin winder seat, the thread may bend or break when the bobbin thread starts to hold the thread that the thread is wound counterclockwise, the thread may be damaged. l CAUTION ● Be sure to stop button) once to pull the thread tightly and wind it . ... machine while winding the bobbin. If the bobbin thread is wound incorrectly, press (Start/stop the bobbin winding. X The bobbin winding will stop the machine. If the thread is correctly set before starting the bobbin winding. Otherwise the thread may become tangled in the bobbin or the needle may ...
Users Manual - English
Page 35
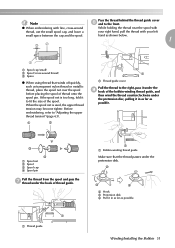
b a a Thread b Bobbin winder seat CAUTION ● Do not remove the bobbin winder seat even if the thread become tangled under the bobbin winder seat. a a Start/stop button) once to the left, and then remove the ■ When the thread became tangled under the bobbin a winder seat, press (Start/stop button Winding/Installing the Bobbin 33 It may result in...
b a a Thread b Bobbin winder seat CAUTION ● Do not remove the bobbin winder seat even if the thread become tangled under the bobbin winder seat. a a Start/stop button) once to the left, and then remove the ■ When the thread became tangled under the bobbin a winder seat, press (Start/stop button Winding/Installing the Bobbin 33 It may result in...
Users Manual - English
Page 36
... scissors beside the bobbinb winding thread guide. Installing the bobbin a a Bobbin-winding thread guide Slide the bobbin winder shaft to the left hand, and d wind off the thread clockwise near the bobbin with your right hand as shown below. ● The included bobbin was designed specifically for this machine. Hold the thread end with thread, otherwise the needle may break...
... scissors beside the bobbinb winding thread guide. Installing the bobbin a a Bobbin-winding thread guide Slide the bobbin winder shaft to the left hand, and d wind off the thread clockwise near the bobbin with your right hand as shown below. ● The included bobbin was designed specifically for this machine. Hold the thread end with thread, otherwise the needle may break...
Users Manual - English
Page 90
... 43 start/stop button 12 stopping embroidering 67 T thread cutter 10 thread cutter button 12 thread guide 10, 31, 39 thread guide cover 10, 31, 39 thread guide disk 11, 40 thread spools 37 thread take-up lever 10, 40 thread tension adjustment 63, 64 threading 37 threading bobbin 29 threading needle 37 threading needle manually 42 touch panel 13 troubleshooting 78 turning...
... 43 start/stop button 12 stopping embroidering 67 T thread cutter 10 thread cutter button 12 thread guide 10, 31, 39 thread guide cover 10, 31, 39 thread guide disk 11, 40 thread spools 37 thread take-up lever 10, 40 thread tension adjustment 63, 64 threading 37 threading bobbin 29 threading needle 37 threading needle manually 42 touch panel 13 troubleshooting 78 turning...


