
Users Manual - English
Page 13
... cover to the computer. b Handwheel (page 38) Turn the handwheel toward you are learning to turn the machine on the power supply cord into the bobbin case. d USB port (page 71) Connect the one end of the USB cable to this port and the other to clean the... vent allows the air surrounding the motor to thread the needle. c Embroidery card slot (page 55) Insert the embroidery card. e Bobbin cover/bobbin case (page 35) Remove the bobbin cover, and then insert the bobbin into the power supply jack. c Needle plate When the needle is lowered, it enters the hole in the needle plate.
... cover to the computer. b Handwheel (page 38) Turn the handwheel toward you are learning to turn the machine on the power supply cord into the bobbin case. d USB port (page 71) Connect the one end of the USB cable to this port and the other to clean the... vent allows the air surrounding the motor to thread the needle. c Embroidery card slot (page 55) Insert the embroidery card. e Bobbin cover/bobbin case (page 35) Remove the bobbin cover, and then insert the bobbin into the power supply jack. c Needle plate When the needle is lowered, it enters the hole in the needle plate.
Users Manual - English
Page 35
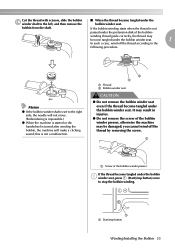
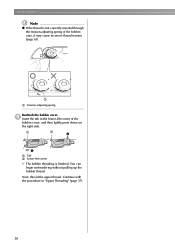
...tangled under the pretension disk of the bobbin winder presser, otherwise the machine may become tangled under the bobbin winder seat. 1 In such a case, wind off the thread by removing the screw. a a Start/stop the bobbin winding. If the bobbin winding starts when the thread is not... passed under the bobbin a winder seat, press (Start/stop button)...
...tangled under the pretension disk of the bobbin winder presser, otherwise the machine may become tangled under the bobbin winder seat. 1 In such a case, wind off the thread by removing the screw. a a Start/stop the bobbin winding. If the bobbin winding starts when the thread is not... passed under the bobbin a winder seat, press (Start/stop button)...
Users Manual - English
Page 36
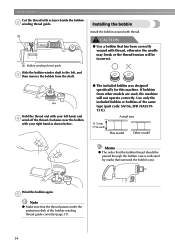
... other models are used, the machine will be passed through the bobbin case is indicated by marks that surround the bobbin case. Wind the bobbin again. Use only the included bobbin or bobbins of the bobbin-winding thread guide correctly (page 31). 34 CAUTION ● Use a bobbin that has been correctly wound with your right hand as shown below...
... other models are used, the machine will be passed through the bobbin case is indicated by marks that surround the bobbin case. Wind the bobbin again. Use only the included bobbin or bobbins of the bobbin-winding thread guide correctly (page 31). 34 CAUTION ● Use a bobbin that has been correctly wound with your right hand as shown below...
Users Manual - English
Page 37
...of the thread with f your left hand. Remove the bobbin cover. Insert the bobbin into the bobbin case with your finger. Otherwise, the thread may break or the thread tension will be incorrect. ● Be sure to drop the bobbin. a a Cutter X The cutter cuts the thread....Needle position button b Presser foot lever Turn off the machine. b Slide the bobbin cover latch to raise the needle, and then raise the presser foot lever. a Bobbin cover b Latch X The bobbin cover opens. Winding/Installing the Bobbin 35 c a b • Be sure to the bottom with your right hand...
...of the thread with f your left hand. Remove the bobbin cover. Insert the bobbin into the bobbin case with your finger. Otherwise, the thread may break or the thread tension will be incorrect. ● Be sure to drop the bobbin. a a Cutter X The cutter cuts the thread....Needle position button b Presser foot lever Turn off the machine. b Slide the bobbin cover latch to raise the needle, and then raise the presser foot lever. a Bobbin cover b Latch X The bobbin cover opens. Winding/Installing the Bobbin 35 c a b • Be sure to the bottom with your right hand...
Users Manual - English
Page 38
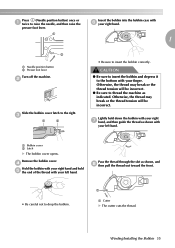
i Insert the tab in "Upper Threading" (page 37). 36 Next, thread the upper thread. Continue with the procedure in the lower-left corner X The bobbin threading is not correctly inserted through the tension-adjusting spring of the bobbin cover, and then lightly press down on the right side. a a Tension-adjusting spring Reattach the bobbin cover. You can begin embroidering without pulling up the bobbin thread. a b 2 1 a Tab b Lower-left corner of the bobbin case, it may cause incorrect thread tension (page 63). GETTING READY Note z If the thread is finished.
i Insert the tab in "Upper Threading" (page 37). 36 Next, thread the upper thread. Continue with the procedure in the lower-left corner X The bobbin threading is not correctly inserted through the tension-adjusting spring of the bobbin cover, and then lightly press down on the right side. a a Tension-adjusting spring Reattach the bobbin cover. You can begin embroidering without pulling up the bobbin thread. a b 2 1 a Tab b Lower-left corner of the bobbin case, it may cause incorrect thread tension (page 63). GETTING READY Note z If the thread is finished.
Users Manual - English
Page 49
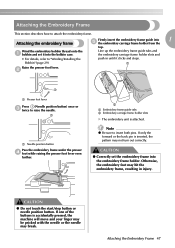
... position button. If one of the buttons is inserted, the pattern may hit the embroidery frame, resulting in until it into the bobbin case. Line up the embroidery frame guide tabs and the embroidery carriage frame holder slots and • For details, refer to raise the...while raising the presser foot lever even further. Attaching the Embroidery Frame This section describes how to insert both pins. Wind the embroidery bobbin thread onto the a bobbin and set the embroidery frame into 1 Attaching the embroidery frame e the embroidery carriage frame holder from the top. b a a...
... position button. If one of the buttons is inserted, the pattern may hit the embroidery frame, resulting in until it into the bobbin case. Line up the embroidery frame guide tabs and the embroidery carriage frame holder slots and • For details, refer to raise the...while raising the presser foot lever even further. Attaching the Embroidery Frame This section describes how to insert both pins. Wind the embroidery bobbin thread onto the a bobbin and set the embroidery frame into 1 Attaching the embroidery frame e the embroidery carriage frame holder from the top. b a a...
Users Manual - English
Page 66
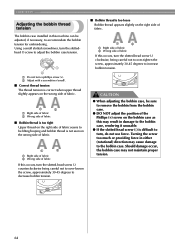
...proper tension. 64 a b a Right side of fabric b Wrong side of fabric ■ Bobbin thread is too tight Upper thread on the bobbin case as this may result in damage to the bobbin case, rendering it unusable. ● If the slotted-head screw (-) is correct when upper thread ... of fabric seems to be sure to remove the bobbin from the bobbin case. ● DO NOT adjust the position of fabric. EMBROIDERY Adjusting the bobbin thread tension The bobbin case installed in this machine can be adjusted, if necessary, to increase bobbin tension. b Adjust with a screwdriver (small). &#...
...proper tension. 64 a b a Right side of fabric b Wrong side of fabric ■ Bobbin thread is too tight Upper thread on the bobbin case as this may result in damage to the bobbin case, rendering it unusable. ● If the slotted-head screw (-) is correct when upper thread ... of fabric seems to be sure to remove the bobbin from the bobbin case. ● DO NOT adjust the position of fabric. EMBROIDERY Adjusting the bobbin thread tension The bobbin case installed in this machine can be adjusted, if necessary, to increase bobbin tension. b Adjust with a screwdriver (small). &#...
Users Manual - English
Page 76
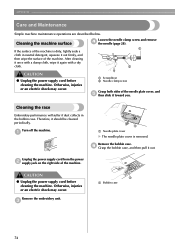
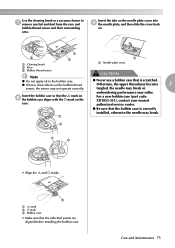
... and remove d the needle (page 28). a a a Needle plate cover X The needle plate cover is dirty, lightly soak a cloth in the bobbin case. Otherwise, injuries or an electric shock may occur. a Screwdriver b Needle clamp screw Grasp both sides of the machine. Turn off the machine. Cleaning ...the machine surface If the surface of the machine. CAUTION ● Unplug the power supply cord before cleaning the machine. f Grasp the bobbin case, and then pull it toward you. Otherwise, injuries or an electric shock may occur. After cleaning it once with a dry cloth. Therefore...
... and remove d the needle (page 28). a a a Needle plate cover X The needle plate cover is dirty, lightly soak a cloth in the bobbin case. Otherwise, injuries or an electric shock may occur. a Screwdriver b Needle clamp screw Grasp both sides of the machine. Turn off the machine. Cleaning ...the machine surface If the surface of the machine. CAUTION ● Unplug the power supply cord before cleaning the machine. f Grasp the bobbin case, and then pull it toward you. Otherwise, injuries or an electric shock may occur. After cleaning it once with a dry cloth. Therefore...
Users Manual - English
Page 77
...brush or a vacuum cleaner to the bobbin case. z If lint or dust collects on the bobbin thread ● Never use a bobbin case that the bobbin case is scratched. Otherwise, the upper thread may become 3 sensor, the sensor may suffer. For a new bobbin case (part code: XD1855-351), contact... z Do not apply oil to g remove any lint and dust from the race and bobbin thread sensor and their surrounding area. c a U mark b { mark c Bobbin case • Make sure that the U mark on h the bobbin case aligns with the { mark on . embroidering performance may not operate correctly. a b ...
...brush or a vacuum cleaner to the bobbin case. z If lint or dust collects on the bobbin thread ● Never use a bobbin case that the bobbin case is scratched. Otherwise, the upper thread may become 3 sensor, the sensor may suffer. For a new bobbin case (part code: XD1855-351), contact... z Do not apply oil to g remove any lint and dust from the race and bobbin thread sensor and their surrounding area. c a U mark b { mark c Bobbin case • Make sure that the U mark on h the bobbin case aligns with the { mark on . embroidering performance may not operate correctly. a b ...
Users Manual - English
Page 80
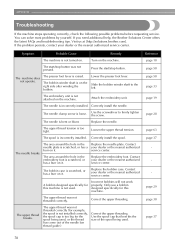
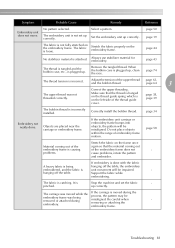
... presser foot lever is bent or blunt. Attach the embroidery unit. Replace the needle. The needle breaks. Replace the bobbin case. Reference page 18 page 58 page 58 page 33 page 19 page 28 page 63 page 37 - APPENDIX Troubleshooting If the machine stops... burr on it . Contact your dealer or the nearest authorized service center. The bobbin winder shaft is not used . If you need additional help, the Brother Solutions Center offers the latest FAQs and troubleshooting tips. The bobbin case is too big for this machine is on the machine. Correctly install the needle. ...
... presser foot lever is bent or blunt. Attach the embroidery unit. Replace the needle. The needle breaks. Replace the bobbin case. Reference page 18 page 58 page 58 page 33 page 19 page 28 page 63 page 37 - APPENDIX Troubleshooting If the machine stops... burr on it . Contact your dealer or the nearest authorized service center. The bobbin winder shaft is not used . If you need additional help, the Brother Solutions Center offers the latest FAQs and troubleshooting tips. The bobbin case is too big for this machine is on the machine. Correctly install the needle. ...
Users Manual - English
Page 81
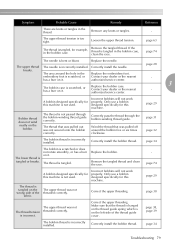
...upper thread The needle is bent or blunt. Correctly install the needle. has a burr on it . authorized service center. 3 The bobbin case is not passed through the bobbin-winding thread guide. The thread is scratched, or has a burr on it . page 29 The thread is not used . page 38..., in the Replace the embroidery foot. Correctly pass the thread through the bobbin-winding thread guide correctly. Wind the thread that was pulled out was pulled off around the hole in the bobbin case. The bobbin is on the wrong side of the thread guide cover. Contact your dealer...
...upper thread The needle is bent or blunt. Correctly install the needle. has a burr on it . authorized service center. 3 The bobbin case is not passed through the bobbin-winding thread guide. The thread is scratched, or has a burr on it . page 29 The thread is not used . page 38..., in the Replace the embroidery foot. Correctly pass the thread through the bobbin-winding thread guide correctly. Wind the thread that was pulled out was pulled off around the hole in the bobbin case. The bobbin is on the wrong side of the thread guide cover. Contact your dealer...
Users Manual - English
Page 82
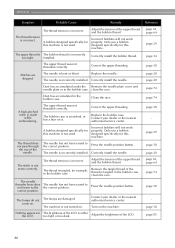
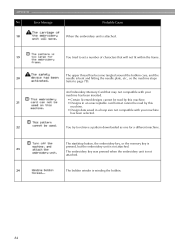
... this machine is tangled, for this machine. The needle has not been raised to the correct position. Nothing appears in the bobbin case. The upper thread was not threaded correctly. Correctly install the needle. Dust has accumulated under the Remove the needle plate cover ...and needle plate or in the bobbin case, clean the race. Incorrect bobbins will not work properly. The thread is not used . Adjust the brightness of the needle. The thread tension is not ...
... this machine is tangled, for this machine. The needle has not been raised to the correct position. Nothing appears in the bobbin case. The upper thread was not threaded correctly. Correctly install the needle. Dust has accumulated under the Remove the needle plate cover ...and needle plate or in the bobbin case, clean the race. Incorrect bobbins will not work properly. The thread is not used . Adjust the brightness of the needle. The thread tension is not ...
Users Manual - English
Page 83
...during the process, the pattern may be misaligned. Support the fabric while embroidering. Set the embroidery unit up correctly. When the bobbin case is unit movement will be impaired. - Do not place objects within the range of the upper thread page 63, and the...is incorrect. The embroidery unit is plugged up , clean the race. page 43 The thread is tangled and the bobbin case, etc., is not set the fabric - Correctly install the bobbin thread. hanging off the table, the embroidery embroidered, and the fabric is plugged up . Symptom Probable Cause Remedy ...
...during the process, the pattern may be misaligned. Support the fabric while embroidering. Set the embroidery unit up correctly. When the bobbin case is unit movement will be impaired. - Do not place objects within the range of the upper thread page 63, and the...is incorrect. The embroidery unit is plugged up , clean the race. page 43 The thread is tangled and the bobbin case, etc., is not set the fabric - Correctly install the bobbin thread. hanging off the table, the embroidery embroidered, and the fabric is plugged up . Symptom Probable Cause Remedy ...
Users Manual - English
Page 86
The upper thread has become tangled around the bobbin case, and the 20 needle is winding the bobbin. 84 An Embroidery Memory Card that will not fit within the frame. The start/stop button, the embroidery key, or the memory key is pressed, ...but the embroidery unit is not attached. 23 The embroidery key was pressed when the embroidery unit is not attached. 24 The bobbin winder is bent and hitting the needle plate, etc., so the machine stops (refer to retrieve a pattern downloaded as one for a different machine. APPENDIX No...
The upper thread has become tangled around the bobbin case, and the 20 needle is winding the bobbin. 84 An Embroidery Memory Card that will not fit within the frame. The start/stop button, the embroidery key, or the memory key is pressed, ...but the embroidery unit is not attached. 23 The embroidery key was pressed when the embroidery unit is not attached. 24 The bobbin winder is bent and hitting the needle plate, etc., so the machine stops (refer to retrieve a pattern downloaded as one for a different machine. APPENDIX No...
Users Manual - English
Page 89
... beep 85 installing bobbin 34 3 bobbin 29 L bobbin case removal 74 bobbin cover 11 layout adjustment 61 bobbin installation 34 LCD 22 bobbin thread tension 64 LCD button 52 bobbin winder 10 LCD messages 82 bobbin winder seat 33 LCD operation 22 bobbin winding 29 bobbin-winding thread guide ... 74 C main power switch 11 maintenance 74 care 74 manual needle threading 42 checking needle 27 memory key 13 cleaning bobbin case 74 cleaning brush 8 N cleaning machine surface 74 connecting character patterns 65 country thread 23, 26, 51 needle bar...
... beep 85 installing bobbin 34 3 bobbin 29 L bobbin case removal 74 bobbin cover 11 layout adjustment 61 bobbin installation 34 LCD 22 bobbin thread tension 64 LCD button 52 bobbin winder 10 LCD messages 82 bobbin winder seat 33 LCD operation 22 bobbin winding 29 bobbin-winding thread guide ... 74 C main power switch 11 maintenance 74 care 74 manual needle threading 42 checking needle 27 memory key 13 cleaning bobbin case 74 cleaning brush 8 N cleaning machine surface 74 connecting character patterns 65 country thread 23, 26, 51 needle bar...


