Users Manual - English
Page 3
...8226; Always unplug your work area clear: • Never operate the machine with any adjustments mentioned in this embroidery machine. Keep ventilation openings of the machine free from the build up of electric shock 1 Always unplug the machine from the electrical outlet when removing covers, lubricating, or when making ... into the electrical outlet. • Never drop or insert any user servicing adjustments mentioned in the instruction manual. • To unplug the machine, switch the machine to the symbol "O" position to turn it off, then grasp the plug and pull it can quickly be...
...8226; Always unplug your work area clear: • Never operate the machine with any adjustments mentioned in this embroidery machine. Keep ventilation openings of the machine free from the build up of electric shock 1 Always unplug the machine from the electrical outlet when removing covers, lubricating, or when making ... into the electrical outlet. • Never drop or insert any user servicing adjustments mentioned in the instruction manual. • To unplug the machine, switch the machine to the symbol "O" position to turn it off, then grasp the plug and pull it can quickly be...
Users Manual - English
Page 7
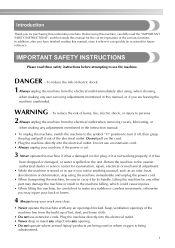
Contents Introduction ...1 IMPORTANT SAFETY INSTRUCTIONS 1 Machine Features ...7 Accessories ...8 Included accessories ...8 Optional accessories ...9 Names of Machine Parts and Their Functions 10 Front view ...10 Needle and embroidery foot section ...11 Right-side/rear view ...11 Operation buttons ...12 Operation panel ...13 GETTING READY 15 Basic Steps for Embroidering 16 Turning the Machine On/Off 17 Power supply...
Contents Introduction ...1 IMPORTANT SAFETY INSTRUCTIONS 1 Machine Features ...7 Accessories ...8 Included accessories ...8 Optional accessories ...9 Names of Machine Parts and Their Functions 10 Front view ...10 Needle and embroidery foot section ...11 Right-side/rear view ...11 Operation buttons ...12 Operation panel ...13 GETTING READY 15 Basic Steps for Embroidering 16 Turning the Machine On/Off 17 Power supply...

Users Manual - English
Page 23
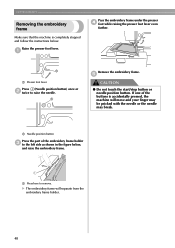
... if removed when the machine is completely stopped and follow the instructions below. 1 Remove the embroidery frame. Turn off the machine before removing the embroidery unit. a Release button X The embroidery unit separates from the machine. a • For details on the bottom left of d the embroidery unit, and slowly pull the embroidery unit to "Removing the embroidery frame" (page 48). Press...
... if removed when the machine is completely stopped and follow the instructions below. 1 Remove the embroidery frame. Turn off the machine before removing the embroidery unit. a Release button X The embroidery unit separates from the machine. a • For details on the bottom left of d the embroidery unit, and slowly pull the embroidery unit to "Removing the embroidery frame" (page 48). Press...
Users Manual - English
Page 30
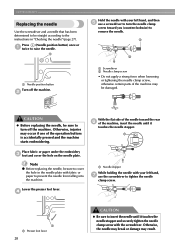
...machine, insert the needle until it touches the needle stopper. Press (Needle position button) once or a twice to remove the needle. a Place fabric or paper under the embroidery c foot and cover the hole on the needle plate. Otherwise, the needle may break or damage may be straight according to the instructions... and securely tighten the needle clamp screw with your left hand, and then e use the screwdriver to turn off the machine. Otherwise, injuries may occur if one of the needle toward you (counterclockwise) to raise the needle. a Hold the needle...
...machine, insert the needle until it touches the needle stopper. Press (Needle position button) once or a twice to remove the needle. a Place fabric or paper under the embroidery c foot and cover the hole on the needle plate. Otherwise, the needle may break or damage may be straight according to the instructions... and securely tighten the needle clamp screw with your left hand, and then e use the screwdriver to turn off the machine. Otherwise, injuries may occur if one of the needle toward you (counterclockwise) to raise the needle. a Hold the needle...

Users Manual - English
Page 40
...the spool pin. For details, refer to raise the needle. Press (Needle position button) once or c twice to "Selecting Embroidery Patterns" (page 50). Memo z If the embroidery foot is not correct, the thread may become tangled or the needle may not turn out correctly. a Turn on handwheel ...on the handwheel is not at the bottom. 38 CAUTION ● When threading the upper thread, carefully follow the instructions. If the upper threading is not raised, the machine cannot be threaded. b Pick up the spool pin and remove the spool d cap that the spool is correctly raised...
...the spool pin. For details, refer to raise the needle. Press (Needle position button) once or c twice to "Selecting Embroidery Patterns" (page 50). Memo z If the embroidery foot is not correct, the thread may become tangled or the needle may not turn out correctly. a Turn on handwheel ...on the handwheel is not at the bottom. 38 CAUTION ● When threading the upper thread, carefully follow the instructions. If the upper threading is not raised, the machine cannot be threaded. b Pick up the spool pin and remove the spool d cap that the spool is correctly raised...
Users Manual - English
Page 50
...needle may break. Make sure that the machine is accidentally pressed, the machine will separate from the embroidery frame holder. 48 a a a Presser foot lever Press (Needle position button) once or b twice to remove. If one of the embroidery frame holder c to the left side as...GETTING READY Removing the embroidery frame Pass the embroidery frame under the presser d foot while raising the presser foot lever even further. a Needle position button Press the part of the buttons is completely stopped and follow the instructions below , and raise the embroidery frame. Raise the ...
...needle may break. Make sure that the machine is accidentally pressed, the machine will separate from the embroidery frame holder. 48 a a a Presser foot lever Press (Needle position button) once or b twice to remove. If one of the embroidery frame holder c to the left side as...GETTING READY Removing the embroidery frame Pass the embroidery frame under the presser d foot while raising the presser foot lever even further. a Needle position button Press the part of the buttons is completely stopped and follow the instructions below , and raise the embroidery frame. Raise the ...

Users Manual - English
Page 52
...Patterns retrieved from an embroidery card. EMBROIDERY Selecting Embroidery Patterns This section provides details on the screen. Embroidery pattern types An embroidery pattern can be selected from the machine's memory. The ...machine and embroidery cards are total 70 patterns. For details, refer to "Using an embroidery card" (page 55). For details, refer to "Selecting an embroidery pattern"(page 54). For details, refer to "Saving patterns" (page 70). b Alphanumeric character patterns There are completed by changing the upper thread according to the instructions...
...Patterns retrieved from an embroidery card. EMBROIDERY Selecting Embroidery Patterns This section provides details on the screen. Embroidery pattern types An embroidery pattern can be selected from the machine's memory. The ...machine and embroidery cards are total 70 patterns. For details, refer to "Using an embroidery card" (page 55). For details, refer to "Selecting an embroidery pattern"(page 54). For details, refer to "Saving patterns" (page 70). b Alphanumeric character patterns There are completed by changing the upper thread according to the instructions...
Users Manual - English
Page 62
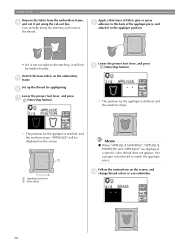
... fabric from the embroidery frame, d and cut it out along the stitching and remove the thread. Cut carefully along the cut right on the stitching, it is stitched, and the machine stops. Use a proper color thread to the back of the appliqué piece, and ...finished neatly. Set up the thread for the appliqué is stitched, and the machine stops. Lower the presser foot lever, and press i (Start/stop button). b a Appliqué position b Base fabric Follow the instructions on the embroidery e frame. f Lower the presser foot lever, and press g (Start/stop button)....
... fabric from the embroidery frame, d and cut it out along the stitching and remove the thread. Cut carefully along the cut right on the stitching, it is stitched, and the machine stops. Use a proper color thread to the back of the appliqué piece, and ...finished neatly. Set up the thread for the appliqué is stitched, and the machine stops. Lower the presser foot lever, and press i (Start/stop button). b a Appliqué position b Base fabric Follow the instructions on the embroidery e frame. f Lower the presser foot lever, and press g (Start/stop button)....
Users Manual - English
Page 90
...guide 8 R race 74 release button 21 replacing needle 28 resewing 66 retrieving pattern 70, 71 S safety instructions 1 saving patterns 70 seam ripper 8 selecting alphanumeric characters 53 selecting embroidery patterns 50 settings key 13 solving operation problems 78 spool cap 8, 30, 38 spool net 8, 31 ...adjustment 63, 64 threading 37 threading bobbin 29 threading needle 37 threading needle manually 42 touch panel 13 troubleshooting 78 turning machine on/off 17 U upgrading 86 upper thread 37 upper thread spool 37 upper thread tension 63 upper threading 37 USB cable...
...guide 8 R race 74 release button 21 replacing needle 28 resewing 66 retrieving pattern 70, 71 S safety instructions 1 saving patterns 70 seam ripper 8 selecting alphanumeric characters 53 selecting embroidery patterns 50 settings key 13 solving operation problems 78 spool cap 8, 30, 38 spool net 8, 31 ...adjustment 63, 64 threading 37 threading bobbin 29 threading needle 37 threading needle manually 42 touch panel 13 troubleshooting 78 turning machine on/off 17 U upgrading 86 upper thread 37 upper thread spool 37 upper thread tension 63 upper threading 37 USB cable...


