
Users Manual - English
Page 8
Embroidering ...57 Embroidering a pattern ...57 Appliquéing ...59 Editing and Saving Patterns 61 Adjusting the layout and the size ...61 Adjusting the upper thread tension ...63 Adjusting the bobbin thread ...
Embroidering ...57 Embroidering a pattern ...57 Appliquéing ...59 Editing and Saving Patterns 61 Adjusting the layout and the size ...61 Adjusting the upper thread tension ...63 Adjusting the bobbin thread ...
Users Manual - English
Page 59
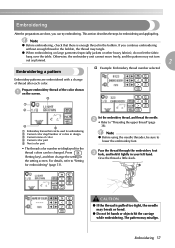
... pattern may break or bend. ● Do not let hands or objects hit the carriage while embroidering. If you can be used for embroidering and appliquéing. Otherwise, the embroidery unit cannot move freely, and the pattern may tangle. Pass the thread through the embroidery foot c hole, and hold it...
... pattern may break or bend. ● Do not let hands or objects hit the carriage while embroidering. If you can be used for embroidering and appliquéing. Otherwise, the embroidery unit cannot move freely, and the pattern may tangle. Pass the thread through the embroidery foot c hole, and hold it...
Users Manual - English
Page 61
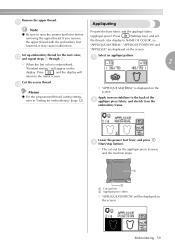
... lowered, it on the screen. Press (Settings key), and set the thread color display to NAME OF COLOR, so "APPLIQUE MATERIAL", "APPLIQUE POSITION" and "APPLIQUE" are displayed on the display. will appear on the screen. Apply iron-on stabilizer to the initial screen. Lower the ...presser foot lever, and press c (Start/stop button). a b a Cut-out line b Appliqué piece fabric X "APPLIQUE POSITION" will return to the back of the b appliqué piece fabric, and stretch it may cause malfunction. Press , and the display will be displayed on the...
... lowered, it on the screen. Press (Settings key), and set the thread color display to NAME OF COLOR, so "APPLIQUE MATERIAL", "APPLIQUE POSITION" and "APPLIQUE" are displayed on the display. will appear on the screen. Apply iron-on stabilizer to the initial screen. Lower the ...presser foot lever, and press c (Start/stop button). a b a Cut-out line b Appliqué piece fabric X "APPLIQUE POSITION" will return to the back of the b appliqué piece fabric, and stretch it may cause malfunction. Press , and the display will be displayed on the...
Users Manual - English
Page 62
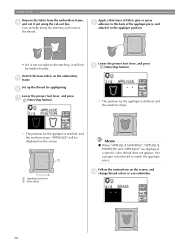
... embroider. 60 f Lower the presser foot lever, and press g (Start/stop button). X The position for the appliqué is not cut right on the screen. b a Appliqué position b Base fabric Follow the instructions on the embroidery e frame. Cut carefully along the cut-out line..... • If it is stitched, and the machine stops. Set up the thread for the appliqué is stitched, and the machine stops. a Memo z When "APPLIQUE MATERIAL", "APPLIQUE POSITION" and "APPLIQUE" are displayed, a specific color thread does not appear. EMBROIDERY Remove the fabric from the embroidery...
... embroider. 60 f Lower the presser foot lever, and press g (Start/stop button). X The position for the appliqué is not cut right on the screen. b a Appliqué position b Base fabric Follow the instructions on the embroidery e frame. Cut carefully along the cut-out line..... • If it is stitched, and the machine stops. Set up the thread for the appliqué is stitched, and the machine stops. a Memo z When "APPLIQUE MATERIAL", "APPLIQUE POSITION" and "APPLIQUE" are displayed, a specific color thread does not appear. EMBROIDERY Remove the fabric from the embroidery...
Users Manual - English
Page 89
Index A F accessories 8, 9 adjusting layout 61 adjusting thread tension 63, 64 air vent 11 appliqué pattern selection 59 attaching stabilizer material 43 attributes 23 frame pattern selection 55 front view 10 H handle 11 handwheel 11 help key 13 B I back ...
Index A F accessories 8, 9 adjusting layout 61 adjusting thread tension 63, 64 air vent 11 appliqué pattern selection 59 attaching stabilizer material 43 attributes 23 frame pattern selection 55 front view 10 H handle 11 handwheel 11 help key 13 B I back ...


