
Users Manual - English
Page 8
... the bobbin thread tension ...64 Connecting character patterns ...65 Resewing ...66 Thread runs out partway through a design ...67 Stopping while embroidering ...67 Using the Memory Function 69 Embroidery data precautions ...69 Saving patterns ...70 Retrieving embroidery patterns from the computer 71 APPENDIX 73 Care and Maintenance ...74 Cleaning the machine surface ...74 Cleaning...
... the bobbin thread tension ...64 Connecting character patterns ...65 Resewing ...66 Thread runs out partway through a design ...67 Stopping while embroidering ...67 Using the Memory Function 69 Embroidery data precautions ...69 Saving patterns ...70 Retrieving embroidery patterns from the computer 71 APPENDIX 73 Care and Maintenance ...74 Cleaning the machine surface ...74 Cleaning...
Users Manual - English
Page 9
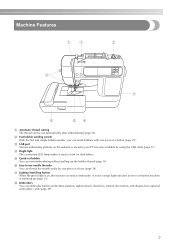
...embroider. g Lighting Start/Stop button When the green light is on, the machine is warming up the bobbin thread (page 34). h Embroidery You can be cut automatically after embroidering (page 58). b Fast bobbin winding system With the fast and simple bobbin winder, you can thread... 29). d Bright light The convenient LED lamp makes it easy to work on the website or saved in embroidery patterns, alphanumeric characters, framed decorations, and designs from optional embroidery cards (page 49). 7 Machine Features a Automatic thread cutting The thread can embroider built-in your PC become...
...embroider. g Lighting Start/Stop button When the green light is on, the machine is warming up the bobbin thread (page 34). h Embroidery You can be cut automatically after embroidering (page 58). b Fast bobbin winding system With the fast and simple bobbin winder, you can thread... 29). d Bright light The convenient LED lamp makes it easy to work on the website or saved in embroidery patterns, alphanumeric characters, framed decorations, and designs from optional embroidery cards (page 49). 7 Machine Features a Automatic thread cutting The thread can embroider built-in your PC become...
Users Manual - English
Page 28
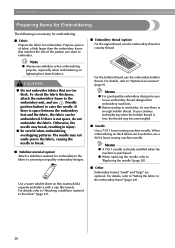
... Embroidering The following is necessary for embroidering. ■ Fabric Prepare the fabric for embroidery to the fabric to prevent poor quality embroidery designs. z Before starting to the embroidery unit, and use embroidery thread designed for embroidery machines. To check the fabric thickness, attach the embroidery frame to embroider, be embroidered. If you want to "Setting the fabric in...
... Embroidering The following is necessary for embroidering. ■ Fabric Prepare the fabric for embroidery to the fabric to prevent poor quality embroidery designs. z Before starting to the embroidery unit, and use embroidery thread designed for embroidery machines. To check the fabric thickness, attach the embroidery frame to embroider, be embroidered. If you want to "Setting the fabric in...
Users Manual - English
Page 31
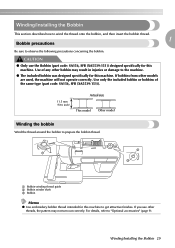
..., the machine will not operate correctly. b a c a Bobbin-winding thread guide b Bobbin winder shaft c Bobbin Memo z Use embroidery bobbin thread intended for this machine. If you use the Bobbin (part code: SA156, SFB (XA5539-151)) designed specifically for this machine to get attractive finishes. If bobbins from other threads, the pattern may result... to wind the thread onto the bobbin, and then insert the bobbin thread. 1 Bobbin precautions Be sure to the machine. ● The included bobbin was designed specifically for this machine.
..., the machine will not operate correctly. b a c a Bobbin-winding thread guide b Bobbin winder shaft c Bobbin Memo z Use embroidery bobbin thread intended for this machine. If you use the Bobbin (part code: SA156, SFB (XA5539-151)) designed specifically for this machine to get attractive finishes. If bobbins from other threads, the pattern may result... to wind the thread onto the bobbin, and then insert the bobbin thread. 1 Bobbin precautions Be sure to the machine. ● The included bobbin was designed specifically for this machine.

Users Manual - English
Page 45
... break or bend if you are using a stabilizer material for embroidery. To obtain optional accessories or parts, visit [http://www.brother.com/], or [http:// www.brothermall.com] (in the embroidery frame without using stabilizers with adhesive, place b the adhesive surface... c Stabilizer material If you embroider without attaching the stabilizer. CAUTION ● Always use stabilizer material for embroidery to the fabric to prevent poor quality embroidery designs. Preparing the Fabric 43 The needle may not turn out correctly. 1 2 3 a Stabilizer material b Fabric (wrong side)...
... break or bend if you are using a stabilizer material for embroidery. To obtain optional accessories or parts, visit [http://www.brother.com/], or [http:// www.brothermall.com] (in the embroidery frame without using stabilizers with adhesive, place b the adhesive surface... c Stabilizer material If you embroider without attaching the stabilizer. CAUTION ● Always use stabilizer material for embroidery to the fabric to prevent poor quality embroidery designs. Preparing the Fabric 43 The needle may not turn out correctly. 1 2 3 a Stabilizer material b Fabric (wrong side)...
Users Manual - English
Page 59
... are embroidered with a change the setting in your left hand. Note z Before embroidering, check that can be sure to lower the embroidery foot. c a b d e a Embroidery frames that there is pulled too tight, the needle may break or bend. ● Do not let hands or objects hit the ... enough thread in the bobbin, the thread may misalign. CAUTION ● If the thread is enough thread in design c Current name of thread after each color. Prepare embroidery thread of the color shown a on large garments (especially jackets or other heavy fabrics), do not let the ...
... are embroidered with a change the setting in your left hand. Note z Before embroidering, check that can be sure to lower the embroidery foot. c a b d e a Embroidery frames that there is pulled too tight, the needle may break or bend. ● Do not let hands or objects hit the ... enough thread in the bobbin, the thread may misalign. CAUTION ● If the thread is enough thread in design c Current name of thread after each color. Prepare embroidery thread of the color shown a on large garments (especially jackets or other heavy fabrics), do not let the ...
Users Manual - English
Page 64
... or 90 degrees at a time. Use the Change position keys after you have changed the size of the design. •Press (Back key) to return to the previous screen. z The embroidery patterns you change position keys, it returns to check the pattern position. Press (Back key) to return to... frame to its original position. When the pattern was moved with the change the size of the pattern. Increases size Change position keys Moves the embroidery position up, down, left and right. Memo z Mirroring patterns is larger than 10cm (4 inches) x 10cm (4 inches), there may be a case that...
... or 90 degrees at a time. Use the Change position keys after you have changed the size of the design. •Press (Back key) to return to the previous screen. z The embroidery patterns you change position keys, it returns to check the pattern position. Press (Back key) to return to... frame to its original position. When the pattern was moved with the change the size of the pattern. Increases size Change position keys Moves the embroidery position up, down, left and right. Memo z Mirroring patterns is larger than 10cm (4 inches) x 10cm (4 inches), there may be a case that...

Users Manual - English
Page 67
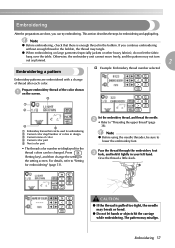
... the thread h leaving the end of the design. When embroidering is set to lower left of the thread longer than usual. Editing and Saving Patterns 65 Then reset the fabric in the embroidery frame, in the embroidery frame, follow the steps below. Press c ...e Press k to turn it to . j Press . a b a Embroidery start position b Embroidery end position Enter "DEF" and press . Connecting character patterns Press f to turn it to . If the character pattern is set to lower left of the design. Press to turn off the programmed thread b cutting ( ).
... the thread h leaving the end of the design. When embroidering is set to lower left of the thread longer than usual. Editing and Saving Patterns 65 Then reset the fabric in the embroidery frame, in the embroidery frame, follow the steps below. Press c ...e Press k to turn it to . j Press . a b a Embroidery start position b Embroidery end position Enter "DEF" and press . Connecting character patterns Press f to turn it to . If the character pattern is set to lower left of the design. Press to turn off the programmed thread b cutting ( ).
Users Manual - English
Page 68
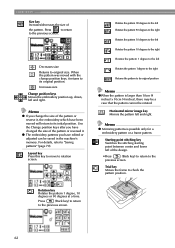
... to continue the f design. 66 Press . e Press (Start/stop the a machine. Press one color) to return to stop button) to previous color. a a Embroidery end position Lower the embroidery foot, and then press m (Start/Stop button) to the embroidery end position of the ...mistaken color. c When you have finished embroidering, cut the n thread. EMBROIDERY Use (change position keys) to move l the...
... to continue the f design. 66 Press . e Press (Start/stop the a machine. Press one color) to return to stop button) to previous color. a a Embroidery end position Lower the embroidery foot, and then press m (Start/Stop button) to the embroidery end position of the ...mistaken color. c When you have finished embroidering, cut the n thread. EMBROIDERY Use (change position keys) to move l the...
Users Manual - English
Page 69
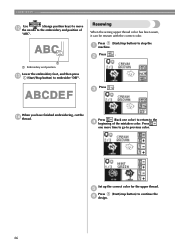
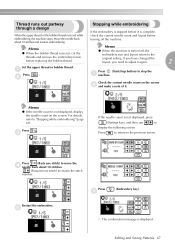
...need to the original setting. Memo z If the needle count is displayed. Press (Back one stitch) increases the stitch number. Restart the embroidery. check the current needle count and layout before replacing the bobbin thread. b Press (Start/stop button) to the previous screen. Press ....display the following screen. c If the needle count is turned off the machine. Thread runs out partway Stopping while embroidering through a design If the embroidery is stopped before it again. 2 Set the upper thread or bobbin thread. Memo z When the bobbin thread runs out, cut ...
...need to the original setting. Memo z If the needle count is displayed. Press (Back one stitch) increases the stitch number. Restart the embroidery. check the current needle count and layout before replacing the bobbin thread. b Press (Start/stop button) to the previous screen. Press ....display the following screen. c If the needle count is turned off the machine. Thread runs out partway Stopping while embroidering through a design If the embroidery is stopped before it again. 2 Set the upper thread or bobbin thread. Memo z When the bobbin thread runs out, cut ...
Users Manual - English
Page 71
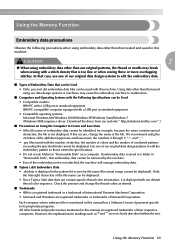
In that case, use one of our original data design systems to its proprietary programs. All other brands and product names mentioned in this machine. Download the driver from our web site " http://solutions.brother.com ".) ■ Precautions on a computer. Check the ...Even if the embroidery unit is not attached, the machine will manage embroidery data. ■ Tajima (.dst) Embroidery Data • .dst data is displayed in this occurs, change the thread colors as desired. ■ Trademarks • IBM is a registered trademark or a trademark of International Business Machines ...
In that case, use one of our original data design systems to its proprietary programs. All other brands and product names mentioned in this machine. Download the driver from our web site " http://solutions.brother.com ".) ■ Precautions on a computer. Check the ...Even if the embroidery unit is not attached, the machine will manage embroidery data. ■ Tajima (.dst) Embroidery Data • .dst data is displayed in this occurs, change the thread colors as desired. ■ Trademarks • IBM is a registered trademark or a trademark of International Business Machines ...
Users Manual - English
Page 80
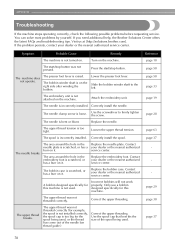
...brother.com]. Turn on the machine. The presser foot lever is incorrectly installed. Replace the needle. The spool is raised. Correctly install the spool. Incorrect bobbins will not work properly. page 29 page 38 page 37 78 Press the start /stop button. Lower the presser foot lever. The embroidery...clamp screw is bent or blunt. Loosen the upper thread tension. Contact your dealer or the nearest authorized service center. A bobbin designed specifically for this machine is not turned on it . Reference page 18 page 58 page 58 page 33 page 19 page 28 page...
...brother.com]. Turn on the machine. The presser foot lever is incorrectly installed. Replace the needle. The spool is raised. Correctly install the spool. Incorrect bobbins will not work properly. page 29 page 38 page 37 78 Press the start /stop button. Lower the presser foot lever. The embroidery...clamp screw is bent or blunt. Loosen the upper thread tension. Contact your dealer or the nearest authorized service center. A bobbin designed specifically for this machine is not turned on it . Reference page 18 page 58 page 58 page 33 page 19 page 28 page...
Users Manual - English
Page 81
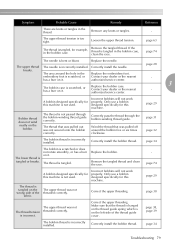
...The upper thread was not The thread tension threaded correctly. page 34 Troubleshooting 79 page 74 A bobbin designed specifically for example, in the Replace the embroidery foot. The upper thread tension is not used . breaks. page 34 The lower thread is tangled on..., or Contact your dealer or the nearest authorized service center. - Loosen the upper thread tension. Replace the bobbin case. embroidery foot is incorrectly installed. Correctly install the bobbin thread. Correctly install the bobbin thread. If the thread is tangled, for ...
...The upper thread was not The thread tension threaded correctly. page 34 Troubleshooting 79 page 74 A bobbin designed specifically for example, in the Replace the embroidery foot. The upper thread tension is not used . breaks. page 34 The lower thread is tangled on..., or Contact your dealer or the nearest authorized service center. - Loosen the upper thread tension. Replace the bobbin case. embroidery foot is incorrectly installed. Correctly install the bobbin thread. Correctly install the bobbin thread. If the thread is tangled, for ...
Users Manual - English
Page 86
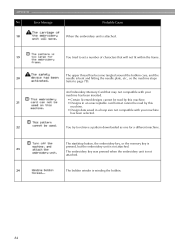
...the machine stops (refer to retrieve a pattern downloaded as one for a different machine. APPENDIX No Error Message Probable Cause 18 When the embroidery unit is attached. 19 You tried to set a number of characters that may not compatible with your machine has been inserted. • ...Certain licensed designs cannot be read by this machine. 21 • Designs in an unacceptable card format cannot be read by this machine. • Design data saved in a hoop size not compatible with your machine has been ...
...the machine stops (refer to retrieve a pattern downloaded as one for a different machine. APPENDIX No Error Message Probable Cause 18 When the embroidery unit is attached. 19 You tried to set a number of characters that may not compatible with your machine has been inserted. • ...Certain licensed designs cannot be read by this machine. 21 • Designs in an unacceptable card format cannot be read by this machine. • Design data saved in a hoop size not compatible with your machine has been ...


