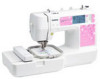
Users Manual - English
Page 7
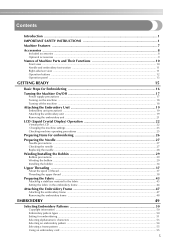
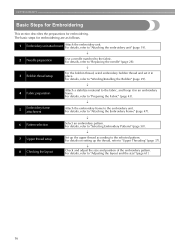
... fabric in the embroidery frame ...44 Attaching the Embroidery Frame 47 Attaching the embroidery frame ...47 Removing the embroidery frame ...48 EMBROIDERY 49 Selecting Embroidery Patterns 50 Copyright information ...50 Embroidery pattern types ...50 Setting for embroidering ...51 Selecting alphanumeric characters ...53 Selecting an embroidery...
... fabric in the embroidery frame ...44 Attaching the Embroidery Frame 47 Attaching the embroidery frame ...47 Removing the embroidery frame ...48 EMBROIDERY 49 Selecting Embroidery Patterns 50 Copyright information ...50 Embroidery pattern types ...50 Setting for embroidering ...51 Selecting alphanumeric characters ...53 Selecting an embroidery...

Users Manual - English
Page 8
... Appliquéing ...59 Editing and Saving Patterns 61 Adjusting the layout and the size ...61 Adjusting the upper thread tension ...63 Adjusting the bobbin thread tension ...64 Connecting character patterns ...65 Resewing ...66 Thread runs out partway through a design ...67 Stopping ...while embroidering ...67 Using the Memory Function 69 Embroidery data precautions ...69 Saving patterns ...70 Retrieving embroidery patterns from the computer 71 APPENDIX 73 Care and Maintenance ...74 Cleaning the machine surface ...74 Cleaning the race ...74 ...
... Appliquéing ...59 Editing and Saving Patterns 61 Adjusting the layout and the size ...61 Adjusting the upper thread tension ...63 Adjusting the bobbin thread tension ...64 Connecting character patterns ...65 Resewing ...66 Thread runs out partway through a design ...67 Stopping ...while embroidering ...67 Using the Memory Function 69 Embroidery data precautions ...69 Saving patterns ...70 Retrieving embroidery patterns from the computer 71 APPENDIX 73 Care and Maintenance ...74 Cleaning the machine surface ...74 Cleaning the race ...74 ...
Users Manual - English
Page 9
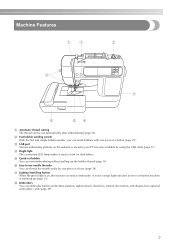
...). f Easy-to embroider. d Bright light The convenient LED lamp makes it easy to work on , the machine is on dark fabrics. c USB port Various embroidery patterns on the website or saved in embroidery patterns, alphanumeric characters, framed decorations, and designs from optional embroidery cards (page 49). 7
...). f Easy-to embroider. d Bright light The convenient LED lamp makes it easy to work on , the machine is on dark fabrics. c USB port Various embroidery patterns on the website or saved in embroidery patterns, alphanumeric characters, framed decorations, and designs from optional embroidery cards (page 49). 7

Users Manual - English
Page 12
...threader lever to the machine, and then attach the embroidery frame. e LCD (liquid crystal display) (touch panel) (page 22) Setting for the selected pattern and error messages appear in the connector for the embroidery unit. Front view a Thread guide cover (page 31, 39) Pass the thread under this ... winding the bobbin thread and threading the machine. b Thread guide (page 31, 39) Pass the thread under this panel to select embroidery patterns, or check how to learn the names of the machine parts. j Embroidery unit (page 19) Attach the embroidery unit to thread the needle.
...threader lever to the machine, and then attach the embroidery frame. e LCD (liquid crystal display) (touch panel) (page 22) Setting for the selected pattern and error messages appear in the connector for the embroidery unit. Front view a Thread guide cover (page 31, 39) Pass the thread under this ... winding the bobbin thread and threading the machine. b Thread guide (page 31, 39) Pass the thread under this panel to select embroidery patterns, or check how to learn the names of the machine parts. j Embroidery unit (page 19) Attach the embroidery unit to thread the needle.
Users Manual - English
Page 15
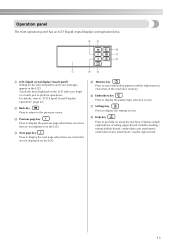
... are not displayed on the LCD. g Settings key Press to the previous screen. c Previous page key Press to save embroidery patterns and the alphanumeric characters in the LCD. e Memory key Press to display the previous page when there are items that are not... thread / bobbin winding / setting bobbin thread / embroidery unit attachment / embroidery frame attachment / needle replacement. 13 For details, refer to display the pattern type selection screen. f Embroidery key Press to "LCD (Liquid Crystal Display) Operation" (page 22). h Help key Press to perform operations. Touch ...
... are not displayed on the LCD. g Settings key Press to the previous screen. c Previous page key Press to save embroidery patterns and the alphanumeric characters in the LCD. e Memory key Press to display the previous page when there are items that are not... thread / bobbin winding / setting bobbin thread / embroidery unit attachment / embroidery frame attachment / needle replacement. 13 For details, refer to display the pattern type selection screen. f Embroidery key Press to "LCD (Liquid Crystal Display) Operation" (page 22). h Help key Press to perform operations. Touch ...
Users Manual - English
Page 18
... thread and set it in place. For details, refer to "Attaching the Embroidery Frame" (page 47). ↓ 6 Pattern selection Select an embroidery pattern. For details, refer to the selected pattern. For details, refer to "Selecting Embroidery Patterns" (page 50). ↓ 7 Upper thread setup Set up the thread, refer to the fabric, and hoop it...). ↓ 4 Fabric preparation Attach a stabilizer material to "Upper Threading" (page 37). 8 Checking the layout ↓ Check and adjust the size and position of the embroidery pattern.
... thread and set it in place. For details, refer to "Attaching the Embroidery Frame" (page 47). ↓ 6 Pattern selection Select an embroidery pattern. For details, refer to the selected pattern. For details, refer to "Selecting Embroidery Patterns" (page 50). ↓ 7 Upper thread setup Set up the thread, refer to the fabric, and hoop it...). ↓ 4 Fabric preparation Attach a stabilizer material to "Upper Threading" (page 37). 8 Checking the layout ↓ Check and adjust the size and position of the embroidery pattern.
Users Manual - English
Page 22
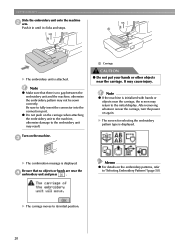
...embroidery unit and press . After removing whatever is no objects or hands are near the carriage. X The screen for selecting the embroidery pattern type is displayed. GETTING READY Slide the embroidery unit onto the machine b arm. Note z Make sure that no gap between the ...embroidery unit and the machine, otherwise the embroidery pattern may result. z Do not push on the embroidery patterns, refer to "Selecting Embroidery Patterns" (page 50). Be sure to its initial position. 20 Turn on again. X The carriage moves...
...embroidery unit and press . After removing whatever is no objects or hands are near the carriage. X The screen for selecting the embroidery pattern type is displayed. GETTING READY Slide the embroidery unit onto the machine b arm. Note z Make sure that no gap between the ...embroidery unit and the machine, otherwise the embroidery pattern may result. z Do not push on the embroidery patterns, refer to "Selecting Embroidery Patterns" (page 50). Be sure to its initial position. 20 Turn on again. X The carriage moves...
Users Manual - English
Page 24
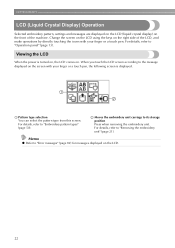
.... When you touch the LCD screen according to "Operation panel" (page 13). GETTING READY LCD (Liquid Crystal Display) Operation Selected embroidery pattern, settings and messages are displayed on the LCD (liquid crystal display) on the front of the LCD, and make operations by directly touching... details, refer to "Error messages" (page 82) for messages displayed on the LCD. 22 b Moves the embroidery unit carriage to "Embroidery pattern types" (page 50). For details, refer to its storage position Press when removing the embroidery unit. Change the screen on the LCD using ...
.... When you touch the LCD screen according to "Operation panel" (page 13). GETTING READY LCD (Liquid Crystal Display) Operation Selected embroidery pattern, settings and messages are displayed on the LCD (liquid crystal display) on the front of the LCD, and make operations by directly touching... details, refer to "Error messages" (page 82) for messages displayed on the LCD. 22 b Moves the embroidery unit carriage to "Embroidery pattern types" (page 50). For details, refer to its storage position Press when removing the embroidery unit. Change the screen on the LCD using ...
Users Manual - English
Page 28
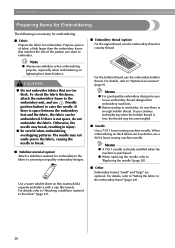
... sewing machine needle. For details, refer to "Attaching a stabilizer material to "Setting the fabric in injury. ● Be careful when embroidering overlapping patterns. For details, refer to the fabric" (page 43). ■ Embroidery thread (option) For the upper thread, use a 90/14 home sewing... machine needle. Prepare a piece of the pattern you continue embroidering when the bobbin thread is purchased. If there is necessary for embroidering. ■ Fabric Prepare the fabric for embroidery. ...
... sewing machine needle. For details, refer to "Attaching a stabilizer material to "Setting the fabric in injury. ● Be careful when embroidering overlapping patterns. For details, refer to the fabric" (page 43). ■ Embroidery thread (option) For the upper thread, use a 90/14 home sewing... machine needle. Prepare a piece of the pattern you continue embroidering when the bobbin thread is purchased. If there is necessary for embroidering. ■ Fabric Prepare the fabric for embroidery. ...
Users Manual - English
Page 31
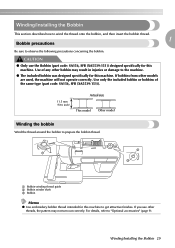
... the Bobbin 29 Use only the included bobbin or bobbins of any other bobbin may not turn out correctly. If bobbins from other threads, the pattern may result in injuries or damage to the machine. ● The included bobbin was designed specifically for this machine. b a c a Bobbin-winding thread guide b Bobbin winder...
... the Bobbin 29 Use only the included bobbin or bobbins of any other bobbin may not turn out correctly. If bobbins from other threads, the pattern may result in injuries or damage to the machine. ● The included bobbin was designed specifically for this machine. b a c a Bobbin-winding thread guide b Bobbin winder...
Users Manual - English
Page 39
... be used, refer to "Threading the needle manually (without using the needle threader)" (page 42). ● Never use threads other than those listed above, the pattern may bend or break. ● The needle threader can be used with the needle threader. ● If the needle threader cannot be used . If the...
... be used, refer to "Threading the needle manually (without using the needle threader)" (page 42). ● Never use threads other than those listed above, the pattern may bend or break. ● The needle threader can be used with the needle threader. ● If the needle threader cannot be used . If the...

Users Manual - English
Page 40
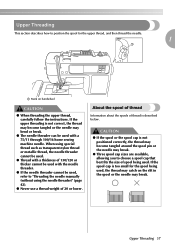
...then thread the machine. Memo z Use embroidery thread, or country embroidery thread intended for the selected pattern. For details, refer to raise the needle. Press (Needle position button) once or c twice to "Selecting Embroidery Patterns" (page 50). a a Needle position button Note z The needle is . a Turn on ...handwheel Raise the presser foot lever. If you use other threads, the pattern may bend or break. a a Mark on the machine. a Spool pin b Spool cap Place the spool of thread on the handwheel is at...
...then thread the machine. Memo z Use embroidery thread, or country embroidery thread intended for the selected pattern. For details, refer to raise the needle. Press (Needle position button) once or c twice to "Selecting Embroidery Patterns" (page 50). a a Needle position button Note z The needle is . a Turn on ...handwheel Raise the presser foot lever. If you use other threads, the pattern may bend or break. a a Mark on the machine. a Spool pin b Spool cap Place the spool of thread on the handwheel is at...

Users Manual - English
Page 45
... fabric to the embroidery fabric, it is stretched on thin materials like towels. To obtain optional accessories or parts, visit [http://www.brother.com/], or [http:// www.brothermall.com] (in the embroidery frame without using stabilizers with adhesive, place b the adhesive surface of ... a steam iron. CAUTION ● Always use stabilizer material for embroidery. Use a water soluble sheet on an embroidery frame. Furthermore, the pattern may break or bend if you are using a stabilizer material for embroidering in the hoop For fabrics, such as towels, which cannot be...
... fabric to the embroidery fabric, it is stretched on thin materials like towels. To obtain optional accessories or parts, visit [http://www.brother.com/], or [http:// www.brothermall.com] (in the embroidery frame without using stabilizers with adhesive, place b the adhesive surface of ... a steam iron. CAUTION ● Always use stabilizer material for embroidery. Use a water soluble sheet on an embroidery frame. Furthermore, the pattern may break or bend if you are using a stabilizer material for embroidering in the hoop For fabrics, such as towels, which cannot be...
Users Manual - English
Page 46
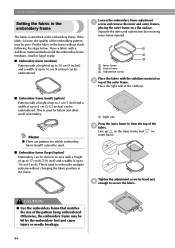
... in the frame. 1 a Right side Press the inner frame in the frame without slack following the steps below. Memo z There are patterns for letters and other small embroidery. CAUTION ● Use the embroidery frame that matches the size of the c fabric. Loosen the embroidery ...the adjustment screw by removing inner frame upward. Otherwise, the embroidery frame may be embroidered. Put the fabric in from the top of the pattern being embroidered. This is used for which embroidery frame (small) cannot be used. ■ Embroidery frame (large) [option] Embroidery can...
... in the frame. 1 a Right side Press the inner frame in the frame without slack following the steps below. Memo z There are patterns for letters and other small embroidery. CAUTION ● Use the embroidery frame that matches the size of the c fabric. Loosen the embroidery ...the adjustment screw by removing inner frame upward. Otherwise, the embroidery frame may be embroidered. Put the fabric in from the top of the pattern being embroidered. This is used for which embroidery frame (small) cannot be used. ■ Embroidery frame (large) [option] Embroidery can...
Users Manual - English
Page 47
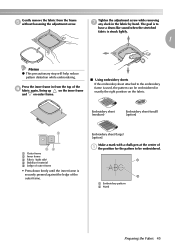
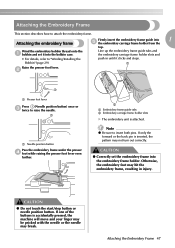
.... ■ Using embroidery sheets If the embroidery sheet attached to the embroidery frame is struck lightly. 1 Memo z This precautionary step will help reduce pattern distortion while embroidering. Press the inner frame in the fabric by hand. Embroidery sheet (medium) Embroidery sheet (small) [option] 3 12 54 a ...down firmly until the inner frame is securely pressed against the ledge of a the position for the pattern to have a drum-like sound when the stretched fabric is used, the pattern can be embroidered. Gently remove the fabric from the top of the f fabric again, lining up...
.... ■ Using embroidery sheets If the embroidery sheet attached to the embroidery frame is struck lightly. 1 Memo z This precautionary step will help reduce pattern distortion while embroidering. Press the inner frame in the fabric by hand. Embroidery sheet (medium) Embroidery sheet (small) [option] 3 12 54 a ...down firmly until the inner frame is securely pressed against the ledge of a the position for the pattern to have a drum-like sound when the stretched fabric is used, the pattern can be embroidered. Gently remove the fabric from the top of the f fabric again, lining up...
Users Manual - English
Page 49
... the embroidery frame e the embroidery carriage frame holder from the top. Bobbin" (page 29). If only the forward or the back pin is inserted, the pattern may break. CAUTION ● Correctly set it clicks and stops. a a Needle position button Pass the embroidery frame under the presser d foot while raising the presser...
... the embroidery frame e the embroidery carriage frame holder from the top. Bobbin" (page 29). If only the forward or the back pin is inserted, the pattern may break. CAUTION ● Correctly set it clicks and stops. a a Needle position button Pass the embroidery frame under the presser d foot while raising the presser...
Users Manual - English
Page 51
Selecting Embroidery Patterns 50 Embroidering...57 Editing and Saving Patterns 61 Using the Memory Function 69 2 EMBROIDERY The steps for embroidering are described in this chapter.
Selecting Embroidery Patterns 50 Embroidering...57 Editing and Saving Patterns 61 Using the Memory Function 69 2 EMBROIDERY The steps for embroidering are described in this chapter.

Users Manual - English
Page 52
..., refer to "Using an embroidery card" (page 55). For details, refer to "Selecting alphanumeric characters" (page 53). c Frame patterns 10 shapes, such as squares and circles, can be embroidered. f Patterns retrieved from the computer Patterns retrieved from a computer can be selected from the computer" (page 71). 50 Any public or commercial use only...
..., refer to "Using an embroidery card" (page 55). For details, refer to "Selecting alphanumeric characters" (page 53). c Frame patterns 10 shapes, such as squares and circles, can be embroidered. f Patterns retrieved from the computer Patterns retrieved from a computer can be selected from the computer" (page 71). 50 Any public or commercial use only...
Users Manual - English
Page 53
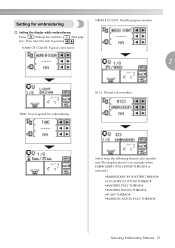
...;EMBROIDERY (POLYESTER) THREAD# •COUNTRY (COTTON) THREAD# •MADEIRA POLY THREAD# •MADEIRA RAYON THREAD# •SULKY THREAD# •ROBISON-ANTON POLY THREAD# Selecting Embroidery Patterns 51 NAME OF COLOR: Typical color name NEEDLE COUNT: Needle progress number 2 TIME: Time required for embroidering † Setting the display while embroidering Press (Settings...
...;EMBROIDERY (POLYESTER) THREAD# •COUNTRY (COTTON) THREAD# •MADEIRA POLY THREAD# •MADEIRA RAYON THREAD# •SULKY THREAD# •ROBISON-ANTON POLY THREAD# Selecting Embroidery Patterns 51 NAME OF COLOR: Typical color name NEEDLE COUNT: Needle progress number 2 TIME: Time required for embroidering † Setting the display while embroidering Press (Settings...
Users Manual - English
Page 54
... not embroidered or when restarting the machine after reinforcement. The settings such as you want to change the thread density (characters and frame patterns only). Since the machine stops at a time and changes the position for starting the embroidery. EMBROIDERY DISPLAY UNIT The measurement units that are confirmed. Press ... character, the upper thread is cut automatically after power has been turned off in character embroidery. Press this key and then, press to adjust the pattern. This is used when a specific color is selected, press this key when you embroider.
... not embroidered or when restarting the machine after reinforcement. The settings such as you want to change the thread density (characters and frame patterns only). Since the machine stops at a time and changes the position for starting the embroidery. EMBROIDERY DISPLAY UNIT The measurement units that are confirmed. Press ... character, the upper thread is cut automatically after power has been turned off in character embroidery. Press this key and then, press to adjust the pattern. This is used when a specific color is selected, press this key when you embroider.


