Brother International PS5234 Support and Manuals
Get Help and Manuals for this Brother International item
View All Support Options Below
Free Brother International PS5234 manuals!
Problems with Brother International PS5234?
Ask a Question
Free Brother International PS5234 manuals!
Problems with Brother International PS5234?
Ask a Question
Brother International PS5234 Videos

Pacesetter PS5234 Serger
Duration: :46
Total Views: 130
Duration: :46
Total Views: 130
Popular Brother International PS5234 Manual Pages
Users Guide - Page 1
...;n de problemas así como la lista de preguntas y respuestas más frecuentes.
English
Español
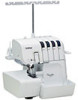
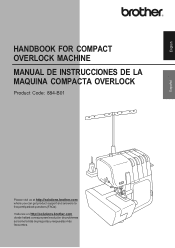
HANDBOOK FOR COMPACT OVERLOCK MACHINE MANUAL DE INSTRUCCIONES DE LA MAQUINA COMPACTA OVERLOCK
Product Code: 884-B01
Please visit us at http://solutions.brother.com
where you can get product support and answers to frequently asked questions (FAQs).
Users Guide - Page 2
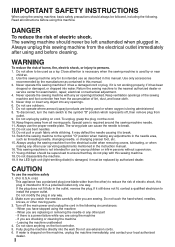
..., knives, or other user servicing adjustments mentioned in the instruction manual. 16. Do not store...it is intended to be replaced by pulling on the foot...there is not intended for examination, repair, electrical or mechanical adjustment. 4....wrong plate can cause the needle to install the proper outlet. Do not use... one blade wider than the other part - Never operate this sewing machine ...
Users Guide - Page 3
...leaving this manual before you replace or fi... or other parts to the ...repair or adjust the machine If the machine breaks down or needs adjustment, first follow the troubleshooting...problem persists, consult your machine a longer life 1. SAVE THESE INSTRUCTIONS...servicing the sewing machine, or when removing covers, the machine or the electrical set must be made by children without...
Users Guide - Page 4
...rating as marked on the motor
-
CAUTION
When threading or replacing needle, the main power and light switch of replacing the plug fuse, use of service. When the motor is always happy to BS 1362, ... regarding the use a fuse approved by the carbon brushes and the commutator, and are part of the sewing machine can be removed from the wall socket to observe the precautions described...
Users Guide - Page 5
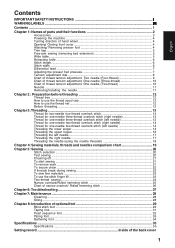
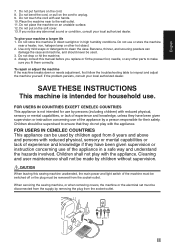
...INSTRUCTIONS I WARNING LABELS ...III Contents ...1 Chapter 1: Names of parts... ...11 Removing/Installing the needle 11...Troubleshooting ...27 Chapter 7: Maintenance ...28 Cleaning ...28 Oiling ...28 Chapter 8: Introduction of optional feet 29 Blind stitch foot ...29 Taping foot ...31 Pearl sequence foot ...32 Piping foot ...33 Gathering foot ...34 Specifications ...35 Specifications ...35 Setting...
Users Guide - Page 6
...set, Hexagonal driver
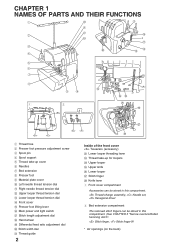
2 Bed extension compartment
The removed stitch fingers can be stored in this compartment. (See CHAPTER 5 "Narrow overlock/Rolled hemming stitch". Stitch finger, Stitch finger W
* Air openings (on the back) CHAPTER 1 NAMES OF PARTS AND THEIR FUNCTIONS
1
2
1 Thread tree 2 Presser foot pressure adjustment screw 3 Spool pin 4 Spool support... Thread guide
2...
Users Guide - Page 7
...the machine model.
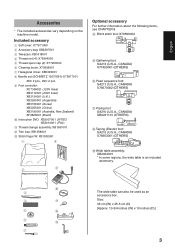
Size:...Cleaning brush: X75906001 7 Hexagonal driver: XB0393001
8 Needle set (SCHMETZ 130/705H): X75917001
...#80: 2 pcs., #90: 2 pcs.
9 Foot controller: XC7359021 (120V Area) XB3112001 (230V Area) XB3134001 (U.K.) XB3200001 (Argentina) XB3156001 (Korea) XB3255001 (China) XB3190001 (Australia, New Zealand) XF2826001 (Brazil)
0 Instruction...
Users Guide - Page 11
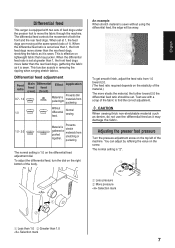
...1.0 toward 2.0 the differential feed ratio should be wavy. When the differential feed ratio is set at greater than 1, the front feed dogs move slower than the rear feed dogs, stretching ....
When the differential feed ratio is sewn. Normal sewing
1.0 - 2.0
Material is sewn. When set at less than 1, the front feed dogs move faster than 1.0 Selection mark
7 This function assists...
Users Guide - Page 25
...1 "Tension adjustment dial".)
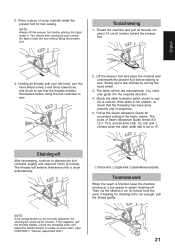
21 If feeding for chaining-off is set to obtain chaining-off 10cm (4 inches). You need only guide it in sequence.
5. Slowly sew a few times toward you,...entwine themselves into a chain automatically.
3 2
1
1 Presser foot 2 Upper knife 3 Seam Allowance Guide
To remove work . To start sewing by turning the hand wheel.
3. If this happens, pull...
Users Guide - Page 28
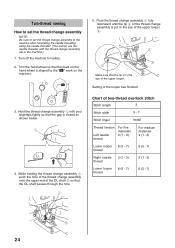
... OL shaft 2 so that the OL shaft passes through the hole. 1
5. Chart of the looper has finished. TC
3. Setting of two-thread overlock stitch
Stitch length
3
Stitch width
5 - 7
Stitch finger
Install
Thread tension
Left needle thread
For fine materials 2 (1 - 3)
For medium materials 2 (1 - 3)
Lower looper thread
6 (5 - 7)
6 (5 - 7)
Right needle thread
2 (1 - 3)
2 (1 - 3)
Lower...
Users Guide - Page 29
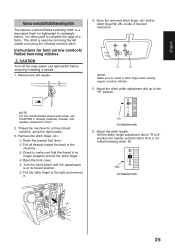
... position. Instructions for a three thread overlock, using the 3-thread overlock stitch. Adjust the stitch width adjustment dial up to complete the edge of a fabric. Adjust the stitch length. Set the stitch... overlock/ Rolled hemming stitches
CAUTION Turn off the main power and light switch before removing/ installing a needle. 1. Remove the stitch finger . 1 Raise the presser foot lever. 2 Pull...
Users Guide - Page 31
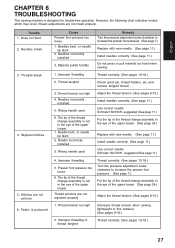
... upper looper. (See page 24.)
Replace with new needle. (See page 11.)
Install needles correctly. (See page 11.)
Do not press or pull material too hard when sewing.
1. English
CHAPTER 6 TROUBLESHOOTING
This sewing machine is puckered
Cause
Presser foot pressure too loose
1. However, the following chart indicates trouble which may occur if basic adjustments...
Users Guide - Page 33
...direction of the same fabric should be easier if a crease is pulled flat. Recommended settings - Adjust the guide position of the fabric out, fold the fabric once and then back to the required ... same time. English
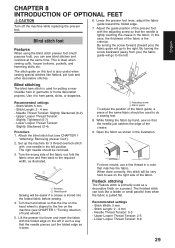
CHAPTER 8 INTRODUCTION OF OPTIONAL FEET
CAUTION Turn off the machine while replacing the presser foot. By turning the screw forward (toward the folded edge.
7. Blind stitching...
Users Guide - Page 34
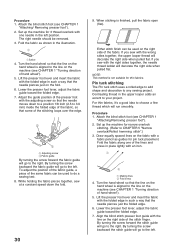
... Pin tuck stitch uses a rolled edge to add shape and decoration to the left. By turning the screw backward the stitch guide will go to any sewing project. Procedure 1. Set up the machine for pin tuck placement. Lift the presser foot lever and insert the fabric with the adjusting screw so that...
Users Guide - Page 35
...
14 5
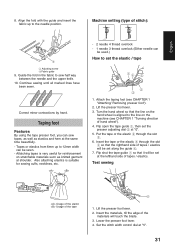
2 3 1. Tapes or elastics from 6mm up to the line on the machine (see CHAPTER 1 "Attaching/ Removing presser foot"). 2. Flip open the tape guide 1, then set along the guide 4. 7.
Taping foot
Features
By using the tape presser foot, you can sew tapes, as well as knitted garment at "5".
31 Attach the taping foot...
Brother International PS5234 Reviews
We have not received any reviews for Brother International yet.