Users Manual - English
Page 3
...persons. 2 Always unplug the machine from the build up of the electrical outlet. Introduction Thank you are being administered. 1 Do not use if you may damage the machine or result in the machine falling, which could cause injuries. • When lifting the machine, be ... servicing adjustments mentioned in the instruction manual. • To unplug the machine, switch the machine to the symbol "O" position to use extension cords. Before using , when cleaning, when making any object into the electrical outlet. To reduce the risk of electric shock 1 Always unplug the...
...persons. 2 Always unplug the machine from the build up of the electrical outlet. Introduction Thank you are being administered. 1 Do not use if you may damage the machine or result in the machine falling, which could cause injuries. • When lifting the machine, be ... servicing adjustments mentioned in the instruction manual. • To unplug the machine, switch the machine to the symbol "O" position to use extension cords. Before using , when cleaning, when making any object into the electrical outlet. To reduce the risk of electric shock 1 Always unplug the...
Users Manual - English
Page 4
...in fire or an electric shock. • Do not place this machine on an unstable surface, such as contained in the manual. Do not use or store the machine near a space heater, iron, halogen lamp, or other parts to assure correct installation. 8 For repair or adjustment: &#...attention to clean the machine. The contents of this manual and specifications of suffocation. • Do not use . 2 For additional product information and updates, visit our web site at www.brother.com SAVE THESE INSTRUCTIONS This machine is required, first follow the troubleshooting table in the needle area. ...
...in fire or an electric shock. • Do not place this machine on an unstable surface, such as contained in the manual. Do not use or store the machine near a space heater, iron, halogen lamp, or other parts to assure correct installation. 8 For repair or adjustment: &#...attention to clean the machine. The contents of this manual and specifications of suffocation. • Do not use . 2 For additional product information and updates, visit our web site at www.brother.com SAVE THESE INSTRUCTIONS This machine is required, first follow the troubleshooting table in the needle area. ...
Users Manual - English
Page 5
... with the fuse cover omitted. • If the available electrical outlet is not intended for use by persons (including children) with the appliance. carrying the mark, rating as marked on plug. • Always replace the fuse cover. FOR USERS IN THE ...UK, EIRE, MALTA AND CYPRUS ONLY IMPORTANT • In the event of replacing the plug fuse, use of experience and knowledge, unless they have been given supervision or instruction concerning use a fuse approved by ASTA to BS 1362, i.e. Children should contact your authorized dealer to obtain the correct lead...
... with the fuse cover omitted. • If the available electrical outlet is not intended for use by persons (including children) with the appliance. carrying the mark, rating as marked on plug. • Always replace the fuse cover. FOR USERS IN THE ...UK, EIRE, MALTA AND CYPRUS ONLY IMPORTANT • In the event of replacing the plug fuse, use of experience and knowledge, unless they have been given supervision or instruction concerning use a fuse approved by ASTA to BS 1362, i.e. Children should contact your authorized dealer to obtain the correct lead...
Users Manual - English
Page 6
...Declaration of Conformity (For USA Only) Responsible Party: Brother International Corporation 100 Somerset Corporate Boulevard Bridgewater, NJ 08807-0911 USA TEL : (908) 704-1700 declares that the product Product Name: Model Number: Brother Sewing Machine HE1, PE500 This device complies with Part 15 of the following ...a residential installation. This equipment has been tested and found to Part 15 of the FCC Rules. This equipment generates, uses, and can be used in order to ensure compliance with the limits for a Class B digital device, pursuant to comply with the instructions,...
...Declaration of Conformity (For USA Only) Responsible Party: Brother International Corporation 100 Somerset Corporate Boulevard Bridgewater, NJ 08807-0911 USA TEL : (908) 704-1700 declares that the product Product Name: Model Number: Brother Sewing Machine HE1, PE500 This device complies with Part 15 of the following ...a residential installation. This equipment has been tested and found to Part 15 of the FCC Rules. This equipment generates, uses, and can be used in order to ensure compliance with the limits for a Class B digital device, pursuant to comply with the instructions,...
Users Manual - English
Page 7
... 50 Copyright information ...50 Embroidery pattern types ...50 Setting for embroidering ...51 Selecting alphanumeric characters ...53 Selecting an embroidery pattern ...54 Selecting a frame pattern ...55 Using an embroidery card ...55 5
... 50 Copyright information ...50 Embroidery pattern types ...50 Setting for embroidering ...51 Selecting alphanumeric characters ...53 Selecting an embroidery pattern ...54 Selecting a frame pattern ...55 Using an embroidery card ...55 5

Users Manual - English
Page 8
... tension ...63 Adjusting the bobbin thread tension ...64 Connecting character patterns ...65 Resewing ...66 Thread runs out partway through a design ...67 Stopping while embroidering ...67 Using the Memory Function 69 Embroidery data precautions ...69 Saving patterns ...70 Retrieving embroidery patterns from the computer 71 APPENDIX 73 Care and Maintenance ...74 Cleaning...
... tension ...63 Adjusting the bobbin thread tension ...64 Connecting character patterns ...65 Resewing ...66 Thread runs out partway through a design ...67 Stopping while embroidering ...67 Using the Memory Function 69 Embroidery data precautions ...69 Saving patterns ...70 Retrieving embroidery patterns from the computer 71 APPENDIX 73 Care and Maintenance ...74 Cleaning...
Users Manual - English
Page 9
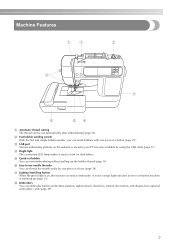
Machine Features a Automatic thread cutting The thread can thread the needle easily by using the USB cable (page 71). h Embroidery You can embroider built-in your PC become available by one press of a lever (page 38). A red or orange ... 34). c USB port Various embroidery patterns on dark fabrics. e Quick-set bobbin You can wind bobbins with one press of a button (page 29). f Easy-to-use needle threader You can be cut automatically after embroidering (page 58). d Bright light The convenient LED lamp makes it easy to embroider.
Machine Features a Automatic thread cutting The thread can thread the needle easily by using the USB cable (page 71). h Embroidery You can embroider built-in your PC become available by one press of a lever (page 38). A red or orange ... 34). c USB port Various embroidery patterns on dark fabrics. e Quick-set bobbin You can wind bobbins with one press of a button (page 29). f Easy-to-use needle threader You can be cut automatically after embroidering (page 58). d Bright light The convenient LED lamp makes it easy to embroider.

Users Manual - English
Page 12
...31, 39) Pass the thread under this panel to select embroidery patterns, or check how to use the machine, etc. f Operation panel (page 13) Use the keys on the spool pin. l Needle threader lever (page 41) Use the needle threader lever to the machine, and then attach the embroidery frame. n Thread take...under this dial. Names of Machine Parts and Their Functions The names of the various parts of the machine parts. d Bobbin winder (page 29) Use the bobbin winder when winding the bobbin. k Thread cutter (page 40) Pass the threads through the thread cutter to learn the names of the machine...
...31, 39) Pass the thread under this panel to select embroidery patterns, or check how to use the machine, etc. f Operation panel (page 13) Use the keys on the spool pin. l Needle threader lever (page 41) Use the needle threader lever to the machine, and then attach the embroidery frame. n Thread take...under this dial. Names of Machine Parts and Their Functions The names of the various parts of the machine parts. d Bobbin winder (page 29) Use the bobbin winder when winding the bobbin. k Thread cutter (page 40) Pass the threads through the thread cutter to learn the names of the machine...

Users Manual - English
Page 13
... to pages 10 through 13 while you (counterclockwise) to raise and lower the needle. Do not cover the air vent while the machine is being used for embroidering. f Embroidery foot "Q" (page 76) This presser foot is lowered, it enters the hole in the needle plate. d Needle plate cover ...Needle and embroidery foot section Right-side/rear view a Thread guide disk (page 40) Pass the thread through the thread guide disk when using the needle threader to use your machine. 11 b Needle bar thread guide (page 40) Pass the upper thread through the needle bar thread guide. b Handwheel (page...
... to pages 10 through 13 while you (counterclockwise) to raise and lower the needle. Do not cover the air vent while the machine is being used for embroidering. f Embroidery foot "Q" (page 76) This presser foot is lowered, it enters the hole in the needle plate. d Needle plate cover ...Needle and embroidery foot section Right-side/rear view a Thread guide disk (page 40) Pass the thread through the thread guide disk when using the needle threader to use your machine. 11 b Needle bar thread guide (page 40) Pass the upper thread through the needle bar thread guide. b Handwheel (page...
Users Manual - English
Page 14
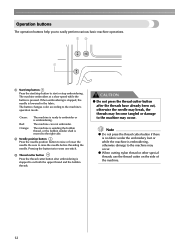
..., the needle is pressed. CAUTION ● Do not press the thread cutter button after embroidering is embroidering. z When cutting nylon thread or other special threads, use the thread cutter on the side of the machine. 12 The machine is winding the bobbin thread, or the bobbin winder shaft is moved to...
..., the needle is pressed. CAUTION ● Do not press the thread cutter button after embroidering is embroidering. z When cutting nylon thread or other special threads, use the thread cutter on the side of the machine. 12 The machine is winding the bobbin thread, or the bobbin winder shaft is moved to...
Users Manual - English
Page 15
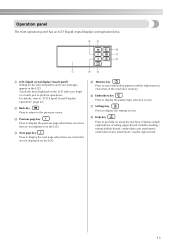
... or a touch pen to display the settings screen. For details, refer to display the previous page when there are items that are not displayed on using the machine. c Previous page key Press to "LCD (Liquid Crystal Display) Operation" (page 22). g Settings key Press to perform operations. Touch the keys displayed on...
... or a touch pen to display the settings screen. For details, refer to display the previous page when there are items that are not displayed on using the machine. c Previous page key Press to "LCD (Liquid Crystal Display) Operation" (page 22). g Settings key Press to perform operations. Touch the keys displayed on...
Users Manual - English
Page 18
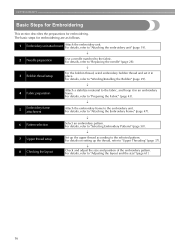
... hoop it in an embroidery frame. For details, refer to the fabric. For details, refer to "Attaching the embroidery unit" (page 19). ↓ 2 Needle preparation Use a needle matched to "Adjusting the layout and the size" (page 61). 16 For details, refer to "Preparing the Fabric" (page 43). ↓ 5 Embroidery frame attachment...
... hoop it in an embroidery frame. For details, refer to the fabric. For details, refer to "Attaching the embroidery unit" (page 19). ↓ 2 Needle preparation Use a needle matched to "Adjusting the layout and the size" (page 61). 16 For details, refer to "Preparing the Fabric" (page 43). ↓ 5 Embroidery frame attachment...
Users Manual - English
Page 19
... machine. ● Make sure that is not to be cut, damaged, modified, forcefully bent, pulled, twisted, or bundled. Do not subject the cord to be used for the power source. Otherwise a fire may result. ● When unplugging the machine, always turn the machine on the power cord into an electrical outlet... the power cord included with wet hands. These things may result. ● Do not touch the plug with this machine. ● Do not use . ● Unplug the power cord if the machine is in poor condition. ● Turn off the main power and remove the plug in to them. ...
... machine. ● Make sure that is not to be cut, damaged, modified, forcefully bent, pulled, twisted, or bundled. Do not subject the cord to be used for the power source. Otherwise a fire may result. ● When unplugging the machine, always turn the machine on the power cord into an electrical outlet... the power cord included with wet hands. These things may result. ● Do not touch the plug with this machine. ● Do not use . ● Unplug the power cord if the machine is in poor condition. ● Turn off the main power and remove the plug in to them. ...

Users Manual - English
Page 20
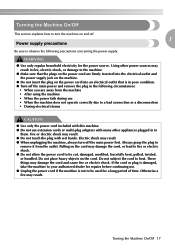
... does not operate. (For details, refer to "|"). Unplug the power supply cord from the power supply d jack. Turning off the machine When you have finished using the machine, turn it off (set it to turn off . Press the left side of the main power switch on b the right side of the...
... does not operate. (For details, refer to "|"). Unplug the power supply cord from the power supply d jack. Turning off the machine When you have finished using the machine, turn it off (set it to turn off . Press the left side of the main power switch on b the right side of the...
Users Manual - English
Page 24
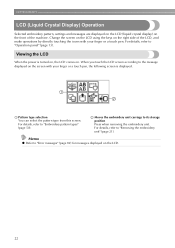
... the front of the LCD, and make operations by directly touching the icons with your finger or a touch pen. Change the screen on the LCD using the keys on the screen with your finger or a touch pen, the following screen is turned on, the LCD comes on the LCD. 22 Viewing...
... the front of the LCD, and make operations by directly touching the icons with your finger or a touch pen. Change the screen on the LCD using the keys on the screen with your finger or a touch pen, the following screen is turned on, the LCD comes on the LCD. 22 Viewing...
Users Manual - English
Page 25
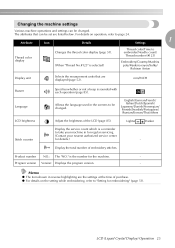
Allows the language used in reverse highlighting are the settings at the time of purchase. Program version Version: Displays the program version. - The attributes that are displayed (page 52). ...
Allows the language used in reverse highlighting are the settings at the time of purchase. Program version Version: Displays the program version. - The attributes that are displayed (page 52). ...

Users Manual - English
Page 26
X The initial screen appears again. z Settings that are changed are complete, press d (Back key). a The highlighted display is installed in the machine. c Switch the screen using (Previous page key) and (Next page key). • The following screens show their default settings. z "VERSION" is the program version which is the initial setting. ...
X The initial screen appears again. z Settings that are changed are complete, press d (Back key). a The highlighted display is installed in the machine. c Switch the screen using (Previous page key) and (Next page key). • The following screens show their default settings. z "VERSION" is the program version which is the initial setting. ...
Users Manual - English
Page 28
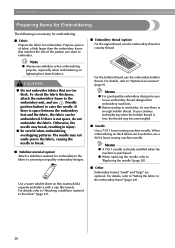
...larger than the embroidery frame that are optional. The needle may break, resulting in the embroidery frame" (page 44). 26 For the bobbin thread, use the embroidery thread or country thread. For details, refer to "Replacing the needle" (page 28). ■ Other Embroidery frames "small" and "large... like towels. Memo z For good quality embroidery designs be sure there is low, the thread may become tangled. ■ Needle Use a 75/11 home sewing machine needle. GETTING READY Preparing Items for Embroidering The following is purchased. z Before starting to embroider, be sure ...
...larger than the embroidery frame that are optional. The needle may break, resulting in the embroidery frame" (page 44). 26 For the bobbin thread, use the embroidery thread or country thread. For details, refer to "Replacing the needle" (page 28). ■ Other Embroidery frames "small" and "large... like towels. Memo z For good quality embroidery designs be sure there is low, the thread may become tangled. ■ Needle Use a 75/11 home sewing machine needle. GETTING READY Preparing Items for Embroidering The following is purchased. z Before starting to embroider, be sure ...
Users Manual - English
Page 29
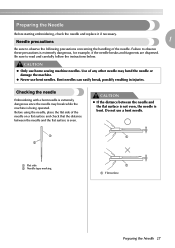
... z If the distance between the needle and the flat surface is being operated. Do not use home sewing machine needles. CAUTION z Only use a bent needle. Before using the needle, place the flat side of the needle. z Never use bent needles. Use of any other needle may break while the machine is even. a a b a Flat side b Needle...
... z If the distance between the needle and the flat surface is being operated. Do not use home sewing machine needles. CAUTION z Only use a bent needle. Before using the needle, place the flat side of the needle. z Never use bent needles. Use of any other needle may break while the machine is even. a a b a Flat side b Needle...
Users Manual - English
Page 30
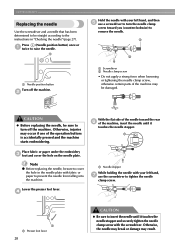
...parts of the operation buttons is accidentally pressed and the machine starts embroidering. a Needle stopper While holding the needle with your left hand, g use a screwdriver to turn off the machine. Lower the presser foot lever. Otherwise, the needle may break or damage may be damaged. Otherwise, ... z Before replacing the needle, be sure to cover the hole in "Checking the needle" (page 27). GETTING READY Replacing the needle Use the screwdriver and a needle that has been determined to be straight according to the instructions in the needle plate with fabric or paper to...
...parts of the operation buttons is accidentally pressed and the machine starts embroidering. a Needle stopper While holding the needle with your left hand, g use a screwdriver to turn off the machine. Lower the presser foot lever. Otherwise, the needle may break or damage may be damaged. Otherwise, ... z Before replacing the needle, be sure to cover the hole in "Checking the needle" (page 27). GETTING READY Replacing the needle Use the screwdriver and a needle that has been determined to be straight according to the instructions in the needle plate with fabric or paper to...


