Users Manual - English
Page 1
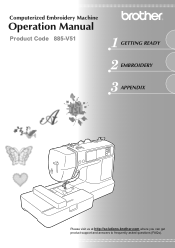
Computerized Embroidery Machine Operation Manual Product Code 885-V51 GETTING READY EMBROIDERY APPENDIX Please visit us at http://solutions.brother.com where you can get product support and answers to frequently asked questions (FAQs).
Computerized Embroidery Machine Operation Manual Product Code 885-V51 GETTING READY EMBROIDERY APPENDIX Please visit us at http://solutions.brother.com where you can get product support and answers to frequently asked questions (FAQs).
Users Manual - English
Page 3
... 4 Always keep your work area clear: • Never operate the machine with any adjustments mentioned in the instruction manual. • To unplug the machine, switch the machine to the symbol "O" position to persons. 2 Always unplug the machine from the build up of lint, dust, and loose cloth. •...then grasp the plug and pull it has been dropped or damaged, or water is stored or in the machine falling, which could cause injuries. • When lifting the machine, be careful not to the nearest authorized dealer or service center for examination, repair, electrical or mechanical ...
... 4 Always keep your work area clear: • Never operate the machine with any adjustments mentioned in the instruction manual. • To unplug the machine, switch the machine to the symbol "O" position to persons. 2 Always unplug the machine from the build up of lint, dust, and loose cloth. •...then grasp the plug and pull it has been dropped or damaged, or water is stored or in the machine falling, which could cause injuries. • When lifting the machine, be careful not to the nearest authorized dealer or service center for examination, repair, electrical or mechanical ...
Users Manual - English
Page 4
... thinner, and scouring powders can damage the machine, and should be used by the manufacturer as described in the manual. For additional product information and updates, visit our web site at www.brother.com SAVE THESE INSTRUCTIONS This machine is required when embroidering: • Always pay... close attention is necessary when the machine is required, first follow the troubleshooting table in the back of . Use...
... thinner, and scouring powders can damage the machine, and should be used by the manufacturer as described in the manual. For additional product information and updates, visit our web site at www.brother.com SAVE THESE INSTRUCTIONS This machine is required when embroidering: • Always pay... close attention is necessary when the machine is required, first follow the troubleshooting table in the back of . Use...
Users Manual - English
Page 6
...with the instructions, may cause undesired operation. Federal Communications Commission (FCC) Declaration of Conformity (For USA Only) Responsible Party: Brother International Corporation 100 Somerset Corporate Boulevard Bridgewater, NJ 08807-0911 USA TEL : (908) 704-1700 declares that to which can ...8226; Connect the equipment into an outlet on a circuit different from that the product Product Name: Model Number: Brother Sewing Machine HE1, PE500 This device complies with Part 15 of the FCC Rules. could void the user's authority to provide reasonable protection against...
...with the instructions, may cause undesired operation. Federal Communications Commission (FCC) Declaration of Conformity (For USA Only) Responsible Party: Brother International Corporation 100 Somerset Corporate Boulevard Bridgewater, NJ 08807-0911 USA TEL : (908) 704-1700 declares that to which can ...8226; Connect the equipment into an outlet on a circuit different from that the product Product Name: Model Number: Brother Sewing Machine HE1, PE500 This device complies with Part 15 of the FCC Rules. could void the user's authority to provide reasonable protection against...
Users Manual - English
Page 7
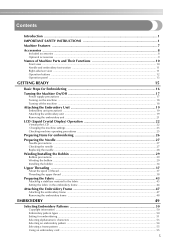
...12 Operation panel ...13 GETTING READY 15 Basic Steps for Embroidering 16 Turning the Machine On/Off 17 Power supply precautions ...17 Turning on the machine ...18 Turning off the machine ...18 Attaching the Embroidery Unit 19 Embroidery unit precautions ...19 Attaching the embroidery ...unit ...19 Removing the embroidery unit ...21 LCD (Liquid Crystal Display) Operation 22 Viewing the LCD ...22 Changing the machine settings ...23 Checking machine operating procedures ...25 Preparing Items for embroidering 26 Preparing the Needle ...27 Needle precautions ...27 Checking the needle ...27 ...
...12 Operation panel ...13 GETTING READY 15 Basic Steps for Embroidering 16 Turning the Machine On/Off 17 Power supply precautions ...17 Turning on the machine ...18 Turning off the machine ...18 Attaching the Embroidery Unit 19 Embroidery unit precautions ...19 Attaching the embroidery ...unit ...19 Removing the embroidery unit ...21 LCD (Liquid Crystal Display) Operation 22 Viewing the LCD ...22 Changing the machine settings ...23 Checking machine operating procedures ...25 Preparing Items for embroidering 26 Preparing the Needle ...27 Needle precautions ...27 Checking the needle ...27 ...

Users Manual - English
Page 8
... Memory Function 69 Embroidery data precautions ...69 Saving patterns ...70 Retrieving embroidery patterns from the computer 71 APPENDIX 73 Care and Maintenance ...74 Cleaning the machine surface ...74 Cleaning the race ...74 Attaching the Embroidery Foot 76 Attaching the embroidery foot ...76 Troubleshooting ...78 Error messages ...82 Adjusting the LCD ...85...
... Memory Function 69 Embroidery data precautions ...69 Saving patterns ...70 Retrieving embroidery patterns from the computer 71 APPENDIX 73 Care and Maintenance ...74 Cleaning the machine surface ...74 Cleaning the race ...74 Attaching the Embroidery Foot 76 Attaching the embroidery foot ...76 Troubleshooting ...78 Error messages ...82 Adjusting the LCD ...85...
Users Manual - English
Page 9
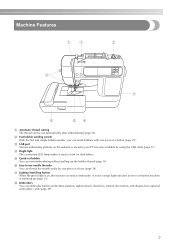
... threader You can wind bobbins with one press of a button (page 29). A red or orange light indicates an error or that the machine is ready to work on dark fabrics. d Bright light The convenient LED lamp makes it easy to embroider. b Fast bobbin winding system With the ...fast and simple bobbin winder, you can thread the needle easily by using the USB cable (page 71). Machine Features a Automatic thread cutting The thread can start embroidering without pulling up (page 12). e Quick-set bobbin You can be cut automatically after embroidering...
... threader You can wind bobbins with one press of a button (page 29). A red or orange light indicates an error or that the machine is ready to work on dark fabrics. d Bright light The convenient LED lamp makes it easy to embroider. b Fast bobbin winding system With the ...fast and simple bobbin winder, you can thread the needle easily by using the USB cable (page 71). Machine Features a Automatic thread cutting The thread can start embroidering without pulling up (page 12). e Quick-set bobbin You can be cut automatically after embroidering...
Users Manual - English
Page 10
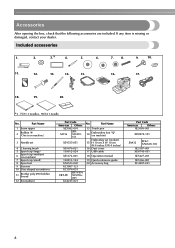
...Spool net 9 Scissors 10 Disc-shaped screwdriver 11 Brother poly #90 bobbin thread 12 Screwdriver Part Code Americas Others XZ5082-001 SFB: SA156 XA5539151 X59535-051 X59476-021 130012-024 No. Part Name 13 Touch pen 14 Embroidery foot "Q" (on machine) Embroidery set 4 Cleaning brush 5 Spool cap (...large) 6 Spool cap (medium) (on machine.) 3 Needle set (medium) 15 H 10 cm X W 10 cm (H 4 inches X W 4 inches) 16...
...Spool net 9 Scissors 10 Disc-shaped screwdriver 11 Brother poly #90 bobbin thread 12 Screwdriver Part Code Americas Others XZ5082-001 SFB: SA156 XA5539151 X59535-051 X59476-021 130012-024 No. Part Name 13 Touch pen 14 Embroidery foot "Q" (on machine) Embroidery set 4 Cleaning brush 5 Spool cap (...large) 6 Spool cap (medium) (on machine.) 3 Needle set (medium) 15 H 10 cm X W 10 cm (H 4 inches X W 4 inches) 16...
Users Manual - English
Page 11
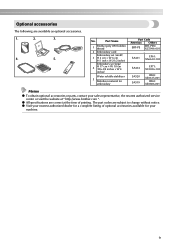
... your nearest authorized dealer for a complete listing of optional accessories available for embroidery Part Code Americas Others EBT-PE EBT-PEN: XC5996-001 - Part Name 1 Brother poly #90 bobbin thread 2 Embroidery card Embroidery set (small) 3 H 2 cm × W 6 cm (H 1 inch × W 2-1/2 inches...001 Memo z To obtain optional accessories or parts, contact your machine. 9 The part codes are available as optional accessories. 1. 2. 3. 4. 5. z All specifications are correct at " http://www.brother.com ". Optional accessories The following are subject to change without ...
... your nearest authorized dealer for a complete listing of optional accessories available for embroidery Part Code Americas Others EBT-PE EBT-PEN: XC5996-001 - Part Name 1 Brother poly #90 bobbin thread 2 Embroidery card Embroidery set (small) 3 H 2 cm × W 6 cm (H 1 inch × W 2-1/2 inches...001 Memo z To obtain optional accessories or parts, contact your machine. 9 The part codes are available as optional accessories. 1. 2. 3. 4. 5. z All specifications are correct at " http://www.brother.com ". Optional accessories The following are subject to change without ...

Users Manual - English
Page 12
... i Operation buttons (page 12) Use these descriptions to learn the names of thread on this panel to select embroidery patterns, or check how to the machine, and then attach the embroidery frame. e LCD (liquid crystal display) (touch panel) (page 22) Setting for the selected pattern and error messages appear... this dial. b Thread guide (page 31, 39) Pass the thread under this thread guide when winding the bobbin thread and threading the machine. f Operation panel (page 13) Use the keys on the spool pin. j Embroidery unit (page 19) Attach the embroidery unit to use the...
... i Operation buttons (page 12) Use these descriptions to learn the names of thread on this panel to select embroidery patterns, or check how to the machine, and then attach the embroidery frame. e LCD (liquid crystal display) (touch panel) (page 22) Setting for the selected pattern and error messages appear... this dial. b Thread guide (page 31, 39) Pass the thread under this thread guide when winding the bobbin thread and threading the machine. f Operation panel (page 13) Use the keys on the spool pin. j Embroidery unit (page 19) Attach the embroidery unit to use the...

Users Manual - English
Page 13
...10 through 13 while you (counterclockwise) to raise and lower the needle. b Handwheel (page 38) Turn the handwheel toward you are learning to turn the machine on the power supply cord into the bobbin case. e Air vent The air vent allows the air surrounding the motor to the computer. c Embroidery card...the USB cable to this port and the other to be exchanged. f Main power switch (page 18) Use the main power switch to use your machine. 11 b Needle bar thread guide (page 40) Pass the upper thread through the thread guide disk when using the needle threader to clean the ...
...10 through 13 while you (counterclockwise) to raise and lower the needle. b Handwheel (page 38) Turn the handwheel toward you are learning to turn the machine on the power supply cord into the bobbin case. e Air vent The air vent allows the air surrounding the motor to the computer. c Embroidery card...the USB cable to this port and the other to be exchanged. f Main power switch (page 18) Use the main power switch to use your machine. 11 b Needle bar thread guide (page 40) Pass the upper thread through the thread guide disk when using the needle threader to clean the ...
Users Manual - English
Page 14
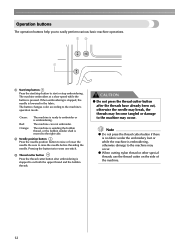
... the thread cutter button if there is no fabric under the embroidery foot or while the machine is stopped to the machine may occur. b Needle position button Press the needle position button to easily perform various basic machine operations. z When cutting nylon thread or other special threads, use the thread cutter on the... side of the machine. 12 Operation buttons The operation buttons help you to raise or lower the needle. a Start/stop button Press the start or stop embroidering. Be sure ...
... the thread cutter button if there is no fabric under the embroidery foot or while the machine is stopped to the machine may occur. b Needle position button Press the needle position button to easily perform various basic machine operations. z When cutting nylon thread or other special threads, use the thread cutter on the... side of the machine. 12 Operation buttons The operation buttons help you to raise or lower the needle. a Start/stop button Press the start or stop embroidering. Be sure ...
Users Manual - English
Page 15
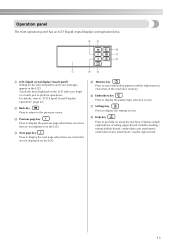
.... Touch the keys displayed on the LCD with your finger or a touch pen to get help on using the machine. c Previous page key Press to display the previous page when there are items that are not displayed on the LCD. h Help key Press to perform ...
.... Touch the keys displayed on the LCD with your finger or a touch pen to get help on using the machine. c Previous page key Press to display the previous page when there are items that are not displayed on the LCD. h Help key Press to perform ...
Users Manual - English
Page 17
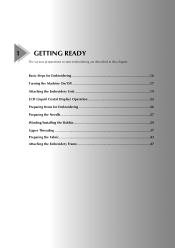
Basic Steps for Embroidering 16 Turning the Machine On/Off 17 Attaching the Embroidery Unit 19 LCD (Liquid Crystal Display) Operation 22 Preparing Items for Embroidering 26 Preparing the Needle 27 Winding/Installing the Bobbin 29 Upper Threading ...37 Preparing the Fabric 43 Attaching the Embroidery Frame 47 1 GETTING READY The various preparations to start embroidering are described in this chapter.
Basic Steps for Embroidering 16 Turning the Machine On/Off 17 Attaching the Embroidery Unit 19 LCD (Liquid Crystal Display) Operation 22 Preparing Items for Embroidering 26 Preparing the Needle 27 Winding/Installing the Bobbin 29 Upper Threading ...37 Preparing the Fabric 43 Attaching the Embroidery Frame 47 1 GETTING READY The various preparations to start embroidering are described in this chapter.
Users Manual - English
Page 19
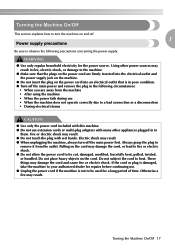
... may result in the following precautions concerning the power supply. If the cord or plug is damaged, take the machine to your authorized dealer for the power source. Turning the Machine On/Off This section explains how to turn off . 1 Power supply precautions Be sure to observe the following ...circumstances: • When you are firmly inserted into the electrical outlet and the power supply jack on the machine. ● Do not insert the plug on the cord. Otherwise a fire may damage the cord and cause fire or electric shock. Using ...
... may result in the following precautions concerning the power supply. If the cord or plug is damaged, take the machine to your authorized dealer for the power source. Turning the Machine On/Off This section explains how to turn off . 1 Power supply precautions Be sure to observe the following ...circumstances: • When you are firmly inserted into the electrical outlet and the power supply jack on the machine. ● Do not insert the plug on the cord. Otherwise a fire may damage the cord and cause fire or electric shock. Using ...

Users Manual - English
Page 20
... electrician to "Attaching the Embroidery Unit" (page 19).) Prepare the included power supply cord. X The light, LCD and (Start/stop button) light up when the machine is not a malfunction. Unplug the power supply cord from the power supply d jack. If the plug does not fit fully in the outlet, reverse the...power supply cord into a b household electrical outlet. 1 a Power supply jack Press the right side of the main power switch c on the right side of the machine to turn off (the a main power switch is set to " "), and then plug the power supply cord into the power supply jack on the right...
... electrician to "Attaching the Embroidery Unit" (page 19).) Prepare the included power supply cord. X The light, LCD and (Start/stop button) light up when the machine is not a malfunction. Unplug the power supply cord from the power supply d jack. If the plug does not fit fully in the outlet, reverse the...power supply cord into a b household electrical outlet. 1 a Power supply jack Press the right side of the main power switch c on the right side of the machine to turn off (the a main power switch is set to " "), and then plug the power supply cord into the power supply jack on the right...
Users Manual - English
Page 21
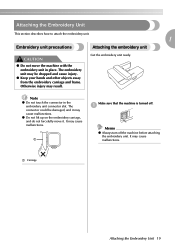
... the embroidery unit in the embroidery unit connector slot. Note z Do not touch the connector in place. a Make sure that the machine is turned off the machine before attaching the embroidery unit. It may result. a Carriage Attaching the Embroidery Unit 19 The connector could be damaged, and it . Attaching the Embroidery Unit...
... the embroidery unit in the embroidery unit connector slot. Note z Do not touch the connector in place. a Make sure that the machine is turned off the machine before attaching the embroidery unit. It may result. a Carriage Attaching the Embroidery Unit 19 The connector could be damaged, and it . Attaching the Embroidery Unit...
Users Manual - English
Page 22
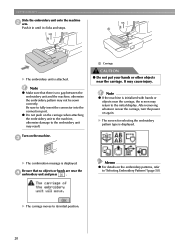
... unit may cause injury. Turn on again. It may result. Note z Make sure that no gap between the embroidery unit and the machine, otherwise the embroidery pattern may return to fully insert the connector into the connection port. X The screen for selecting the embroidery pattern type... objects or hands are near the carriage. Be sure that there is initialized with hands or objects near the carriage, turn the power on the machine. c a Carriage CAUTION ● Do not put your hands or other objects near the d embroidery unit and press . After removing whatever is ...
... unit may cause injury. Turn on again. It may result. Note z Make sure that no gap between the embroidery unit and the machine, otherwise the embroidery pattern may return to fully insert the connector into the connection port. X The screen for selecting the embroidery pattern type... objects or hands are near the carriage. Be sure that there is initialized with hands or objects near the carriage, turn the power on the machine. c a Carriage CAUTION ● Do not put your hands or other objects near the d embroidery unit and press . After removing whatever is ...

Users Manual - English
Page 23
... X The embroidery carriage moves into a position where it can be saved. a Release button X The embroidery unit separates from the machine. Make sure that the machine is turned on removing the embroidery frame, refer to the left of d the embroidery unit, and slowly pull the embroidery unit to...cause malfunctions. Removing the embroidery unit Hold the release button on the bottom left . c CAUTION ● Always turn off the machine. It may cause malfunctions if removed when the machine is completely stopped and follow the instructions below. 1 Remove the embroidery frame.
... X The embroidery carriage moves into a position where it can be saved. a Release button X The embroidery unit separates from the machine. Make sure that the machine is turned on removing the embroidery frame, refer to the left of d the embroidery unit, and slowly pull the embroidery unit to...cause malfunctions. Removing the embroidery unit Hold the release button on the bottom left . c CAUTION ● Always turn off the machine. It may cause malfunctions if removed when the machine is completely stopped and follow the instructions below. 1 Remove the embroidery frame.
Users Manual - English
Page 24
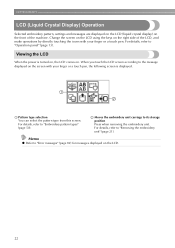
...). For details, refer to "Operation panel" (page 13). For details, refer to "Error messages" (page 82) for messages displayed on the right side of the machine. Change the screen on the LCD using the keys on the LCD. 22 Memo z Refer to "Removing the embroidery unit" (page 21). a b a Pattern type selection...
...). For details, refer to "Operation panel" (page 13). For details, refer to "Error messages" (page 82) for messages displayed on the right side of the machine. Change the screen on the LCD using the keys on the LCD. 22 Memo z Refer to "Removing the embroidery unit" (page 21). a b a Pattern type selection...


