Users Manual - English
Page 7
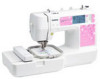
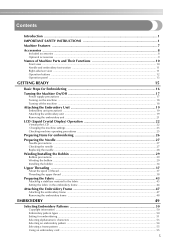
...accessories ...9 Names of Machine Parts and Their Functions 10 Front view ...10 Needle and embroidery foot section ...11 Right-side/rear view ...11 Operation buttons ...12 Operation panel ...13...embroidery frame ...44 Attaching the Embroidery Frame 47 Attaching the embroidery frame ...47 Removing the embroidery frame ...48 EMBROIDERY 49 Selecting Embroidery Patterns 50 Copyright information ...50 Embroidery pattern types ...50 Setting for embroidering ...51 Selecting alphanumeric characters ...53 Selecting an embroidery pattern ...54 Selecting a frame pattern ...55 Using an embroidery card...
...accessories ...9 Names of Machine Parts and Their Functions 10 Front view ...10 Needle and embroidery foot section ...11 Right-side/rear view ...11 Operation buttons ...12 Operation panel ...13...embroidery frame ...44 Attaching the Embroidery Frame 47 Attaching the embroidery frame ...47 Removing the embroidery frame ...48 EMBROIDERY 49 Selecting Embroidery Patterns 50 Copyright information ...50 Embroidery pattern types ...50 Setting for embroidering ...51 Selecting alphanumeric characters ...53 Selecting an embroidery pattern ...54 Selecting a frame pattern ...55 Using an embroidery card...
Users Manual - English
Page 9
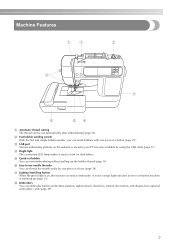
... With the fast and simple bobbin winder, you can thread the needle easily by using the USB cable (page 71). h Embroidery You can be cut automatically after embroidering (page 58). Machine Features a Automatic thread cutting The thread can embroider built-in your...embroidery patterns on dark fabrics. d Bright light The convenient LED lamp makes it easy to embroider. A red or orange light indicates an error or that the machine is ready to work on the website or saved in embroidery patterns, alphanumeric characters, framed decorations, and designs from optional embroidery cards...
... With the fast and simple bobbin winder, you can thread the needle easily by using the USB cable (page 71). h Embroidery You can be cut automatically after embroidering (page 58). Machine Features a Automatic thread cutting The thread can embroider built-in your...embroidery patterns on dark fabrics. d Bright light The convenient LED lamp makes it easy to embroider. A red or orange light indicates an error or that the machine is ready to work on the website or saved in embroidery patterns, alphanumeric characters, framed decorations, and designs from optional embroidery cards...
Users Manual - English
Page 11
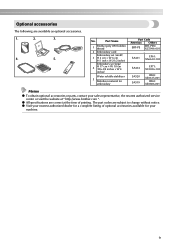
... machine. 9 z All specifications are correct at the time of optional accessories available for embroidery Part Code Americas Others EBT-PE EBT-PEN: XC5996-001 - Part Name 1 Brother poly #90 bobbin thread 2 Embroidery card Embroidery set (small) 3 H 2 cm × W 6 cm (H 1 inch × W 2-1/2 inches) Embroidery set (large) 4 H 17 cm × W 10 cm (H 6-3/4 inches × W 4 inches) Water soluble stabilizer...
... machine. 9 z All specifications are correct at the time of optional accessories available for embroidery Part Code Americas Others EBT-PE EBT-PEN: XC5996-001 - Part Name 1 Brother poly #90 bobbin thread 2 Embroidery card Embroidery set (small) 3 H 2 cm × W 6 cm (H 1 inch × W 2-1/2 inches) Embroidery set (large) 4 H 17 cm × W 10 cm (H 6-3/4 inches × W 4 inches) Water soluble stabilizer...

Users Manual - English
Page 13
.... c Needle plate When the needle is used . e Air vent The air vent allows the air surrounding the motor to raise and lower the needle. f Embroidery foot "Q" (page 76) This presser foot is lowered, it enters the hole in the needle plate. d USB port (page 71) Connect the one end...Thread guide disk (page 40) Pass the thread through the thread guide disk when using the needle threader to use your machine. 11 c Embroidery card slot (page 55) Insert the embroidery card. g Power supply jack (page 18) Insert the plug on and off. Memo z Refer to pages 10 through the needle bar thread ...
.... c Needle plate When the needle is used . e Air vent The air vent allows the air surrounding the motor to raise and lower the needle. f Embroidery foot "Q" (page 76) This presser foot is lowered, it enters the hole in the needle plate. d USB port (page 71) Connect the one end...Thread guide disk (page 40) Pass the thread through the thread guide disk when using the needle threader to use your machine. 11 c Embroidery card slot (page 55) Insert the embroidery card. g Power supply jack (page 18) Insert the plug on and off. Memo z Refer to pages 10 through the needle bar thread ...

Users Manual - English
Page 52
... prohibited. For details, refer to "Selecting an embroidery pattern"(page 54). For details, refer to "Saving patterns" (page 70). d Embroidery card Press when selecting patterns from the computer" (page 71). 50 bc a d ef a Embroidery patterns There are completed by changing the upper thread...: upper case/lower case/numbers/symbols/European characters. The patterns are total 70 patterns. For details, refer to "Using an embroidery card" (page 55). f Patterns retrieved from the computer Patterns retrieved from a computer can be combined with 12 stitch types. Copyright...
... prohibited. For details, refer to "Selecting an embroidery pattern"(page 54). For details, refer to "Saving patterns" (page 70). d Embroidery card Press when selecting patterns from the computer" (page 71). 50 bc a d ef a Embroidery patterns There are completed by changing the upper thread...: upper case/lower case/numbers/symbols/European characters. The patterns are total 70 patterns. For details, refer to "Using an embroidery card" (page 55). f Patterns retrieved from the computer Patterns retrieved from a computer can be combined with 12 stitch types. Copyright...
Users Manual - English
Page 57
... the machine. 2 There are not in use, keep them in their storage cases. Turn off the machine to insert and remove embroidery cards. z When embroidery cards are various cards with different themes. Using unauthorized cards may not work with 12 stitch types. c Switch the screen using (Previous page key) and (Next page key), and select from...
... the machine. 2 There are not in use, keep them in their storage cases. Turn off the machine to insert and remove embroidery cards. z When embroidery cards are various cards with different themes. Using unauthorized cards may not work with 12 stitch types. c Switch the screen using (Previous page key) and (Next page key), and select from...

Users Manual - English
Page 58
c Press d on the machine. X This selection screen for the patterns saved in the card is the same as in "Selecting an embroidery pattern" (page 54). 56 Select a pattern. e The operation is displayed. Turn on the screen. EMBROIDERY Insert the embroidery card in the embroidery b card slot on the right side of the arrow. Face the arrow on the embroidery card toward you, and insert it in the direction of the machine.
c Press d on the machine. X This selection screen for the patterns saved in the card is the same as in "Selecting an embroidery pattern" (page 54). 56 Select a pattern. e The operation is displayed. Turn on the screen. EMBROIDERY Insert the embroidery card in the embroidery b card slot on the right side of the arrow. Face the arrow on the embroidery card toward you, and insert it in the direction of the machine.
Users Manual - English
Page 84
...If you press or do the operation correctly while the error message is deleted from the "Removable Disk". 6 on the LCD was pressed when no card was inserted. 7 The start /stop button was raised. 8 The memory is displayed. Upper thread not set up correctly. APPENDIX Error messages When ...messages and advice on the LCD. If you press (Start/stop button or thread cutter button was pressed while the embroidery foot was pressed at a screen other than the embroidery screen. Follow what is full and the pattern cannot be displayed on operation will be saved. 82 No Error ...
...If you press or do the operation correctly while the error message is deleted from the "Removable Disk". 6 on the LCD was pressed when no card was inserted. 7 The start /stop button was raised. 8 The memory is displayed. Upper thread not set up correctly. APPENDIX Error messages When ...messages and advice on the LCD. If you press (Start/stop button or thread cutter button was pressed while the embroidery foot was pressed at a screen other than the embroidery screen. Follow what is full and the pattern cannot be displayed on operation will be saved. 82 No Error ...
Users Manual - English
Page 86
...tangled around the bobbin case, and the 20 needle is winding the bobbin. 84 An Embroidery Memory Card that will not fit within the frame. APPENDIX No Error Message Probable Cause 18 When the embroidery unit is attached. 19 You tried to set a number of characters that may not ...compatible with your machine has been inserted. • Certain licensed designs cannot be read by this machine. 21 • Designs in an unacceptable card format cannot be read ...
...tangled around the bobbin case, and the 20 needle is winding the bobbin. 84 An Embroidery Memory Card that will not fit within the frame. APPENDIX No Error Message Probable Cause 18 When the embroidery unit is attached. 19 You tried to set a number of characters that may not ...compatible with your machine has been inserted. • Certain licensed designs cannot be read by this machine. 21 • Designs in an unacceptable card format cannot be read ...
Users Manual - English
Page 89
... needle replacement 28 embroidering pattern 57 needle set 8 embroidery card 55 embroidery card slot 11, 56 needle threader lever 10 needle threading 37 embroidery character selection 53 needles 27 embroidery data 69 next page key 13 embroidery foot installation 76 embroidery frame 44 O embroidery frame installation 47 embroidery frame removal 48 embroidery key 13 operation beep 85 operation buttons 10, 12...
... needle replacement 28 embroidering pattern 57 needle set 8 embroidery card 55 embroidery card slot 11, 56 needle threader lever 10 needle threading 37 embroidery character selection 53 needles 27 embroidery data 69 next page key 13 embroidery foot installation 76 embroidery frame 44 O embroidery frame installation 47 embroidery frame removal 48 embroidery key 13 operation beep 85 operation buttons 10, 12...


