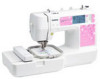
Users Manual - English
Page 3
...where oxygen is stored or in the machine falling, which could cause injuries. • When lifting the machine, be careful not to use extension cords. Plug the machine directly into the electrical outlet. • Never drop or insert any sudden or careless movements, otherwise you...reduce the risk of electric shock 1 Always unplug the machine from the build up of lint, dust, and loose cloth. • Do not use the machine. IMPORTANT SAFETY INSTRUCTIONS Please read the "IMPORTANT SAFETY INSTRUCTIONS", and then study this manual for the correct operation of the electrical outlet. ...
...where oxygen is stored or in the machine falling, which could cause injuries. • When lifting the machine, be careful not to use extension cords. Plug the machine directly into the electrical outlet. • Never drop or insert any sudden or careless movements, otherwise you...reduce the risk of electric shock 1 Always unplug the machine from the build up of lint, dust, and loose cloth. • Do not use the machine. IMPORTANT SAFETY INSTRUCTIONS Please read the "IMPORTANT SAFETY INSTRUCTIONS", and then study this manual for the correct operation of the electrical outlet. ...
Users Manual - English
Page 4
... replacing or installing any assemblies, needle, or other hot objects. • Use only neutral soaps or detergents to the needle. If the problem persists, please consult your local authorized Brother dealer. Use accessories recommended by the manufacturer as it must be kept out of the reach...• In the event a malfunction occurs or adjustment is intended for its intended use as a stove or iron; For additional product information and updates, visit our web site at www.brother.com SAVE THESE INSTRUCTIONS This machine is required, first follow the troubleshooting table in ...
... replacing or installing any assemblies, needle, or other hot objects. • Use only neutral soaps or detergents to the needle. If the problem persists, please consult your local authorized Brother dealer. Use accessories recommended by the manufacturer as it must be kept out of the reach...• In the event a malfunction occurs or adjustment is intended for its intended use as a stove or iron; For additional product information and updates, visit our web site at www.brother.com SAVE THESE INSTRUCTIONS This machine is required, first follow the troubleshooting table in ...
Users Manual - English
Page 5
... with the fuse cover omitted. • If the available electrical outlet is not intended for use by persons (including children) with reduced physical, sensory or mental capabilities, or lack of experience and knowledge, unless they do not play with this equipment,... you should be supervised to ensure that they have been given supervision or instruction concerning use of replacing the plug fuse, use a fuse approved by ASTA to obtain the correct lead. 3 Children should contact your authorized dealer to BS 1362, i.e. This appliance is ...
... with the fuse cover omitted. • If the available electrical outlet is not intended for use by persons (including children) with reduced physical, sensory or mental capabilities, or lack of experience and knowledge, unless they do not play with this equipment,... you should be supervised to ensure that they have been given supervision or instruction concerning use of replacing the plug fuse, use a fuse approved by ASTA to obtain the correct lead. 3 Children should contact your authorized dealer to BS 1362, i.e. This appliance is ...
Users Manual - English
Page 6
...receiver. • Connect the equipment into an outlet on a circuit different from that the product Product Name: Model Number: Brother Sewing Machine HE1, PE500 This device complies with Part 15 of the FCC Rules. could void the user's authority to operate the equipment. 4 ...of Conformity (For USA Only) Responsible Party: Brother International Corporation 100 Somerset Corporate Boulevard Bridgewater, NJ 08807-0911 USA TEL : (908) 704-1700 declares that to which can radiate radio frequency energy and, if not installed and used in order to ensure compliance with the limits for...
...receiver. • Connect the equipment into an outlet on a circuit different from that the product Product Name: Model Number: Brother Sewing Machine HE1, PE500 This device complies with Part 15 of the FCC Rules. could void the user's authority to operate the equipment. 4 ...of Conformity (For USA Only) Responsible Party: Brother International Corporation 100 Somerset Corporate Boulevard Bridgewater, NJ 08807-0911 USA TEL : (908) 704-1700 declares that to which can radiate radio frequency energy and, if not installed and used in order to ensure compliance with the limits for...
Users Manual - English
Page 7
... 50 Copyright information ...50 Embroidery pattern types ...50 Setting for embroidering ...51 Selecting alphanumeric characters ...53 Selecting an embroidery pattern ...54 Selecting a frame pattern ...55 Using an embroidery card ...55 5
... 50 Copyright information ...50 Embroidery pattern types ...50 Setting for embroidering ...51 Selecting alphanumeric characters ...53 Selecting an embroidery pattern ...54 Selecting a frame pattern ...55 Using an embroidery card ...55 5

Users Manual - English
Page 8
... tension ...63 Adjusting the bobbin thread tension ...64 Connecting character patterns ...65 Resewing ...66 Thread runs out partway through a design ...67 Stopping while embroidering ...67 Using the Memory Function 69 Embroidery data precautions ...69 Saving patterns ...70 Retrieving embroidery patterns from the computer 71 APPENDIX 73 Care and Maintenance ...74 Cleaning...
... tension ...63 Adjusting the bobbin thread tension ...64 Connecting character patterns ...65 Resewing ...66 Thread runs out partway through a design ...67 Stopping while embroidering ...67 Using the Memory Function 69 Embroidery data precautions ...69 Saving patterns ...70 Retrieving embroidery patterns from the computer 71 APPENDIX 73 Care and Maintenance ...74 Cleaning...
Users Manual - English
Page 9
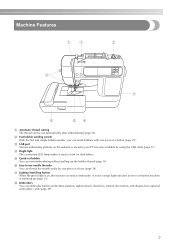
... threader You can thread the needle easily by using the USB cable (page 71). h Embroidery You can be cut automatically after embroidering (page 58). d Bright light The convenient LED lamp makes it easy to ...
... threader You can thread the needle easily by using the USB cable (page 71). h Embroidery You can be cut automatically after embroidering (page 58). d Bright light The convenient LED lamp makes it easy to ...

Users Manual - English
Page 12
...winding the bobbin thread. 10 b Thread guide (page 31, 39) Pass the thread under this panel to select embroidery patterns, or check how to use the machine, etc. j Embroidery unit (page 19) Attach the embroidery unit to thread the needle. g Embroidery unit connector slot (page 20) ...for the embroidery unit. k Thread cutter (page 40) Pass the threads through the thread cutter to raise and lower the embroidery foot . Before using the machine, carefully read these buttons to learn the names of the machine and their functions are described below. h Presser foot lever (page 28...
...winding the bobbin thread. 10 b Thread guide (page 31, 39) Pass the thread under this panel to select embroidery patterns, or check how to use the machine, etc. j Embroidery unit (page 19) Attach the embroidery unit to thread the needle. g Embroidery unit connector slot (page 20) ...for the embroidery unit. k Thread cutter (page 40) Pass the threads through the thread cutter to raise and lower the embroidery foot . Before using the machine, carefully read these buttons to learn the names of the machine and their functions are described below. h Presser foot lever (page 28...

Users Manual - English
Page 13
... needle plate. Needle and embroidery foot section Right-side/rear view a Thread guide disk (page 40) Pass the thread through the thread guide disk when using the needle threader to clean the bobbin case and race. d Needle plate cover (page 74) Remove the needle plate cover to thread the needle. e Bobbin... (page 55) Insert the embroidery card. d USB port (page 71) Connect the one end of the USB cable to this port and the other to use your machine. 11 Memo z Refer to pages 10 through the needle bar thread guide. b Needle bar thread guide (page 40) Pass the upper thread through...
... needle plate. Needle and embroidery foot section Right-side/rear view a Thread guide disk (page 40) Pass the thread through the thread guide disk when using the needle threader to clean the bobbin case and race. d Needle plate cover (page 74) Remove the needle plate cover to thread the needle. e Bobbin... (page 55) Insert the embroidery card. d USB port (page 71) Connect the one end of the USB cable to this port and the other to use your machine. 11 Memo z Refer to pages 10 through the needle bar thread guide. b Needle bar thread guide (page 40) Pass the upper thread through...
Users Manual - English
Page 14
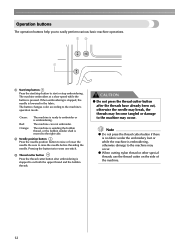
... cutter button after the threads have already been cut both the upper thread and the bobbin threads. z When cutting nylon thread or other special threads, use the thread cutter on the side of the machine. 12 Operation buttons The operation buttons help you to raise or lower the needle. The machine...
... cutter button after the threads have already been cut both the upper thread and the bobbin threads. z When cutting nylon thread or other special threads, use the thread cutter on the side of the machine. 12 Operation buttons The operation buttons help you to raise or lower the needle. The machine...
Users Manual - English
Page 15
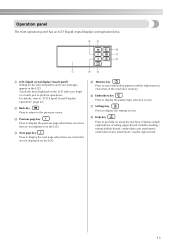
... finger or a touch pen to display the next page when there are items that are not displayed on the LCD. Touch the keys displayed on using the machine. For details, refer to save embroidery patterns and the alphanumeric characters in the LCD. e Memory key Press to "LCD (Liquid Crystal Display) Operation...
... finger or a touch pen to display the next page when there are items that are not displayed on the LCD. Touch the keys displayed on using the machine. For details, refer to save embroidery patterns and the alphanumeric characters in the LCD. e Memory key Press to "LCD (Liquid Crystal Display) Operation...
Users Manual - English
Page 18
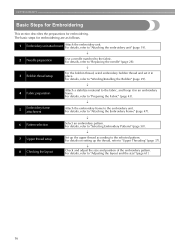
...; 7 Upper thread setup Set up the thread, refer to the selected pattern. For details, refer to "Attaching the embroidery unit" (page 19). ↓ 2 Needle preparation Use a needle matched to "Adjusting the layout and the size" (page 61). 16
...; 7 Upper thread setup Set up the thread, refer to the selected pattern. For details, refer to "Attaching the embroidery unit" (page 19). ↓ 2 Needle preparation Use a needle matched to "Adjusting the layout and the size" (page 61). 16
Users Manual - English
Page 19
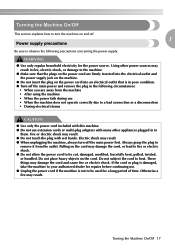
...electrical outlet that the plugs on the power cord are away from the outlet. These things may result. WARNING ● Use only regular household electricity for repairs before continuing use. ● Unplug the power cord if the machine is in poor condition. ● Turn off the main power first..../Off This section explains how to turn off the main power and remove the plug in the following precautions concerning the power supply. Using other appliances plugged in to observe the following circumstances: • When you are firmly inserted into the electrical outlet and the power ...
...electrical outlet that the plugs on the power cord are away from the outlet. These things may result. WARNING ● Use only regular household electricity for repairs before continuing use. ● Unplug the power cord if the machine is in poor condition. ● Turn off the main power first..../Off This section explains how to turn off the main power and remove the plug in the following precautions concerning the power supply. Using other appliances plugged in to observe the following circumstances: • When you are firmly inserted into the electrical outlet and the power ...

Users Manual - English
Page 20
Make sure that the machine is turned off (the a main power switch is turned off the machine When you have finished using the machine, turn it moves; Grasp the plug when unplugging the power supply cord. If the plug does not fit fully in any way. 18 ...
Make sure that the machine is turned off (the a main power switch is turned off the machine When you have finished using the machine, turn it moves; Grasp the plug when unplugging the power supply cord. If the plug does not fit fully in any way. 18 ...
Users Manual - English
Page 24
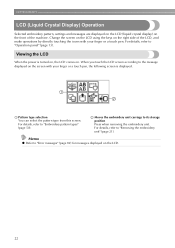
... the LCD When the power is displayed. a b a Pattern type selection You can select the pattern type from this screen. Change the screen on the LCD using the keys on the screen with your finger or a touch pen, the following screen is turned on, the LCD comes on. Memo z Refer to the...
... the LCD When the power is displayed. a b a Pattern type selection You can select the pattern type from this screen. Change the screen on the LCD using the keys on the screen with your finger or a touch pen, the following screen is turned on, the LCD comes on. Memo z Refer to the...
Users Manual - English
Page 25
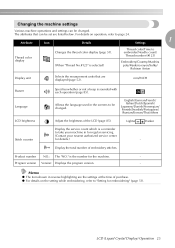
Allows the language used in for regular servicing. (Contact your machine in the screens to take your nearest authorized service center for details.) - The attributes that are listed below. ...
Allows the language used in for regular servicing. (Contact your machine in the screens to take your nearest authorized service center for details.) - The attributes that are listed below. ...

Users Manual - English
Page 26
... the power is installed in the machine. Example: Changing the measurement unit X The LCD comes on the operation X The setting screen appears. c Switch the screen using (Previous page key) and (Next page key). • The following screens show their default settings. GETTING READY Turn on the machine.
... the power is installed in the machine. Example: Changing the measurement unit X The LCD comes on the operation X The setting screen appears. c Switch the screen using (Previous page key) and (Next page key). • The following screens show their default settings. GETTING READY Turn on the machine.
Users Manual - English
Page 28
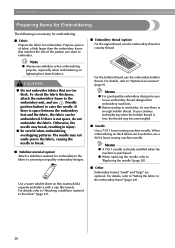
...the fabric, the fabric can be sure there is enough bobbin thread. For the bobbin thread, use embroidery thread designed for embroidery. If you want to raise the needle. Use a water soluble sheet on lightweight or stretch fabrics. Otherwise, the needle may not easily pierce ...the fabric, causing the needle to break. ■ Stabilizer material (option) Attach a stabilizer material for embroidery to the fabric to use the embroidery bobbin thread. Memo z For good quality embroidery designs be sure to prevent poor quality embroidery designs. For details, refer to "...
...the fabric, the fabric can be sure there is enough bobbin thread. For the bobbin thread, use embroidery thread designed for embroidery. If you want to raise the needle. Use a water soluble sheet on lightweight or stretch fabrics. Otherwise, the needle may not easily pierce ...the fabric, causing the needle to break. ■ Stabilizer material (option) Attach a stabilizer material for embroidery to the fabric to use the embroidery bobbin thread. Memo z For good quality embroidery designs be sure to prevent poor quality embroidery designs. For details, refer to "...
Users Manual - English
Page 29
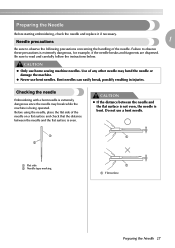
... possibly resulting in injuries. a a b a Flat side b Needle type marking a a Flat surface Preparing the Needle 27 Do not use bent needles. z Never use a bent needle. Checking the needle Embroidering with a bent needle is extremely dangerous since the needle may bend the needle or damage the ... needle is being operated. Preparing the Needle Before starting embroidering, check the needle and replace it if necessary. CAUTION z Only use home sewing machine needles. Failure to observe these precautions is even. CAUTION z If the distance between the needle and the flat...
... possibly resulting in injuries. a a b a Flat side b Needle type marking a a Flat surface Preparing the Needle 27 Do not use bent needles. z Never use a bent needle. Checking the needle Embroidering with a bent needle is extremely dangerous since the needle may bend the needle or damage the ... needle is being operated. Preparing the Needle Before starting embroidering, check the needle and replace it if necessary. CAUTION z Only use home sewing machine needles. Failure to observe these precautions is even. CAUTION z If the distance between the needle and the flat...
Users Manual - English
Page 30
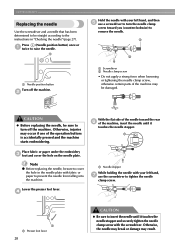
...you (counterclockwise) to remove the needle. a Needle stopper While holding the needle with your left hand, and then e use the screwdriver to tighten the needle clamp screw. GETTING READY Replacing the needle Use the screwdriver and a needle that has been determined to be sure to turn the needle clamp screw toward the... the needle clamp screw with fabric or paper to prevent the needle from falling into the machine. a Hold the needle with your left hand, g use a screwdriver to turn off the machine. d a a Presser foot lever 28 CAUTION z Be sure to raise the needle.
...you (counterclockwise) to remove the needle. a Needle stopper While holding the needle with your left hand, and then e use the screwdriver to tighten the needle clamp screw. GETTING READY Replacing the needle Use the screwdriver and a needle that has been determined to be sure to turn the needle clamp screw toward the... the needle clamp screw with fabric or paper to prevent the needle from falling into the machine. a Hold the needle with your left hand, g use a screwdriver to turn off the machine. d a a Presser foot lever 28 CAUTION z Be sure to raise the needle.


