Users Manual - English
Page 4
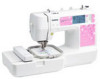
... table in the back of the operation manual to clean the machine. Never allow children to play with this product are subject to the needle. Use this machine, avoid direct sunlight and high humidity locations. Use only the interface cable (USB cable) included with the bag due ...; Your close attention to change without notice. For additional product information and updates, visit our web site at www.brother.com SAVE THESE INSTRUCTIONS This machine is damaged, it could cause the needle to the danger of suffocation. • Do not use outdoors. 7 For a longer service life: •...
... table in the back of the operation manual to clean the machine. Never allow children to play with this product are subject to the needle. Use this machine, avoid direct sunlight and high humidity locations. Use only the interface cable (USB cable) included with the bag due ...; Your close attention to change without notice. For additional product information and updates, visit our web site at www.brother.com SAVE THESE INSTRUCTIONS This machine is damaged, it could cause the needle to the danger of suffocation. • Do not use outdoors. 7 For a longer service life: •...
Users Manual - English
Page 7
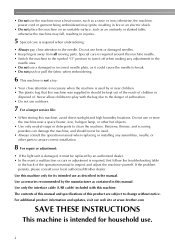
... Features ...7 Accessories ...8 Included accessories ...8 Optional accessories ...9 Names of Machine Parts and Their Functions 10 Front view ...10 Needle and embroidery foot section ...11 Right-side/rear view ...11 Operation buttons ...12 Operation panel ...13 GETTING READY 15 Basic...the machine settings ...23 Checking machine operating procedures ...25 Preparing Items for embroidering 26 Preparing the Needle ...27 Needle precautions ...27 Checking the needle ...27 Replacing the needle ...28 Winding/Installing the Bobbin 29 Bobbin precautions ...29 Winding the bobbin ...29 Installing the...
... Features ...7 Accessories ...8 Included accessories ...8 Optional accessories ...9 Names of Machine Parts and Their Functions 10 Front view ...10 Needle and embroidery foot section ...11 Right-side/rear view ...11 Operation buttons ...12 Operation panel ...13 GETTING READY 15 Basic...the machine settings ...23 Checking machine operating procedures ...25 Preparing Items for embroidering 26 Preparing the Needle ...27 Needle precautions ...27 Checking the needle ...27 Replacing the needle ...28 Winding/Installing the Bobbin 29 Bobbin precautions ...29 Winding the bobbin ...29 Installing the...
Users Manual - English
Page 9
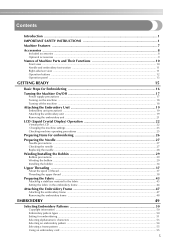
... designs from optional embroidery cards (page 49). 7 e Quick-set bobbin You can start embroidering without pulling up (page 12). f Easy-to-use needle threader You can embroider built-in your PC become available by one press of a lever (page 38). c USB port Various embroidery patterns on , ...the machine is warming up the bobbin thread (page 34). h Embroidery You can thread the needle easily by using the USB cable (page 71). b Fast bobbin winding system With the fast and simple bobbin winder, you can be cut automatically ...
... designs from optional embroidery cards (page 49). 7 e Quick-set bobbin You can start embroidering without pulling up (page 12). f Easy-to-use needle threader You can embroider built-in your PC become available by one press of a lever (page 38). c USB port Various embroidery patterns on , ...the machine is warming up the bobbin thread (page 34). h Embroidery You can thread the needle easily by using the USB cable (page 71). b Fast bobbin winding system With the fast and simple bobbin winder, you can be cut automatically ...
Users Manual - English
Page 10
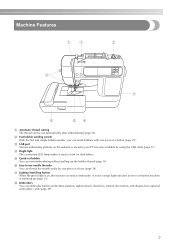
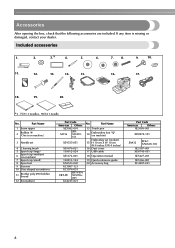
.... Part Name 13 Touch pen 14 Embroidery foot "Q" (on machine) Embroidery set 4 Cleaning brush 5 Spool cap (large) 6 Spool cap (medium) (on machine.) 3 Needle set (medium) 15 H 10 cm X W 10 cm (H 4 inches X W 4 inches) 16 Dust cover 17 USB cable XE1372-001 18 Operation manual 130013-124 ...that the following accessories are included. If any item is on machine) 7 Spool cap (small) 8 Spool net 9 Scissors 10 Disc-shaped screwdriver 11 Brother poly #90 bobbin thread 12 Screwdriver Part Code Americas Others XZ5082-001 SFB: SA156 XA5539151 X59535-051 X59476-021 130012-024 No.
.... Part Name 13 Touch pen 14 Embroidery foot "Q" (on machine) Embroidery set 4 Cleaning brush 5 Spool cap (large) 6 Spool cap (medium) (on machine.) 3 Needle set (medium) 15 H 10 cm X W 10 cm (H 4 inches X W 4 inches) 16 Dust cover 17 USB cable XE1372-001 18 Operation manual 130013-124 ...that the following accessories are included. If any item is on machine) 7 Spool cap (small) 8 Spool net 9 Scissors 10 Disc-shaped screwdriver 11 Brother poly #90 bobbin thread 12 Screwdriver Part Code Americas Others XZ5082-001 SFB: SA156 XA5539151 X59535-051 X59476-021 130012-024 No.

Users Manual - English
Page 12
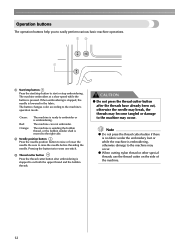
... the bobbin thread and threading the machine. h Presser foot lever (page 28) Raise and lower the presser foot lever to thread the needle. l Needle threader lever (page 41) Use the needle threader lever to raise and lower the embroidery foot . m Thread tension dial (page 63) Adjust the upper thread tension with this panel...
... the bobbin thread and threading the machine. h Presser foot lever (page 28) Raise and lower the presser foot lever to thread the needle. l Needle threader lever (page 41) Use the needle threader lever to raise and lower the embroidery foot . m Thread tension dial (page 63) Adjust the upper thread tension with this panel...

Users Manual - English
Page 13
... to turn the machine on the power supply cord into the bobbin case. c Needle plate When the needle is being used for embroidering. d Needle plate cover (page 74) Remove the needle plate cover to the computer. b Needle bar thread guide (page 40) Pass the upper thread through the thread guide disk...(counterclockwise) to use your machine. 11 b Handwheel (page 38) Turn the handwheel toward you are learning to raise and lower the needle. c Embroidery card slot (page 55) Insert the embroidery card. e Air vent The air vent allows the air surrounding the motor to thread the...
... to turn the machine on the power supply cord into the bobbin case. c Needle plate When the needle is being used for embroidering. d Needle plate cover (page 74) Remove the needle plate cover to the computer. b Needle bar thread guide (page 40) Pass the upper thread through the thread guide disk...(counterclockwise) to use your machine. 11 b Handwheel (page 38) Turn the handwheel toward you are learning to raise and lower the needle. c Embroidery card slot (page 55) Insert the embroidery card. e Air vent The air vent allows the air surrounding the motor to thread the...
Users Manual - English
Page 14
... cutter on the side of the machine. 12 a Start/stop button Press the start/stop button to raise or lower the needle. b Needle position button Press the needle position button to start or stop embroidering. Pressing the button twice sews one stitch. The machine embroiders at a slow speed while...the thread cutter button if there is no fabric under the embroidery foot or while the machine is stopped to cut , otherwise the needle may break, the threads may become tangled or damage to easily perform various basic machine operations. Operation buttons The operation buttons help you...
... cutter on the side of the machine. 12 a Start/stop button Press the start/stop button to raise or lower the needle. b Needle position button Press the needle position button to start or stop embroidering. Pressing the button twice sews one stitch. The machine embroiders at a slow speed while...the thread cutter button if there is no fabric under the embroidery foot or while the machine is stopped to cut , otherwise the needle may break, the threads may become tangled or damage to easily perform various basic machine operations. Operation buttons The operation buttons help you...
Users Manual - English
Page 15
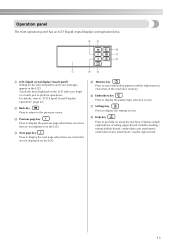
... LCD (liquid crystal display) and operation keys. Displays simple explanations of setting upper thread / bobbin winding / setting bobbin thread / embroidery unit attachment / embroidery frame attachment / needle replacement. 13 h Help key Press to perform operations.
... LCD (liquid crystal display) and operation keys. Displays simple explanations of setting upper thread / bobbin winding / setting bobbin thread / embroidery unit attachment / embroidery frame attachment / needle replacement. 13 h Help key Press to perform operations.
Users Manual - English
Page 17
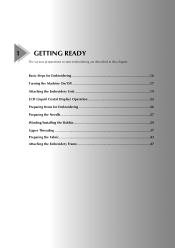
1 GETTING READY The various preparations to start embroidering are described in this chapter. Basic Steps for Embroidering 16 Turning the Machine On/Off 17 Attaching the Embroidery Unit 19 LCD (Liquid Crystal Display) Operation 22 Preparing Items for Embroidering 26 Preparing the Needle 27 Winding/Installing the Bobbin 29 Upper Threading ...37 Preparing the Fabric 43 Attaching the Embroidery Frame 47
1 GETTING READY The various preparations to start embroidering are described in this chapter. Basic Steps for Embroidering 16 Turning the Machine On/Off 17 Attaching the Embroidery Unit 19 LCD (Liquid Crystal Display) Operation 22 Preparing Items for Embroidering 26 Preparing the Needle 27 Winding/Installing the Bobbin 29 Upper Threading ...37 Preparing the Fabric 43 Attaching the Embroidery Frame 47
Users Manual - English
Page 18
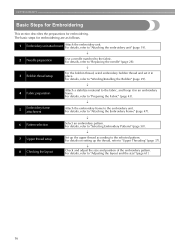
..." (page 61). 16 The basic steps for embroidering. For details, refer to the fabric. For details, refer to "Attaching the embroidery unit" (page 19). ↓ 2 Needle preparation Use a needle matched to "Replacing the needle" (page 28). ↓ 3 Bobbin thread setup For the bobbin thread, wind embroidery bobbin thread and set it in place.
..." (page 61). 16 The basic steps for embroidering. For details, refer to the fabric. For details, refer to "Attaching the embroidery unit" (page 19). ↓ 2 Needle preparation Use a needle matched to "Replacing the needle" (page 28). ↓ 3 Bobbin thread setup For the bobbin thread, wind embroidery bobbin thread and set it in place.

Users Manual - English
Page 20
... intended to fit in a polarized outlet only one blade wider than the other). Note z If a power outage occurs while the machine is turned on, the needle will make sound when it still does not fit, contact a qualified electrician to install the proper outlet. If the embroidery unit is turned on. Unplug...
... intended to fit in a polarized outlet only one blade wider than the other). Note z If a power outage occurs while the machine is turned on, the needle will make sound when it still does not fit, contact a qualified electrician to install the proper outlet. If the embroidery unit is turned on. Unplug...
Users Manual - English
Page 25
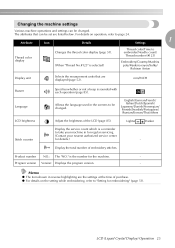
... for the machine. - Product number NO.: The "NO." Program version Version: Displays the program version. - For details on the setting while embroidering, refer to embroider/Needle count/ Thread number (#123) Embroidery/Country/Madeira poly/Madeira rayon/Sulky/ Robison Anton Display unit Selects the measurement units that can be set are listed...
... for the machine. - Product number NO.: The "NO." Program version Version: Displays the program version. - For details on the setting while embroidering, refer to embroider/Needle count/ Thread number (#123) Embroidery/Country/Madeira poly/Madeira rayon/Sulky/ Robison Anton Display unit Selects the measurement units that can be set are listed...
Users Manual - English
Page 27
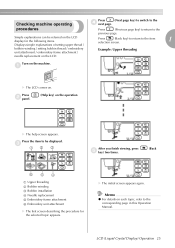
bobbin winding / setting bobbin thread / embroidery unit attachment / embroidery frame attachment / Example: Upper threading needle replacement on the operation X The help screen appears. Press b panel. (Help key) on the LCD. X The initial...Operation 25 c ab c After you finish viewing, press e key) two times. (Back f ed a Upper threading b Bobbin winding c Bobbin installation d Needle replacement e Embroidery frame attachment f Embroidery unit attachment X The first screen describing the procedure for the following items. Displays simple explanations of setting upper thread / ...
bobbin winding / setting bobbin thread / embroidery unit attachment / embroidery frame attachment / Example: Upper threading needle replacement on the operation X The help screen appears. Press b panel. (Help key) on the LCD. X The initial...Operation 25 c ab c After you finish viewing, press e key) two times. (Back f ed a Upper threading b Bobbin winding c Bobbin installation d Needle replacement e Embroidery frame attachment f Embroidery unit attachment X The first screen describing the procedure for the following items. Displays simple explanations of setting upper thread / ...
Users Manual - English
Page 28
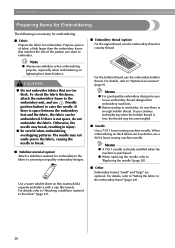
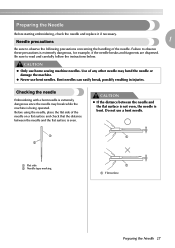
...embroidery thread or country thread. When embroidering on thick fabrics such as denim, use the embroidery bobbin thread. Memo z A 75/11 needle is already installed when the machine is necessary for embroidering. ■ Fabric Prepare the fabric for embroidery. CAUTION ● Do not ...embroidering projects, especially when embroidering on thin materials like organdy and fabrics with a nap like towels. For details, refer to raise the needle. For details, refer to "Setting the fabric in injury. ● Be careful when embroidering overlapping patterns. GETTING READY Preparing Items ...
...embroidery thread or country thread. When embroidering on thick fabrics such as denim, use the embroidery bobbin thread. Memo z A 75/11 needle is already installed when the machine is necessary for embroidering. ■ Fabric Prepare the fabric for embroidery. CAUTION ● Do not ...embroidering projects, especially when embroidering on thin materials like organdy and fabrics with a nap like towels. For details, refer to raise the needle. For details, refer to "Setting the fabric in injury. ● Be careful when embroidering overlapping patterns. GETTING READY Preparing Items ...
Users Manual - English
Page 29
... these precautions is even. Do not use a bent needle. Needle precautions 1 Be sure to read and carefully follow the instructions below. Bent needles can easily break, possibly resulting in injuries. Use of the needle. Checking the needle Embroidering with a bent needle is extremely dangerous since the needle may bend the needle or damage the machine. CAUTION z If the...
... these precautions is even. Do not use a bent needle. Needle precautions 1 Be sure to read and carefully follow the instructions below. Bent needles can easily break, possibly resulting in injuries. Use of the needle. Checking the needle Embroidering with a bent needle is extremely dangerous since the needle may bend the needle or damage the machine. CAUTION z If the...
Users Manual - English
Page 30
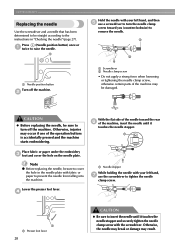
.... CAUTION z Before replacing the needle, be damaged. Lower the presser foot lever. Otherwise, the needle may break or damage may occur if one of the machine, insert the needle until it touches the needle stopper. a Needle stopper While holding the needle with your left hand, g ... use the screwdriver to tighten the needle clamp screw. With the flat side of the needle toward you (counterclockwise) to remove the needle. a b a Needle position button Turn off the machine. GETTING READY Replacing the needle Use the screwdriver and a needle that has been determined to be ...
.... CAUTION z Before replacing the needle, be damaged. Lower the presser foot lever. Otherwise, the needle may break or damage may occur if one of the machine, insert the needle until it touches the needle stopper. a Needle stopper While holding the needle with your left hand, g ... use the screwdriver to tighten the needle clamp screw. With the flat side of the needle toward you (counterclockwise) to remove the needle. a b a Needle position button Turn off the machine. GETTING READY Replacing the needle Use the screwdriver and a needle that has been determined to be ...

Users Manual - English
Page 34
l CAUTION ● Be sure to cut it clockwise. a a Start/stop . a a Guide slit in bobbin winder seat (with built-in the bobbin or the needle may wind around j the bobbin five or six times. Otherwise the thread may become tangled in cutter) CAUTION ● Be sure to pull the thread ...
l CAUTION ● Be sure to cut it clockwise. a a Start/stop . a a Guide slit in bobbin winder seat (with built-in the bobbin or the needle may wind around j the bobbin five or six times. Otherwise the thread may become tangled in cutter) CAUTION ● Be sure to pull the thread ...
Users Manual - English
Page 35
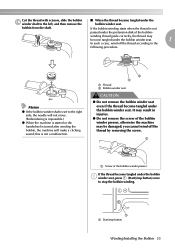
Memo z If the bobbin winder shaft is set to the right side, the needle will not move. (Embroidering is impossible.) z When the machine is started or the handwheel is not a malfunction. b a a Thread b Bobbin winder seat CAUTION ● Do not ...
Memo z If the bobbin winder shaft is set to the right side, the needle will not move. (Embroidering is impossible.) z When the machine is started or the handwheel is not a malfunction. b a a Thread b Bobbin winder seat CAUTION ● Do not ...
Users Manual - English
Page 36
... ● Use a bobbin that has been correctly wound with scissors beside the bobbinb winding thread guide. GETTING READY Cut the thread with thread, otherwise the needle may break or the thread tension will not operate correctly.
... ● Use a bobbin that has been correctly wound with scissors beside the bobbinb winding thread guide. GETTING READY Cut the thread with thread, otherwise the needle may break or the thread tension will not operate correctly.
Users Manual - English
Page 37
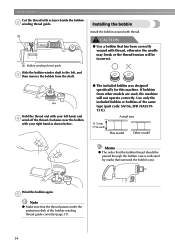
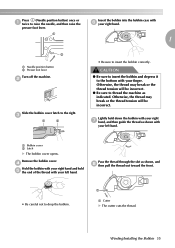
... pull the thread out toward the front. • Be careful not to raise the needle, and then raise the presser foot lever. Winding/Installing the Bobbin 35 a 1 b a Needle position button b Presser foot lever Turn off the machine. Press (Needle position button) once or a twice to drop the bobbin. Insert the bobbin into the...
... pull the thread out toward the front. • Be careful not to raise the needle, and then raise the presser foot lever. Winding/Installing the Bobbin 35 a 1 b a Needle position button b Presser foot lever Turn off the machine. Press (Needle position button) once or a twice to drop the bobbin. Insert the bobbin into the...


