
Brother International CE-5500PRW Support Question
Brother International CE-5500PRW Support Question
Find answers below for this question about Brother International CE-5500PRW.Need a Brother International CE-5500PRW manual? We have 3 online manuals for this item!
Question posted by mastAES on August 10th, 2014
How To Thread Bobbin Brother Ce5500prw Sewing Machine
The person who posted this question about this Brother International product did not include a detailed explanation. Please use the "Request More Information" button to the right if more details would help you to answer this question.
Current Answers
Related Brother International CE-5500PRW Manual Pages
Users Manual - English - Page 6

... Spool pin ...10
USING YOUR SEWING MACHINE 12
Power supply precautions ...12 Power supply ...12 Foot controller ...13 Sewing speed controller (for models equipped with the start/stop button 13 Changing the needle stop position ...13
THREADING THE MACHINE 14
Winding the bobbin ...14 Lower threading ...19 Upper threading ...22 Drawing up the lower thread ...27
REPLACING THE NEEDLE...
Users Manual - English - Page 8
... can be fed, for thick seams to be used on machine)
XC3021-031
6 Blind stitch foot "R"
XC4051-031
7 Button fitting foot "M"
XE2137-001
8 Seam ripper
X54243-051
9
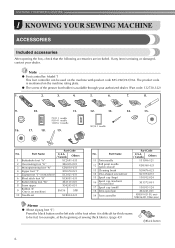
Bobbin (4) (One is missing or damaged, contact your authorized dealer...KNOWING YOUR SEWING MACHINE
1 KNOWING YOUR SEWING MACHINE
ACCESSORIES
Included accessories
After opening the box, check that the following accessories are...
Users Manual - English - Page 10
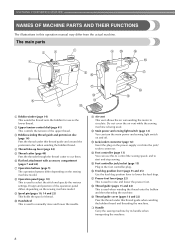
... the jack/ socket connector. h Operation panel (page 10) This is used . j Handwheel This is used when winding the thread onto the bobbin and then threading the machine.
Do not cover the air vent while the sewing machine is used to manually raise and lower the needle. n Foot controller (page 13) You can turn the main power...
Users Manual - English - Page 11

... presser foot applies pressure consistently on the sewing machine model. h Feed dogs
The feed dogs feed the fabric in the fabric. j Bobbin cover
Open the bobbin cover to raise the needle before threading the needle.
The operation buttons differ depending on the
fabric as the sewing takes place. The machine sews at a slow speed at the beginning of...
Users Manual - English - Page 16
... not grab the bar to the machine.
● We designed the bobbin that have been designed for this machine or bobbins of the same type (part code: SA156, SFB).
The thread may bend or break.
Only use bobbins (part code: SA156, SFB) that comes with this machine. KNOWING YOUR SEWING MACHINE
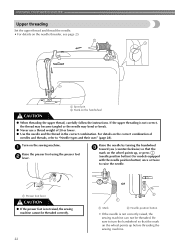
THREADING THE MACHINE
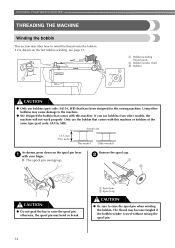
Winding the bobbin
This section describes how to...
Users Manual - English - Page 18
... cm (2-3/4 - 3-15/16 inches)
Trim the excess thread above the bobbin. Put the bobbin onto the bobbin winder shaft h and slide the bobbin winder shaft to the right. a Bobbin-winding thread guide
Make sure that the thread is wound around the bobbin. i
While holding the end of thread from the hole on the sewing machine.
k
CAUTION
● Make sure you do not...
Users Manual - English - Page 19
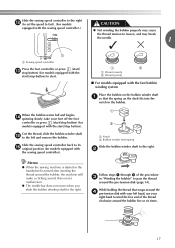
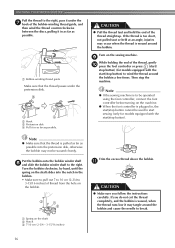
... models equipped with the fast bobbin winding system
Place the bobbin on the bobbin winder shaft a so that wraps around the bobbin, the machine will make a clicking sound; a Notch b Bobbin winder shaft spring
Slide the bobbin winder shaft to pass the thread
around the bobbin five or six times.
17
Memo
● When the sewing machine is started or the handwheel...
Users Manual - English - Page 20
... its k original position (for models equipped with the sewing speed controller).
KNOWING YOUR SEWING MACHINE
Pull the thread to the left, and then remove the bobbin from
the shaft. a Slit in bobbin winder seat (with
the sewing speed controller). CAUTION
● Not winding the bobbin properly may cause the thread tension to loosen, and may bend or break when...
Users Manual - English - Page 21

...
Other models
CAUTION
● Make sure you turn the power off the sewing machine.
Use only the enclosed bobbin or bobbins of the same type (part code: SA156, SFB). Memo
● The direction for feeding the bobbin thread is indicated by the arrow.
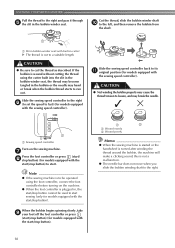
Lower threading
Raise the needle to its highest position by turning a the handwheel toward...
Users Manual - English - Page 22

... side (see arrow b) until the cover clicks into place. KNOWING YOUR SEWING MACHINE
Hold the end of the thread, push the bobbin e down with your left hand as shown, lightly pull the thread to its highest position by turning a the handwheel toward you set bobbin
Memo
● The direction for models equipped with the needle position...
Users Manual - English - Page 24
...
b Needle position button
• If the needle is not correct, the thread may become tangled or the needle may bend or break.
● Never use a thread weight of
needles and threads, refer to turn the handwheel so that the
mark on the sewing machine.
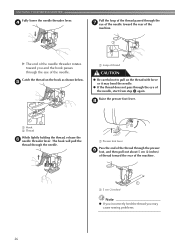
a Spool pin b Mark on the needle threader, see page 25. a
Raise...
Users Manual - English - Page 27
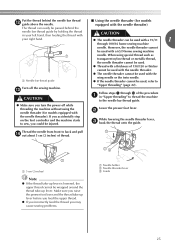
... the guide.
a 5 cm (2 inches)
Note
● If the thread take-up lever is lowered, the upper thread cannot be passed behind the
needle bar thread guide by holding the thread in "Upper threading" to thread the machine
to sew, you turn the power off the sewing machine. Make sure you may cause sewing problems.
a Needle holder b Needle threader lever c Guide
25...
Users Manual - English - Page 28
... the eye of the needle, start from step c again. KNOWING YOUR SEWING MACHINE
Fully lower the needle threader lever. d
Pull the loop of the thread passed through the eye of the needle.
Catch the thread on the thread with force or it may cause sewing problems.
26
X The end of the needle threader rotates toward the...
Users Manual - English - Page 87
... stitches.
• Refer to "Needle types and their uses"
(page 28) to select an appropriate thread tension.
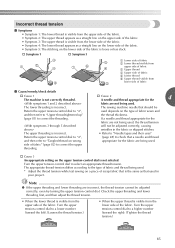
The sewing machine needle that should be adjusted correctly, even by turning the upper tension-control dial. Note
● If the upper threading and lower threading are being used depends on the type of the fabric. The upper...
Users Manual - English - Page 88
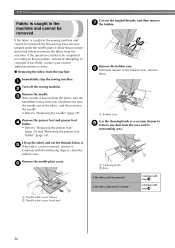
... bobbin.
a Needle plate cover release b Needle plate cover (front part)
86
e If the fabric can be removed, remove it . b
Remove the needle. Lift up the fabric and cut the threads below to complete it forcefully, contact your nearest authorized service center.
■ Removing the fabric from the machine
Immediately stop the sewing machine. h If threads remain...
Users Manual - English - Page 91
... nearest authorized service center.
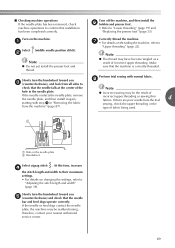
89 Turn off the machine, and then install the f bobbin and presser foot.
• Refer to
"Upper threading" (page 22). Correctly thread the machine.
b
Note
● Do not yet install the presser foot and thread.
h
check that installation has been completed correctly. ■ Checking machine operations If the needle plate has been removed...
Users Manual - English - Page 93
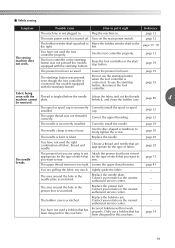
...
How to put it right
Reference
The machine is tangled below it, and clean the bobbin case.
Turn on the main power switch. page 17, 18
The sewing machine does not work properly.
To use the start /stop button was not pressed (for the type of fabric, thread and needle. below the needle Lift up...
Users Manual - English - Page 97
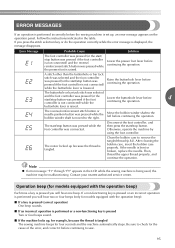
...before continuing the operation.
4
buttonhole lever is lowered. Move the bobbin winder shaft to sew.
95
Otherwise, operate the machine by using the foot controller.
The buttonhole or bar tack stitch...correctly while the error message is set up , for example, because the thread is tangled The sewing machine beeps for models equipped with the operation beep)
Each time a key is ...
Users Manual - English - Page 98
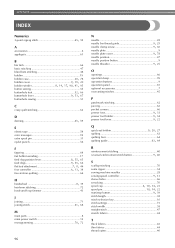
...main parts 8 main power switch 12
, monogramming 70 72
96
N
needle 28
, needle bar thread guide 9 25 , needle clamp screw 9 30
needle plate 9
, needle plate cover 9 78... bobbin 9, 20, 27
quilting 63 quilting foot 64
, quilting guide 63 64
R
reinforcement stitching 40
, reverse/reinforcement stitch button 9 40
S
scallop stitching 70 seam ripper 54 sewing machine needles 28
, sewing ...
Users Manual - English - Page 99
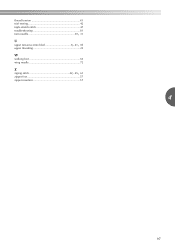
thread tension 41 trial sewing 42 triple stretch stitch 47 troubleshooting 81
twin needle 30, 31
U
upper tension-control dial 8, 41, 85
upper threading 22
W
walking foot 63 wing needle 72
Z
zigzag stitch 42, 45, 61
zipper foot 57 zipper insertion 57
4
97
Similar Questions

What Is Screw For On Back Of Machine Brother Ce5500prw On Back Of Machine
(Posted by jacqucmrtn 9 years ago)

How To Thread A Brother Vx1435 Sewing Machine
(Posted by vrojimbo 10 years ago)


How To Thread A Brother Ls2300prw Sewing Machine
(Posted by mewhottr 10 years ago)

How To Do Zigzag In Brother Ce5500prw?
I tried to do zigzag on my brother ce5500prw sewing machine, there was no error message when I start...
I tried to do zigzag on my brother ce5500prw sewing machine, there was no error message when I start...
(Posted by Prasanthikk 11 years ago)