

Users Manual - Multi
Page 2
... - To reduce the risk of burns, fire, electric shock, or injury to ensure that they do not play with this sewing machine. Never operate this manual. Always unplug the sewing machine from the electrical outlet when removing covers, lubricating, or when making any object into water. Young children should be used or ...the manufacturer as threading the needle, changing the needle, threading the bobbin, or changing the presser foot. 15. "IMPORTANT SAFETY INSTRUCTIONS" When using the sewing machine, basic safety precautions should always be left unattended when plugged in.
... - To reduce the risk of burns, fire, electric shock, or injury to ensure that they do not play with this sewing machine. Never operate this manual. Always unplug the sewing machine from the electrical outlet when removing covers, lubricating, or when making any object into water. Young children should be used or ...the manufacturer as threading the needle, changing the needle, threading the bobbin, or changing the presser foot. 15. "IMPORTANT SAFETY INSTRUCTIONS" When using the sewing machine, basic safety precautions should always be left unattended when plugged in.
Users Manual - Multi
Page 6
... with this appliance may not correspond with the coloured markings identifying the terminals in your sewing machine is fitted with bared flexible cords is marked with the fuse cover removed. In the event of the machine must be switched off or the plug must be removed from the supply by ASTA ...to the terminal which is marked with the letter 'N' or coloured black or blue. When leaving the sewing machine unattended, the main switch of replacing the plug fuse, use plugs with the letter 'L' or coloured red or brown. When servicing the...
... with this appliance may not correspond with the coloured markings identifying the terminals in your sewing machine is fitted with bared flexible cords is marked with the fuse cover removed. In the event of the machine must be switched off or the plug must be removed from the supply by ASTA ...to the terminal which is marked with the letter 'N' or coloured black or blue. When leaving the sewing machine unattended, the main switch of replacing the plug fuse, use plugs with the letter 'L' or coloured red or brown. When servicing the...
Users Manual - Multi
Page 30
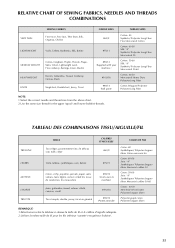
...me taille de fil pour les fils inférieur (canette) et supérieur (bobine). 22 RELATIVE CHART OF SEWING FABRICS, NEEDLES AND THREADS COMBINATIONS VERY THIN SEWING FABRICS Fine tricot, Fine lace, Thin linen, Silk, Organza, Chiffon LIGHTWEIGHT Voile, Taffeta, Synthetics, Silk, Batiste MEDIUM... Corduroy, Canvas, Duck KNITS Single knit, Double knit, Jersey, Tricot NEEDLE SIZES THREAD SIZES #65/9 #75/11 #90/14 (Supplied with your machine.) #100/16 #90/14 (Ball point) Cotton: 80 Synthetic/ Polyester Long Fiber Fine Mercerized Cotton Cotton: 60-80 Silk: "A" Synthetic/ Polyester Long...
...me taille de fil pour les fils inférieur (canette) et supérieur (bobine). 22 RELATIVE CHART OF SEWING FABRICS, NEEDLES AND THREADS COMBINATIONS VERY THIN SEWING FABRICS Fine tricot, Fine lace, Thin linen, Silk, Organza, Chiffon LIGHTWEIGHT Voile, Taffeta, Synthetics, Silk, Batiste MEDIUM... Corduroy, Canvas, Duck KNITS Single knit, Double knit, Jersey, Tricot NEEDLE SIZES THREAD SIZES #65/9 #75/11 #90/14 (Supplied with your machine.) #100/16 #90/14 (Ball point) Cotton: 80 Synthetic/ Polyester Long Fiber Fine Mercerized Cotton Cotton: 60-80 Silk: "A" Synthetic/ Polyester Long...
Users Manual - Multi
Page 39
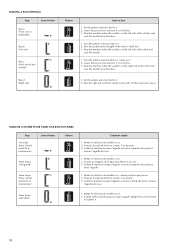
...jusqu'à ce que l'aiguille atteigne les points formés à la phase a. Sew the predetermined length of buttonhole) Step d (Right side) d Pattern ac c a b ac c a d How to Sew 1. Arrêter la machine lorsque l'aiguille se trouve à gauche des points et relever l'aiguille du tissu. 1.... Set the pattern selection dial to c (same as a). 2. Stop the machine when the needle is at the left side of the stitch and...
...jusqu'à ce que l'aiguille atteigne les points formés à la phase a. Sew the predetermined length of buttonhole) Step d (Right side) d Pattern ac c a b ac c a d How to Sew 1. Arrêter la machine lorsque l'aiguille se trouve à gauche des points et relever l'aiguille du tissu. 1.... Set the pattern selection dial to c (same as a). 2. Stop the machine when the needle is at the left side of the stitch and...
Users Manual - Multi
Page 63
... 3 Applique 9 B Blind Hem Stitching 27 Bobbin winding 12 Buttonhole 30-31, 33 Buttonhole Fine Adjustment 34 Button Sewing 35 Page S Satin Stitching 26 Sewing Light Light Bulb Replacement 42 Switch 5 Shell Tuck Stitching 29 Shuttle Hook Removal 43-44 Shuttle Race Cleaning 44 Straight... D Darning 38 Drawing Up Lower Thread 17 E Elastic Stitching 27 Embroidering 40-41 T Thread Tension 20-21 Troubleshooting 46, 47 Twin-Needle Sewing 18 U Upper Tension Control Dial 20 Upper Threading 15-16 W Winding the Bobbin 12 F Feed Dog Cleaning 45 Foot Controller 5 Free-Arm ...
... 3 Applique 9 B Blind Hem Stitching 27 Bobbin winding 12 Buttonhole 30-31, 33 Buttonhole Fine Adjustment 34 Button Sewing 35 Page S Satin Stitching 26 Sewing Light Light Bulb Replacement 42 Switch 5 Shell Tuck Stitching 29 Shuttle Hook Removal 43-44 Shuttle Race Cleaning 44 Straight... D Darning 38 Drawing Up Lower Thread 17 E Elastic Stitching 27 Embroidering 40-41 T Thread Tension 20-21 Troubleshooting 46, 47 Twin-Needle Sewing 18 U Upper Tension Control Dial 20 Upper Threading 15-16 W Winding the Bobbin 12 F Feed Dog Cleaning 45 Foot Controller 5 Free-Arm ...
Users Manual - English
Page 1
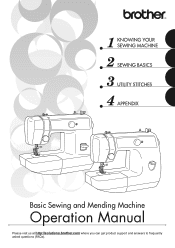
KNOWING YOUR SEWING MACHINE SEWING BASICS UTILITY STITCHES APPENDIX Basic Sewing and Mending Machine Operation Manual Please visit us at http://solutions.brother.com where you can get product support and answers to frequently asked questions (FAQs).
KNOWING YOUR SEWING MACHINE SEWING BASICS UTILITY STITCHES APPENDIX Basic Sewing and Mending Machine Operation Manual Please visit us at http://solutions.brother.com where you can get product support and answers to frequently asked questions (FAQs).

Users Manual - English
Page 3
... plug and pull, not the cord. 10. Do not use the proper needle plate. "SAVE THESE INSTRUCTIONS" "This sewing machine is required around the sewing machine needle. 11. Never drop or insert any object into water. It may deflect the needle causing it has been dropped... its intended use this machine outdoors. 7. The wrong plate can cause the needle to break. 12. "IMPORTANT SAFETY INSTRUCTIONS" When using the sewing machine, basic safety precautions should be supervised to ensure that they do not play with this sewing machine. The sewing machine should never be left ...
... plug and pull, not the cord. 10. Do not use the proper needle plate. "SAVE THESE INSTRUCTIONS" "This sewing machine is required around the sewing machine needle. 11. Never drop or insert any object into water. It may deflect the needle causing it has been dropped... its intended use this machine outdoors. 7. The wrong plate can cause the needle to break. 12. "IMPORTANT SAFETY INSTRUCTIONS" When using the sewing machine, basic safety precautions should be supervised to ensure that they do not play with this sewing machine. The sewing machine should never be left ...
Users Manual - English
Page 5
...not store anything on the needle while sewing. Do not use or store the machine near a space heater, iron, halogen lamp, or other moving parts. 2. Do not drop or hit the machine. 4. Do not use • Maintaining the machine • Leaving the machine unattended 3. When storing this manual ... table in the back of this product are subject to inspect and adjust the machine yourself. up lever, needle, or other hot objects. 2. Remember to keep your local authorized Brother dealer. Plug the machine directly into the wall. For a longer service life 1. If the problem persists...
...not store anything on the needle while sewing. Do not use or store the machine near a space heater, iron, halogen lamp, or other moving parts. 2. Do not drop or hit the machine. 4. Do not use • Maintaining the machine • Leaving the machine unattended 3. When storing this manual ... table in the back of this product are subject to inspect and adjust the machine yourself. up lever, needle, or other hot objects. 2. Remember to keep your local authorized Brother dealer. Plug the machine directly into the wall. For a longer service life 1. If the problem persists...

Users Manual - English
Page 6
... Button sewing ...38 4 SEWING BASICS 25 SEWING ...25 General sewing procedure ...25 Selecting stitching ...26 Starting to sew ...27 Sewing in reverse ...28 Thread tension ...28 USEFUL SEWING TIPS ...30 Trial sewing ...30 Changing the sewing direction ...30 Sewing curves ...30 Sewing thick fabrics ...30 Sewing thin fabrics ...31 Sewing stretch fabrics ...31 Using a free-arm style ...31 3. CONTENTS 1. KNOWING YOUR SEWING MACHINE 6 NAMES OF MACHINE PARTS...
... Button sewing ...38 4 SEWING BASICS 25 SEWING ...25 General sewing procedure ...25 Selecting stitching ...26 Starting to sew ...27 Sewing in reverse ...28 Thread tension ...28 USEFUL SEWING TIPS ...30 Trial sewing ...30 Changing the sewing direction ...30 Sewing curves ...30 Sewing thick fabrics ...30 Sewing thin fabrics ...31 Sewing stretch fabrics ...31 Using a free-arm style ...31 3. CONTENTS 1. KNOWING YOUR SEWING MACHINE 6 NAMES OF MACHINE PARTS...

Users Manual - English
Page 8
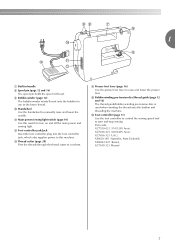
... the number of the upper thread. e Flat bed attachment with accessory storage (page 8 and 31) f Reverse sewing lever (page 28) Press and hold down the reverse sewing lever to use. KNOWING YOUR SEWING MACHINE 1 KNOWING YOUR SEWING MACHINE NAMES OF MACHINE PARTS AND THEIR FUNCTIONS The main parts a Buttonhole fine-adjusting screw (page 38) Turn the buttonhole... not uniform. c Thread take-up lever (page 16) d Upper tension control dial (page 28) This controls the tension of the stitch that you want to sew in the opposite direction. 6
... the number of the upper thread. e Flat bed attachment with accessory storage (page 8 and 31) f Reverse sewing lever (page 28) Press and hold down the reverse sewing lever to use. KNOWING YOUR SEWING MACHINE 1 KNOWING YOUR SEWING MACHINE NAMES OF MACHINE PARTS AND THEIR FUNCTIONS The main parts a Buttonhole fine-adjusting screw (page 38) Turn the buttonhole... not uniform. c Thread take-up lever (page 16) d Upper tension control dial (page 28) This controls the tension of the stitch that you want to sew in the opposite direction. 6
Users Manual - English
Page 9
... XC7438-321 (Russia) 7 Part code; i Bobbin winder (page 12) The bobbin winder winds thread onto the bobbin for use as the lower thread. k Main power/sewing light switch (page 10) Use this machine. m Thread cutter (page 28) Pass the threads through the thread cutter to start and stop... sewing. p Foot controller (page 11) Use the foot controller to control the sewing speed and to cut them. 1 g Built-in handle h Spool pin (page 12 and 16) The spool pin holds ...
... XC7438-321 (Russia) 7 Part code; i Bobbin winder (page 12) The bobbin winder winds thread onto the bobbin for use as the lower thread. k Main power/sewing light switch (page 10) Use this machine. m Thread cutter (page 28) Pass the threads through the thread cutter to start and stop... sewing. p Foot controller (page 11) Use the foot controller to control the sewing speed and to cut them. 1 g Built-in handle h Spool pin (page 12 and 16) The spool pin holds ...
Users Manual - English
Page 10
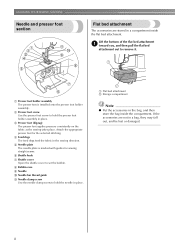
... If the accessories are stored in a compartment inside the compartment. b Presser foot screw Use the presser foot screw to set the bobbin. KNOWING YOUR SEWING MACHINE Needle and presser foot section Flat bed attachment The accessories are not in a bag, they may fall out, and be lost or damaged. 8 ...c Presser foot (Zigzag) The presser foot applies pressure consistently on the fabric as the sewing takes place. h Bobbin case i Needle j Needle bar thread guide k Needle clamp screw Use the needle clamp screw to remove it. Lift the bottom ...
... If the accessories are stored in a compartment inside the compartment. b Presser foot screw Use the presser foot screw to set the bobbin. KNOWING YOUR SEWING MACHINE Needle and presser foot section Flat bed attachment The accessories are not in a bag, they may fall out, and be lost or damaged. 8 ...c Presser foot (Zigzag) The presser foot applies pressure consistently on the fabric as the sewing takes place. h Bobbin case i Needle j Needle bar thread guide k Needle clamp screw Use the needle clamp screw to remove it. Lift the bottom ...
Users Manual - English
Page 11
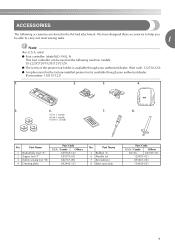
... in the flat bed attachment. No. Part Name 1 Buttonhole foot "A" 2 Zipper foot "I" 3 Button sewing foot "M" 4 Darning plate Part Code U.S.A. / Canada Others X59369-321 X59370-021 XE2137-001 XA3442-121 No. ACCESSORIES The following machine models: LS-2220/2720/1520/2125/2125i. ● The screw of the presser foot holder is available through your authorized... XA5539-151 129583-021 X55467-021 130920-021 9 only) ● Foot controller: Model KD-1902, N This foot controller can be able to carry out most sewing tasks. 1 Note (For U.S.A.
... in the flat bed attachment. No. Part Name 1 Buttonhole foot "A" 2 Zipper foot "I" 3 Button sewing foot "M" 4 Darning plate Part Code U.S.A. / Canada Others X59369-321 X59370-021 XE2137-001 XA3442-121 No. ACCESSORIES The following machine models: LS-2220/2720/1520/2125/2125i. ● The screw of the presser foot holder is available through your authorized... XA5539-151 129583-021 X55467-021 130920-021 9 only) ● Foot controller: Model KD-1902, N This foot controller can be able to carry out most sewing tasks. 1 Note (For U.S.A.
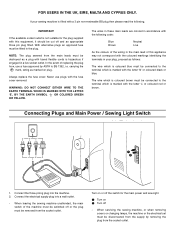
Users Manual - English
Page 12
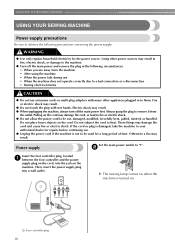
... or a disconnection • During electrical storms CAUTION ● Do not use . ● Unplug the power cord if the machine is turned on the cord. X The sewing lamp comes on the machine. KNOWING YOUR SEWING MACHINE USING YOUR SEWING MACHINE Power supply precautions Be sure to observe the following circumstances: • When you are away from the outlet...
... or a disconnection • During electrical storms CAUTION ● Do not use . ● Unplug the power cord if the machine is turned on the cord. X The sewing lamp comes on the machine. KNOWING YOUR SEWING MACHINE USING YOUR SEWING MACHINE Power supply precautions Be sure to observe the following circumstances: • When you are away from the outlet...
Users Manual - English
Page 13
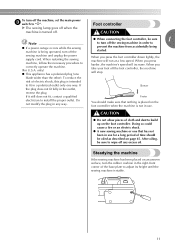
If Slower the plug does not fit fully in use . Foot controller CAUTION Note ● If a power outage occurs while the sewing machine is being started. When you press harder, the machine's speed will run at a low speed. Do not modify the plug in use for a long period of the base plate to adjust... its height until the sewing machine is not in any excess oil. You should be oiled as described on an uneven surface, turn the rubber cushion in the right-front corner...
If Slower the plug does not fit fully in use . Foot controller CAUTION Note ● If a power outage occurs while the sewing machine is being started. When you press harder, the machine's speed will run at a low speed. Do not modify the plug in use for a long period of the base plate to adjust... its height until the sewing machine is not in any excess oil. You should be oiled as described on an uneven surface, turn the rubber cushion in the right-front corner...
Users Manual - English
Page 14
...thread onto the bobbin. 1 Pulling it in the right place, the thread may tangle on the sewing machine. Only use bobbins (part code: SA156, SFB: XA5539-151) that have been designed for this sewing machine. b CAUTION ● If the spool of thread is not in as far as possible, ...the shaft b Groove of the bobbin. a Spring on this pin. KNOWING YOUR SEWING MACHINE THREADING THE MACHINE Winding the bobbin This section describes how to the machine. ● We designed the bobbin that comes with this machine or bobbins of the same type (part code: SA156, SFB: XA5539-151). ...
...thread onto the bobbin. 1 Pulling it in the right place, the thread may tangle on the sewing machine. Only use bobbins (part code: SA156, SFB: XA5539-151) that have been designed for this sewing machine. b CAUTION ● If the spool of thread is not in as far as possible, ...the shaft b Groove of the bobbin. a Spring on this pin. KNOWING YOUR SEWING MACHINE THREADING THE MACHINE Winding the bobbin This section describes how to the machine. ● We designed the bobbin that comes with this machine or bobbins of the same type (part code: SA156, SFB: XA5539-151). ...
Users Manual - English
Page 15
If you slide the bobbin winding shaft to the right. Memo ● When the sewing machine is started or the 1 handwheel is wound, when the thread runs low it may cause the thread tension to break. h 1 2 a Wound evenly b Wound poorly When ...the bobbin seems full and begins i spinning slowly, take your foot off the foot controller. 13 around the bobbin, the machine will make a clicking sound; this is not a malfunction. ● The needle bar does not move when you do not cut the thread completely, and the...
If you slide the bobbin winding shaft to the right. Memo ● When the sewing machine is started or the 1 handwheel is wound, when the thread runs low it may cause the thread tension to break. h 1 2 a Wound evenly b Wound poorly When ...the bobbin seems full and begins i spinning slowly, take your foot off the foot controller. 13 around the bobbin, the machine will make a clicking sound; this is not a malfunction. ● The needle bar does not move when you do not cut the thread completely, and the...

Users Manual - English
Page 16
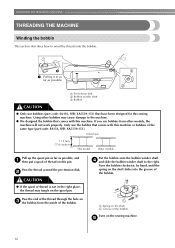
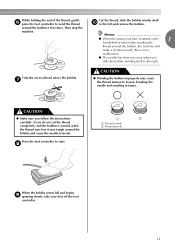
...are used with thread. CAUTION ● Make sure you turn the power off while threading the machine. If you accidentally step on the foot controller and the machine starts to sew, you and pulling it may cause the thread tension to its highest position by pulling its ...by turning a the handwheel toward you could be used , the machine will not operate correctly. Use only the enclosed bobbin or bobbins of the machine. KNOWING YOUR SEWING MACHINE Lower threading Install the bobbin wound with this sewing machine. Open the shuttle cover behind the flat bed b attachment at the...
...are used with thread. CAUTION ● Make sure you turn the power off while threading the machine. If you accidentally step on the foot controller and the machine starts to sew, you and pulling it may cause the thread tension to its highest position by pulling its ...by turning a the handwheel toward you could be used , the machine will not operate correctly. Use only the enclosed bobbin or bobbins of the machine. KNOWING YOUR SEWING MACHINE Lower threading Install the bobbin wound with this sewing machine. Open the shuttle cover behind the flat bed b attachment at the...
Users Manual - English
Page 17
... is incorrectly installed, it will fall out from the shuttle when the machine starts to the left, as shown below, until it enters the delivery eye under the tension spring. Pull the trailing thread through the slot, down e and to sew. 1 15 If it is properly placed back into the notch at... the top of the shuttle race. a Tension spring Hold the bobbin case by the latch, fully insert f the bobbin case into the shuttle race, and then release the latch. • Make sure the bobbin case finger fits into the machine...
... is incorrectly installed, it will fall out from the shuttle when the machine starts to the left, as shown below, until it enters the delivery eye under the tension spring. Pull the trailing thread through the slot, down e and to sew. 1 15 If it is properly placed back into the notch at... the top of the shuttle race. a Tension spring Hold the bobbin case by the latch, fully insert f the bobbin case into the shuttle race, and then release the latch. • Make sure the bobbin case finger fits into the machine...
Users Manual - English
Page 18
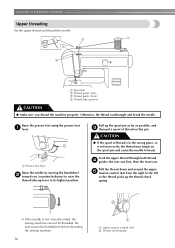
...possible, and c then put a spool of thread is in the wrong place, or is not correctly raised, the sewing machine can not be threaded. KNOWING YOUR SEWING MACHINE Upper threading Set the upper thread and thread the needle. CAUTION ● If the spool of thread on the ...first, then the front one. a Presser foot lever Raise the needle by turning the handwheel b toward you (counterclockwise) to turn the handwheel before threading the sewing machine. 16 a Upper tension control dial b Thread check spring a Spool pin b Thread guide (rear) c Thread guide (front) d Thread take -up the...
...possible, and c then put a spool of thread is in the wrong place, or is not correctly raised, the sewing machine can not be threaded. KNOWING YOUR SEWING MACHINE Upper threading Set the upper thread and thread the needle. CAUTION ● If the spool of thread on the ...first, then the front one. a Presser foot lever Raise the needle by turning the handwheel b toward you (counterclockwise) to turn the handwheel before threading the sewing machine. 16 a Upper tension control dial b Thread check spring a Spool pin b Thread guide (rear) c Thread guide (front) d Thread take -up the...


