

Users Manual - Multi
Page 2
...DANGER - Replace bulb with any object into water. Never operate this machine to break. 14. The wrong plate can cause the needle to persons: 1. "IMPORTANT SAFETY INSTRUCTIONS" When using the sewing machine, basic safety precautions should always be used as threading the needle, changing the ...needle, threading the bobbin, or changing the presser foot. 15. Do not allow this sewing machine if it has a damaged cord or plug,...
...DANGER - Replace bulb with any object into water. Never operate this machine to break. 14. The wrong plate can cause the needle to persons: 1. "IMPORTANT SAFETY INSTRUCTIONS" When using the sewing machine, basic safety precautions should always be used as threading the needle, changing the ...needle, threading the bobbin, or changing the presser foot. 15. Do not allow this sewing machine if it has a damaged cord or plug,...
Users Manual - Multi
Page 6
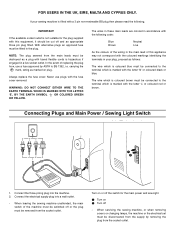
...letter 'L' or coloured red or brown. Connecting Plugs and Main Power / Sewing Light Switch 1 2 1. Connect the electrical supply plug into the machine. 2. When servicing the sewing machine, or when removing covers or changing lamps, the machine or the electrical set must be cut off the switch for the plug ... 3 pin non-rewireable BS plug then please read the following code: Blue Brown Neutral Live As the colours of the wiring in your sewing machine is marked with the letter 'N' or coloured black or blue. NOTE: The plug severed from the socket outlet. Always replace the fuse ...
...letter 'L' or coloured red or brown. Connecting Plugs and Main Power / Sewing Light Switch 1 2 1. Connect the electrical supply plug into the machine. 2. When servicing the sewing machine, or when removing covers or changing lamps, the machine or the electrical set must be cut off the switch for the plug ... 3 pin non-rewireable BS plug then please read the following code: Blue Brown Neutral Live As the colours of the wiring in your sewing machine is marked with the letter 'N' or coloured black or blue. NOTE: The plug severed from the socket outlet. Always replace the fuse ...
Users Manual - Multi
Page 30
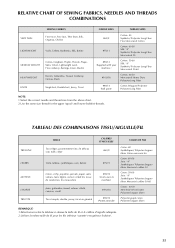
..., NEEDLES AND THREADS COMBINATIONS VERY THIN SEWING FABRICS Fine tricot, Fine lace, Thin linen, Silk, Organza, Chiffon LIGHTWEIGHT Voile, ... Single knit, Double knit, Jersey, Tricot NEEDLE SIZES THREAD SIZES #65/9 #75/11 #90/14 (Supplied with your machine.) #100/16 #90/14 (Ball point) Cotton: 80 Synthetic/ Polyester Long Fiber Fine Mercerized Cotton Cotton: 60-80 Silk... jersey, tricot en général CALIBRES D'AIGUILLES #65/9 #75/11 #90/14 (Livrés avec la machine) #100/16 #90/14 (Pointe arrondie) TAILLES DE FILS Coton: 80 Synthétiques/ Polyester longues fibres Coton ...
..., NEEDLES AND THREADS COMBINATIONS VERY THIN SEWING FABRICS Fine tricot, Fine lace, Thin linen, Silk, Organza, Chiffon LIGHTWEIGHT Voile, ... Single knit, Double knit, Jersey, Tricot NEEDLE SIZES THREAD SIZES #65/9 #75/11 #90/14 (Supplied with your machine.) #100/16 #90/14 (Ball point) Cotton: 80 Synthetic/ Polyester Long Fiber Fine Mercerized Cotton Cotton: 60-80 Silk... jersey, tricot en général CALIBRES D'AIGUILLES #65/9 #75/11 #90/14 (Livrés avec la machine) #100/16 #90/14 (Pointe arrondie) TAILLES DE FILS Coton: 80 Synthétiques/ Polyester longues fibres Coton ...
Users Manual - Multi
Page 39
...b (Left side) c Step c (Back end of the tailor's chalk line. 3. Lower the presser foot and sew 5 to b. 2. Lower the presser foot and sew 5 to c (same as a). 2. Arrêter la machine lorsque l'aiguille se trouve à droite des points et lever l'aiguille du tissu. 4ème temps (barre d'arr...side) d Pattern ac c a b ac c a d How to Sew 1. Set the pattern selection dial to a. 2. Mettre le sélecteur de modèle sur a. 2. Mettre le sélecteur de modèle sur b. 2. Arrêter la machine lorsque l'aiguille se trouve à gauche des points et lever l'aiguille...
...b (Left side) c Step c (Back end of the tailor's chalk line. 3. Lower the presser foot and sew 5 to b. 2. Lower the presser foot and sew 5 to c (same as a). 2. Arrêter la machine lorsque l'aiguille se trouve à droite des points et lever l'aiguille du tissu. 4ème temps (barre d'arr...side) d Pattern ac c a b ac c a d How to Sew 1. Set the pattern selection dial to a. 2. Mettre le sélecteur de modèle sur a. 2. Mettre le sélecteur de modèle sur b. 2. Arrêter la machine lorsque l'aiguille se trouve à gauche des points et lever l'aiguille...
Users Manual - Multi
Page 55
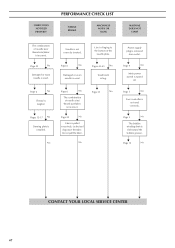
... 4 No Main power switch is pulled excessively. Page 5 No Foot controller is incorrect. FABRIC DOES NOT FEED PROPERLY PERFORMANCE CHECK LIST NEEDLE BREAKS MACHINE IS NOISY OR SLOW MACHINE DOES NOT START The combination of needle size/ thread size/fabric is not used correctly. Lint is installed. Pages 12-17 No Darning...
... 4 No Main power switch is pulled excessively. Page 5 No Foot controller is incorrect. FABRIC DOES NOT FEED PROPERLY PERFORMANCE CHECK LIST NEEDLE BREAKS MACHINE IS NOISY OR SLOW MACHINE DOES NOT START The combination of needle size/ thread size/fabric is not used correctly. Lint is installed. Pages 12-17 No Darning...
Users Manual - English
Page 1
KNOWING YOUR SEWING MACHINE SEWING BASICS UTILITY STITCHES APPENDIX Basic Sewing and Mending Machine Operation Manual Please visit us at http://solutions.brother.com where you can get product support and answers to frequently asked questions (FAQs).
KNOWING YOUR SEWING MACHINE SEWING BASICS UTILITY STITCHES APPENDIX Basic Sewing and Mending Machine Operation Manual Please visit us at http://solutions.brother.com where you can get product support and answers to frequently asked questions (FAQs).

Users Manual - English
Page 3
... reduce the risk of electric shock: 1. Do not allow this machine where aerosol (spray) products are being administered. 8. Never operate this sewing machine from outlet. 9. Always use a bent needle. 13. This sewing machine is required around the sewing machine needle. 11. "IMPORTANT SAFETY INSTRUCTIONS" When using the sewing machine, basic safety precautions should always be followed, including the following: "Read...
... reduce the risk of electric shock: 1. Do not allow this machine where aerosol (spray) products are being administered. 8. Never operate this sewing machine from outlet. 9. Always use a bent needle. 13. This sewing machine is required around the sewing machine needle. 11. "IMPORTANT SAFETY INSTRUCTIONS" When using the sewing machine, basic safety precautions should always be followed, including the following: "Read...
Users Manual - English
Page 4
FOR USERS IN THE UK, EIRE, MALTA AND CYPRUS ONLY If this machine is fitted with a three-pin non-rewireable BS plug then please read the following code: Blue Neutral Brown Live As the colours of the wiring ...
FOR USERS IN THE UK, EIRE, MALTA AND CYPRUS ONLY If this machine is fitted with a three-pin non-rewireable BS plug then please read the following code: Blue Neutral Brown Live As the colours of the wiring ...
Users Manual - English
Page 5
... notice. 3 Do not drop or hit the machine. 4. Do not store anything on the needle while sewing. Do not use • Maintaining the machine • Leaving the machine unattended 3. For additional product information and updates, visit our web site at www.brother.com The contents of this machine, avoid direct sunlight and high humidity locations. Do...
... notice. 3 Do not drop or hit the machine. 4. Do not store anything on the needle while sewing. Do not use • Maintaining the machine • Leaving the machine unattended 3. For additional product information and updates, visit our web site at www.brother.com The contents of this machine, avoid direct sunlight and high humidity locations. Do...

Users Manual - English
Page 6
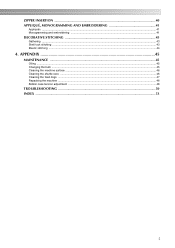
...foot section ...8 Flat bed attachment ...8 ACCESSORIES ...9 USING YOUR SEWING MACHINE 10 Power supply precautions ...10 Power supply ...10 Foot controller ...11 Steadying the machine ...11 THREADING THE MACHINE 12 Winding the bobbin ...12 Lower threading ...14 Upper ...sewing ...38 4 SEWING BASICS 25 SEWING ...25 General sewing procedure ...25 Selecting stitching ...26 Starting to sew ...27 Sewing in reverse ...28 Thread tension ...28 USEFUL SEWING TIPS ...30 Trial sewing ...30 Changing the sewing direction ...30 Sewing curves ...30 Sewing thick fabrics ...30 Sewing thin fabrics ...31 Sewing...
...foot section ...8 Flat bed attachment ...8 ACCESSORIES ...9 USING YOUR SEWING MACHINE 10 Power supply precautions ...10 Power supply ...10 Foot controller ...11 Steadying the machine ...11 THREADING THE MACHINE 12 Winding the bobbin ...12 Lower threading ...14 Upper ...sewing ...38 4 SEWING BASICS 25 SEWING ...25 General sewing procedure ...25 Selecting stitching ...26 Starting to sew ...27 Sewing in reverse ...28 Thread tension ...28 USEFUL SEWING TIPS ...30 Trial sewing ...30 Changing the sewing direction ...30 Sewing curves ...30 Sewing thick fabrics ...30 Sewing thin fabrics ...31 Sewing...
Users Manual - English
Page 7
APPENDIX ...45 MAINTENANCE ...45 Oiling ...45 Changing the bulb ...45 Cleaning the machine surface ...46 Cleaning the shuttle race ...46 Cleaning the feed dogs ...47 Repacking the machine ...48 Bobbin case tension adjustment ...48 TROUBLESHOOTING ...50 INDEX ...53 5 ZIPPER INSERTION ...40 APPLIQUÉ, MONOGRAMMING AND EMBROIDERING 41 Appliqués ...41 Monogramming and embroidering ...41 DECORATIVE STITCHING 43 Gathering ...43 Shell tuck stitching ...43 Elastic stitching ...44 4.
APPENDIX ...45 MAINTENANCE ...45 Oiling ...45 Changing the bulb ...45 Cleaning the machine surface ...46 Cleaning the shuttle race ...46 Cleaning the feed dogs ...47 Repacking the machine ...48 Bobbin case tension adjustment ...48 TROUBLESHOOTING ...50 INDEX ...53 5 ZIPPER INSERTION ...40 APPLIQUÉ, MONOGRAMMING AND EMBROIDERING 41 Appliqués ...41 Monogramming and embroidering ...41 DECORATIVE STITCHING 43 Gathering ...43 Shell tuck stitching ...43 Elastic stitching ...44 4.

Users Manual - English
Page 8
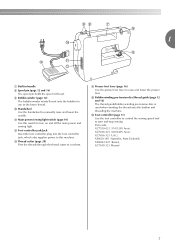
...take-up lever (page 16) d Upper tension control dial (page 28) This controls the tension of the stitch that you want to sew in the opposite direction. 6 b Pattern selection dial (page 26) Turn the pattern selection dial to select the number of the upper thread.... e Flat bed attachment with accessory storage (page 8 and 31) f Reverse sewing lever (page 28) Press and hold down the reverse sewing lever to use. KNOWING YOUR SEWING MACHINE 1 KNOWING YOUR SEWING MACHINE NAMES OF MACHINE PARTS AND THEIR FUNCTIONS The main parts a Buttonhole fine-adjusting screw (page 38) Turn...
...take-up lever (page 16) d Upper tension control dial (page 28) This controls the tension of the stitch that you want to sew in the opposite direction. 6 b Pattern selection dial (page 26) Turn the pattern selection dial to select the number of the upper thread.... e Flat bed attachment with accessory storage (page 8 and 31) f Reverse sewing lever (page 28) Press and hold down the reverse sewing lever to use. KNOWING YOUR SEWING MACHINE 1 KNOWING YOUR SEWING MACHINE NAMES OF MACHINE PARTS AND THEIR FUNCTIONS The main parts a Buttonhole fine-adjusting screw (page 38) Turn...
Users Manual - English
Page 9
... power to this switch to turn on and off the main power and sewing light. m Thread cutter (page 28) Pass the threads through the thread cutter to start and stop sewing. k Main power/sewing light switch (page 10) Use this machine. n Presser foot lever (page 16) Use the presser foot lever to manually raise... guide (page 12 and 16) The thread guide/bobbin winding pre-tension disc is used when winding the thread onto the bobbin and threading the machine.
... power to this switch to turn on and off the main power and sewing light. m Thread cutter (page 28) Pass the threads through the thread cutter to start and stop sewing. k Main power/sewing light switch (page 10) Use this machine. n Presser foot lever (page 16) Use the presser foot lever to manually raise... guide (page 12 and 16) The thread guide/bobbin winding pre-tension disc is used when winding the thread onto the bobbin and threading the machine.
Users Manual - English
Page 10
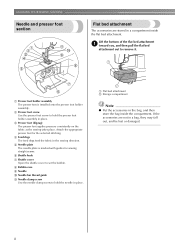
... bag inside the flat bed attachment. a Flat bed attachment b Storage compartment Note ● Put the accessories in the sewing direction. KNOWING YOUR SEWING MACHINE Needle and presser foot section Flat bed attachment The accessories are not in place. c Presser foot (Zigzag) The presser ...foot applies pressure consistently on the fabric as the sewing takes place. b Presser foot screw Use the presser foot screw ...
... bag inside the flat bed attachment. a Flat bed attachment b Storage compartment Note ● Put the accessories in the sewing direction. KNOWING YOUR SEWING MACHINE Needle and presser foot section Flat bed attachment The accessories are not in place. c Presser foot (Zigzag) The presser ...foot applies pressure consistently on the fabric as the sewing takes place. b Presser foot screw Use the presser foot screw ...
Users Manual - English
Page 11
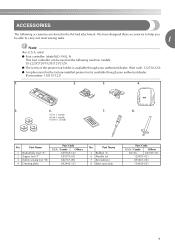
...spool pin Part Code U.S.A. / Canada Others SA156 XA5539-151 129583-021 X55467-021 130920-021 9 We have designed these accessories to carry out most sewing tasks. 1 Note (For U.S.A. only) ● Foot controller: Model KD-1902, N This foot controller can be able to help you be used... on the following accessories are stored in the flat bed attachment. ACCESSORIES The following machine models: LS-2220/2720/1520/2125/2125i. ● The screw of the presser foot holder is available through your authorized dealer. (Part code: 132730-122) &#...
...spool pin Part Code U.S.A. / Canada Others SA156 XA5539-151 129583-021 X55467-021 130920-021 9 We have designed these accessories to carry out most sewing tasks. 1 Note (For U.S.A. only) ● Foot controller: Model KD-1902, N This foot controller can be able to help you be used... on the following accessories are stored in the flat bed attachment. ACCESSORIES The following machine models: LS-2220/2720/1520/2125/2125i. ● The screw of the presser foot holder is available through your authorized dealer. (Part code: 132730-122) &#...
Users Manual - English
Page 12
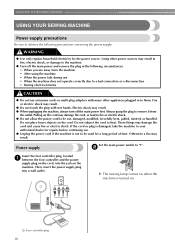
...on the cord. These things may result. ● Do not touch the plug with many other power sources may result. X The sewing lamp comes on when the machine is not to a bad connection or a disconnection • During electrical storms CAUTION ● Do not use . ● Unplug... or damage to them. If the cord or plug is damaged, take the machine to observe the following circumstances: • When you are away from the outlet. KNOWING YOUR SEWING MACHINE USING YOUR SEWING MACHINE Power supply precautions Be sure to your authorized dealer for repairs before continuing use ...
...on the cord. These things may result. ● Do not touch the plug with many other power sources may result. X The sewing lamp comes on when the machine is not to a bad connection or a disconnection • During electrical storms CAUTION ● Do not use . ● Unplug... or damage to them. If the cord or plug is damaged, take the machine to observe the following circumstances: • When you are away from the outlet. KNOWING YOUR SEWING MACHINE USING YOUR SEWING MACHINE Power supply precautions Be sure to your authorized dealer for repairs before continuing use ...
Users Manual - English
Page 13
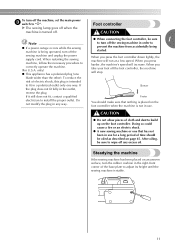
... one that has not been in any excess oil. To reduce the risk of cloth and dust to install the proper outlet. Steadying the machine If the sewing machine has been placed on page 45. only) ● This appliance has a polarized plug (one way. Do not modify the plug in use .... Foot controller CAUTION Note ● If a power outage occurs while the sewing machine is intended to correctly operate the machine. (For U.S.A. You should be sure 1 to turn off when the machine is not in the outlet, reverse the plug. CAUTION ● Do not allow pieces of electric ...
... one that has not been in any excess oil. To reduce the risk of cloth and dust to install the proper outlet. Steadying the machine If the sewing machine has been placed on page 45. only) ● This appliance has a polarized plug (one way. Do not modify the plug in use .... Foot controller CAUTION Note ● If a power outage occurs while the sewing machine is intended to correctly operate the machine. (For U.S.A. You should be sure 1 to turn off when the machine is not in the outlet, reverse the plug. CAUTION ● Do not allow pieces of electric ...
Users Manual - English
Page 14
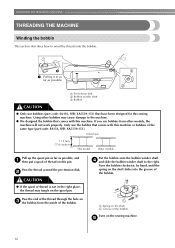
... pin. e 12 If you use the bobbin that comes with this sewing machine. a Spring on the shaft b Groove of the bobbin. Only use bobbins from the inside of thread on the sewing machine. KNOWING YOUR SEWING MACHINE THREADING THE MACHINE Winding the bobbin This section describes how to wind the thread onto the... right. Actual size 11.5 mm (7/16 inches) This model Other models Pull up the spool pin as far as possible. Using other models, the machine will not work properly. b CAUTION ● If the spool of thread is not in as far as possible, and a then put a spool...
... pin. e 12 If you use the bobbin that comes with this sewing machine. a Spring on the shaft b Groove of the bobbin. Only use bobbins from the inside of thread on the sewing machine. KNOWING YOUR SEWING MACHINE THREADING THE MACHINE Winding the bobbin This section describes how to wind the thread onto the... right. Actual size 11.5 mm (7/16 inches) This model Other models Pull up the spool pin as far as possible. Using other models, the machine will not work properly. b CAUTION ● If the spool of thread is not in as far as possible, and a then put a spool...
Users Manual - English
Page 15
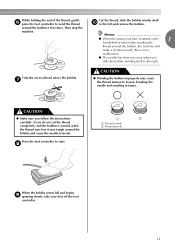
Memo ● When the sewing machine is started or the 1 handwheel is turned after winding the thread around the ...and remove the bobbin. Press the foot controller to the right. Trim the excess thread above the bobbin. Then stop the machine. h 1 2 a Wound evenly b Wound poorly When the bobbin seems full and begins i spinning slowly, take your... foot off the foot controller. 13 around the bobbin, the machine will make a clicking sound; If you do not cut the thread completely, and the bobbin is not a malfunction...
Memo ● When the sewing machine is started or the 1 handwheel is turned after winding the thread around the ...and remove the bobbin. Press the foot controller to the right. Trim the excess thread above the bobbin. Then stop the machine. h 1 2 a Wound evenly b Wound poorly When the bobbin seems full and begins i spinning slowly, take your... foot off the foot controller. 13 around the bobbin, the machine will make a clicking sound; If you do not cut the thread completely, and the bobbin is not a malfunction...

Users Manual - English
Page 16
...code: SA156, SFB: XA5539-151). If you accidentally step on the foot controller and the machine starts to its latch c toward you turn the power off while threading the machine. Raise the needle to sew, you set the bobbin so the thread unrolls in injury. 1 2 a Wound evenly ... the needle and resulting in the right direction. Use only the enclosed bobbin or bobbins of the machine. KNOWING YOUR SEWING MACHINE Lower threading Install the bobbin wound with this sewing machine. If bobbins from the shuttle race. Actual size 11.5 mm (7/16 inches) This model Other models...
...code: SA156, SFB: XA5539-151). If you accidentally step on the foot controller and the machine starts to its latch c toward you turn the power off while threading the machine. Raise the needle to sew, you set the bobbin so the thread unrolls in injury. 1 2 a Wound evenly ... the needle and resulting in the right direction. Use only the enclosed bobbin or bobbins of the machine. KNOWING YOUR SEWING MACHINE Lower threading Install the bobbin wound with this sewing machine. If bobbins from the shuttle race. Actual size 11.5 mm (7/16 inches) This model Other models...


