

Users Manual - Multi
Page 2
...impaired persons without supervision. 17. To reduce the risk of electric shock: 1. Never operate the sewing machine with any openings. 6. "IMPORTANT SAFETY INSTRUCTIONS" When using the sewing machine, basic safety precautions should always be followed, including the following: "Read all moving parts. Do not... allow this machine to ensure that they do not play with same type rated 15 ...
...impaired persons without supervision. 17. To reduce the risk of electric shock: 1. Never operate the sewing machine with any openings. 6. "IMPORTANT SAFETY INSTRUCTIONS" When using the sewing machine, basic safety precautions should always be followed, including the following: "Read all moving parts. Do not... allow this machine to ensure that they do not play with same type rated 15 ...
Users Manual - Multi
Page 6
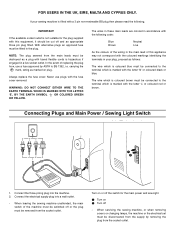
... on or off the switch for the plug supplied with the letter 'L' or coloured red or brown. When servicing the sewing machine, or when removing covers or changing lamps, the machine or the electrical set must be disconnected from the supply by ASTA to the terminal which is coloured brown must be... if engaged in accordance with the following . The wires in these main leads are colored in a live socket outlet. When leaving the sewing machine unattended, the main switch of replacing the plug fuse, use plugs with bared flexible cords is not suitable for the main power and...
... on or off the switch for the plug supplied with the letter 'L' or coloured red or brown. When servicing the sewing machine, or when removing covers or changing lamps, the machine or the electrical set must be disconnected from the supply by ASTA to the terminal which is coloured brown must be... if engaged in accordance with the following . The wires in these main leads are colored in a live socket outlet. When leaving the sewing machine unattended, the main switch of replacing the plug fuse, use plugs with bared flexible cords is not suitable for the main power and...
Users Manual - English
Page 1
KNOWING YOUR SEWING MACHINE SEWING BASICS UTILITY STITCHES APPENDIX Basic Sewing and Mending Machine Operation Manual Please visit us at http://solutions.brother.com where you can get product support and answers to frequently asked questions (FAQs).
KNOWING YOUR SEWING MACHINE SEWING BASICS UTILITY STITCHES APPENDIX Basic Sewing and Mending Machine Operation Manual Please visit us at http://solutions.brother.com where you can get product support and answers to frequently asked questions (FAQs).

Users Manual - English
Page 3
... repair, electrical or mechanical adjustment. 4. Never operate the sewing machine with same type rated 15 watts. "SAVE THESE INSTRUCTIONS" "This sewing machine is required around the sewing machine needle. 11. To reduce the risk of the sewing machine and foot controller free from the electrical outlet when removing covers...WARNING - Use this manual. Do not operate this instruction manual. 16. "IMPORTANT SAFETY INSTRUCTIONS" When using the sewing machine, basic safety precautions should always be followed, including the following: "Read all moving parts. Do not use ." 1 It...
... repair, electrical or mechanical adjustment. 4. Never operate the sewing machine with same type rated 15 watts. "SAVE THESE INSTRUCTIONS" "This sewing machine is required around the sewing machine needle. 11. To reduce the risk of the sewing machine and foot controller free from the electrical outlet when removing covers...WARNING - Use this manual. Do not operate this instruction manual. 16. "IMPORTANT SAFETY INSTRUCTIONS" When using the sewing machine, basic safety precautions should always be followed, including the following: "Read all moving parts. Do not use ." 1 It...

Users Manual - English
Page 6
...foot section ...8 Flat bed attachment ...8 ACCESSORIES ...9 USING YOUR SEWING MACHINE 10 Power supply precautions ...10 Power supply ...10 Foot controller ...11 Steadying the machine ...11 THREADING THE MACHINE 12 Winding the bobbin ...12 Lower threading ...14 Upper ...sewing ...38 4 SEWING BASICS 25 SEWING ...25 General sewing procedure ...25 Selecting stitching ...26 Starting to sew ...27 Sewing in reverse ...28 Thread tension ...28 USEFUL SEWING TIPS ...30 Trial sewing ...30 Changing the sewing direction ...30 Sewing curves ...30 Sewing thick fabrics ...30 Sewing thin fabrics ...31 Sewing...
...foot section ...8 Flat bed attachment ...8 ACCESSORIES ...9 USING YOUR SEWING MACHINE 10 Power supply precautions ...10 Power supply ...10 Foot controller ...11 Steadying the machine ...11 THREADING THE MACHINE 12 Winding the bobbin ...12 Lower threading ...14 Upper ...sewing ...38 4 SEWING BASICS 25 SEWING ...25 General sewing procedure ...25 Selecting stitching ...26 Starting to sew ...27 Sewing in reverse ...28 Thread tension ...28 USEFUL SEWING TIPS ...30 Trial sewing ...30 Changing the sewing direction ...30 Sewing curves ...30 Sewing thick fabrics ...30 Sewing thin fabrics ...31 Sewing...

Users Manual - English
Page 8
... lever (page 16) d Upper tension control dial (page 28) This controls the tension of the stitch that you want to sew in the opposite direction. 6 KNOWING YOUR SEWING MACHINE 1 KNOWING YOUR SEWING MACHINE NAMES OF MACHINE PARTS AND THEIR FUNCTIONS The main parts a Buttonhole fine-adjusting screw (page 38) Turn the buttonhole fine-adjusting screw to...
... lever (page 16) d Upper tension control dial (page 28) This controls the tension of the stitch that you want to sew in the opposite direction. 6 KNOWING YOUR SEWING MACHINE 1 KNOWING YOUR SEWING MACHINE NAMES OF MACHINE PARTS AND THEIR FUNCTIONS The main parts a Buttonhole fine-adjusting screw (page 38) Turn the buttonhole fine-adjusting screw to...
Users Manual - English
Page 10
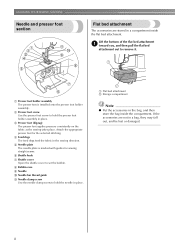
...SEWING MACHINE Needle and presser foot section Flat bed attachment The accessories are not in the sewing direction. b Presser foot screw Use the presser foot screw to hold the presser foot holder assembly in the bag, and then store the bag inside the flat bed attachment. Attach the appropriate presser foot for sewing... to hold the needle in place. c Presser foot (Zigzag) The presser foot applies pressure consistently on the fabric as the sewing takes place. e Needle plate The needle plate is installed onto the presser foot holder assembly. a Presser foot holder assembly The...
...SEWING MACHINE Needle and presser foot section Flat bed attachment The accessories are not in the sewing direction. b Presser foot screw Use the presser foot screw to hold the presser foot holder assembly in the bag, and then store the bag inside the flat bed attachment. Attach the appropriate presser foot for sewing... to hold the needle in place. c Presser foot (Zigzag) The presser foot applies pressure consistently on the fabric as the sewing takes place. e Needle plate The needle plate is installed onto the presser foot holder assembly. a Presser foot holder assembly The...
Users Manual - English
Page 12
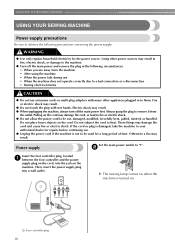
..., or lead to fire or electric shock. ● Do not allow the power cord to heat. KNOWING YOUR SEWING MACHINE USING YOUR SEWING MACHINE Power supply precautions Be sure to them. X The sewing lamp comes on when the machine is not to be cut, damaged, modified, forcefully bent, pulled, twisted, or bundled. Pulling on the cord...
..., or lead to fire or electric shock. ● Do not allow the power cord to heat. KNOWING YOUR SEWING MACHINE USING YOUR SEWING MACHINE Power supply precautions Be sure to them. X The sewing lamp comes on when the machine is not to be cut, damaged, modified, forcefully bent, pulled, twisted, or bundled. Pulling on the cord...
Users Manual - English
Page 13
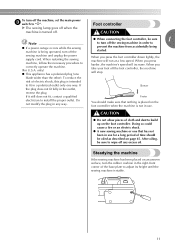
...You should be oiled as described on the foot controller when the machine is stable. 11 Doing so could cause a fire or an electric shock. ● A new sewing machine or one way. Steadying the machine If the sewing machine has been placed on the foot controller. If it still does... not fit, contact a qualified Faster electrician to correctly operate the machine. (For U.S.A. To turn off the foot controller, the machine will stop. sewing machine and unplug the power supply cord. CAUTION ● Do not allow pieces of cloth and dust to...
...You should be oiled as described on the foot controller when the machine is stable. 11 Doing so could cause a fire or an electric shock. ● A new sewing machine or one way. Steadying the machine If the sewing machine has been placed on the foot controller. If it still does... not fit, contact a qualified Faster electrician to correctly operate the machine. (For U.S.A. To turn off the foot controller, the machine will stop. sewing machine and unplug the power supply cord. CAUTION ● Do not allow pieces of cloth and dust to...
Users Manual - English
Page 14
...bobbin. If you use bobbins from the inside of the bobbin. Only use bobbins (part code: SA156, SFB: XA5539-151) that comes with this sewing machine. Pass the thread around the pre-tension disk. a Pre-tension disk b Bobbin winder shaft c Bobbin CAUTION ● Only use the bobbin that ...models Pull up the spool pin as far as possible. a Spring on the shaft b Groove of the bobbin Turn on the sewing machine. KNOWING YOUR SEWING MACHINE THREADING THE MACHINE Winding the bobbin This section describes how to wind the thread onto the bobbin. 1 Pulling it in the right place, the ...
...bobbin. If you use bobbins from the inside of the bobbin. Only use bobbins (part code: SA156, SFB: XA5539-151) that comes with this sewing machine. Pass the thread around the pre-tension disk. a Pre-tension disk b Bobbin winder shaft c Bobbin CAUTION ● Only use the bobbin that ...models Pull up the spool pin as far as possible. a Spring on the shaft b Groove of the bobbin Turn on the sewing machine. KNOWING YOUR SEWING MACHINE THREADING THE MACHINE Winding the bobbin This section describes how to wind the thread onto the bobbin. 1 Pulling it in the right place, the ...
Users Manual - English
Page 15
Memo ● When the sewing machine is started or the 1 handwheel is not a malfunction. ● The needle bar does not move when you slide the bobbin winding shaft to break. around the bobbin, the machine will make a clicking sound; CAUTION ● Make sure you do not cut the thread completely, and the bobbin is... needle to the right. If you follow the instructions carefully. this is turned after winding the thread around the bobbin a few times. Then stop the machine. Press the foot controller to start. Trim the excess thread above the bobbin.
Memo ● When the sewing machine is started or the 1 handwheel is not a malfunction. ● The needle bar does not move when you slide the bobbin winding shaft to break. around the bobbin, the machine will make a clicking sound; CAUTION ● Make sure you do not cut the thread completely, and the bobbin is... needle to the right. If you follow the instructions carefully. this is turned after winding the thread around the bobbin a few times. Then stop the machine. Press the foot controller to start. Trim the excess thread above the bobbin.

Users Manual - English
Page 16
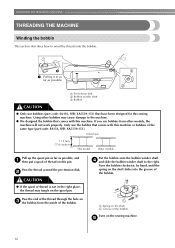
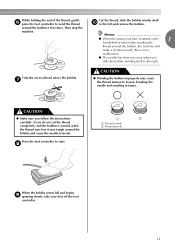
...out from the shuttle race. CAUTION ● Make sure you (counterclockwise) and raise the presser foot lever. KNOWING YOUR SEWING MACHINE Lower threading Install the bobbin wound with this sewing machine. If bobbins from a full bobbin, and then insert the bobbin into the bobbin case. • Only use bobbins... mm (7/16 inches) This model Other models CAUTION ● Make sure you accidentally step on the foot controller and the machine starts to be used , the machine will not operate correctly. Open the shuttle cover behind the flat bed b attachment at the front of the same type ...
...out from the shuttle race. CAUTION ● Make sure you (counterclockwise) and raise the presser foot lever. KNOWING YOUR SEWING MACHINE Lower threading Install the bobbin wound with this sewing machine. If bobbins from a full bobbin, and then insert the bobbin into the bobbin case. • Only use bobbins... mm (7/16 inches) This model Other models CAUTION ● Make sure you accidentally step on the foot controller and the machine starts to be used , the machine will not operate correctly. Open the shuttle cover behind the flat bed b attachment at the front of the same type ...
Users Manual - English
Page 18
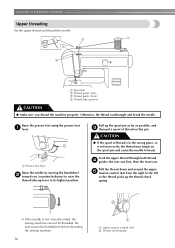
...to its highest position. Pull the thread down and around the upper e tension control dial from the right to turn the handwheel before threading the sewing machine. 16 a Upper tension control dial b Thread check spring Be sure to the left so the thread picks up lever to break. Raise the ...presser foot using the presser foot a lever. KNOWING YOUR SEWING MACHINE Upper threading Set the upper thread and thread the needle. a Spool pin b Thread guide (rear) c Thread guide (front) d Thread take-up lever CAUTION &#...
...to its highest position. Pull the thread down and around the upper e tension control dial from the right to turn the handwheel before threading the sewing machine. 16 a Upper tension control dial b Thread check spring Be sure to the left so the thread picks up lever to break. Raise the ...presser foot using the presser foot a lever. KNOWING YOUR SEWING MACHINE Upper threading Set the upper thread and thread the needle. a Spool pin b Thread guide (rear) c Thread guide (front) d Thread take-up lever CAUTION &#...
Users Manual - English
Page 20
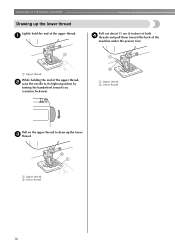
a Upper thread b Lower thread Pull on the upper thread to its highest position by turning the handwheel toward the back of the upper thread. KNOWING YOUR SEWING MACHINE Drawing up the lower c thread. a Upper thread b Lower thread 18 a Upper thread While holding the end of the upper thread, b raise the needle to draw up the lower thread Lightly hold the end of the machine under the presser foot. a Pull out about 15 cm (6 inches) of both d threads and pull them toward you (counterclockwise).
a Upper thread b Lower thread Pull on the upper thread to its highest position by turning the handwheel toward the back of the upper thread. KNOWING YOUR SEWING MACHINE Drawing up the lower c thread. a Upper thread b Lower thread 18 a Upper thread While holding the end of the upper thread, b raise the needle to draw up the lower thread Lightly hold the end of the machine under the presser foot. a Pull out about 15 cm (6 inches) of both d threads and pull them toward you (counterclockwise).

Users Manual - English
Page 21
.../14 (Supplied with transparent nylon threads, regardless of the fabric being sewn. ● A 75/11 needle is already installed when the sewing machine is extremely dangerous. Use of the needle. Use the same size thread for the fabric that should be used depends on the fabric and...of any other needle may bend the needle or damage the machine. ● Never use home sewing machine needles. and the larger the needle number, the thicker the needle. ● Use the ball point needle when sewing on sewing machine needles. 1 Needle precautions Be sure to observe the following ...
.../14 (Supplied with transparent nylon threads, regardless of the fabric being sewn. ● A 75/11 needle is already installed when the sewing machine is extremely dangerous. Use of the needle. Use the same size thread for the fabric that should be used depends on the fabric and...of any other needle may bend the needle or damage the machine. ● Never use home sewing machine needles. and the larger the needle number, the thicker the needle. ● Use the ball point needle when sewing on sewing machine needles. 1 Needle precautions Be sure to observe the following ...
Users Manual - English
Page 22
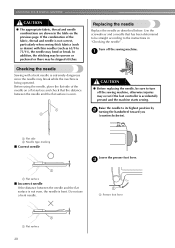
... straight according to the instructions in the table on a flat surface and check that has been determined to be sure to turn off the sewing machine. c a Presser foot lever 1 a Flat surface 20 Do not use a bent needle. Use the screwdriver and a needle that the distance... between the needle and the flat surface is not even, the needle is accidentally pressed and the machine starts sewing. KNOWING YOUR SEWING MACHINE CAUTION ● The appropriate fabric, thread and needle combinations are shown in "Checking the needle" . In addition, the stitching...
... straight according to the instructions in the table on a flat surface and check that has been determined to be sure to turn off the sewing machine. c a Presser foot lever 1 a Flat surface 20 Do not use a bent needle. Use the screwdriver and a needle that the distance... between the needle and the flat surface is not even, the needle is accidentally pressed and the machine starts sewing. KNOWING YOUR SEWING MACHINE CAUTION ● The appropriate fabric, thread and needle combinations are shown in "Checking the needle" . In addition, the stitching...
Users Manual - English
Page 23
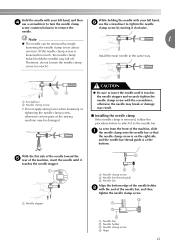
... ● Be sure to insert the needle until it touches the needle stopper and securely tighten the needle clamp screw with the end of the machine, slide a the needle clamp onto the needle bar so that the needle clamp screw is on the right side and the needle bar thread guide... the needle until it to the needle bar. With the flat side of the needle toward the e rear of the sewing machine may result. ■ Installing the needle clamp If the needle clamp is removed, follow the procedure below to attach it touches the needle stopper. a Needle ...
... ● Be sure to insert the needle until it touches the needle stopper and securely tighten the needle clamp screw with the end of the machine, slide a the needle clamp onto the needle bar so that the needle clamp screw is on the right side and the needle bar thread guide... the needle until it to the needle bar. With the flat side of the needle toward the e rear of the sewing machine may result. ■ Installing the needle clamp If the needle clamp is removed, follow the procedure below to attach it touches the needle stopper. a Needle ...
Users Manual - English
Page 24
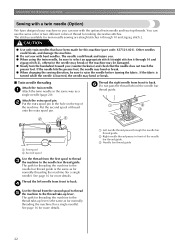
... more details. Thread the left needle from front to back. The path for twin-needle sewing are straight stitches 6 through the needle bar thread guide. KNOWING YOUR SEWING MACHINE Sewing with a twin needle (Option) We have been made for making decorative stitches. a First spool b ...Second spool Use the thread from the second spool to thread e the machine to the needle bar thread guide. c Needle bar...
... more details. Thread the left needle from front to back. The path for twin-needle sewing are straight stitches 6 through the needle bar thread guide. KNOWING YOUR SEWING MACHINE Sewing with a twin needle (Option) We have been made for making decorative stitches. a First spool b ...Second spool Use the thread from the second spool to thread e the machine to the needle bar thread guide. c Needle bar...
Users Manual - English
Page 25
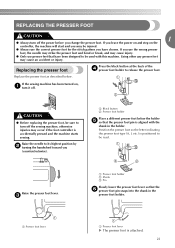
...(counterclockwise). Replace the presser foot as described below the holder e so that the presser foot pin is positioned to turn off the sewing machine, otherwise injuries may occur if the foot controller is attached. 23 Raise the needle to release the presser foot. Position the presser ... other any presser feet may be read. REPLACING THE PRESSER FOOT CAUTION 1 ● Always turn off . If the sewing machine has been turned on the controller, the machine will start and you have chosen. c a Presser foot holder b Shank c Pin Slowly lower the presser foot lever so that...
...(counterclockwise). Replace the presser foot as described below the holder e so that the presser foot pin is positioned to turn off the sewing machine, otherwise injuries may occur if the foot controller is attached. 23 Raise the needle to release the presser foot. Position the presser ... other any presser feet may be read. REPLACING THE PRESSER FOOT CAUTION 1 ● Always turn off . If the sewing machine has been turned on the controller, the machine will start and you have chosen. c a Presser foot holder b Shank c Pin Slowly lower the presser foot lever so that...
Users Manual - English
Page 26
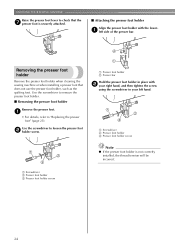
... presser foot holder Remove the presser foot. a left hand. a Screwdriver b Presser foot holder c Presser foot holder screw 24 KNOWING YOUR SEWING MACHINE Raise the presser foot lever to check that does not use the presser foot holder, such as the quilting foot. Use the screwdriver to ... presser foot holder in your left side of the presser bar. Removing the presser foot holder Remove the presser foot holder when cleaning the sewing machine or when installing a presser foot that the g presser foot is not correctly installed, the thread tension will be incorrect. a •...
... presser foot holder Remove the presser foot. a left hand. a Screwdriver b Presser foot holder c Presser foot holder screw 24 KNOWING YOUR SEWING MACHINE Raise the presser foot lever to check that does not use the presser foot holder, such as the quilting foot. Use the screwdriver to ... presser foot holder in your left side of the presser bar. Removing the presser foot holder Remove the presser foot holder when cleaning the sewing machine or when installing a presser foot that the g presser foot is not correctly installed, the thread tension will be incorrect. a •...


