

Users Manual - Multi
Page 2
... manufacturer as a toy. Always use a bent needle. 13. Switch the sewing machine to ensure that they do not play with this sewing machine from the accumulation of lint, dust and loose cloth. 5. Always unplug the sewing machine from outlet. 9. "IMPORTANT SAFETY INSTRUCTIONS" When using...sewing machine, basic safety precautions should always be followed, including the following: "Read all moving parts. Always unplug before changing the light bulb. Do not allow this machine to the symbol "O" position which represents off , symbol "O" position when making any adjustments in the needle...
... manufacturer as a toy. Always use a bent needle. 13. Switch the sewing machine to ensure that they do not play with this sewing machine from the accumulation of lint, dust and loose cloth. 5. Always unplug the sewing machine from outlet. 9. "IMPORTANT SAFETY INSTRUCTIONS" When using...sewing machine, basic safety precautions should always be followed, including the following: "Read all moving parts. Always unplug before changing the light bulb. Do not allow this machine to the symbol "O" position which represents off , symbol "O" position when making any adjustments in the needle...
Users Manual - Multi
Page 30
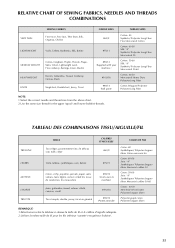
RELATIVE CHART OF SEWING FABRICS, NEEDLES AND THREADS COMBINATIONS VERY THIN SEWING FABRICS Fine tricot, Fine lace, Thin linen, Silk, Organza, Chiffon LIGHTWEIGHT Voile, Taffeta, Synthetics, Silk, Batiste MEDIUM WEIGHT Cotton, Gingham, Poplin, Percale, ...corduroy, Suitings, Linen, Muslin HEAVYWEIGHT Denim, Gabardine, Tweed, Corduroy, Canvas, Duck KNITS Single knit, Double knit, Jersey, Tricot NEEDLE SIZES THREAD SIZES #65/9 #75/11 #90/14 (Supplied with your machine.) #100/16 #90/14 (Ball point) Cotton: 80 Synthetic/ Polyester Long Fiber Fine Mercerized Cotton Cotton: 60-80 Silk:...
RELATIVE CHART OF SEWING FABRICS, NEEDLES AND THREADS COMBINATIONS VERY THIN SEWING FABRICS Fine tricot, Fine lace, Thin linen, Silk, Organza, Chiffon LIGHTWEIGHT Voile, Taffeta, Synthetics, Silk, Batiste MEDIUM WEIGHT Cotton, Gingham, Poplin, Percale, ...corduroy, Suitings, Linen, Muslin HEAVYWEIGHT Denim, Gabardine, Tweed, Corduroy, Canvas, Duck KNITS Single knit, Double knit, Jersey, Tricot NEEDLE SIZES THREAD SIZES #65/9 #75/11 #90/14 (Supplied with your machine.) #100/16 #90/14 (Ball point) Cotton: 80 Synthetic/ Polyester Long Fiber Fine Mercerized Cotton Cotton: 60-80 Silk:...
Users Manual - Multi
Page 39
...) Step d (Right side) d Pattern ac c a b ac c a d How to c (same as a). 2. Stop the machine when the needle is at the left side of the stitch and raise the needle. 1. Turn the pattern selection dial to Sew 1. Abaisser le pied-de-biche et coudre 5 ou 6 points. 3. Arrêter la... Set the pattern selection dial to b. 2. Lower the presser foot and sew 5 to 6 stitches. 3. Stop the machine when the needle is at the right side of the tailor's chalk line. 3. Sew the right side until the needle reaches the stitches formed in step a. MARCHE A SUIVRE POUR FAIRE UNE ...
...) Step d (Right side) d Pattern ac c a b ac c a d How to c (same as a). 2. Stop the machine when the needle is at the left side of the stitch and raise the needle. 1. Turn the pattern selection dial to Sew 1. Abaisser le pied-de-biche et coudre 5 ou 6 points. 3. Arrêter la... Set the pattern selection dial to b. 2. Lower the presser foot and sew 5 to 6 stitches. 3. Stop the machine when the needle is at the right side of the tailor's chalk line. 3. Sew the right side until the needle reaches the stitches formed in step a. MARCHE A SUIVRE POUR FAIRE UNE ...
Users Manual - Multi
Page 54
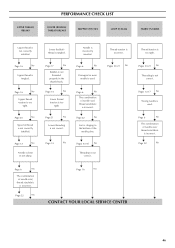
...thread tension is used . Thread tension is tangled. Page 22 No Page 6 No The combination of needle size/ thread size/fabric is not correctly installed. Page 20 No Spool of the needle plate. Lower (bobbin) thread is incorrect. Page 22 No Lint is clinging to the bottom of...or not sharp. Page 16 No Upper thread is not correct. Page 21 No Lower threading is tangled. Page 6 No The combination of needle size/ thread size/fabric is not correctly installed. UPPER THREAD BREAKS PERFORMANCE CHECK LIST LOWER (BOBBIN) THREAD BREAKS SKIPPED STITCHES LOOP IN SEAM ...
...thread tension is used . Thread tension is tangled. Page 22 No Page 6 No The combination of needle size/ thread size/fabric is not correctly installed. Page 20 No Spool of the needle plate. Lower (bobbin) thread is incorrect. Page 22 No Lint is clinging to the bottom of...or not sharp. Page 16 No Upper thread is not correct. Page 21 No Lower threading is tangled. Page 6 No The combination of needle size/ thread size/fabric is not correctly installed. UPPER THREAD BREAKS PERFORMANCE CHECK LIST LOWER (BOBBIN) THREAD BREAKS SKIPPED STITCHES LOOP IN SEAM ...
Users Manual - Multi
Page 55
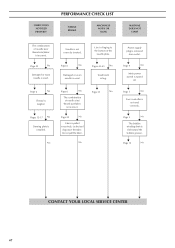
... thread size/fabric is used correctly. Page 4 No Main power switch is installed. Page 6 No Damaged or worn needle is incorrect. Page 6 No The combination of the needle plate. Let the feed dogs move the fabric. Pages 12-17 No Darning plate is turned off. Page 5 No... Foot controller is used. FABRIC DOES NOT FEED PROPERLY PERFORMANCE CHECK LIST NEEDLE BREAKS MACHINE IS NOISY OR SLOW MACHINE DOES NOT START The combination of needle size/ thread size/fabric is slid toward the bobbin presser. Pages 43-45 No Insufficient oiling. Page 5...
... thread size/fabric is used correctly. Page 4 No Main power switch is installed. Page 6 No Damaged or worn needle is incorrect. Page 6 No The combination of the needle plate. Let the feed dogs move the fabric. Pages 12-17 No Darning plate is turned off. Page 5 No... Foot controller is used. FABRIC DOES NOT FEED PROPERLY PERFORMANCE CHECK LIST NEEDLE BREAKS MACHINE IS NOISY OR SLOW MACHINE DOES NOT START The combination of needle size/ thread size/fabric is slid toward the bobbin presser. Pages 43-45 No Insufficient oiling. Page 5...
Users Manual - Multi
Page 63
... 3 Applique 9 B Blind Hem Stitching 27 Bobbin winding 12 Buttonhole 30-31, 33 Buttonhole Fine Adjustment 34 Button Sewing 35 Page S Satin Stitching 26 Sewing Light Light Bulb Replacement 42 Switch 5 Shell Tuck Stitching 29 Shuttle Hook Removal 43-44 Shuttle Race Cleaning 44 Straight...Plugs 4 D Darning 38 Drawing Up Lower Thread 17 E Elastic Stitching 27 Embroidering 40-41 T Thread Tension 20-21 Troubleshooting 46, 47 Twin-Needle Sewing 18 U Upper Tension Control Dial 20 Upper Threading 15-16 W Winding the Bobbin 12 F Feed Dog Cleaning 45 Foot Controller 5 Free-Arm...
... 3 Applique 9 B Blind Hem Stitching 27 Bobbin winding 12 Buttonhole 30-31, 33 Buttonhole Fine Adjustment 34 Button Sewing 35 Page S Satin Stitching 26 Sewing Light Light Bulb Replacement 42 Switch 5 Shell Tuck Stitching 29 Shuttle Hook Removal 43-44 Shuttle Race Cleaning 44 Straight...Plugs 4 D Darning 38 Drawing Up Lower Thread 17 E Elastic Stitching 27 Embroidering 40-41 T Thread Tension 20-21 Troubleshooting 46, 47 Twin-Needle Sewing 18 U Upper Tension Control Dial 20 Upper Threading 15-16 W Winding the Bobbin 12 F Feed Dog Cleaning 45 Foot Controller 5 Free-Arm...

Users Manual - English
Page 3
...light bulb. Do not allow this sewing machine. Do not unplug by the manufacturer as contained in the needle area, such as threading the needle, changing the needle, threading the bobbin, or changing the presser foot. 15. Always unplug the sewing machine from the electrical outlet when removing ...the accumulation of lint, dust and loose cloth. 5. "IMPORTANT SAFETY INSTRUCTIONS" When using the sewing machine, basic safety precautions should be supervised to ensure that they do not play with this machine to be used as a toy. Special care is intended for use ." 1 Use only ...
...light bulb. Do not allow this sewing machine. Do not unplug by the manufacturer as contained in the needle area, such as threading the needle, changing the needle, threading the bobbin, or changing the presser foot. 15. Always unplug the sewing machine from the electrical outlet when removing ...the accumulation of lint, dust and loose cloth. 5. "IMPORTANT SAFETY INSTRUCTIONS" When using the sewing machine, basic safety precautions should be supervised to ensure that they do not play with this machine to be used as a toy. Special care is intended for use ." 1 Use only ...
Users Manual - English
Page 5
... use • Maintaining the machine • Leaving the machine unattended 3. Do not store anything on the needle while sewing. CONGRATULATIONS ON CHOOSING OUR MACHINE To fully enjoy all the features, we suggest that you study the manual before using the machine. When storing this product are subject to keep your local authorized Brother dealer. For additional product...
... use • Maintaining the machine • Leaving the machine unattended 3. Do not store anything on the needle while sewing. CONGRATULATIONS ON CHOOSING OUR MACHINE To fully enjoy all the features, we suggest that you study the manual before using the machine. When storing this product are subject to keep your local authorized Brother dealer. For additional product...

Users Manual - English
Page 6
... 3. CONTENTS 1. UTILITY STITCHES 32 USEFUL STITCHES ...32 Zigzag stitches ...32 Basic stitching ...33 Blind hem stitching ...33 Darning ...35 BUTTONHOLE SEWING 36 Making the buttonhole ...36 Adjusting buitching stitching ...38 Button sewing ...38 4 KNOWING YOUR SEWING MACHINE 6 NAMES OF MACHINE PARTS AND THEIR FUNCTIONS 6 The main parts ...6 Needle and presser foot section ...8 Flat bed attachment ...8 ACCESSORIES ...9 USING...
... 3. CONTENTS 1. UTILITY STITCHES 32 USEFUL STITCHES ...32 Zigzag stitches ...32 Basic stitching ...33 Blind hem stitching ...33 Darning ...35 BUTTONHOLE SEWING 36 Making the buttonhole ...36 Adjusting buitching stitching ...38 Button sewing ...38 4 KNOWING YOUR SEWING MACHINE 6 NAMES OF MACHINE PARTS AND THEIR FUNCTIONS 6 The main parts ...6 Needle and presser foot section ...8 Flat bed attachment ...8 ACCESSORIES ...9 USING...
Users Manual - English
Page 9
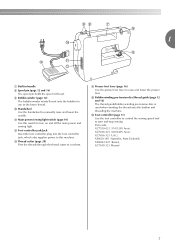
... 16) The thread guide/bobbin winding pre-tension disc is used when winding the thread onto the bobbin and threading the machine. j Handwheel Use the handwheel to start and stop sewing. Part code; 1 g Built-in handle h Spool pin (page 12 and 16) The spool pin holds the spool of thread. k ...onto the bobbin for use as the lower thread. p Foot controller (page 11) Use the foot controller to control the sewing speed and to manually raise and lower the needle. l Foot controller jack/jack Insert the foot controller plug into the foot controller jack, which also supplies power to this ...
... 16) The thread guide/bobbin winding pre-tension disc is used when winding the thread onto the bobbin and threading the machine. j Handwheel Use the handwheel to start and stop sewing. Part code; 1 g Built-in handle h Spool pin (page 12 and 16) The spool pin holds the spool of thread. k ...onto the bobbin for use as the lower thread. p Foot controller (page 11) Use the foot controller to control the sewing speed and to manually raise and lower the needle. l Foot controller jack/jack Insert the foot controller plug into the foot controller jack, which also supplies power to this ...
Users Manual - English
Page 10
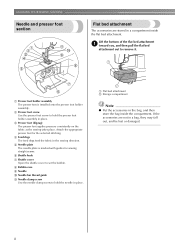
... pressure consistently on the fabric as the sewing takes place. h Bobbin case i Needle j Needle bar thread guide k Needle clamp screw Use the needle clamp screw to hold the needle in the bag, and then store the bag inside the flat bed attachment. e Needle plate The needle plate is installed onto the presser foot ... a compartment inside the compartment. a Presser foot holder assembly The presser foot is marked with guides for the selected stitching. KNOWING YOUR SEWING MACHINE Needle and presser foot section Flat bed attachment The accessories are not in place.
... pressure consistently on the fabric as the sewing takes place. h Bobbin case i Needle j Needle bar thread guide k Needle clamp screw Use the needle clamp screw to hold the needle in the bag, and then store the bag inside the flat bed attachment. e Needle plate The needle plate is installed onto the presser foot ... a compartment inside the compartment. a Presser foot holder assembly The presser foot is marked with guides for the selected stitching. KNOWING YOUR SEWING MACHINE Needle and presser foot section Flat bed attachment The accessories are not in place.
Users Manual - English
Page 11
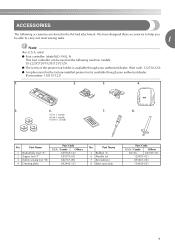
... Model KD-1902, N This foot controller can be able to carry out most sewing tasks. 1 Note (For U.S.A. ACCESSORIES The following machine models: LS-2220/2720/1520/2125/2125i. ● The screw of the presser foot holder is available through your authorized ... 4. 5. 6. 75/11 1 needle 90/14 1 needle 100/16 1 needle 7. 8. Part Name 5 Bobbin (3) 6 Needle set 7 Screwdriver 8 Extra spool pin Part Code U.S.A. / Canada Others SA156 XA5539-151 129583-021 X55467-021 130920-021 9 Part Name 1 Buttonhole foot "A" 2 Zipper foot "I" 3 Button sewing foot "M" 4 Darning plate Part...
... Model KD-1902, N This foot controller can be able to carry out most sewing tasks. 1 Note (For U.S.A. ACCESSORIES The following machine models: LS-2220/2720/1520/2125/2125i. ● The screw of the presser foot holder is available through your authorized ... 4. 5. 6. 75/11 1 needle 90/14 1 needle 100/16 1 needle 7. 8. Part Name 5 Bobbin (3) 6 Needle set 7 Screwdriver 8 Extra spool pin Part Code U.S.A. / Canada Others SA156 XA5539-151 129583-021 X55467-021 130920-021 9 Part Name 1 Buttonhole foot "A" 2 Zipper foot "I" 3 Button sewing foot "M" 4 Darning plate Part...
Users Manual - English
Page 15
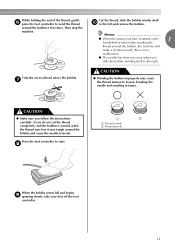
...when the thread runs low it may cause the thread tension to loosen, breaking the needle and resulting in injury. this is turned after winding the thread around the bobbin, the machine will make a clicking sound; Press the foot controller to the right. While holding...break. CAUTION ● Make sure you slide the bobbin winding shaft to start. Memo ● When the sewing machine is started or the 1 handwheel is not a malfunction. ● The needle bar does not move when you follow the instructions carefully. g CAUTION ● Winding the bobbin improperly may...
...when the thread runs low it may cause the thread tension to loosen, breaking the needle and resulting in injury. this is turned after winding the thread around the bobbin, the machine will make a clicking sound; Press the foot controller to the right. While holding...break. CAUTION ● Make sure you slide the bobbin winding shaft to start. Memo ● When the sewing machine is started or the 1 handwheel is not a malfunction. ● The needle bar does not move when you follow the instructions carefully. g CAUTION ● Winding the bobbin improperly may...

Users Manual - English
Page 16
... that were designed to its latch c toward you could be injured. KNOWING YOUR SEWING MACHINE Lower threading Install the bobbin wound with this sewing machine. a Flat bed attachment b Shuttle cover Remove the bobbin case by pulling its highest...needle. 14 Actual size 11.5 mm (7/16 inches) This model Other models CAUTION ● Make sure you set the bobbin so the thread unrolls in injury. 1 2 a Wound evenly b Wound poorly ● The bobbin was designed specifically for this machine. CAUTION ● Winding the bobbin improperly may cause the thread tension to sew...
... that were designed to its latch c toward you could be injured. KNOWING YOUR SEWING MACHINE Lower threading Install the bobbin wound with this sewing machine. a Flat bed attachment b Shuttle cover Remove the bobbin case by pulling its highest...needle. 14 Actual size 11.5 mm (7/16 inches) This model Other models CAUTION ● Make sure you set the bobbin so the thread unrolls in injury. 1 2 a Wound evenly b Wound poorly ● The bobbin was designed specifically for this machine. CAUTION ● Winding the bobbin improperly may cause the thread tension to sew...
Users Manual - English
Page 18
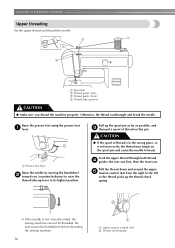
...spool of thread is in the wrong place, or is not correctly raised, the sewing machine can not be threaded. Be sure to its highest position. Pull up the thread check spring. • If the needle is set incorrectly, the thread may tangle on this pin. a Spool pin ...front one. Otherwise, the thread could tangle and break the needle. KNOWING YOUR SEWING MACHINE Upper threading Set the upper thread and thread the needle. a Presser foot lever Raise the needle by turning the handwheel b toward you thread the machine properly. Raise the presser foot using the presser foot a lever...
...spool of thread is in the wrong place, or is not correctly raised, the sewing machine can not be threaded. Be sure to its highest position. Pull up the thread check spring. • If the needle is set incorrectly, the thread may tangle on this pin. a Spool pin ...front one. Otherwise, the thread could tangle and break the needle. KNOWING YOUR SEWING MACHINE Upper threading Set the upper thread and thread the needle. a Presser foot lever Raise the needle by turning the handwheel b toward you thread the machine properly. Raise the presser foot using the presser foot a lever...
Users Manual - English
Page 19
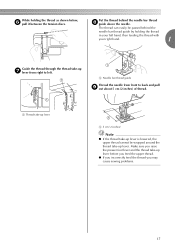
... (2 inches) Note ● If the thread take-up lever is lowered, the upper thread cannot be passed behind the needle bar thread h guide above the needle. a Needle bar thread guide Thread the needle from right to back and pull i out about 5 cm (2 inches) of thread. Make sure you raise the presser ...foot lever and the thread take -up lever before you feed the upper thread. ● If you incorrectly feed the thread you may cause sewing...
... (2 inches) Note ● If the thread take-up lever is lowered, the upper thread cannot be passed behind the needle bar thread h guide above the needle. a Needle bar thread guide Thread the needle from right to back and pull i out about 5 cm (2 inches) of thread. Make sure you raise the presser ...foot lever and the thread take -up lever before you feed the upper thread. ● If you incorrectly feed the thread you may cause sewing...
Users Manual - English
Page 20
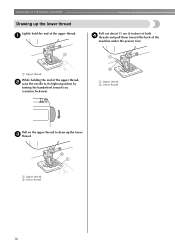
a Pull out about 15 cm (6 inches) of the upper thread, b raise the needle to draw up the lower thread Lightly hold the end of the machine under the presser foot. a Upper thread While holding the end of both d threads and pull them toward you (counterclockwise). a Upper thread b Lower thread Pull on the upper thread to its highest position by turning the handwheel toward the back of the upper thread. a Upper thread b Lower thread 18 KNOWING YOUR SEWING MACHINE Drawing up the lower c thread.
a Pull out about 15 cm (6 inches) of the upper thread, b raise the needle to draw up the lower thread Lightly hold the end of the machine under the presser foot. a Upper thread While holding the end of both d threads and pull them toward you (counterclockwise). a Upper thread b Lower thread Pull on the upper thread to its highest position by turning the handwheel toward the back of the upper thread. a Upper thread b Lower thread 18 KNOWING YOUR SEWING MACHINE Drawing up the lower c thread.

Users Manual - English
Page 21
... use bent needles. Use of the needle. Selecting the needle depending on the thread and fabric types The sewing machine needle that you wish to sew. Refer to the following precautions concerning the handling of any other needle may bend the needle or damage the machine. ● Never use home sewing machine needles. REPLACING THE NEEDLE This section provides information on sewing machine needles. 1 Needle precautions Be sure...
... use bent needles. Use of the needle. Selecting the needle depending on the thread and fabric types The sewing machine needle that you wish to sew. Refer to the following precautions concerning the handling of any other needle may bend the needle or damage the machine. ● Never use home sewing machine needles. REPLACING THE NEEDLE This section provides information on sewing machine needles. 1 Needle precautions Be sure...
Users Manual - English
Page 22
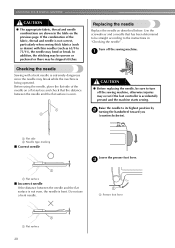
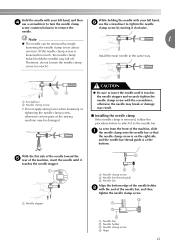
... operated. In addition, the stitching may be skipped stitches. KNOWING YOUR SEWING MACHINE CAUTION ● The appropriate fabric, thread and needle combinations are shown in "Checking the needle" . Checking the needle Sewing with thin needles (such as 65/9 to turn off the sewing machine. a CAUTION ● Before replacing the needle, be straight according to its highest position by b turning the...
... operated. In addition, the stitching may be skipped stitches. KNOWING YOUR SEWING MACHINE CAUTION ● The appropriate fabric, thread and needle combinations are shown in "Checking the needle" . Checking the needle Sewing with thin needles (such as 65/9 to turn off the sewing machine. a CAUTION ● Before replacing the needle, be straight according to its highest position by b turning the...
Users Manual - English
Page 23
... seen from the front of the sewing machine may be removed by simply loosening the needle clamp screw about one turn the needle clamp screw counterclockwise to remove the needle. While holding the needle with the screwdriver, otherwise the needle may break or damage may fall off. Therefore, do not loosen the needle clamp screw too much , the...
... seen from the front of the sewing machine may be removed by simply loosening the needle clamp screw about one turn the needle clamp screw counterclockwise to remove the needle. While holding the needle with the screwdriver, otherwise the needle may break or damage may fall off. Therefore, do not loosen the needle clamp screw too much , the...


