

Users Manual - Multi
Page 2
... dropped into any of lint, dust and loose cloth. 5. The sewing machine should be left unattended when plugged in this sewing machine from all instructions before cleaning. 2. Never operate this instruction manual. 16. Never operate the sewing machine with same type rated 15 watts. Use this sewing machine only for household use as threading the needle, changing the needle, threading the bobbin, or changing the presser foot. 15. Use only accessories recommended by pulling on the cord. This sewing machine is not working properly...
... dropped into any of lint, dust and loose cloth. 5. The sewing machine should be left unattended when plugged in this sewing machine from all instructions before cleaning. 2. Never operate this instruction manual. 16. Never operate the sewing machine with same type rated 15 watts. Use this sewing machine only for household use as threading the needle, changing the needle, threading the bobbin, or changing the presser foot. 15. Use only accessories recommended by pulling on the cord. This sewing machine is not working properly...
Users Manual - Multi
Page 63
... 5 Shell Tuck Stitching 29 Shuttle Hook Removal 43-44 Shuttle Race Cleaning 44 Straight Stitching 24 Stretch Blind Stitch 27 C Cleaning 43-45 Connecting Plugs 4 D Darning 38 Drawing Up Lower Thread 17 E Elastic Stitching 27 Embroidering 40-41 T Thread Tension 20-21 Troubleshooting 46, 47 Twin-Needle Sewing 18 U Upper Tension Control Dial 20 Upper Threading 15-16 W Winding the Bobbin 12 F Feed Dog Cleaning 45 Foot Controller 5 Free-Arm Style 8 Z Zigzag Stitching 26 Zipper Insertion 36 G Gathering 37 L Lower Threading 14 M Main Power Switch 5 Monogramming 40-41...
... 5 Shell Tuck Stitching 29 Shuttle Hook Removal 43-44 Shuttle Race Cleaning 44 Straight Stitching 24 Stretch Blind Stitch 27 C Cleaning 43-45 Connecting Plugs 4 D Darning 38 Drawing Up Lower Thread 17 E Elastic Stitching 27 Embroidering 40-41 T Thread Tension 20-21 Troubleshooting 46, 47 Twin-Needle Sewing 18 U Upper Tension Control Dial 20 Upper Threading 15-16 W Winding the Bobbin 12 F Feed Dog Cleaning 45 Foot Controller 5 Free-Arm Style 8 Z Zigzag Stitching 26 Zipper Insertion 36 G Gathering 37 L Lower Threading 14 M Main Power Switch 5 Monogramming 40-41...
Users Manual - English
Page 1
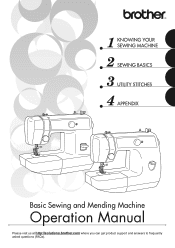
KNOWING YOUR SEWING MACHINE SEWING BASICS UTILITY STITCHES APPENDIX Basic Sewing and Mending Machine Operation Manual Please visit us at http://solutions.brother.com where you can get product support and answers to frequently asked questions (FAQs).
KNOWING YOUR SEWING MACHINE SEWING BASICS UTILITY STITCHES APPENDIX Basic Sewing and Mending Machine Operation Manual Please visit us at http://solutions.brother.com where you can get product support and answers to frequently asked questions (FAQs).

Users Manual - English
Page 3
.... Always use a bent needle. 13. Do not pull or push the fabric while stitching. Do not use ." 1 This sewing machine is intended for examination, repair, electrical or mechanical adjustment. 4. Do not allow this machine to break. 14. "IMPORTANT SAFETY INSTRUCTIONS" When using the sewing machine, basic safety precautions should always be used as contained in this manual. 3. Replace bulb with this sewing machine. Keep the ventilation openings of the sewing machine and foot controller free from all instructions before using...
.... Always use a bent needle. 13. Do not pull or push the fabric while stitching. Do not use ." 1 This sewing machine is intended for examination, repair, electrical or mechanical adjustment. 4. Do not allow this machine to break. 14. "IMPORTANT SAFETY INSTRUCTIONS" When using the sewing machine, basic safety precautions should always be used as contained in this manual. 3. Replace bulb with this sewing machine. Keep the ventilation openings of the sewing machine and foot controller free from all instructions before using...
Users Manual - English
Page 5
... troubleshooting table in the back of this machine, avoid direct sunlight and high humidity locations. For repair or adjustment In the event a malfunction occurs or adjustment is completed • Replacing or removing the needle or any assemblies, the presser feet, needle, or other hot objects. 2. Do not use or store the machine near a space heater, iron, halogen lamp, or other parts to clean the case. Always consult the operation manual when replacing...
... troubleshooting table in the back of this machine, avoid direct sunlight and high humidity locations. For repair or adjustment In the event a malfunction occurs or adjustment is completed • Replacing or removing the needle or any assemblies, the presser feet, needle, or other hot objects. 2. Do not use or store the machine near a space heater, iron, halogen lamp, or other parts to clean the case. Always consult the operation manual when replacing...

Users Manual - English
Page 6
... Zigzag stitches ...32 Basic stitching ...33 Blind hem stitching ...33 Darning ...35 BUTTONHOLE SEWING 36 Making the buttonhole ...36 Adjusting buitching stitching ...38 Button sewing ...38 4 CONTENTS 1. KNOWING YOUR SEWING MACHINE 6 NAMES OF MACHINE PARTS AND THEIR FUNCTIONS 6 The main parts ...6 Needle and presser foot section ...8 Flat bed attachment ...8 ACCESSORIES ...9 USING YOUR SEWING MACHINE 10 Power supply precautions ...10 Power supply ...10 Foot controller ...11 Steadying the machine ...11 THREADING THE MACHINE 12 Winding the bobbin ...12 Lower threading ...14 Upper threading...
... Zigzag stitches ...32 Basic stitching ...33 Blind hem stitching ...33 Darning ...35 BUTTONHOLE SEWING 36 Making the buttonhole ...36 Adjusting buitching stitching ...38 Button sewing ...38 4 CONTENTS 1. KNOWING YOUR SEWING MACHINE 6 NAMES OF MACHINE PARTS AND THEIR FUNCTIONS 6 The main parts ...6 Needle and presser foot section ...8 Flat bed attachment ...8 ACCESSORIES ...9 USING YOUR SEWING MACHINE 10 Power supply precautions ...10 Power supply ...10 Foot controller ...11 Steadying the machine ...11 THREADING THE MACHINE 12 Winding the bobbin ...12 Lower threading ...14 Upper threading...
Users Manual - English
Page 9
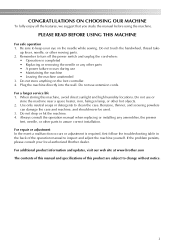
... power to raise and lower the presser foot. n Presser foot lever (page 16) Use the presser foot lever to this switch to manually raise and lower the needle. o Bobbin winding pre-tension disc/thread guide (page 12 and 16) The thread guide/bobbin winding pre-tension disc is used when winding the thread onto the bobbin and threading the machine. m Thread cutter (page 28) Pass the threads through the thread cutter to start and stop sewing. Part code; i Bobbin winder (page 12) The bobbin winder winds thread onto the bobbin for use as the lower thread. p Foot controller (page 11) Use...
... power to raise and lower the presser foot. n Presser foot lever (page 16) Use the presser foot lever to this switch to manually raise and lower the needle. o Bobbin winding pre-tension disc/thread guide (page 12 and 16) The thread guide/bobbin winding pre-tension disc is used when winding the thread onto the bobbin and threading the machine. m Thread cutter (page 28) Pass the threads through the thread cutter to start and stop sewing. Part code; i Bobbin winder (page 12) The bobbin winder winds thread onto the bobbin for use as the lower thread. p Foot controller (page 11) Use...
Users Manual - English
Page 10
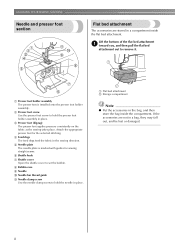
... the bag inside the flat bed attachment. a Flat bed attachment b Storage compartment Note ● Put the accessories in place. c Presser foot (Zigzag) The presser foot applies pressure consistently on the fabric as the sewing takes place. h Bobbin case i Needle j Needle bar thread guide k Needle clamp screw Use the needle clamp screw to set the bobbin. Attach the appropriate presser foot for sewing straight seams. f Shuttle hook g Shuttle cover Open the shuttle cover to hold the presser foot holder assembly in place. If the accessories are stored in the sewing direction.
... the bag inside the flat bed attachment. a Flat bed attachment b Storage compartment Note ● Put the accessories in place. c Presser foot (Zigzag) The presser foot applies pressure consistently on the fabric as the sewing takes place. h Bobbin case i Needle j Needle bar thread guide k Needle clamp screw Use the needle clamp screw to set the bobbin. Attach the appropriate presser foot for sewing straight seams. f Shuttle hook g Shuttle cover Open the shuttle cover to hold the presser foot holder assembly in place. If the accessories are stored in the sewing direction.
Users Manual - English
Page 11
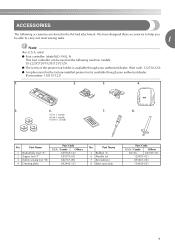
..., N This foot controller can be able to help you be used on the following accessories are stored in the flat bed attachment. We have designed these accessories to carry out most sewing tasks. 1 Note (For U.S.A. No. Part Name 1 Buttonhole foot "A" 2 Zipper foot "I" 3 Button sewing foot "M" 4 Darning plate Part Code U.S.A. / Canada Others X59369-321 X59370-021 XE2137-001 XA3442-121 No. ACCESSORIES The following machine models: LS-2220/2720/1520/2125/2125i. ● The screw of the presser foot holder is...
..., N This foot controller can be able to help you be used on the following accessories are stored in the flat bed attachment. We have designed these accessories to carry out most sewing tasks. 1 Note (For U.S.A. No. Part Name 1 Buttonhole foot "A" 2 Zipper foot "I" 3 Button sewing foot "M" 4 Darning plate Part Code U.S.A. / Canada Others X59369-321 X59370-021 XE2137-001 XA3442-121 No. ACCESSORIES The following machine models: LS-2220/2720/1520/2125/2125i. ● The screw of the presser foot holder is...
Users Manual - English
Page 15
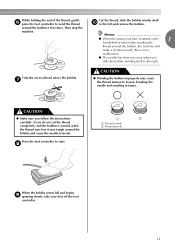
..., breaking the needle and resulting in injury. around the bobbin a few times. Trim the excess thread above the bobbin. Then stop the machine. this is wound, when the thread runs low it may cause the thread tension to start. While holding the end of the thread, gently f press the foot controller to wind the thread Cut the thread, slide the bobbin winder shaft j to the right. CAUTION ● Make sure...
..., breaking the needle and resulting in injury. around the bobbin a few times. Trim the excess thread above the bobbin. Then stop the machine. this is wound, when the thread runs low it may cause the thread tension to start. While holding the end of the thread, gently f press the foot controller to wind the thread Cut the thread, slide the bobbin winder shaft j to the right. CAUTION ● Make sure...

Users Manual - English
Page 16
... bobbin or bobbins of the machine. KNOWING YOUR SEWING MACHINE Lower threading Install the bobbin wound with this sewing machine. If you accidentally step on the foot controller and the machine starts to be used , the machine will not operate correctly. a Flat bed attachment b Shuttle cover Remove the bobbin case by turning a the handwheel toward you (counterclockwise) and raise the presser foot lever. If bobbins from other models are used with thread. Actual size 11.5 mm (7/16 inches) This model Other models CAUTION ● Make...
... bobbin or bobbins of the machine. KNOWING YOUR SEWING MACHINE Lower threading Install the bobbin wound with this sewing machine. If you accidentally step on the foot controller and the machine starts to be used , the machine will not operate correctly. a Flat bed attachment b Shuttle cover Remove the bobbin case by turning a the handwheel toward you (counterclockwise) and raise the presser foot lever. If bobbins from other models are used with thread. Actual size 11.5 mm (7/16 inches) This model Other models CAUTION ● Make...
Users Manual - English
Page 22
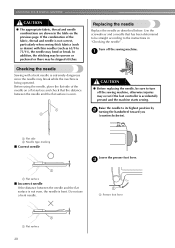
... be straight according to the instructions in "Checking the needle" . Turn off the sewing machine, otherwise injuries may bend or break. a CAUTION ● Before replacing the needle, be sure to turn off the sewing machine. Do not use a bent needle. Raise the needle to 75/11), the needle may occur if the foot controller is not correct, particularly when sewing thick fabrics (such as described below. a Flat side b Needle type...
... be straight according to the instructions in "Checking the needle" . Turn off the sewing machine, otherwise injuries may bend or break. a CAUTION ● Before replacing the needle, be sure to turn off the sewing machine. Do not use a bent needle. Raise the needle to 75/11), the needle may occur if the foot controller is not correct, particularly when sewing thick fabrics (such as described below. a Flat side b Needle type...
Users Manual - English
Page 24
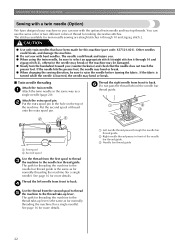
... lowered, the needle may bend or break. ■ Twin needle threading Attach the twin needle. If the fabric is turned while the needle is the same as for normally threading the machine (for a single needle). Thread the right needle from the second spool to thread e the machine to the needle bar thread guide is the same as a single needle (page 20). CAUTION ● Use only twin needles that the needle does not touch the presser foot. The stitches available for twin-needle sewing are straight stitches...
... lowered, the needle may bend or break. ■ Twin needle threading Attach the twin needle. If the fabric is turned while the needle is the same as for normally threading the machine (for a single needle). Thread the right needle from the second spool to thread e the machine to the needle bar thread guide is the same as a single needle (page 20). CAUTION ● Use only twin needles that the needle does not touch the presser foot. The stitches available for twin-needle sewing are straight stitches...
Users Manual - English
Page 25
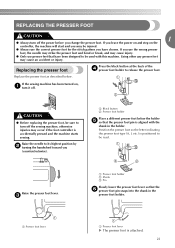
... power before you (counterclockwise). c a Presser foot holder b Shank c Pin Slowly lower the presser foot lever so that the f presser foot pin snaps into the shank in the holder. REPLACING THE PRESSER FOOT CAUTION 1 ● Always turn it off. CAUTION ● Before replacing the presser foot, be sure to its highest position by b turning the handwheel toward you change the presser foot. Position the presser foot so the letter indicating the presser foot type (A, I, etc.) is accidentally pressed and the machine starts sewing. Using other any presser feet...
... power before you (counterclockwise). c a Presser foot holder b Shank c Pin Slowly lower the presser foot lever so that the f presser foot pin snaps into the shank in the holder. REPLACING THE PRESSER FOOT CAUTION 1 ● Always turn it off. CAUTION ● Before replacing the presser foot, be sure to its highest position by b turning the handwheel toward you change the presser foot. Position the presser foot so the letter indicating the presser foot type (A, I, etc.) is accidentally pressed and the machine starts sewing. Using other any presser feet...
Users Manual - English
Page 27
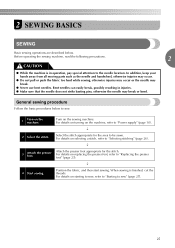
... use bent needles. p 3 Attach the presser foot. Bent needles can easily break, possibly resulting in operation, pay special attention to the needle location. For details on the machine. For details on turning on the sewing machine. Position the fabric, and then start sewing. Turn on the machine, refer to "Selecting stitching" (page 26). Before operating the sewing machine, read the following precautions. 2 CAUTION ● While the machine is finished, cut the threads. 2 SEWING BASICS SEWING Basic sewing operations are...
... use bent needles. p 3 Attach the presser foot. Bent needles can easily break, possibly resulting in operation, pay special attention to the needle location. For details on the machine. For details on turning on the sewing machine. Position the fabric, and then start sewing. Turn on the machine, refer to "Selecting stitching" (page 26). Before operating the sewing machine, read the following precautions. 2 CAUTION ● While the machine is finished, cut the threads. 2 SEWING BASICS SEWING Basic sewing operations are...
Users Manual - English
Page 37
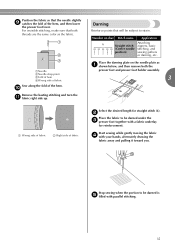
... needle position) Application Attaching zippers, basic stitching, and sewing gathers or darning, etc. Stop sewing when the portion to be subject to be darned under the c presser foot together with your hands, alternately drawing the fabric away and pulling it toward you. aNeedle bNeedle drop point cFold of hem dWrong side of fabric Sew along the fold of the hem, and then lower the presser foot lever. Position the fabric so that both the presser foot and presser foot holder assembly...
... needle position) Application Attaching zippers, basic stitching, and sewing gathers or darning, etc. Stop sewing when the portion to be subject to be darned under the c presser foot together with your hands, alternately drawing the fabric away and pulling it toward you. aNeedle bNeedle drop point cFold of hem dWrong side of fabric Sew along the fold of the hem, and then lower the presser foot lever. Position the fabric so that both the presser foot and presser foot holder assembly...
Users Manual - English
Page 52
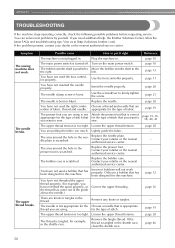
... tighten the screw. sew. Replace the presser foot. Remove any knots or tangles. Loosen the upper thread tension. Remove the tangle thread. The upper thread breaks. Insert the needle properly. The area around the hole in . Replace the bobbin case. The thread is too tight. page 12 page 16 - You can solve most problems by yourself. You have not threaded the upper thread properly. (for the type of fabric, thread and needle. You are using . Incorrect bobbins will not work . The upper thread tension is...
... tighten the screw. sew. Replace the presser foot. Remove any knots or tangles. Loosen the upper thread tension. Remove the tangle thread. The upper thread breaks. Insert the needle properly. The area around the hole in . Replace the bobbin case. The thread is too tight. page 12 page 16 - You can solve most problems by yourself. You have not threaded the upper thread properly. (for the type of fabric, thread and needle. You are using . Incorrect bobbins will not work . The upper thread tension is...
Users Manual - English
Page 53
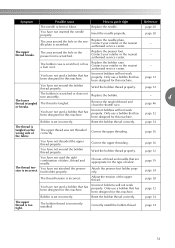
...the tension of fabric, thread and needle. Incorrect bobbins will not work properly. page 12 Bobbin is set incorrectly. page 14 The upper thread is incorrect. Replace the needle plate. Incorrect bobbins will not work properly. You have not threaded the upper thread properly. Choose a thread and needle that has been designed for this machine. Attach the presser-foot holder properly. Correctly install the bobbin thread. Replace the presser foot. Replace the bobbin case. Only use a bobbin that are appropriate for this machine. Remove the tangled thread and...
...the tension of fabric, thread and needle. Incorrect bobbins will not work properly. page 12 Bobbin is set incorrectly. page 14 The upper thread is incorrect. Replace the needle plate. Incorrect bobbins will not work properly. You have not threaded the upper thread properly. Choose a thread and needle that has been designed for this machine. Attach the presser-foot holder properly. Correctly install the bobbin thread. Replace the presser foot. Replace the bobbin case. Only use a bobbin that are appropriate for this machine. Remove the tangled thread and...
Users Manual - English
Page 54
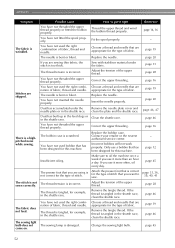
.... Adjust the tension of the upper thread. Make sure to sew. If you are skipped. The thread is too thick. Replace the bobbin case. Stitches are sewing thin fabric, the stitch is tangled, for example, in the shuttle race, clean the shuttle race. You have not used the right combination of fabric, thread and needle. Attach the presser foot that is wrinkled. The fabric does not feed. If you use it right Thread the upper thread and wind the bobbin thread properly. Insert the needle...
.... Adjust the tension of the upper thread. Make sure to sew. If you are skipped. The thread is too thick. Replace the bobbin case. Stitches are sewing thin fabric, the stitch is tangled, for example, in the shuttle race, clean the shuttle race. You have not used the right combination of fabric, thread and needle. Attach the presser foot that is wrinkled. The fabric does not feed. If you use it right Thread the upper thread and wind the bobbin thread properly. Insert the needle...
Users Manual - English
Page 55
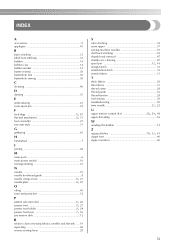
... 33 bobbin 14 bobbin case 14 bobbin winder 12 button sewing 38 buttonhole foot 36 buttonhole sewing 36 C cleaning 46 D darning 35 E embroidering 41 extra spool pin 22 F , feed dogs 8 47 , flat bed attachment 8 31 foot controller 27 free-arm style 31 G gathering 43 H handwheel 7 J joining 44 M main parts 6 main power switch 10 monogramming 41 N needle 19 needle bar thread guide 8 , needle clamp screw 8 21 , needle plate 8 47 O oiling 45 overcasting stitches 32 P , pattern selection dial 6 26 , presser foot 8 23 , presser foot holder 8 24 , presser foot lever 7 16...
... 33 bobbin 14 bobbin case 14 bobbin winder 12 button sewing 38 buttonhole foot 36 buttonhole sewing 36 C cleaning 46 D darning 35 E embroidering 41 extra spool pin 22 F , feed dogs 8 47 , flat bed attachment 8 31 foot controller 27 free-arm style 31 G gathering 43 H handwheel 7 J joining 44 M main parts 6 main power switch 10 monogramming 41 N needle 19 needle bar thread guide 8 , needle clamp screw 8 21 , needle plate 8 47 O oiling 45 overcasting stitches 32 P , pattern selection dial 6 26 , presser foot 8 23 , presser foot holder 8 24 , presser foot lever 7 16...


