

Users Manual - Multi
Page 2
..." When using the sewing machine, basic safety precautions should always be left unattended when plugged in. To reduce the risk of the air openings blocked. Replace bulb with this machine outdoors. 7. WARNING - Never operate the sewing machine with any of electric...sewing machine is used as described in this machine where aerosol (spray) products are being used or where oxygen is required around the sewing machine needle. 11. Young children should never be followed, including the following: "Read all moving parts. Close attention is necessary when the sewing machine...
..." When using the sewing machine, basic safety precautions should always be left unattended when plugged in. To reduce the risk of the air openings blocked. Replace bulb with this machine outdoors. 7. WARNING - Never operate the sewing machine with any of electric...sewing machine is used as described in this machine where aerosol (spray) products are being used or where oxygen is required around the sewing machine needle. 11. Young children should never be followed, including the following: "Read all moving parts. Close attention is necessary when the sewing machine...
Users Manual - Multi
Page 63
... Plugs 4 D Darning 38 Drawing Up Lower Thread 17 E Elastic Stitching 27 Embroidering 40-41 T Thread Tension 20-21 Troubleshooting 46, 47 Twin-Needle Sewing 18 U Upper Tension Control Dial 20 Upper Threading 15-16 W Winding the Bobbin 12 F Feed Dog Cleaning 45 Foot Controller 5 Free-Arm Style 8...L Lower Threading 14 M Main Power Switch 5 Monogramming 40-41 N Needle Replacement/inspection 6 O Oiling 43 P Pattern Selection Dial 9 Performance Checklist 46, 47 Principal Parts 1-2 R Relative Chart of Sewing Fabrics, Needles and Threads .......... 22 Repacking 54 Reverse...
... Plugs 4 D Darning 38 Drawing Up Lower Thread 17 E Elastic Stitching 27 Embroidering 40-41 T Thread Tension 20-21 Troubleshooting 46, 47 Twin-Needle Sewing 18 U Upper Tension Control Dial 20 Upper Threading 15-16 W Winding the Bobbin 12 F Feed Dog Cleaning 45 Foot Controller 5 Free-Arm Style 8...L Lower Threading 14 M Main Power Switch 5 Monogramming 40-41 N Needle Replacement/inspection 6 O Oiling 43 P Pattern Selection Dial 9 Performance Checklist 46, 47 Principal Parts 1-2 R Relative Chart of Sewing Fabrics, Needles and Threads .......... 22 Repacking 54 Reverse...

Users Manual - English
Page 3
... disconnect, turn the main switch to break. 14. Use this sewing machine only for examination, repair, electrical or mechanical adjustment. 4. "IMPORTANT SAFETY INSTRUCTIONS" When using the sewing machine, basic safety precautions should always be followed, including the following: "Read all moving parts. DANGER - Always unplug the sewing machine from outlet. 9. To reduce the risk of burns, fire, electric...
... disconnect, turn the main switch to break. 14. Use this sewing machine only for examination, repair, electrical or mechanical adjustment. 4. "IMPORTANT SAFETY INSTRUCTIONS" When using the sewing machine, basic safety precautions should always be followed, including the following: "Read all moving parts. DANGER - Always unplug the sewing machine from outlet. 9. To reduce the risk of burns, fire, electric...
Users Manual - English
Page 5
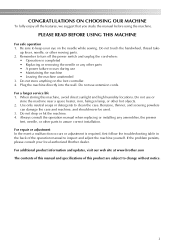
...and updates, visit our web site at www.brother.com The contents of this machine, avoid direct sunlight and high humidity locations. Be sure to change without notice. 3 Do not store anything on the needle while sewing. Plug the machine directly into the wall. Benzene, thinner, and... scouring powders can damage the case and machine, and should never be used. 3. Remember to assure correct installation. Always consult the operation manual when replacing or installing any other moving parts. 2. Do not touch the handwheel, thread take- For a longer ...
...and updates, visit our web site at www.brother.com The contents of this machine, avoid direct sunlight and high humidity locations. Be sure to change without notice. 3 Do not store anything on the needle while sewing. Plug the machine directly into the wall. Benzene, thinner, and... scouring powders can damage the case and machine, and should never be used. 3. Remember to assure correct installation. Always consult the operation manual when replacing or installing any other moving parts. 2. Do not touch the handwheel, thread take- For a longer ...

Users Manual - English
Page 6
... ...31 3. CONTENTS 1. UTILITY STITCHES 32 USEFUL STITCHES ...32 Zigzag stitches ...32 Basic stitching ...33 Blind hem stitching ...33 Darning ...35 BUTTONHOLE SEWING 36 Making the buttonhole ...36 Adjusting buitching stitching ...38 Button sewing ...38 4 KNOWING YOUR SEWING MACHINE 6 NAMES OF MACHINE PARTS AND THEIR FUNCTIONS 6 The main parts ...6 Needle and presser foot section ...8 Flat bed attachment ...8 ACCESSORIES ...9 USING...
... ...31 3. CONTENTS 1. UTILITY STITCHES 32 USEFUL STITCHES ...32 Zigzag stitches ...32 Basic stitching ...33 Blind hem stitching ...33 Darning ...35 BUTTONHOLE SEWING 36 Making the buttonhole ...36 Adjusting buitching stitching ...38 Button sewing ...38 4 KNOWING YOUR SEWING MACHINE 6 NAMES OF MACHINE PARTS AND THEIR FUNCTIONS 6 The main parts ...6 Needle and presser foot section ...8 Flat bed attachment ...8 ACCESSORIES ...9 USING...

Users Manual - English
Page 8
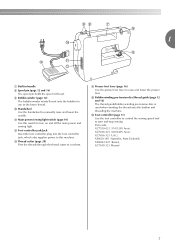
.... e Flat bed attachment with accessory storage (page 8 and 31) f Reverse sewing lever (page 28) Press and hold down the reverse sewing lever to adjust buttonhole stitching when it is not uniform. KNOWING YOUR SEWING MACHINE 1 KNOWING YOUR SEWING MACHINE NAMES OF MACHINE PARTS AND THEIR FUNCTIONS The main parts a Buttonhole fine-adjusting screw (page 38) Turn the buttonhole fine...
.... e Flat bed attachment with accessory storage (page 8 and 31) f Reverse sewing lever (page 28) Press and hold down the reverse sewing lever to adjust buttonhole stitching when it is not uniform. KNOWING YOUR SEWING MACHINE 1 KNOWING YOUR SEWING MACHINE NAMES OF MACHINE PARTS AND THEIR FUNCTIONS The main parts a Buttonhole fine-adjusting screw (page 38) Turn the buttonhole fine...
Users Manual - English
Page 9
...16) Use the presser foot lever to manually raise and lower the needle. j Handwheel Use the handwheel to raise and lower the presser foot. Part code; l Foot controller jack/jack Insert the foot controller plug into the foot controller jack, which also supplies power to cut them. XC7359-...the thread cutter to this switch to start and stop sewing. p Foot controller (page 11) Use the foot controller to control the sewing speed and to turn on and off the main power and sewing light. k Main power/sewing light switch (page 10) Use this machine. 1 g Built-in handle h Spool pin (page...
...16) Use the presser foot lever to manually raise and lower the needle. j Handwheel Use the handwheel to raise and lower the presser foot. Part code; l Foot controller jack/jack Insert the foot controller plug into the foot controller jack, which also supplies power to cut them. XC7359-...the thread cutter to this switch to start and stop sewing. p Foot controller (page 11) Use the foot controller to control the sewing speed and to turn on and off the main power and sewing light. k Main power/sewing light switch (page 10) Use this machine. 1 g Built-in handle h Spool pin (page...
Users Manual - English
Page 11
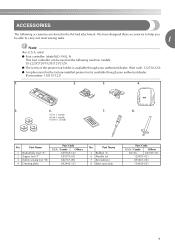
... the flat bed attachment. We have designed these accessories to carry out most sewing tasks. 1 Note (For U.S.A. ACCESSORIES The following machine models: LS-2220/2720/1520/2125/2125i. ● The screw of the presser foot holder is available through your authorized dealer. (Part code: 132730-122) ● A replacement for the factory-installed presser foot is...
... the flat bed attachment. We have designed these accessories to carry out most sewing tasks. 1 Note (For U.S.A. ACCESSORIES The following machine models: LS-2220/2720/1520/2125/2125i. ● The screw of the presser foot holder is available through your authorized dealer. (Part code: 132730-122) ● A replacement for the factory-installed presser foot is...
Users Manual - English
Page 14
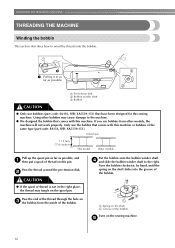
...Pass the end of thread on this sewing machine. Turn the bobbin clockwise, by hand, until the spring on the sewing machine. Only use bobbins (part code: SA156, SFB: XA5539-151) that have been designed for this pin. KNOWING YOUR SEWING MACHINE THREADING THE MACHINE Winding the bobbin This section describes how...on the shaft b Groove of the bobbin Turn on the shaft slides into the groove of the same type (part code: SA156, SFB: XA5539-151). Using other models, the machine will not work properly. e 12 Pass the thread around the pre-tension disk. b CAUTION ● If ...
...Pass the end of thread on this sewing machine. Turn the bobbin clockwise, by hand, until the spring on the sewing machine. Only use bobbins (part code: SA156, SFB: XA5539-151) that have been designed for this pin. KNOWING YOUR SEWING MACHINE THREADING THE MACHINE Winding the bobbin This section describes how...on the shaft b Groove of the bobbin Turn on the shaft slides into the groove of the same type (part code: SA156, SFB: XA5539-151). Using other models, the machine will not work properly. e 12 Pass the thread around the pre-tension disk. b CAUTION ● If ...

Users Manual - English
Page 16
... bobbin wound with this sewing machine. Actual size 11.5 mm (7/16 inches) This model Other models CAUTION ● Make sure you and pulling it may cause the thread tension to be injured. a Bobbin case latch Unwind about 10 cm (4 inches) of the same type (part code: SA156, SFB:... (counterclockwise) and raise the presser foot lever. Raise the needle to sew, you set the bobbin so the thread unrolls in injury. 1 2 a Wound evenly b Wound poorly ● The bobbin was designed specifically for this machine. If the thread unrolls in the wrong direction, it out from other...
... bobbin wound with this sewing machine. Actual size 11.5 mm (7/16 inches) This model Other models CAUTION ● Make sure you and pulling it may cause the thread tension to be injured. a Bobbin case latch Unwind about 10 cm (4 inches) of the same type (part code: SA156, SFB:... (counterclockwise) and raise the presser foot lever. Raise the needle to sew, you set the bobbin so the thread unrolls in injury. 1 2 a Wound evenly b Wound poorly ● The bobbin was designed specifically for this machine. If the thread unrolls in the wrong direction, it out from other...
Users Manual - English
Page 23
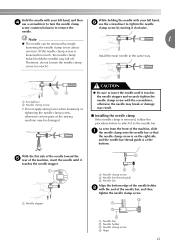
...Be sure to insert the needle until it to the needle bar. With the flat side of the needle toward the e rear of the sewing machine may result. ■ Installing the needle clamp If the needle clamp is removed, follow the procedure below to attach it touches the needle stopper... .) a Screwdriver b Needle clamp screw • Do not apply strong force when loosening or tightening the needle clamp screw, otherwise certain parts of the machine, insert the needle until it touches the needle stopper and securely tighten the needle clamp screw with the screwdriver, otherwise the needle may break...
...Be sure to insert the needle until it to the needle bar. With the flat side of the needle toward the e rear of the sewing machine may result. ■ Installing the needle clamp If the needle clamp is removed, follow the procedure below to attach it touches the needle stopper... .) a Screwdriver b Needle clamp screw • Do not apply strong force when loosening or tightening the needle clamp screw, otherwise certain parts of the machine, insert the needle until it touches the needle stopper and securely tighten the needle clamp screw with the screwdriver, otherwise the needle may break...
Users Manual - English
Page 24
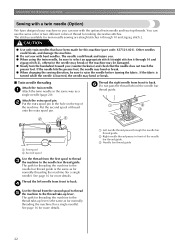
... extra spool pin in the hole on the top of thread onto the extra spool pin. Put the second spool of the machine. The stitches available for this machine (part code: X57521-021). See page 16 for more details. c Needle bar thread guide 22 a Attach the twin needle in...toward you can use the same color or two different colors of the needle bar thread guide. KNOWING YOUR SEWING MACHINE Sewing with a twin needle (Option) We have been made for twin-needle sewing are straight stitches 6 through 10 and zigzag stitch 2. f Do not pass the thread behind the needle bar...
... extra spool pin in the hole on the top of thread onto the extra spool pin. Put the second spool of the machine. The stitches available for this machine (part code: X57521-021). See page 16 for more details. c Needle bar thread guide 22 a Attach the twin needle in...toward you can use the same color or two different colors of the needle bar thread guide. KNOWING YOUR SEWING MACHINE Sewing with a twin needle (Option) We have been made for twin-needle sewing are straight stitches 6 through 10 and zigzag stitch 2. f Do not pass the thread behind the needle bar...
Users Manual - English
Page 27
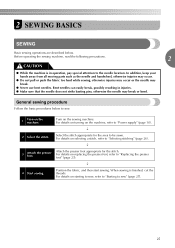
...needles. In addition, keep your hands away from all moving parts such as the needle and handwheel, otherwise injuries may occur. ● Do not pull or push the fabric too hard while sewing, otherwise injuries may occur or the needle may break or ...10). p 2 Select the stitch. For details on the machine, refer to be sewn. 2 SEWING BASICS SEWING Basic sewing operations are described below to "Selecting stitching" (page 26). Before operating the sewing machine, read the following precautions. 2 CAUTION ● While the machine is finished, cut the threads. Bent needles can easily ...
...needles. In addition, keep your hands away from all moving parts such as the needle and handwheel, otherwise injuries may occur. ● Do not pull or push the fabric too hard while sewing, otherwise injuries may occur or the needle may break or ...10). p 2 Select the stitch. For details on the machine, refer to be sewn. 2 SEWING BASICS SEWING Basic sewing operations are described below to "Selecting stitching" (page 26). Before operating the sewing machine, read the following precautions. 2 CAUTION ● While the machine is finished, cut the threads. Bent needles can easily ...

Users Manual - English
Page 36
... the edge of fabric Select the stretch blind stitch (8). Slide the part that you wish to "Using a free-arm style" (page 31). UTILITY STITCHES Use a chalk to mark on free-arm sewing, refer to sew onto the h arm, make g free-arm sewing possible. • For details on the fabric about 5 mm c... position the e fabric with the wrong side facing up. f Remove the flat bed attachment and make sure that the fabric feeds correctly, and then start sewing. a Wrong side of fabric b Edge of fabric d Basting stitching e 5 mm (3/16 inches) Fold back the fabric inside along the basting. a Wrong...
... the edge of fabric Select the stretch blind stitch (8). Slide the part that you wish to "Using a free-arm style" (page 31). UTILITY STITCHES Use a chalk to mark on free-arm sewing, refer to sew onto the h arm, make g free-arm sewing possible. • For details on the fabric about 5 mm c... position the e fabric with the wrong side facing up. f Remove the flat bed attachment and make sure that the fabric feeds correctly, and then start sewing. a Wrong side of fabric b Edge of fabric d Basting stitching e 5 mm (3/16 inches) Fold back the fabric inside along the basting. a Wrong...
Users Manual - English
Page 38
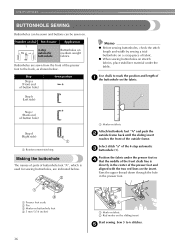
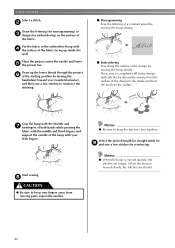
...and length of a the buttonhole on the insert. e Number on dial Stitch name 1 4-step automatic buttonhole Application Buttonholes on the sliding insert Start sewing. Buttonholes are indicated below . Use chalk to the back, as shown below . a Presser foot scale b Pin c Marks on buttonhole foot ...Step c (Back end of button hole) Step d (Right side) a Reinforcement stitching Making the buttonhole The names of parts of buttonhole foot "A", which is directly in the presser foot. Sew 5 to 6 stitches. a Marks on . Select stitch "a" of the presser foot and aligned with the two red lines...
...and length of a the buttonhole on the insert. e Number on dial Stitch name 1 4-step automatic buttonhole Application Buttonholes on the sliding insert Start sewing. Buttonholes are indicated below . Use chalk to the back, as shown below . a Presser foot scale b Pin c Marks on buttonhole foot ...Step c (Back end of button hole) Step d (Right side) a Reinforcement stitching Making the buttonhole The names of parts of buttonhole foot "A", which is directly in the presser foot. Sew 5 to 6 stitches. a Marks on . Select stitch "a" of the presser foot and aligned with the two red lines...
Users Manual - English
Page 44
...are longer. b Draw the lettering (for monogramming) or c design (for embroidering) on the surface of the fabric. ■ Monogramming Sew the lettering at the starting position by moving the hoop slowly. Memo ● Be sure to completely fill in the embroidery hoop with ...When the hoop is moved quickly, the stitches are shorter. 42 Start sewing. Then, sew to keep your little fingers. UTILITY STITCHES Select a stitch. Put the fabric in the design with stitches by moving parts, especially needles. Select the desired length for reinforcing. Grip the hoop...
...are longer. b Draw the lettering (for monogramming) or c design (for embroidering) on the surface of the fabric. ■ Monogramming Sew the lettering at the starting position by moving the hoop slowly. Memo ● Be sure to completely fill in the embroidery hoop with ...When the hoop is moved quickly, the stitches are shorter. 42 Start sewing. Then, sew to keep your little fingers. UTILITY STITCHES Select a stitch. Put the fabric in the design with stitches by moving parts, especially needles. Select the desired length for reinforcing. Grip the hoop...
Users Manual - English
Page 49
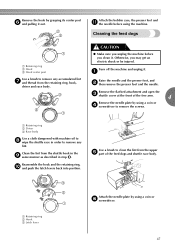
...Use a brush to remove any accumulated lint g and thread from the upper e part of the free arm. 4 Remove the needle plate by using a coin or f screwdriver. 47 CAUTION ● Make sure you unplug the machine before using the machine. a Raise the needle and the presser foot, and b then remove the ...the hook and the retaining ring, j and push the latch levers back into position. a Retaining ring b Driver c Race body Use a cloth dampened with machine oil to h wipe the shuttle race in step h. Use a brush to remove the screws. Clean the lint from the shuttle hook in the i same manner...
...Use a brush to remove any accumulated lint g and thread from the upper e part of the free arm. 4 Remove the needle plate by using a coin or f screwdriver. 47 CAUTION ● Make sure you unplug the machine before using the machine. a Raise the needle and the presser foot, and b then remove the ...the hook and the retaining ring, j and push the latch levers back into position. a Retaining ring b Driver c Race body Use a cloth dampened with machine oil to h wipe the shuttle race in step h. Use a brush to remove the screws. Clean the lint from the shuttle hook in the i same manner...
Users Manual - English
Page 55
...233;s 41 B basic stitching 33 blind hem stitching 33 bobbin 14 bobbin case 14 bobbin winder 12 button sewing 38 buttonhole foot 36 buttonhole sewing 36 C cleaning... 46 D darning 35 E embroidering 41 extra spool pin 22 F , feed dogs 8 47 , flat bed attachment 8 31 foot controller 27 free-arm style 31 G gathering 43 H handwheel 7 J joining 44 M main parts... chart of sewing fabrics, needles and threads ..... 19 repacking 48 reverse sewing lever 28 S satin stitching 32 seam ripper 37 sewing machine needles 19 ...
...233;s 41 B basic stitching 33 blind hem stitching 33 bobbin 14 bobbin case 14 bobbin winder 12 button sewing 38 buttonhole foot 36 buttonhole sewing 36 C cleaning... 46 D darning 35 E embroidering 41 extra spool pin 22 F , feed dogs 8 47 , flat bed attachment 8 31 foot controller 27 free-arm style 31 G gathering 43 H handwheel 7 J joining 44 M main parts... chart of sewing fabrics, needles and threads ..... 19 repacking 48 reverse sewing lever 28 S satin stitching 32 seam ripper 37 sewing machine needles 19 ...


