

Users Manual - Multi
Page 2
.... It may deflect the needle causing it is used as threading the needle, changing the needle, threading the bobbin, or changing the presser foot. 15. "SAVE THESE INSTRUCTIONS" "This sewing machine is being administered. 8. Use only accessories recommended by pulling on...of the air openings blocked. This sewing machine is required around the sewing machine needle. 11. The sewing machine should never be left unattended when plugged in the needle area, such as a toy. "IMPORTANT SAFETY INSTRUCTIONS" When using the sewing machine, basic safety precautions should always be followed,...
.... It may deflect the needle causing it is used as threading the needle, changing the needle, threading the bobbin, or changing the presser foot. 15. "SAVE THESE INSTRUCTIONS" "This sewing machine is being administered. 8. Use only accessories recommended by pulling on...of the air openings blocked. This sewing machine is required around the sewing machine needle. 11. The sewing machine should never be left unattended when plugged in the needle area, such as a toy. "IMPORTANT SAFETY INSTRUCTIONS" When using the sewing machine, basic safety precautions should always be followed,...

Users Manual - English
Page 3
... or mechanical adjustment. 4. Young children should be left unattended when plugged in this machine where aerosol (spray) products are being administered. 8. "IMPORTANT SAFETY INSTRUCTIONS" When using the sewing machine, basic safety precautions should always be used as threading the needle, changing the needle, threading the bobbin, or changing the presser foot. 15. To reduce the risk...
... or mechanical adjustment. 4. Young children should be left unattended when plugged in this machine where aerosol (spray) products are being administered. 8. "IMPORTANT SAFETY INSTRUCTIONS" When using the sewing machine, basic safety precautions should always be used as threading the needle, changing the needle, threading the bobbin, or changing the presser foot. 15. To reduce the risk...

Users Manual - English
Page 6
... Button sewing ...38 4 SEWING BASICS 25 SEWING ...25 General sewing procedure ...25 Selecting stitching ...26 Starting to sew ...27 Sewing in reverse ...28 Thread tension ...28 USEFUL SEWING TIPS ...30 Trial sewing ...30 Changing the sewing direction ...30 Sewing curves ...30 Sewing thick fabrics ...30 Sewing thin fabrics ...31 Sewing stretch fabrics ...31 Using a free-arm style ...31 3. CONTENTS 1. KNOWING YOUR SEWING MACHINE 6 NAMES OF MACHINE PARTS AND...
... Button sewing ...38 4 SEWING BASICS 25 SEWING ...25 General sewing procedure ...25 Selecting stitching ...26 Starting to sew ...27 Sewing in reverse ...28 Thread tension ...28 USEFUL SEWING TIPS ...30 Trial sewing ...30 Changing the sewing direction ...30 Sewing curves ...30 Sewing thick fabrics ...30 Sewing thin fabrics ...31 Sewing stretch fabrics ...31 Using a free-arm style ...31 3. CONTENTS 1. KNOWING YOUR SEWING MACHINE 6 NAMES OF MACHINE PARTS AND...

Users Manual - English
Page 8
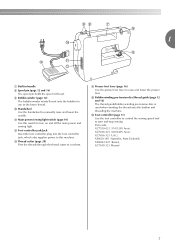
KNOWING YOUR SEWING MACHINE 1 KNOWING YOUR SEWING MACHINE NAMES OF MACHINE PARTS AND THEIR FUNCTIONS The main parts a Buttonhole fine-adjusting screw (page 38) Turn the buttonhole fine-adjusting screw to sew in the opposite direction. 6 c Thread take-up lever (page 16) d Upper tension control dial (page 28) This... controls the tension of the stitch that you want to select the number of the upper thread. b Pattern selection dial (page ...
KNOWING YOUR SEWING MACHINE 1 KNOWING YOUR SEWING MACHINE NAMES OF MACHINE PARTS AND THEIR FUNCTIONS The main parts a Buttonhole fine-adjusting screw (page 38) Turn the buttonhole fine-adjusting screw to sew in the opposite direction. 6 c Thread take-up lever (page 16) d Upper tension control dial (page 28) This... controls the tension of the stitch that you want to select the number of the upper thread. b Pattern selection dial (page ...
Users Manual - English
Page 9
... The spool pin holds the spool of thread. n Presser foot lever (page 16) Use the presser foot lever to start and stop sewing. k Main power/sewing light switch (page 10) Use this machine. p Foot controller (page 11) Use the foot controller to control the sewing speed and to raise and lower the ...presser foot. i Bobbin winder (page 12) The bobbin winder winds thread onto the bobbin for use ...
... The spool pin holds the spool of thread. n Presser foot lever (page 16) Use the presser foot lever to start and stop sewing. k Main power/sewing light switch (page 10) Use this machine. p Foot controller (page 11) Use the foot controller to control the sewing speed and to raise and lower the ...presser foot. i Bobbin winder (page 12) The bobbin winder winds thread onto the bobbin for use ...
Users Manual - English
Page 10
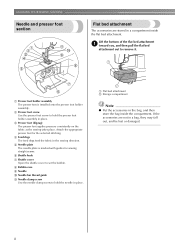
... holder assembly in place. c Presser foot (Zigzag) The presser foot applies pressure consistently on the fabric as the sewing takes place. KNOWING YOUR SEWING MACHINE Needle and presser foot section Flat bed attachment The accessories are not in a bag, they may fall out, and... be lost or damaged. 8 a Flat bed attachment b Storage compartment Note ● Put the accessories in the sewing direction. h Bobbin case i Needle j Needle bar thread guide ...
... holder assembly in place. c Presser foot (Zigzag) The presser foot applies pressure consistently on the fabric as the sewing takes place. KNOWING YOUR SEWING MACHINE Needle and presser foot section Flat bed attachment The accessories are not in a bag, they may fall out, and... be lost or damaged. 8 a Flat bed attachment b Storage compartment Note ● Put the accessories in the sewing direction. h Bobbin case i Needle j Needle bar thread guide ...
Users Manual - English
Page 14
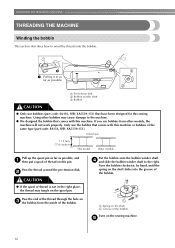
... CAUTION ● Only use bobbins from the inside of the bobbin Turn on the sewing machine. b CAUTION ● If the spool of thread is not in as far as possible, and a then put a spool of thread on c the bobbin from other bobbins may tangle on the shaft slides into the ... the bobbin. a Spring on the shaft b Groove of the bobbin. KNOWING YOUR SEWING MACHINE THREADING THE MACHINE Winding the bobbin This section describes how to wind the thread onto the bobbin. 1 Pulling it in the right place, the thread may cause damage to the right. If you use bobbins (part code: SA156, ...
... CAUTION ● Only use bobbins from the inside of the bobbin Turn on the sewing machine. b CAUTION ● If the spool of thread is not in as far as possible, and a then put a spool of thread on c the bobbin from other bobbins may tangle on the shaft slides into the ... the bobbin. a Spring on the shaft b Groove of the bobbin. KNOWING YOUR SEWING MACHINE THREADING THE MACHINE Winding the bobbin This section describes how to wind the thread onto the bobbin. 1 Pulling it in the right place, the thread may cause damage to the right. If you use bobbins (part code: SA156, ...
Users Manual - English
Page 15
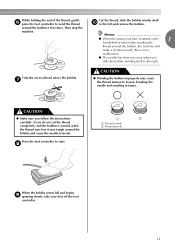
Press the foot controller to the left and remove the bobbin. Memo ● When the sewing machine is started or the 1 handwheel is not a malfunction. ● The needle bar does not move when you slide the bobbin winding shaft to the right. g... improperly may tangle around the bobbin and cause the needle to loosen, breaking the needle and resulting in injury. Then stop the machine. this is turned after winding the thread around the bobbin a few times. If you follow the instructions carefully. h 1 2 a Wound evenly b Wound poorly When the bobbin seems full and...
Press the foot controller to the left and remove the bobbin. Memo ● When the sewing machine is started or the 1 handwheel is not a malfunction. ● The needle bar does not move when you slide the bobbin winding shaft to the right. g... improperly may tangle around the bobbin and cause the needle to loosen, breaking the needle and resulting in injury. Then stop the machine. this is turned after winding the thread around the bobbin a few times. If you follow the instructions carefully. h 1 2 a Wound evenly b Wound poorly When the bobbin seems full and...

Users Manual - English
Page 16
... in the right direction. If you accidentally step on the foot controller and the machine starts to sew, you and pulling it may cause the thread tension to be injured. KNOWING YOUR SEWING MACHINE Lower threading Install the bobbin wound with this sewing machine. Actual size 11.5 mm (7/16 inches) This model Other models CAUTION ● Make sure...
... in the right direction. If you accidentally step on the foot controller and the machine starts to sew, you and pulling it may cause the thread tension to be injured. KNOWING YOUR SEWING MACHINE Lower threading Install the bobbin wound with this sewing machine. Actual size 11.5 mm (7/16 inches) This model Other models CAUTION ● Make sure...
Users Manual - English
Page 18
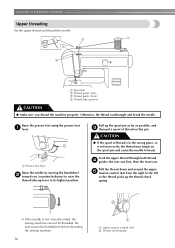
... the right to its highest position. Raise the presser foot using the presser foot a lever. Feed the upper thread through both thread d guides: the rear one first, then the front one. KNOWING YOUR SEWING MACHINE Upper threading Set the upper thread and thread the needle. a Presser foot lever Raise the needle by turning the handwheel b toward you...
... the right to its highest position. Raise the presser foot using the presser foot a lever. Feed the upper thread through both thread d guides: the rear one first, then the front one. KNOWING YOUR SEWING MACHINE Upper threading Set the upper thread and thread the needle. a Presser foot lever Raise the needle by turning the handwheel b toward you...
Users Manual - English
Page 20
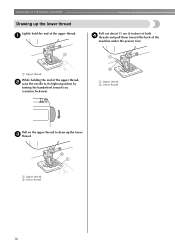
KNOWING YOUR SEWING MACHINE Drawing up the lower c thread. a Pull out about 15 cm (6 inches) of both d threads and pull them toward you (counterclockwise). a Upper thread b Lower thread Pull on the upper thread to its highest position by turning the handwheel toward the back of the upper thread. a Upper thread b Lower thread 18 a Upper thread While holding the end of the upper thread, b raise the needle to draw up the lower thread Lightly hold the end of the machine under the presser foot.
KNOWING YOUR SEWING MACHINE Drawing up the lower c thread. a Pull out about 15 cm (6 inches) of both d threads and pull them toward you (counterclockwise). a Upper thread b Lower thread Pull on the upper thread to its highest position by turning the handwheel toward the back of the upper thread. a Upper thread b Lower thread 18 a Upper thread While holding the end of the upper thread, b raise the needle to draw up the lower thread Lightly hold the end of the machine under the presser foot.

Users Manual - English
Page 21
.... Refer to the following precautions concerning the handling of the fabric being sewn. ● A 75/11 needle is already installed when the sewing machine is extremely dangerous. Sewing fabrics Needle sizes Thread sizes Very thin Fine tricot, Fine lace, Thin linen, Silk, 65/9 Organza, Chiffon Cotton: 80 Synthetic/ Polyester Long Fiber Fine Mercerized Cotton...
.... Refer to the following precautions concerning the handling of the fabric being sewn. ● A 75/11 needle is already installed when the sewing machine is extremely dangerous. Sewing fabrics Needle sizes Thread sizes Very thin Fine tricot, Fine lace, Thin linen, Silk, 65/9 Organza, Chiffon Cotton: 80 Synthetic/ Polyester Long Fiber Fine Mercerized Cotton...
Users Manual - English
Page 22
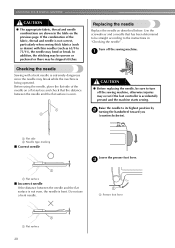
...of the needle on the previous page. Turn off the sewing machine, otherwise injuries may break while the machine is accidentally pressed and the machine starts sewing. Before using the needle, place the flat side of the fabric, thread and needle is bent. a CAUTION ● Before replacing... the needle, be straight according to turn off the sewing machine. KNOWING YOUR SEWING MACHINE CAUTION ● The appropriate fabric, thread and needle combinations are shown in "Checking the needle" . Use the screwdriver and a needle that has...
...of the needle on the previous page. Turn off the sewing machine, otherwise injuries may break while the machine is accidentally pressed and the machine starts sewing. Before using the needle, place the flat side of the fabric, thread and needle is bent. a CAUTION ● Before replacing... the needle, be straight according to turn off the sewing machine. KNOWING YOUR SEWING MACHINE CAUTION ● The appropriate fabric, thread and needle combinations are shown in "Checking the needle" . Use the screwdriver and a needle that has...
Users Manual - English
Page 23
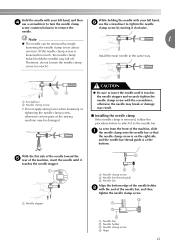
a Needle stopper a Needle clamp screw b Needle bar thread guide c Needle bar Align the bottom edge of the sewing machine may be removed by turning it to the needle bar. Install the twin needle ...touches the needle stopper and securely tighten the needle clamp screw with the end of the machine, slide a the needle clamp onto the needle bar so that the needle clamp screw is on the ...right side and the needle bar thread guide is at the bottom. With the flat side of the needle toward the e rear of the machine, insert the needle until it touches the needle stopper...
a Needle stopper a Needle clamp screw b Needle bar thread guide c Needle bar Align the bottom edge of the sewing machine may be removed by turning it to the needle bar. Install the twin needle ...touches the needle stopper and securely tighten the needle clamp screw with the end of the machine, slide a the needle clamp onto the needle bar so that the needle clamp screw is on the ...right side and the needle bar thread guide is at the bottom. With the flat side of the needle toward the e rear of the machine, insert the needle until it touches the needle stopper...
Users Manual - English
Page 24
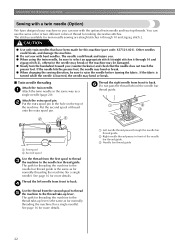
... the needle does not touch the presser foot. Other needles could break and injure you. ● When using the twin needle, be sure to the thread take -up lever. KNOWING YOUR SEWING MACHINE Sewing with a twin needle (Option) We have designed your machine so you (counterclockwise) and check that have been made for this...
... the needle does not touch the presser foot. Other needles could break and injure you. ● When using the twin needle, be sure to the thread take -up lever. KNOWING YOUR SEWING MACHINE Sewing with a twin needle (Option) We have designed your machine so you (counterclockwise) and check that have been made for this...
Users Manual - English
Page 26
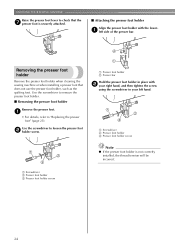
...presser foot holder with b your right hand, and then tighten the screw using the screwdriver in your left side of the presser bar. KNOWING YOUR SEWING MACHINE Raise the presser foot lever to check that does not use the presser foot holder, such as the quilting foot. a left hand. a Presser ...lower- Use the screwdriver to loosen the presser foot b holder screw. Removing the presser foot holder Remove the presser foot holder when cleaning the sewing machine or when installing a presser foot that the g presser foot is not correctly installed, the thread tension will be incorrect.
...presser foot holder with b your right hand, and then tighten the screw using the screwdriver in your left side of the presser bar. KNOWING YOUR SEWING MACHINE Raise the presser foot lever to check that does not use the presser foot holder, such as the quilting foot. a left hand. a Presser ...lower- Use the screwdriver to loosen the presser foot b holder screw. Removing the presser foot holder Remove the presser foot holder when cleaning the sewing machine or when installing a presser foot that the g presser foot is not correctly installed, the thread tension will be incorrect.
Users Manual - English
Page 27
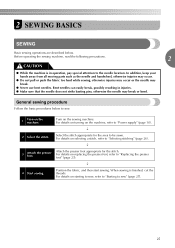
... basting pins, otherwise the needle may break. ● Never use bent needles. 2 SEWING BASICS SEWING Basic sewing operations are described below to sew. 1 Turn on the sewing machine. Before operating the sewing machine, read the following precautions. 2 CAUTION ● While the machine is finished, cut the threads. For details on the machine, refer to be sewn. p 3 Attach the presser foot. Position the fabric...
... basting pins, otherwise the needle may break. ● Never use bent needles. 2 SEWING BASICS SEWING Basic sewing operations are described below to sew. 1 Turn on the sewing machine. Before operating the sewing machine, read the following precautions. 2 CAUTION ● While the machine is finished, cut the threads. For details on the machine, refer to be sewn. p 3 Attach the presser foot. Position the fabric...
Users Manual - English
Page 29
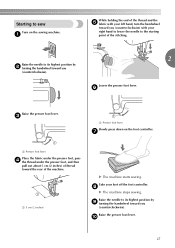
...thread toward the rear of the stitching. 2 Raise the needle to its highest position by i turning the handwheel toward you (counterclockwise). Starting to the starting point of the machine. h X The machine stops sewing. f Raise the presser foot lever. c a Presser foot lever Slowly press down on the sewing machine... cm (2 inches) X The machine starts sewing. Take your left hand, turn the handwheel toward you (counterclockwise) with your right hand to lower the needle to sew Turn on the foot controller. a While holding the end of the thread and the e fabric with your...
...thread toward the rear of the stitching. 2 Raise the needle to its highest position by i turning the handwheel toward you (counterclockwise). Starting to the starting point of the machine. h X The machine stops sewing. f Raise the presser foot lever. c a Presser foot lever Slowly press down on the sewing machine... cm (2 inches) X The machine starts sewing. Take your left hand, turn the handwheel toward you (counterclockwise) with your right hand to lower the needle to sew Turn on the foot controller. a While holding the end of the thread and the e fabric with your...
Users Manual - English
Page 32
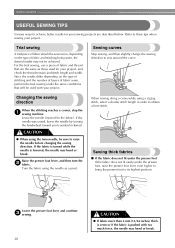
...thread that will be used for your project. Raise the presser foot lever, and then turn the b fabric. Changing the sewing direction When the stitching reaches a corner, stop the a sewing machine. Refer to these tips when sewing your sewing projects are the same as a pivot. Sewing curves Stop sewing, and then slightly change the sewing direction to sew... with your project, and check the thread tension and stitch length and width. SEWING BASICS USEFUL SEWING TIPS Various ways to achieve better results for your project. For the trial sewing, use a piece of fabric and stitching...
...thread that will be used for your project. Raise the presser foot lever, and then turn the b fabric. Changing the sewing direction When the stitching reaches a corner, stop the a sewing machine. Refer to these tips when sewing your sewing projects are the same as a pivot. Sewing curves Stop sewing, and then slightly change the sewing direction to sew... with your project, and check the thread tension and stitch length and width. SEWING BASICS USEFUL SEWING TIPS Various ways to achieve better results for your project. For the trial sewing, use a piece of fabric and stitching...
Users Manual - English
Page 45
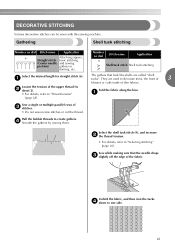
... 6 Attaching zippers, Straight stitch basic stitching, (Center needle and sewing position) gathers or darning, etc. They are called "shell tucks". a The gathers that the needle drops c slightly off the edge of thin fabrics. Loosen the tension of c stitches. • Do not sew reverse stitches or cut the thread. a (page 28). Sew while making sure that... name Application 9 Shell tuck stitch Shell tuck stitching Select the desired length for straight stitch (6). DECORATIVE STITCHING Various decorative stitches can be sewn with this sewing machine.
... 6 Attaching zippers, Straight stitch basic stitching, (Center needle and sewing position) gathers or darning, etc. They are called "shell tucks". a The gathers that the needle drops c slightly off the edge of thin fabrics. Loosen the tension of c stitches. • Do not sew reverse stitches or cut the thread. a (page 28). Sew while making sure that... name Application 9 Shell tuck stitch Shell tuck stitching Select the desired length for straight stitch (6). DECORATIVE STITCHING Various decorative stitches can be sewn with this sewing machine.


