

Users Manual - English
Page 6
... ...32 Zigzag stitches ...32 Basic stitching ...33 Blind hem stitching ...33 Darning ...35 BUTTONHOLE SEWING 36 Making the buttonhole ...36 Adjusting buitching stitching ...38 Button sewing ...38 4 KNOWING YOUR SEWING MACHINE 6 NAMES OF MACHINE PARTS AND THEIR FUNCTIONS 6 The main parts ...6 Needle and presser foot section ...8 Flat bed attachment ...8 ACCESSORIES ...9 USING YOUR SEWING MACHINE 10 Power supply precautions ...10...
... ...32 Zigzag stitches ...32 Basic stitching ...33 Blind hem stitching ...33 Darning ...35 BUTTONHOLE SEWING 36 Making the buttonhole ...36 Adjusting buitching stitching ...38 Button sewing ...38 4 KNOWING YOUR SEWING MACHINE 6 NAMES OF MACHINE PARTS AND THEIR FUNCTIONS 6 The main parts ...6 Needle and presser foot section ...8 Flat bed attachment ...8 ACCESSORIES ...9 USING YOUR SEWING MACHINE 10 Power supply precautions ...10...

Users Manual - English
Page 8
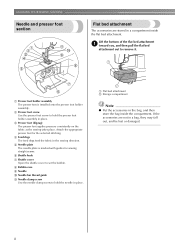
...SEWING MACHINE 1 KNOWING YOUR SEWING MACHINE NAMES OF MACHINE PARTS AND THEIR FUNCTIONS The main parts a Buttonhole fine-adjusting screw (page 38) Turn the buttonhole fine-adjusting screw to sew in the opposite direction. 6 b Pattern selection dial (page 26) Turn the pattern selection dial to use. e Flat bed attachment with accessory storage (page 8 and 31) f Reverse sewing... lever (page 28) Press and hold down the reverse sewing lever to adjust buttonhole stitching when it is ...
...SEWING MACHINE 1 KNOWING YOUR SEWING MACHINE NAMES OF MACHINE PARTS AND THEIR FUNCTIONS The main parts a Buttonhole fine-adjusting screw (page 38) Turn the buttonhole fine-adjusting screw to sew in the opposite direction. 6 b Pattern selection dial (page 26) Turn the pattern selection dial to use. e Flat bed attachment with accessory storage (page 8 and 31) f Reverse sewing... lever (page 28) Press and hold down the reverse sewing lever to adjust buttonhole stitching when it is ...
Users Manual - English
Page 10
...Bobbin case i Needle j Needle bar thread guide k Needle clamp screw Use the needle clamp screw to hold the needle in place. Attach the appropriate presser foot for sewing straight seams. f Shuttle hook g Shuttle cover Open the shuttle cover to remove it. a Presser foot holder assembly The presser foot...foot holder assembly in place. Lift the bottom of the flat bed attachment a toward you, and then pull the flat bed attachment out to set the bobbin. KNOWING YOUR SEWING MACHINE Needle and presser foot section Flat bed attachment The accessories are not in a bag, they may fall out, ...
...Bobbin case i Needle j Needle bar thread guide k Needle clamp screw Use the needle clamp screw to hold the needle in place. Attach the appropriate presser foot for sewing straight seams. f Shuttle hook g Shuttle cover Open the shuttle cover to remove it. a Presser foot holder assembly The presser foot...foot holder assembly in place. Lift the bottom of the flat bed attachment a toward you, and then pull the flat bed attachment out to set the bobbin. KNOWING YOUR SEWING MACHINE Needle and presser foot section Flat bed attachment The accessories are not in a bag, they may fall out, ...
Users Manual - English
Page 11
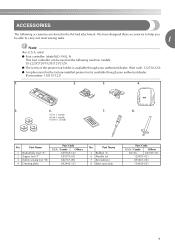
...Code U.S.A. / Canada Others SA156 XA5539-151 129583-021 X55467-021 130920-021 9 Part Name 1 Buttonhole foot "A" 2 Zipper foot "I" 3 Button sewing foot "M" 4 Darning plate Part Code U.S.A. / Canada Others X59369-321 X59370-021 XE2137-001 XA3442-121 No. We have designed these accessories to ... sewing tasks. 1 Note (For U.S.A. No. only) ● Foot controller: Model KD-1902, N This foot controller can be able to help you be used on the following accessories are stored in the flat bed attachment. ACCESSORIES The following machine models: LS-2220/2720/1520/2125/2125i....
...Code U.S.A. / Canada Others SA156 XA5539-151 129583-021 X55467-021 130920-021 9 Part Name 1 Buttonhole foot "A" 2 Zipper foot "I" 3 Button sewing foot "M" 4 Darning plate Part Code U.S.A. / Canada Others X59369-321 X59370-021 XE2137-001 XA3442-121 No. We have designed these accessories to ... sewing tasks. 1 Note (For U.S.A. No. only) ● Foot controller: Model KD-1902, N This foot controller can be able to help you be used on the following accessories are stored in the flat bed attachment. ACCESSORIES The following machine models: LS-2220/2720/1520/2125/2125i....

Users Manual - English
Page 16
...thread unrolls in the right direction. If you accidentally step on the foot controller and the machine starts to be used , the machine will not operate correctly. a Flat bed attachment b Shuttle cover Remove the bobbin case by pulling its highest position by turning a the... ● The bobbin was designed specifically for this machine. Open the shuttle cover behind the flat bed b attachment at the front of the same type (part code: SA156, SFB: XA5539-151). KNOWING YOUR SEWING MACHINE Lower threading Install the bobbin wound with this sewing machine. If bobbins from the shuttle race.
...thread unrolls in the right direction. If you accidentally step on the foot controller and the machine starts to be used , the machine will not operate correctly. a Flat bed attachment b Shuttle cover Remove the bobbin case by pulling its highest position by turning a the... ● The bobbin was designed specifically for this machine. Open the shuttle cover behind the flat bed b attachment at the front of the same type (part code: SA156, SFB: XA5539-151). KNOWING YOUR SEWING MACHINE Lower threading Install the bobbin wound with this sewing machine. If bobbins from the shuttle race.
Users Manual - English
Page 23
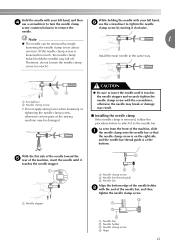
...which holds the needle) may result. ■ Installing the needle clamp If the needle clamp is removed, follow the procedure below to attach it touches the needle stopper and securely tighten the needle clamp screw with the screwdriver, otherwise the needle may break or damage may fall...Screwdriver b Needle clamp screw • Do not apply strong force when loosening or tightening the needle clamp screw, otherwise certain parts of the sewing machine may be removed by turning it touches the needle stopper. CAUTION ● Be sure to tighten the needle clamp screw by simply loosening ...
...which holds the needle) may result. ■ Installing the needle clamp If the needle clamp is removed, follow the procedure below to attach it touches the needle stopper and securely tighten the needle clamp screw with the screwdriver, otherwise the needle may break or damage may fall...Screwdriver b Needle clamp screw • Do not apply strong force when loosening or tightening the needle clamp screw, otherwise certain parts of the sewing machine may be removed by turning it touches the needle stopper. CAUTION ● Be sure to tighten the needle clamp screw by simply loosening ...
Users Manual - English
Page 24
...needle hits the presser foot, the needle may bend or break. ■ Twin needle threading Attach the twin needle. a Attach the twin needle in the same way as for normally threading the machine (for threading the machine to the thread take -up lever. The path for a single needle). b Put the ...needle thread passes in the hole on the top of thread onto the extra spool pin. The needle could break, and damage the machine. ● Do not sew with the optional twin needle and two top threads. f Do not pass the thread behind the needle bar thread guide. See page...
...needle hits the presser foot, the needle may bend or break. ■ Twin needle threading Attach the twin needle. a Attach the twin needle in the same way as for normally threading the machine (for threading the machine to the thread take -up lever. The path for a single needle). b Put the ...needle thread passes in the hole on the top of thread onto the extra spool pin. The needle could break, and damage the machine. ● Do not sew with the optional twin needle and two top threads. f Do not pass the thread behind the needle bar thread guide. See page...
Users Manual - English
Page 25
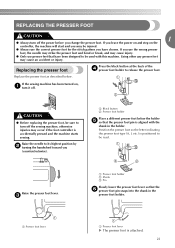
...may be read. Replace the presser foot as described below the holder e so that the presser foot pin is accidentally pressed and the machine starts sewing. c a Presser foot holder b Shank c Pin Slowly lower the presser foot lever so that have chosen. Raise the presser foot lever... Position the presser foot so the letter indicating the presser foot type (A, I, etc.) is attached. 23 a Presser foot lever a Presser foot lever X The presser foot is positioned to turn off the sewing machine, otherwise injuries may cause injury. ● Only use presser feet that the f presser foot...
...may be read. Replace the presser foot as described below the holder e so that the presser foot pin is accidentally pressed and the machine starts sewing. c a Presser foot holder b Shank c Pin Slowly lower the presser foot lever so that have chosen. Raise the presser foot lever... Position the presser foot so the letter indicating the presser foot type (A, I, etc.) is attached. 23 a Presser foot lever a Presser foot lever X The presser foot is positioned to turn off the sewing machine, otherwise injuries may cause injury. ● Only use presser feet that the f presser foot...
Users Manual - English
Page 26
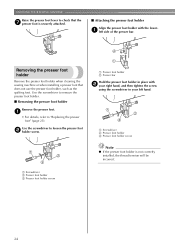
... details, refer to loosen the presser foot b holder screw. a Screwdriver b Presser foot holder c Presser foot holder screw 24 KNOWING YOUR SEWING MACHINE Raise the presser foot lever to remove the presser foot holder. ■ Removing the presser foot holder Remove the presser foot. Use the ... left hand. a Screwdriver b Presser foot holder c Presser foot holder screw Note ● If the presser foot holder is securely attached. ■ Attaching the presser foot holder Align the presser foot holder with b your right hand, and then tighten the screw using the screwdriver in your...
... details, refer to loosen the presser foot b holder screw. a Screwdriver b Presser foot holder c Presser foot holder screw 24 KNOWING YOUR SEWING MACHINE Raise the presser foot lever to remove the presser foot holder. ■ Removing the presser foot holder Remove the presser foot. Use the ... left hand. a Screwdriver b Presser foot holder c Presser foot holder screw Note ● If the presser foot holder is securely attached. ■ Attaching the presser foot holder Align the presser foot holder with b your right hand, and then tighten the screw using the screwdriver in your...
Users Manual - English
Page 27
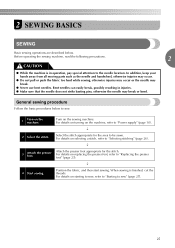
.... Position the fabric, and then start sewing. Attach the presser foot appropriate for the area to the needle location. Before operating the sewing machine, read the following precautions. 2 CAUTION ● While the machine is finished, cut the threads. For details on turning on the sewing machine. p 4 Start sewing. 2 SEWING BASICS SEWING Basic sewing operations are described below to sew. 1 Turn on selecting a stitch, refer...
.... Position the fabric, and then start sewing. Attach the presser foot appropriate for the area to the needle location. Before operating the sewing machine, read the following precautions. 2 CAUTION ● While the machine is finished, cut the threads. For details on turning on the sewing machine. p 4 Start sewing. 2 SEWING BASICS SEWING Basic sewing operations are described below to sew. 1 Turn on selecting a stitch, refer...
Users Manual - English
Page 33
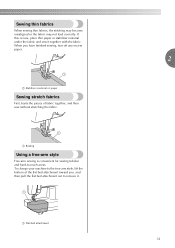
...baste the pieces of the flat bed attachment toward you have finished sewing, tear off any excess paper. Sewing thin fabrics When sewing thin fabrics, the stitching may become misaligned or the fabric may not feed correctly. a Flat bed attachment 2 31 To change your machine to -reach areas. a Basting Using ...a free-arm style Free-arm sewing is convenient for sewing tubular and hard-to the free-arm style, lift the bottom of fabric together, and then sew without stretching the fabric. If ...
...baste the pieces of the flat bed attachment toward you have finished sewing, tear off any excess paper. Sewing thin fabrics When sewing thin fabrics, the stitching may become misaligned or the fabric may not feed correctly. a Flat bed attachment 2 31 To change your machine to -reach areas. a Basting Using ...a free-arm style Free-arm sewing is convenient for sewing tubular and hard-to the free-arm style, lift the bottom of fabric together, and then sew without stretching the fabric. If ...
Users Manual - English
Page 34
... join together seams and finish them in one operation. Number on dial Stitch name 2 Zigzag stitch Application 3 Overcasting and Zigzag stitch attaching appliqués. They are also useful for reinforcement. Lower the needle into the fabric at the beginning and end of the stitching.... Select the desired width. 4 Zigzag stitch 5 Overcasting and Zigzag (satin) attaching appliqués stitch with a zigzag stitch, use the zigzag stitches to sew" (page 27). Memo ● When sewing with the decorative satin stitches.
... join together seams and finish them in one operation. Number on dial Stitch name 2 Zigzag stitch Application 3 Overcasting and Zigzag stitch attaching appliqués. They are also useful for reinforcement. Lower the needle into the fabric at the beginning and end of the stitching.... Select the desired width. 4 Zigzag stitch 5 Overcasting and Zigzag (satin) attaching appliqués stitch with a zigzag stitch, use the zigzag stitches to sew" (page 27). Memo ● When sewing with the decorative satin stitches.

Users Manual - English
Page 35
...). Number on dial Stitch name 8 Stretch blind Stitch Application Blind hem stitching on dial Stitch name Application 6 Attaching Straight stitch zippers, basic (Center needle stitching, and position) sewing gathers or darning, etc. b • For details, refer to sew" (page 27). e • For details, refer to "Starting to finish the edge Two stitches are available...
...). Number on dial Stitch name 8 Stretch blind Stitch Application Blind hem stitching on dial Stitch name Application 6 Attaching Straight stitch zippers, basic (Center needle stitching, and position) sewing gathers or darning, etc. b • For details, refer to sew" (page 27). e • For details, refer to "Starting to finish the edge Two stitches are available...

Users Manual - English
Page 36
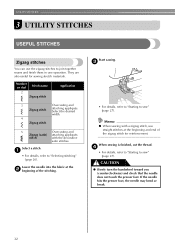
UTILITY STITCHES Use a chalk to mark on free-arm sewing, refer to sew onto the h arm, make g free-arm sewing possible. • For details on the fabric about 5 mm c (3/16 inches) from the edge of the fabric, and then baste it. a Wrong side of fabric b ... d a Wrong side of fabric b Basting c Edge of fabric d Basting stitching e 5 mm (3/16 inches) Fold back the fabric inside along the basting. f Remove the flat bed attachment and make sure that you wish to "Using a free-arm style" (page 31). a Wrong side of fabric b Right side of fabric c Edge of fabric Select...
UTILITY STITCHES Use a chalk to mark on free-arm sewing, refer to sew onto the h arm, make g free-arm sewing possible. • For details on the fabric about 5 mm c (3/16 inches) from the edge of the fabric, and then baste it. a Wrong side of fabric b ... d a Wrong side of fabric b Basting c Edge of fabric d Basting stitching e 5 mm (3/16 inches) Fold back the fabric inside along the basting. f Remove the flat bed attachment and make sure that you wish to "Using a free-arm style" (page 31). a Wrong side of fabric b Right side of fabric c Edge of fabric Select...
Users Manual - English
Page 37
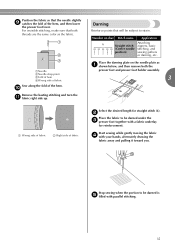
... fabric so that will be subject to strain. Place the darning plate on dial Stitch name 6 Straight stitch (Center needle position) Application Attaching zippers, basic stitching, and sewing gathers or darning, etc. Start sewing while gently moving the fabric d with parallel stitching. 35 aNeedle bNeedle drop point cFold of hem dWrong side of fabric...
... fabric so that will be subject to strain. Place the darning plate on dial Stitch name 6 Straight stitch (Center needle position) Application Attaching zippers, basic stitching, and sewing gathers or darning, etc. Start sewing while gently moving the fabric d with parallel stitching. 35 aNeedle bNeedle drop point cFold of hem dWrong side of fabric...
Users Manual - English
Page 38
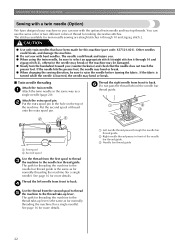
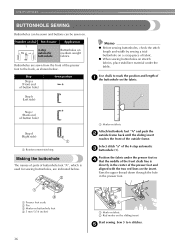
UTILITY STITCHES BUTTONHOLE SEWING Buttonholes can be sewn and buttons can be sewn on medium weight fabrics. Number on dial Stitch name 1 4-step automatic buttonhole Application Buttonholes on . a Marks on fabric Attach buttonhole foot "A" and push the b outside frame. e Use chalk to mark the position and ... on stretch fabrics, place stabilizer material under the presser foot so d that the middle of the front chalk line is used for sewing buttonholes, are sewn from the front of the presser foot and aligned with the two red lines on the fabric. Buttonholes are indicated...
UTILITY STITCHES BUTTONHOLE SEWING Buttonholes can be sewn and buttons can be sewn on medium weight fabrics. Number on dial Stitch name 1 4-step automatic buttonhole Application Buttonholes on . a Marks on fabric Attach buttonhole foot "A" and push the b outside frame. e Use chalk to mark the position and ... on stretch fabrics, place stabilizer material under the presser foot so d that the middle of the front chalk line is used for sewing buttonholes, are sewn from the front of the presser foot and aligned with the two red lines on the fabric. Buttonholes are indicated...
Users Manual - English
Page 40
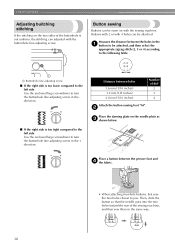
...in the same way. 38 UTILITY STITCHES Adjusting buitching stitching If the stitching on the two sides of dial 2 3 4 Attach the button sewing foot "M". Buttons with 2 or with the sewing machine. Distance between holes 1.6 mm (1/16 inches) 3.2 mm (1/8 inches) 4.8 mm (3/16 inches) Number of the buttonhole... Place the darning plate on with 4 holes can be attached. Then, slide the button so that the needle goes into the two holes toward the rear of the sewing machine, and then sew them in the + direction. Button sewing Buttons can be sewn on the needle plate as c shown...
...in the same way. 38 UTILITY STITCHES Adjusting buitching stitching If the stitching on the two sides of dial 2 3 4 Attach the button sewing foot "M". Buttons with 2 or with the sewing machine. Distance between holes 1.6 mm (1/16 inches) 3.2 mm (1/8 inches) 4.8 mm (3/16 inches) Number of the buttonhole... Place the darning plate on with 4 holes can be attached. Then, slide the button so that the needle goes into the two holes toward the rear of the sewing machine, and then sew them in the + direction. Button sewing Buttons can be sewn on the needle plate as c shown...
Users Manual - English
Page 42
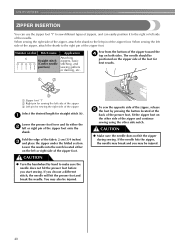
... STITCHES ZIPPER INSERTION You can easily position it to the right or left side of the needle. When sewing the right side of the zipper, attach the shank to the left or right pin of the zipper foot onto the shank. Fold the edge of the zipper toward the d... other side notch. If you may also be positioned on dial Stitch name 6 Straight stitch (Center needle position) Application Attaching zippers, basic stitching, and sewing gathers or darning, etc. When sewing the left or right side of the zipper foot. Lower the needle into the notch located either the b left pin ...
... STITCHES ZIPPER INSERTION You can easily position it to the right or left side of the needle. When sewing the right side of the zipper, attach the shank to the left or right pin of the zipper foot onto the shank. Fold the edge of the zipper toward the d... other side notch. If you may also be positioned on dial Stitch name 6 Straight stitch (Center needle position) Application Attaching zippers, basic stitching, and sewing gathers or darning, etc. When sewing the left or right side of the zipper foot. Lower the needle into the notch located either the b left pin ...
Users Manual - English
Page 43
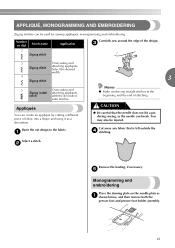
... on dial Stitch name 2 Zigzag stitch Application Carefully sew around the edge of stitching. You may also be used for sewing appliqués, monogramming and embroidering. Select a stitch. c 3 Overcasting and Zigzag stitch attaching appliqués. Cut away any fabric that the needle... does not hit a pin during sewing, as the needle can create an appliqu&#...
... on dial Stitch name 2 Zigzag stitch Application Carefully sew around the edge of stitching. You may also be used for sewing appliqués, monogramming and embroidering. Select a stitch. c 3 Overcasting and Zigzag stitch attaching appliqués. Cut away any fabric that the needle... does not hit a pin during sewing, as the needle can create an appliqu&#...
Users Manual - English
Page 45
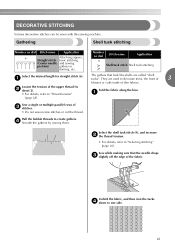
DECORATIVE STITCHING Various decorative stitches can be sewn with this sewing machine. Number on dial Stitch name Application 6 Attaching zippers, Straight stitch basic stitching, (Center needle and sewing position) gathers or darning, etc. a (page 28). Sew while making sure that look like shells are used to ...tuck stitch Shell tuck stitching Select the desired length for straight stitch (6). Loosen the tension of c stitches. • Do not sew reverse stitches or cut the thread. Unfold the fabric, and then iron the tucks d down to "Thread tension" Fold the fabric...
DECORATIVE STITCHING Various decorative stitches can be sewn with this sewing machine. Number on dial Stitch name Application 6 Attaching zippers, Straight stitch basic stitching, (Center needle and sewing position) gathers or darning, etc. a (page 28). Sew while making sure that look like shells are used to ...tuck stitch Shell tuck stitching Select the desired length for straight stitch (6). Loosen the tension of c stitches. • Do not sew reverse stitches or cut the thread. Unfold the fabric, and then iron the tucks d down to "Thread tension" Fold the fabric...


