
Brother International LS-2125i Support Question
Brother International LS-2125i Support Question
Find answers below for this question about Brother International LS-2125i - Basic Sewing And Mending Machine.Need a Brother International LS-2125i manual? We have 2 online manuals for this item!
Question posted by mgmarian on September 22nd, 2014
How To Attach Extra Spool Pin To Brother Sewing Machine Ls2125i
The person who posted this question about this Brother International product did not include a detailed explanation. Please use the "Request More Information" button to the right if more details would help you to answer this question.
Current Answers
Related Brother International LS-2125i Manual Pages
Users Manual - Multi - Page 6
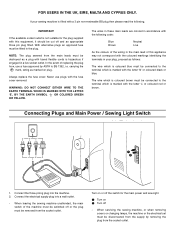
... TERMINAL WHICH IS MARKED WITH THE LETTER
'E', BY THE EARTH SYMBOL
OR COLORED GREEN
OR YELLOW.
When leaving the sewing machine unattended, the main switch of replacing the plug fuse, use plugs with a 3 pin non-rewireable BS plug then please read the following code:
Blue Brown
Neutral Live
As the colours of the...
Users Manual - English - Page 1
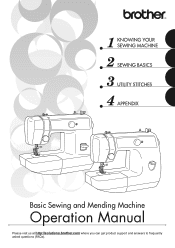
KNOWING YOUR SEWING MACHINE SEWING BASICS UTILITY STITCHES APPENDIX
Basic Sewing and Mending Machine
Operation Manual
Please visit us at http://solutions.brother.com where you can get product support and answers to frequently
asked questions (FAQs).
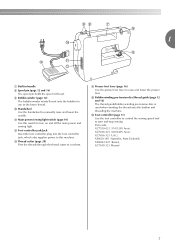
Users Manual - English - Page 6

... AND THEIR FUNCTIONS 6
The main parts ...6 Needle and presser foot section ...8 Flat bed attachment ...8
ACCESSORIES ...9 USING YOUR SEWING MACHINE 10
Power supply precautions ...10 Power supply ...10 Foot controller ...11 Steadying the machine ...11
THREADING THE MACHINE 12
Winding the bobbin ...12 Lower threading ...14 Upper threading ...16 Drawing up the lower thread ...18
REPLACING...
Users Manual - English - Page 8

e Flat bed attachment with accessory storage (page 8 and 31)
f Reverse sewing lever (page 28) Press and hold down the reverse sewing lever to adjust buttonhole stitching when it is... dial (page 26) Turn the pattern selection dial to use. KNOWING YOUR SEWING MACHINE
1 KNOWING YOUR SEWING MACHINE
NAMES OF MACHINE PARTS AND THEIR FUNCTIONS
The main parts
a Buttonhole fine-adjusting screw (page 38)...
Users Manual - English - Page 9
... to this switch to start and stop sewing. o Bobbin winding pre-tension disc/thread guide (page 12 and 16) The thread guide/bobbin winding pre-tension disc is used when winding the thread onto the bobbin and threading the machine. 1
g Built-in handle
h Spool pin (page 12 and 16) The spool pin holds the spool of thread.
Users Manual - English - Page 10
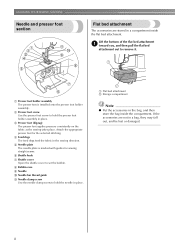
... the needle in place.
e Needle plate The needle plate is installed onto the presser foot holder assembly. KNOWING YOUR SEWING MACHINE
Needle and presser foot section
Flat bed attachment
The accessories are not in the sewing direction. a Presser foot holder assembly The presser foot is marked with guides for the selected stitching. c Presser foot...
Users Manual - English - Page 11
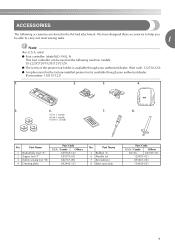
ACCESSORIES
The following machine models: LS-2220/2720/1520/2125/2125i.
● The screw of the presser foot holder is ...flat bed attachment. Part Name
1 Buttonhole foot "A" 2 Zipper foot "I" 3 Button sewing foot "M" 4 Darning plate
Part Code
U.S.A. / Canada
Others
X59369-321
X59370-021
XE2137-001
XA3442-121
No. Part Name
5 Bobbin (3) 6 Needle set 7 Screwdriver 8 Extra spool pin
Part ...
Users Manual - English - Page 14
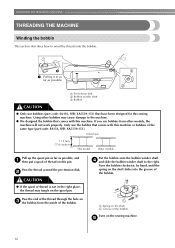
... the shaft b Groove of the bobbin. If you use bobbins from the inside of the bobbin
Turn on the sewing machine.
Actual size
11.5 mm (7/16 inches)
This model
Other models
Pull up the spool pin as far as possible. Pass the end of the thread through the hole on c the bobbin from other...
Users Manual - English - Page 16

Use only the enclosed bobbin or bobbins of the machine. Raise the needle to sew, you set the bobbin so the thread unrolls in the right direction. KNOWING YOUR SEWING MACHINE
Lower threading
Install the bobbin wound with this sewing machine. a Flat bed attachment b Shuttle cover
Remove the bobbin case by turning a the handwheel toward you and pulling...
Users Manual - English - Page 18
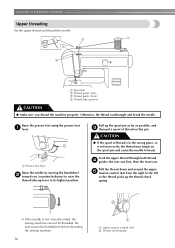
... lever to raise the
thread take-up lever
CAUTION
● Make sure you thread the machine properly. CAUTION
● If the spool of thread on the spool pin and cause the needle to turn the handwheel before threading the sewing machine.
16
a Upper tension control dial b Thread check spring
Pull the thread down and around the...
Users Manual - English - Page 23
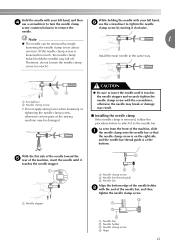
...not apply strong force when loosening or tightening the needle clamp screw, otherwise certain parts of the sewing machine may result.
■ Installing the needle clamp If the needle clamp is at the bottom. ...on the right side and the needle bar thread guide is removed, follow the procedure below to attach it to the needle bar.
Note
1
● The needle can be damaged. a Needle bar...
Users Manual - English - Page 24
... be sure to the needle bar thread guide is the same as a
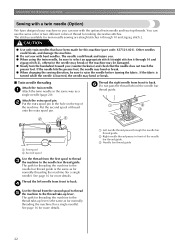
single needle (page 20). The path for this machine (part code: X57521-021). Attach the extra spool pin.
See page 16 for twin-needle sewing are straight stitches 6 through the needle bar thread guide. See page 16 for a single needle). Thread the right needle...
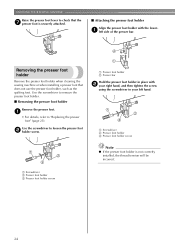
Users Manual - English - Page 25
... foot lever
X The presser foot is aligned with this machine.
Raise the presser foot lever.
c
a Presser foot holder b Shank c Pin
Slowly lower the presser foot lever so that the presser foot pin is attached.
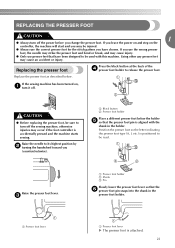
23 If you have been designed to turn off the sewing machine, otherwise injuries may cause an accident or injury. Raise the...
Users Manual - English - Page 26
... holder b Presser bar
Hold the presser foot holder in place with the lower-
KNOWING YOUR SEWING MACHINE
Raise the presser foot lever to check that does not use the presser foot holder, such ...holder c Presser foot holder screw
Note
● If the presser foot holder is securely attached.
■ Attaching the presser foot holder Align the presser foot holder with b your right hand, and...
Users Manual - English - Page 27
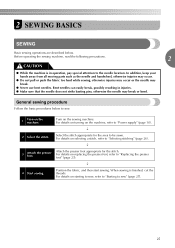
.... Select the stitch appropriate for the stitch. Attach the presser foot appropriate for the area to be sewn.
For details on the sewing machine.
For details on turning on selecting a stitch, refer to "Selecting stitching" (page 26). General sewing procedure
Follow the basic procedures below . Before operating the sewing machine, read the following precautions.
2
CAUTION
●...
Users Manual - English - Page 40
... the presser foot and d the fabric.
• When attaching four-hole buttons, first sew the two holes closest to the following table. Buttons with 2 or with the sewing machine. UTILITY STITCHES
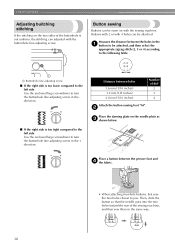
Adjusting buitching stitching
If the stitching on the two sides of the sewing machine, and then sew them in the same way.
38 Place a button between...
Users Manual - English - Page 42
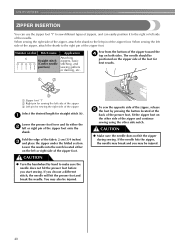
... the needle. When sewing the left side of the zipper c Left pin for best results. CAUTION
● Turn the handwheel by pressing the button located at the
back of the presser foot, fit the zipper foot on dial Stitch name
6
Straight stitch
(Center needle
position)
Application
Attaching zippers, basic stitching, and sewing gathers or darning...
Users Manual - English - Page 43
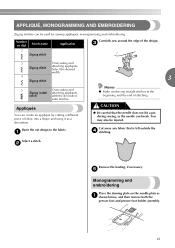
... design. Baste the cut design to the fabric.
c
3
Overcasting and
Zigzag stitch
attaching appliqués. a
CAUTION
● Be careful that is left outside the d stitching. Select a stitch. Cut away any fabric that the needle does not hit a pin during sewing, as the needle can create an appliqué by cutting a different piece of...
Users Manual - English - Page 52
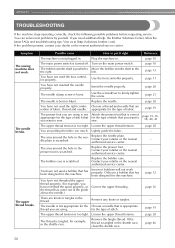
...Attach the presser foot that is appropriate
thread you need additional help, the Brother Solutions Center offers the latest FAQs and troubleshooting tips. The needle breaks. The upper thread breaks.
You have not fitted the spool...38, 40, 41 page 28
- -
-
-
Symptom The sewing machine does not work properly. Plug the machine in the presser foot is tangled in . left.
Use the ...
Users Manual - English - Page 55
INDEX
A
accessories 9 appliqués 41
B
basic stitching 33 blind hem stitching 33 bobbin 14 bobbin case 14 bobbin winder 12 button sewing 38 buttonhole foot 36 buttonhole sewing 36
C
cleaning 46
D
darning 35
E
embroidering 41 extra spool pin 22
F
, feed dogs 8 47 , flat bed attachment 8 31
foot controller 27 free-arm style 31
G
gathering 43
H
handwheel 7
J
joining 44...
Similar Questions

Brother Sewing Machine Bm3700
can 3700BM brother sewing machine use an extension and what model
can 3700BM brother sewing machine use an extension and what model
(Posted by jameelahmuhammad 8 years ago)

Brother Sewing Machine Representative In Hyderabad - India
Can some one let me know if brother sewing machine has an office or representative / deler in Hydera...
Can some one let me know if brother sewing machine has an office or representative / deler in Hydera...
(Posted by jakes7027 9 years ago)

Brother Sewing Machines Ls2125i How To Change Spool
(Posted by ryogra 9 years ago)


How To Thread A Bobbin Brother Sewing Machine Ls2125i
(Posted by Anal14 10 years ago)