
Brother International LS-2125i Support Question
Brother International LS-2125i Support Question
Find answers below for this question about Brother International LS-2125i - Basic Sewing And Mending Machine.Need a Brother International LS-2125i manual? We have 2 online manuals for this item!
Question posted by joregen on September 24th, 2013
Brother Sewing Machine Ls2125i 10 Stitch Which Point Is For Elasticity
The person who posted this question about this Brother International product did not include a detailed explanation. Please use the "Request More Information" button to the right if more details would help you to answer this question.
Current Answers
Related Brother International LS-2125i Manual Pages
Users Manual - Multi - Page 2

...machine where aerosol (spray) products are being administered. 8. Do not operate this sewing machine only for examination, repair, electrical or mechanical adjustment. 4. "IMPORTANT SAFETY INSTRUCTIONS"
When using the sewing machine, basic... stitching. Replace bulb with same type rated 15 watts. Return the sewing machine to break. 14. "SAVE THESE INSTRUCTIONS" "This sewing machine ...
Users Manual - Multi - Page 39
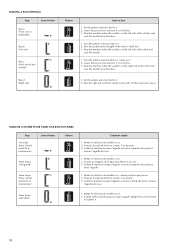
...points. 3. Stop the machine when the needle is at the right side of the stitch and
raise the needle from the fabric.
1. Stop the machine when the needle is at the left side of the stitches... sew 5 to b. 2.
Arrêter la machine lorsque l'aiguille se trouve à gauche des points et
lever l'aiguille.
1. Arrêter la machine lorsque l'aiguille se trouve à droite des points ...
Users Manual - English - Page 1
KNOWING YOUR SEWING MACHINE SEWING BASICS UTILITY STITCHES APPENDIX
Basic Sewing and Mending Machine
Operation Manual
Please visit us at http://solutions.brother.com where you can get product support and answers to frequently
asked questions (FAQs).
Users Manual - English - Page 3

... bulb. Do not pull or push the fabric while stitching. Young children should never be supervised to be followed, including the following:
"Read all moving parts. The sewing machine should be left unattended when plugged in this sewing machine. Keep the ventilation openings of the sewing machine and foot controller free from the electrical outlet when removing...
Users Manual - English - Page 6

... procedure ...25 Selecting stitching ...26 Starting to sew ...27 Sewing in reverse ...28 Thread tension ...28
USEFUL SEWING TIPS ...30
Trial sewing ...30 Changing the sewing direction ...30 Sewing curves ...30 Sewing thick fabrics ...30 Sewing thin fabrics ...31 Sewing stretch fabrics ...31 Using a free-arm style ...31
3. CONTENTS
1. KNOWING YOUR SEWING MACHINE 6
NAMES OF MACHINE PARTS AND THEIR...
Users Manual - English - Page 7
... INSERTION ...40 APPLIQUÉ, MONOGRAMMING AND EMBROIDERING 41
Appliqués ...41 Monogramming and embroidering ...41
DECORATIVE STITCHING 43
Gathering ...43 Shell tuck stitching ...43 Elastic stitching ...44
4. APPENDIX ...45
MAINTENANCE ...45
Oiling ...45 Changing the bulb ...45 Cleaning the machine surface ...46 Cleaning the shuttle race ...46 Cleaning the feed dogs ...47 Repacking the...
Users Manual - English - Page 8

e Flat bed attachment with accessory storage (page 8 and 31)
f Reverse sewing lever (page 28) Press and hold down the reverse sewing lever to adjust buttonhole stitching when it is not uniform. KNOWING YOUR SEWING MACHINE
1 KNOWING YOUR SEWING MACHINE
NAMES OF MACHINE PARTS AND THEIR FUNCTIONS
The main parts
a Buttonhole fine-adjusting screw (page 38) Turn the buttonhole fine...
Users Manual - English - Page 10
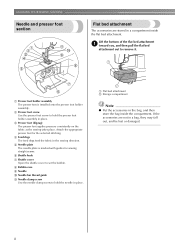
...on the fabric as the sewing takes place.
Lift the bottom... clamp screw to set the bobbin.
Attach the appropriate presser foot for sewing straight seams.
f Shuttle hook
g Shuttle cover Open the shuttle cover ...the accessories are stored in a compartment inside the compartment. KNOWING YOUR SEWING MACHINE
Needle and presser foot section
Flat bed attachment
The accessories are not...
Users Manual - English - Page 12
... the power cord to be used for a long period of time. Power supply
Set the main power switch to heat. a Foot controller plug
10 KNOWING YOUR SEWING MACHINE
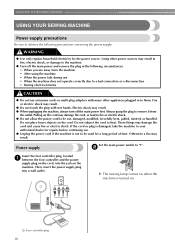
USING YOUR SEWING MACHINE
Power supply precautions
Be sure to observe the following circumstances: • When you are away from
the outlet. Electric shock may result.
Otherwise...
Users Manual - English - Page 16

If you accidentally step on the foot controller and the machine starts to sew, you set the bobbin so the thread unrolls in the right direction.
CAUTION
● Winding the bobbin improperly may cause the thread tension to be injured.
a Bobbin case latch
Unwind about 10 cm (4 inches) of thread d from a full bobbin, and...
Users Manual - English - Page 21

....
● Use the ball point needle when sewing on stretch fabrics or fabrics where skipped stitches easily occur. ● Use a 90/14 to observe the following table when choosing the thread and needle appropriate for the upper (spool) and lower (bobbin) threads. REPLACING THE NEEDLE
This section provides information on sewing machine needles.
1
Needle precautions...
Users Manual - English - Page 22
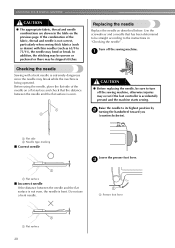
... even.
1 2
Replacing the needle
Replace the needle as 65/9 to be skipped stitches. Checking the needle
Sewing with thin needles (such as described below. Turn off the sewing machine, otherwise injuries may occur if the foot controller is not correct, particularly when sewing thick fabrics (such as denim) with a bent needle is extremely dangerous since...
Users Manual - English - Page 24
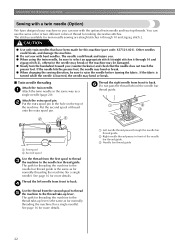
... from front to the thread take -up lever is the same as for normally threading the machine (for twin-needle sewing are straight stitches 6 through 10 and zigzag stitch 2. The needle could break, and damage the machine. ● Do not sew with the optional twin needle and two top threads.
See page 16 for a single needle). Thread...
Users Manual - English - Page 25
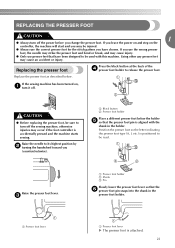
...the holder.
Raise the needle to its highest position by b turning the handwheel toward you have been designed to turn off the sewing machine, otherwise injuries may occur if the foot controller is attached.
23 c
a Presser foot holder b Shank c Pin
Slowly lower ... or break, and may cause injury.
● Only use the correct presser foot for the stitch pattern you
(counterclockwise).
Users Manual - English - Page 27
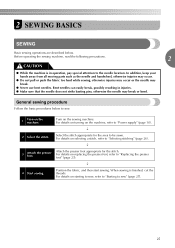
... or the needle may break or bend. General sewing procedure
Follow the basic procedures below . For details on the machine. For details on the machine, refer to sew" (page 27).
25 p
2 Select the stitch.
For details on turning on starting to sew, refer to "Starting to "Power supply" (page 10). When sewing is in injuries. ● Make sure that...
Users Manual - English - Page 29
...with your foot off the foot controller. j
27
h
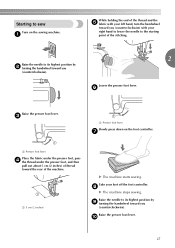
X The machine stops sewing. Starting to sew
Turn on the foot controller. f
Raise the presser foot lever....machine. a 5 cm (2 inches)
X The machine starts sewing.
c
a Presser foot lever
Slowly press down on the sewing machine.
Raise the presser foot lever.
Take your right hand to lower the needle to the starting point of the stitching...
Users Manual - English - Page 32
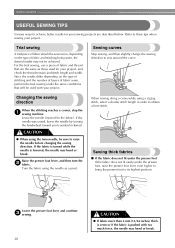
...9679; When using a zigzag stitch, select a shorter stitch length in the fabric). Changing the sewing direction
When the stitching reaches a corner, stop the a sewing machine.
For the trial sewing, use a piece of fabric and stitching being sewn, the desired ...project, and check the thread tension and stitch length and width. SEWING BASICS
USEFUL SEWING TIPS
Various ways to these tips when...
Users Manual - English - Page 41
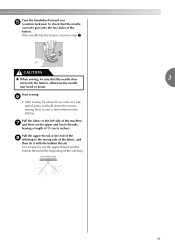
..., return to the left side of the machine, g and then cut the upper thread and the bobbin thread at the end of the h stitching to the wrong side of the stitching.
39
Pull the fabric to step a.
Turn the handwheel toward you e (counterclockwise) to sew a few reinforcement stitches. Use scissors to cut the upper and...
Users Manual - English - Page 52
...http://solutions.brother.com]....stitch. You have not threaded the upper thread properly. (for this machine...10 page 10 page 13 page 11 page 20 page 21 page 20 page 19 page 35, 36, 38, 40, 41 page 28
- -
-
- page 19 page 28 page 46
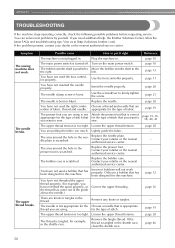
50 APPENDIX
TROUBLESHOOTING
If the machine stops operating correctly, check the following possible problems before requesting service. Symptom The sewing machine...
Users Manual - English - Page 55
...
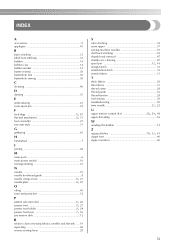
main parts 6 main power switch 10 monogramming 41
N
needle 19 needle bar thread guide 8
, needle clamp screw 8 21 , needle plate 8 47
O
oiling 45 overcasting stitches 32
P
, pattern selection dial ... chart of sewing fabrics, needles and threads ..... 19 repacking 48 reverse sewing lever 28
S
satin stitching 32 seam ripper 37 sewing machine needles 19 shell tuck stitching 43 shuttle...
Similar Questions

Brother Sewing Machine Ls2125i Elastic Stitch What Setting
(Posted by jecomar 9 years ago)

How To Thread Brother Sewing Machine Ls2125i
(Posted by mcbeam 10 years ago)


How To Wind A Brother Sewing Machine Ls2125i
(Posted by saturkanjen 10 years ago)
How To Thread A Bobbin Brother Sewing Machine Ls2125i
(Posted by Anal14 10 years ago)