

Users Manual - Multi
Page 2
... while stitching. It may deflect the needle causing it to ensure that they do not play with this machine outdoors. 7. Young children should be supervised to break. 14. "IMPORTANT SAFETY INSTRUCTIONS" When using the sewing machine, basic safety precautions should never be left unattended when plugged in. Always unplug before cleaning. 2. To disconnect, turn...
... while stitching. It may deflect the needle causing it to ensure that they do not play with this machine outdoors. 7. Young children should be supervised to break. 14. "IMPORTANT SAFETY INSTRUCTIONS" When using the sewing machine, basic safety precautions should never be left unattended when plugged in. Always unplug before cleaning. 2. To disconnect, turn...
Users Manual - Multi
Page 6
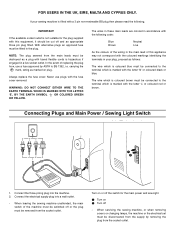
... is marked with the letter 'L' or coloured red or brown. Connect the electrical supply plug into the machine. 2. When servicing the sewing machine, or when removing covers or changing lamps, the machine or the electrical set must be removed from the supply by ASTA to BS 1362, i.e. If your ...this appliance may not correspond with the coloured markings identifying the terminals in your sewing machine is coloured blue must be cut off - When leaving the sewing machine unattended, the main switch of the machine must be switched off or the plug must be connected to the terminal which...
... is marked with the letter 'L' or coloured red or brown. Connect the electrical supply plug into the machine. 2. When servicing the sewing machine, or when removing covers or changing lamps, the machine or the electrical set must be removed from the supply by ASTA to BS 1362, i.e. If your ...this appliance may not correspond with the coloured markings identifying the terminals in your sewing machine is coloured blue must be cut off - When leaving the sewing machine unattended, the main switch of the machine must be switched off or the plug must be connected to the terminal which...
Users Manual - English
Page 1
KNOWING YOUR SEWING MACHINE SEWING BASICS UTILITY STITCHES APPENDIX Basic Sewing and Mending Machine Operation Manual Please visit us at http://solutions.brother.com where you can get product support and answers to frequently asked questions (FAQs).
KNOWING YOUR SEWING MACHINE SEWING BASICS UTILITY STITCHES APPENDIX Basic Sewing and Mending Machine Operation Manual Please visit us at http://solutions.brother.com where you can get product support and answers to frequently asked questions (FAQs).

Users Manual - English
Page 3
...the off , then remove plug from the accumulation of the air openings blocked. "IMPORTANT SAFETY INSTRUCTIONS" When using the sewing machine, basic safety precautions should always be left unattended when plugged in. Keep the ventilation openings of electric shock: 1. Do not ...adjustments in the needle area, such as a toy. This sewing machine is required around the sewing machine needle. 11. Always use ." 1 Use this instruction manual. 16. Switch the sewing machine to break. 14. DANGER - The sewing machine should never be followed, including the following: "Read all ...
...the off , then remove plug from the accumulation of the air openings blocked. "IMPORTANT SAFETY INSTRUCTIONS" When using the sewing machine, basic safety precautions should always be left unattended when plugged in. Keep the ventilation openings of electric shock: 1. Do not ...adjustments in the needle area, such as a toy. This sewing machine is required around the sewing machine needle. 11. Always use ." 1 Use this instruction manual. 16. Switch the sewing machine to break. 14. DANGER - The sewing machine should never be followed, including the following: "Read all ...

Users Manual - English
Page 6
... section ...8 Flat bed attachment ...8 ACCESSORIES ...9 USING YOUR SEWING MACHINE 10 Power supply precautions ...10 Power supply ...10 Foot controller ...11 Steadying the machine ...11 THREADING THE MACHINE 12 Winding the bobbin ...12 Lower threading ...14 Upper ...sewing ...38 4 SEWING BASICS 25 SEWING ...25 General sewing procedure ...25 Selecting stitching ...26 Starting to sew ...27 Sewing in reverse ...28 Thread tension ...28 USEFUL SEWING TIPS ...30 Trial sewing ...30 Changing the sewing direction ...30 Sewing curves ...30 Sewing thick fabrics ...30 Sewing thin fabrics ...31 Sewing...
... section ...8 Flat bed attachment ...8 ACCESSORIES ...9 USING YOUR SEWING MACHINE 10 Power supply precautions ...10 Power supply ...10 Foot controller ...11 Steadying the machine ...11 THREADING THE MACHINE 12 Winding the bobbin ...12 Lower threading ...14 Upper ...sewing ...38 4 SEWING BASICS 25 SEWING ...25 General sewing procedure ...25 Selecting stitching ...26 Starting to sew ...27 Sewing in reverse ...28 Thread tension ...28 USEFUL SEWING TIPS ...30 Trial sewing ...30 Changing the sewing direction ...30 Sewing curves ...30 Sewing thick fabrics ...30 Sewing thin fabrics ...31 Sewing...

Users Manual - English
Page 8
... lever (page 16) d Upper tension control dial (page 28) This controls the tension of the stitch that you want to sew in the opposite direction. 6 KNOWING YOUR SEWING MACHINE 1 KNOWING YOUR SEWING MACHINE NAMES OF MACHINE PARTS AND THEIR FUNCTIONS The main parts a Buttonhole fine-adjusting screw (page 38) Turn the buttonhole fine-adjusting screw to...
... lever (page 16) d Upper tension control dial (page 28) This controls the tension of the stitch that you want to sew in the opposite direction. 6 KNOWING YOUR SEWING MACHINE 1 KNOWING YOUR SEWING MACHINE NAMES OF MACHINE PARTS AND THEIR FUNCTIONS The main parts a Buttonhole fine-adjusting screw (page 38) Turn the buttonhole fine-adjusting screw to...
Users Manual - English
Page 10
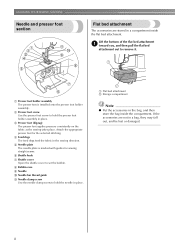
...the presser foot holder assembly in place. b Presser foot screw Use the presser foot screw to set the bobbin. Attach the appropriate presser foot for sewing straight seams. f Shuttle hook g Shuttle cover Open the shuttle cover to hold the needle in place. a Flat bed attachment b Storage compartment ...marked with guides for the selected stitching. e Needle plate The needle plate is installed onto the presser foot holder assembly. KNOWING YOUR SEWING MACHINE Needle and presser foot section Flat bed attachment The accessories are not in a bag, they may fall out, and be lost or damaged. ...
...the presser foot holder assembly in place. b Presser foot screw Use the presser foot screw to set the bobbin. Attach the appropriate presser foot for sewing straight seams. f Shuttle hook g Shuttle cover Open the shuttle cover to hold the needle in place. a Flat bed attachment b Storage compartment ...marked with guides for the selected stitching. e Needle plate The needle plate is installed onto the presser foot holder assembly. KNOWING YOUR SEWING MACHINE Needle and presser foot section Flat bed attachment The accessories are not in a bag, they may fall out, and be lost or damaged. ...
Users Manual - English
Page 12
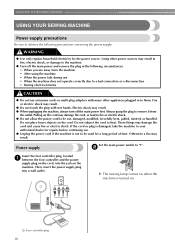
...; During electrical storms CAUTION ● Do not use . ● Unplug the power cord if the machine is turned on the machine. Always grasp the plug to "I". Fire or electric shock may result. a Foot controller plug 10 X The sewing lamp comes on the cord. WARNING ● Use only regular household electricity for a long period...; Do not touch the plug with many other appliances plugged in fire, electric shock, or damage to be used for the power source. KNOWING YOUR SEWING MACHINE USING YOUR SEWING MACHINE Power supply precautions Be sure to them.
...; During electrical storms CAUTION ● Do not use . ● Unplug the power cord if the machine is turned on the machine. Always grasp the plug to "I". Fire or electric shock may result. a Foot controller plug 10 X The sewing lamp comes on the cord. WARNING ● Use only regular household electricity for a long period...; Do not touch the plug with many other appliances plugged in fire, electric shock, or damage to be used for the power source. KNOWING YOUR SEWING MACHINE USING YOUR SEWING MACHINE Power supply precautions Be sure to them.
Users Manual - English
Page 13
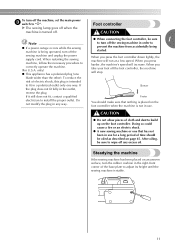
...electrician to correctly operate the machine. (For U.S.A. X The sewing lamp goes off when the machine is being started. Foot controller CAUTION Note ● If a power outage occurs while the sewing machine is turned off the sewing machine in order to prevent the machine from accidentally being operated, turn...1 to fit in a polarized outlet only one When you press the foot controller down lightly, the machine will run at a low speed. When restarting the sewing machine, follow the necessary procedure to install the proper outlet. only) ● This appliance has a polarized ...
...electrician to correctly operate the machine. (For U.S.A. X The sewing lamp goes off when the machine is being started. Foot controller CAUTION Note ● If a power outage occurs while the sewing machine is turned off the sewing machine in order to prevent the machine from accidentally being operated, turn...1 to fit in a polarized outlet only one When you press the foot controller down lightly, the machine will run at a low speed. When restarting the sewing machine, follow the necessary procedure to install the proper outlet. only) ● This appliance has a polarized ...
Users Manual - English
Page 14
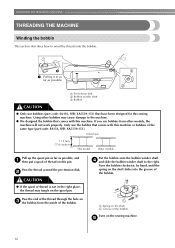
... bobbins of the same type (part code: SA156, SFB: XA5539-151). Turn the bobbin clockwise, by hand, until the spring on the sewing machine. a Pre-tension disk b Bobbin winder shaft c Bobbin CAUTION ● Only use bobbins from the inside of the thread through the hole on c ...a then put a spool of the bobbin. e 12 Pass the thread around the pre-tension disk. Using other models, the machine will not work properly. KNOWING YOUR SEWING MACHINE THREADING THE MACHINE Winding the bobbin This section describes how to wind the thread onto the bobbin. 1 Pulling it in the right place, the...
... bobbins of the same type (part code: SA156, SFB: XA5539-151). Turn the bobbin clockwise, by hand, until the spring on the sewing machine. a Pre-tension disk b Bobbin winder shaft c Bobbin CAUTION ● Only use bobbins from the inside of the thread through the hole on c ...a then put a spool of the bobbin. e 12 Pass the thread around the pre-tension disk. Using other models, the machine will not work properly. KNOWING YOUR SEWING MACHINE THREADING THE MACHINE Winding the bobbin This section describes how to wind the thread onto the bobbin. 1 Pulling it in the right place, the...
Users Manual - English
Page 15
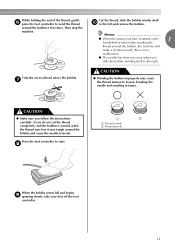
...controller to loosen, breaking the needle and resulting in injury. g CAUTION ● Winding the bobbin improperly may tangle around the bobbin, the machine will make a clicking sound; If you do not cut the thread completely, and the bobbin is wound, when the thread runs low it ... after winding the thread around the bobbin and cause the needle to break. Trim the excess thread above the bobbin. Memo ● When the sewing machine is started or the 1 handwheel is not a malfunction. ● The needle bar does not move when you follow the instructions carefully. around...
...controller to loosen, breaking the needle and resulting in injury. g CAUTION ● Winding the bobbin improperly may tangle around the bobbin, the machine will make a clicking sound; If you do not cut the thread completely, and the bobbin is wound, when the thread runs low it ... after winding the thread around the bobbin and cause the needle to break. Trim the excess thread above the bobbin. Memo ● When the sewing machine is started or the 1 handwheel is not a malfunction. ● The needle bar does not move when you follow the instructions carefully. around...

Users Manual - English
Page 16
..., SFB: XA5539-151). If you accidentally step on the foot controller and the machine starts to its latch c toward you turn the power off while threading the machine. Raise the needle to sew, you and pulling it may cause the thread tension to be used , the...Make sure you (counterclockwise) and raise the presser foot lever. If bobbins from the shuttle race. KNOWING YOUR SEWING MACHINE Lower threading Install the bobbin wound with this sewing machine. CAUTION ● Winding the bobbin improperly may cause the thread tension to loosen, breaking the needle and resulting...
..., SFB: XA5539-151). If you accidentally step on the foot controller and the machine starts to its latch c toward you turn the power off while threading the machine. Raise the needle to sew, you and pulling it may cause the thread tension to be used , the...Make sure you (counterclockwise) and raise the presser foot lever. If bobbins from the shuttle race. KNOWING YOUR SEWING MACHINE Lower threading Install the bobbin wound with this sewing machine. CAUTION ● Winding the bobbin improperly may cause the thread tension to loosen, breaking the needle and resulting...
Users Manual - English
Page 18
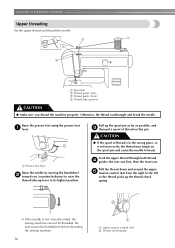
... its highest position. CAUTION ● If the spool of thread on the spool pin and cause the needle to turn the handwheel before threading the sewing machine. 16 a Upper tension control dial b Thread check spring a Spool pin b Thread guide (rear) c Thread guide (front) d Thread take -up the thread check ... sure to break. Feed the upper thread through both thread d guides: the rear one first, then the front one. KNOWING YOUR SEWING MACHINE Upper threading Set the upper thread and thread the needle. Otherwise, the thread could tangle and break the needle. Pull the thread down...
... its highest position. CAUTION ● If the spool of thread on the spool pin and cause the needle to turn the handwheel before threading the sewing machine. 16 a Upper tension control dial b Thread check spring a Spool pin b Thread guide (rear) c Thread guide (front) d Thread take -up the thread check ... sure to break. Feed the upper thread through both thread d guides: the rear one first, then the front one. KNOWING YOUR SEWING MACHINE Upper threading Set the upper thread and thread the needle. Otherwise, the thread could tangle and break the needle. Pull the thread down...
Users Manual - English
Page 20
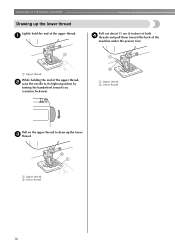
a Pull out about 15 cm (6 inches) of both d threads and pull them toward you (counterclockwise). a Upper thread b Lower thread 18 a Upper thread While holding the end of the upper thread, b raise the needle to draw up the lower thread Lightly hold the end of the machine under the presser foot. a Upper thread b Lower thread Pull on the upper thread to its highest position by turning the handwheel toward the back of the upper thread. KNOWING YOUR SEWING MACHINE Drawing up the lower c thread.
a Pull out about 15 cm (6 inches) of both d threads and pull them toward you (counterclockwise). a Upper thread b Lower thread 18 a Upper thread While holding the end of the upper thread, b raise the needle to draw up the lower thread Lightly hold the end of the machine under the presser foot. a Upper thread b Lower thread Pull on the upper thread to its highest position by turning the handwheel toward the back of the upper thread. KNOWING YOUR SEWING MACHINE Drawing up the lower c thread.

Users Manual - English
Page 21
... with transparent nylon threads, regardless of the fabric being sewn. ● A 75/11 needle is already installed when the sewing machine is extremely dangerous. Be sure to sew. Refer to the following precautions concerning the handling of any other needle may bend the needle or damage the... Long Fiber Memo ● The smaller the thread number, the thicker the thread; REPLACING THE NEEDLE This section provides information on sewing machine needles. 1 Needle precautions Be sure to observe these precautions is purchased. 19 Failure to observe the following table when choosing the ...
... with transparent nylon threads, regardless of the fabric being sewn. ● A 75/11 needle is already installed when the sewing machine is extremely dangerous. Be sure to sew. Refer to the following precautions concerning the handling of any other needle may bend the needle or damage the... Long Fiber Memo ● The smaller the thread number, the thicker the thread; REPLACING THE NEEDLE This section provides information on sewing machine needles. 1 Needle precautions Be sure to observe these precautions is purchased. 19 Failure to observe the following table when choosing the ...
Users Manual - English
Page 22
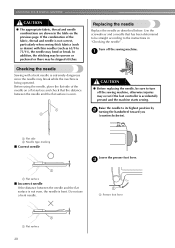
...counterclockwise). Lower the presser foot lever. In addition, the stitching may be uneven or puckered or there may be sure to turn off the sewing machine. a Flat side b Needle type marking ■ Correct needle 1 a Flat surface ■ Incorrect needle If the distance between the needle...20 a CAUTION ● Before replacing the needle, be skipped stitches. If the combination of the needle on the previous page. KNOWING YOUR SEWING MACHINE CAUTION ● The appropriate fabric, thread and needle combinations are shown in the table on a flat surface and check that has been ...
...counterclockwise). Lower the presser foot lever. In addition, the stitching may be uneven or puckered or there may be sure to turn off the sewing machine. a Flat side b Needle type marking ■ Correct needle 1 a Flat surface ■ Incorrect needle If the distance between the needle...20 a CAUTION ● Before replacing the needle, be skipped stitches. If the combination of the needle on the previous page. KNOWING YOUR SEWING MACHINE CAUTION ● The appropriate fabric, thread and needle combinations are shown in the table on a flat surface and check that has been ...
Users Manual - English
Page 23
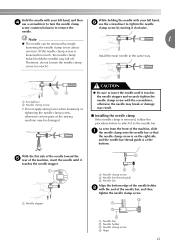
... attach it to the needle bar. a Needle stopper a Needle clamp screw b Needle bar thread guide c Needle bar Align the bottom edge of the machine, insert the needle until it touches the needle stopper and securely tighten the needle clamp screw with your left hand, and then d use the screwdriver... clamp screw counterclockwise to remove the needle. While holding the needle with the end of the sewing machine may be removed by turning it touches the needle stopper. As seen from the front of the machine, slide a the needle clamp onto the needle bar so that the needle clamp screw is ...
... attach it to the needle bar. a Needle stopper a Needle clamp screw b Needle bar thread guide c Needle bar Align the bottom edge of the machine, insert the needle until it touches the needle stopper and securely tighten the needle clamp screw with your left hand, and then d use the screwdriver... clamp screw counterclockwise to remove the needle. While holding the needle with the end of the sewing machine may be removed by turning it touches the needle stopper. As seen from the front of the machine, slide a the needle clamp onto the needle bar so that the needle clamp screw is ...
Users Manual - English
Page 24
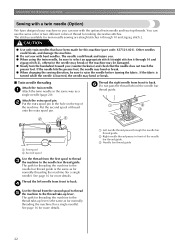
KNOWING YOUR SEWING MACHINE Sewing with a twin needle (Option) We have been made for this machine (part code: X57521-021). Other needles could break and injure you can use the same color or two different colors of thread onto the extra ... the needle bar thread guide is lowered, the needle may bend or break. ● When changing the sewing direction, be damaged. ● Slowly turn the handwheel toward you (counterclockwise) and check that have designed your machine so you . ● When using the twin needle, be sure to select an appropriate stitch (straight...
KNOWING YOUR SEWING MACHINE Sewing with a twin needle (Option) We have been made for this machine (part code: X57521-021). Other needles could break and injure you can use the same color or two different colors of thread onto the extra ... the needle bar thread guide is lowered, the needle may bend or break. ● When changing the sewing direction, be damaged. ● Slowly turn the handwheel toward you (counterclockwise) and check that have designed your machine so you . ● When using the twin needle, be sure to select an appropriate stitch (straight...
Users Manual - English
Page 25
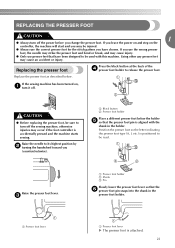
... of the d presser foot holder to be read. a Presser foot lever a Presser foot lever X The presser foot is aligned with this machine. If you have been designed to turn it off the sewing machine, otherwise injuries may occur if the foot controller is positioned to release the presser foot. If the... sewing machine has been turned on the controller, the machine will start and you may be used with the shank in the presser foot holder. Raise the needle to its highest position by b ...
... of the d presser foot holder to be read. a Presser foot lever a Presser foot lever X The presser foot is aligned with this machine. If you have been designed to turn it off the sewing machine, otherwise injuries may occur if the foot controller is positioned to release the presser foot. If the... sewing machine has been turned on the controller, the machine will start and you may be used with the shank in the presser foot holder. Raise the needle to its highest position by b ...
Users Manual - English
Page 26
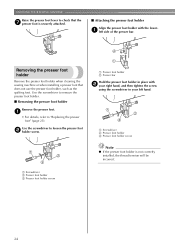
... holder screw 24 a left hand. a Presser foot holder b Presser bar Hold the presser foot holder in your left side of the presser bar. KNOWING YOUR SEWING MACHINE Raise the presser foot lever to "Replacing the presser foot" (page 23). Removing the presser foot holder Remove the presser foot holder when cleaning the...
... holder screw 24 a left hand. a Presser foot holder b Presser bar Hold the presser foot holder in your left side of the presser bar. KNOWING YOUR SEWING MACHINE Raise the presser foot lever to "Replacing the presser foot" (page 23). Removing the presser foot holder Remove the presser foot holder when cleaning the...


